How to Make a Picture the Perfect Background for Your PowerPoint Presentation

In today’s visually-driven world, a compelling presentation is often the key to capturing and holding an audience’s attention. While content is king, the aesthetic appeal of your slides plays an equally vital role in conveying professionalism, reinforcing your message, and creating a memorable experience. One of the most impactful ways to elevate your PowerPoint presentation is by integrating a custom background image. Far from being a mere decorative element, a well-chosen background image can transform a mundane slide deck into an engaging visual narrative.
Whether you’re aiming for a sleek corporate look, an inspiring nature-themed discussion, or an abstract artistic showcase, Tophinhanhdep.com is your ultimate resource for discovering, enhancing, and applying the perfect visuals. This comprehensive guide will walk you through the simple steps of setting a picture as your PowerPoint background, explore the strategic advantages of doing so, and show you how Tophinhanhdep.com’s vast collection of images and powerful tools can help you achieve presentation perfection.
The Strategic Impact of Custom PowerPoint Backgrounds
A presentation is more than just a sequence of slides; it’s an opportunity to tell a story, share information, and leave a lasting impression. A custom background image acts as the stage for this story, subtly influencing your audience’s perception and enhancing the overall message.
Why a Striking Background Matters for Audience Engagement
Imagine attending a presentation with plain, white slides versus one featuring high-resolution, thematic imagery. The difference in engagement is undeniable. Images are powerful communicators, capable of evoking emotions, illustrating concepts, and breaking the monotony of text-heavy slides.
- Visual Appeal: Photos and graphics naturally draw the eye, making your presentation more dynamic and less tedious. Tophinhanhdep.com’s diverse categories like “Aesthetic,” “Nature,” and “Beautiful Photography” offer an endless supply of captivating visuals that can transform your slides.
- Theme Enhancement: A background image can instantly set the tone and reflect the topic of your presentation. A serene landscape from Tophinhanhdep.com’s “Nature” collection might be perfect for an environmental report, while an “Abstract” design could complement a creative industry pitch.
- Emotional Connection: Certain images can evoke specific feelings, helping you connect with your audience on a deeper level. For instance, images from Tophinhanhdep.com’s “Sad/Emotional” collection, when used thoughtfully, could underscore a serious topic, while vibrant, “Beautiful Photography” could inspire enthusiasm.
Bridging Brand Identity with Visual Appeal
For businesses and individuals alike, consistent branding is crucial. Your PowerPoint presentation is often a direct reflection of your brand, and a custom background can be a powerful tool for reinforcing your identity.
- Custom Branding: Incorporating your company’s logo, brand colors, or product images as a background subtly reinforces brand recognition. Tophinhanhdep.com provides the “High Resolution” images necessary to ensure your brand assets look crisp and professional, whether they are stock photos or custom “Digital Photography.”
- Personalization: Adding specific images that resonate with your personal style or business ethos gives your presentation a unique touch, making it more memorable and distinct from generic templates. This aligns with Tophinhanhdep.com’s focus on “Creative Ideas” and offering “Image Inspiration & Collections” for tailored visual content.
Your Comprehensive Guide to Setting PowerPoint Background Images
Setting a picture as a background in PowerPoint is a straightforward process, but understanding the nuances can significantly improve the quality and impact of your presentation.
Step-by-Step: Adding a Single Slide Background
This method is ideal for applying an image to one specific slide, allowing for varied visual themes throughout your presentation.
- Open Your Presentation and Select the Slide: Begin by launching PowerPoint and navigating to the specific slide where you wish to add a background image. If you’re starting fresh, simply open a new presentation.
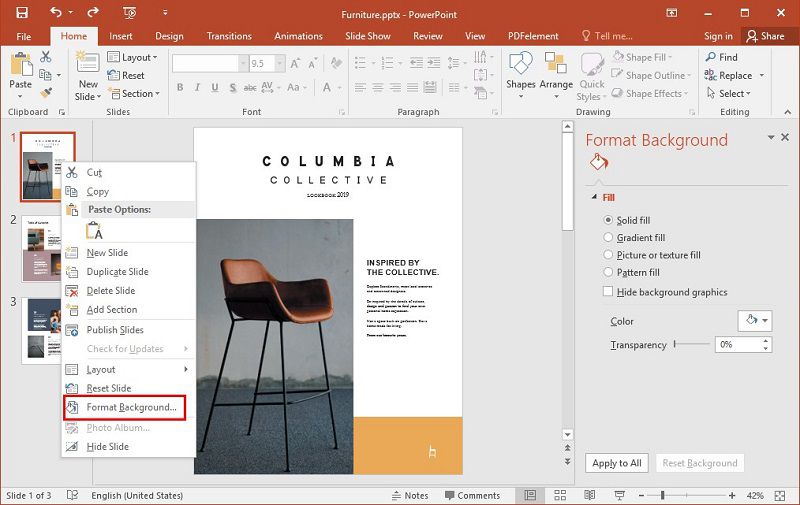
- Access the Format Background Menu:
- Right-click anywhere on an empty area of your selected slide.
- From the context menu that appears, choose “Format Background.” This action will open the “Format Background” pane, typically on the right side of your screen. This pane offers extensive options for customizing your slide’s appearance.
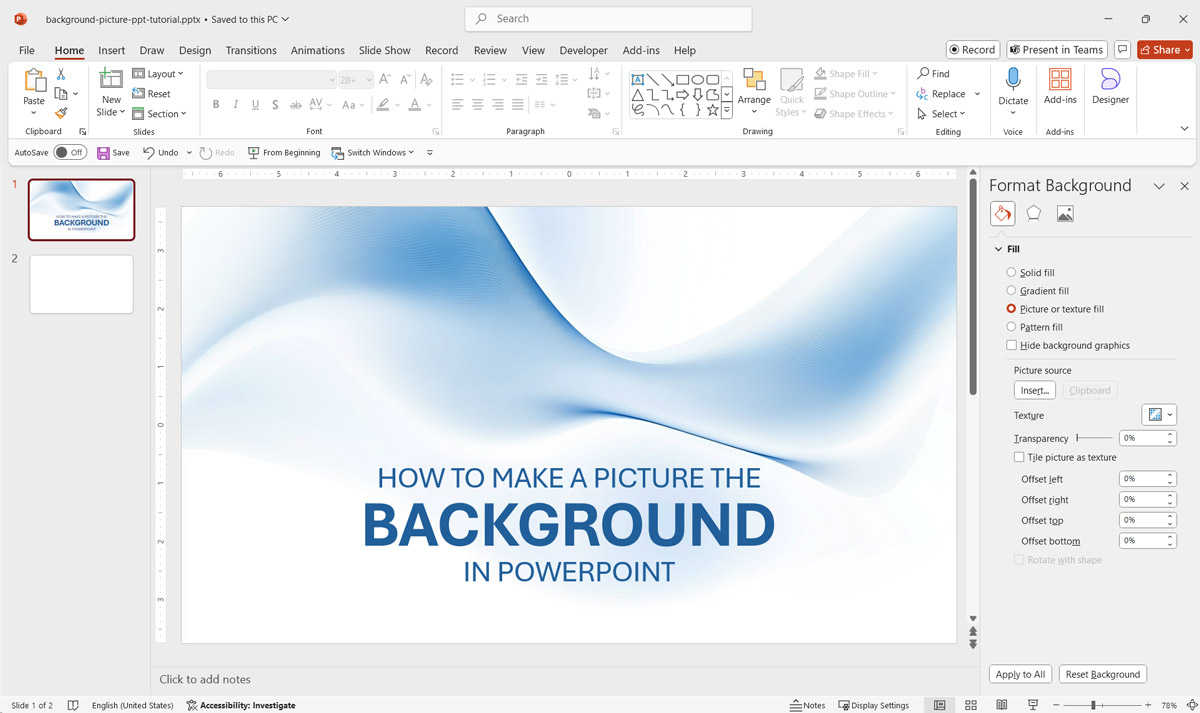
- Choose Picture or Texture Fill: Within the “Format Background” pane, locate and select the “Picture or texture fill” radio button. This option enables you to use an image as your slide’s backdrop.
- Insert Your Image: You have several convenient options for importing your chosen image:
- Insert from File: If you have an image saved on your computer, click the “File” button. This will open a browser window, allowing you to navigate your local drives and select the desired image.
- Online Pictures: For royalty-free stock images or pictures from the web, click “Online Pictures.” PowerPoint will provide an integrated search function to find suitable images, many of which are available for commercial use. Tophinhanhdep.com specializes in providing high-quality images, making it an excellent external resource to download images which you can then “Insert from File.”
- Clipboard: If you’ve recently copied an image from another source (e.g., from Tophinhanhdep.com or an image editing tool), simply click the “Clipboard” option to paste it directly as your background.

Once you've selected your image using any of these methods, it will automatically apply to your chosen slide.
Mastering Global Backgrounds with “Apply to All” and Slide Master
For a consistent look across your entire presentation or specific sections, PowerPoint offers efficient tools to manage backgrounds globally.
- Applying to All Slides: If you’ve just inserted a background image onto a single slide and decide you want it across your entire presentation, look for the “Apply to All” button at the bottom of the “Format Background” pane. Clicking this will instantly set the chosen image as the background for every slide, including any new slides you might add later.
- Using Slide Master for Template Creation: For more advanced control, especially when designing a presentation template or ensuring brand consistency, the “Slide Master” view is indispensable.
- Go to the “View” tab on the PowerPoint ribbon and select “Slide Master.”
- In the left-hand pane, select the main “Slide Master” (the largest thumbnail at the top), or choose specific layout masters if you want different backgrounds for different slide types (e.g., title slide, content slide, section header).
- With the master slide (or layout) selected, follow steps 2-4 from the “Step-by-Step: Adding a Single Slide Background” section above (Right-click > “Format Background” > “Picture or texture fill” > Insert Image).
- Any background applied to the main Slide Master will cascade to all associated layouts. Backgrounds applied to specific layouts will override the master for those particular layouts.
- Once done, click “Close Master View” on the “Slide Master” tab. This powerful feature, often used by graphic designers for “Visual Design” and “Graphic Design,” ensures that your “Thematic Collections” or “Visual Identity” remains consistent throughout.
Adjusting Image Settings for Clarity and Cohesion
After inserting your background image, it’s crucial to fine-tune its appearance to ensure your content remains readable and the overall slide design is harmonious.
- Transparency: A common issue with background images is that they can be too dominant, making text and other elements difficult to read. The “Transparency” slider in the “Format Background” pane is your best friend here. Slide it to the right to make the image more subtle and allow your foreground content to pop. This is a vital “Photo Manipulation” technique for effective “Visual Design.”
- Positioning and Tiling: If your image isn’t perfectly aligned, or if you prefer a repeating pattern, PowerPoint offers options. You can click “Tile picture as texture” to create a repeating pattern, and then use the “Offset” settings (Offset X, Offset Y) to precisely shift the image’s position.
- Brightness & Contrast: For images that might be too dark or too light, you can adjust the “Brightness” and “Contrast” sliders to achieve better clarity and ensure they don’t overpower or get lost behind your text. These “Editing Styles” are essential for creating professional-looking slides.
- Cropping and Resizing (Pre-Import): While PowerPoint offers some basic adjustments, for optimal quality and control, it’s often best to crop and resize your image to match your slide’s aspect ratio (e.g., 16:9 widescreen or 4:3 standard) before inserting it. Tophinhanhdep.com’s “Image Tools” like “Compressors” and “Optimizers” can help ensure your images are perfectly prepared for PowerPoint, maintaining “High Resolution” while keeping file sizes manageable.
Sourcing and Preparing Your Images with Tophinhanhdep.com
Choosing the right image is paramount to creating an impactful presentation. The quality, relevance, and aesthetic of your background image can make or break your slides. Tophinhanhdep.com provides an unparalleled resource for all your visual needs, from discovery to refinement.
Discovering the Ideal Imagery for Every Theme
Tophinhanhdep.com offers a vast repository of images categorized to suit every possible presentation theme and aesthetic requirement.
- Diverse Collections: Explore sections like “Wallpapers,” “Backgrounds,” “Aesthetic,” “Nature,” and “Abstract” to find the perfect visual that resonates with your topic. Whether you need a calming natural scene for a wellness presentation or a dynamic abstract pattern for a tech demo, Tophinhanhdep.com has curated “Thematic Collections” and “Trending Styles” to inspire you.
- High-Resolution Photography: Low-quality, pixelated images can instantly diminish the professionalism of your presentation. Tophinhanhdep.com specializes in “High Resolution” “Beautiful Photography” and “Stock Photos,” ensuring that every image you choose will look crisp and clear, even when stretched to fit a large projector screen.
- Inspiration and Ideas: If you’re struggling for concepts, delve into “Image Inspiration & Collections” or “Photo Ideas” on Tophinhanhdep.com. These resources can spark “Creative Ideas” and help you build “Mood Boards” that define the visual direction of your presentation. You might even find AI-generated imagery under “Digital Art” that offers unique, cutting-edge aesthetics.
Utilizing Tophinhanhdep.com’s Tools for Image Perfection
Beyond providing stunning imagery, Tophinhanhdep.com also offers a suite of “Image Tools” designed to optimize your chosen visuals for any application, including PowerPoint.
- Compressors and Optimizers: Large image files can slow down your PowerPoint presentation, making it cumbersome to share and view. Use Tophinhanhdep.com’s “Compressors” and “Optimizers” to reduce file size without sacrificing image quality. This ensures your presentation remains smooth and responsive.
- AI Upscalers: If you find an image you love but it’s not quite high enough resolution, Tophinhanhdep.com’s “AI Upscalers” can intelligently enhance its quality, making it suitable for a full-slide background without pixelation. This is especially useful for older images or those not originally intended for large display.
- Converters: Need to change an image format? Tophinhanhdep.com’s “Converters” ensure your images are in the right format (e.g., JPG, PNG) for seamless integration into PowerPoint. While PowerPoint is flexible, having images in a consistent, optimized format can prevent compatibility issues.
Best Practices for Stunning and Readable Presentations
Even with the perfect background image from Tophinhanhdep.com, effective visual communication requires adhering to some fundamental design principles.
The Golden Rules of Contrast and Simplicity
- Contrast is Key: The most crucial rule for any visual design is ensuring sufficient contrast between your text and your background. If your background image has dark elements, use light-colored fonts, and vice versa. Adjusting the “Transparency” of your background image (as discussed earlier) is an excellent way to create zones of lower contrast where text can stand out effortlessly. Tophinhanhdep.com’s tools can help you achieve the desired “Editing Styles” to make this balance perfect.
- Avoid Clutter: While captivating, a background image should never compete with your core message. Choose images with plenty of “negative space” – areas of low detail or uniform color – where you can place your text and other visual elements without distraction. A busy background image can overwhelm your audience and dilute your message. Simplicity in “Visual Design” is often the most effective approach.
- Branding Consistency: Maintain a consistent style and theme across all your slides. While you might use different images, ensure they share a similar color palette, mood, or aesthetic. Using disparate images with conflicting “Editing Styles” or “Aesthetic” can make your presentation feel disjointed. Leverage Tophinhanhdep.com’s “Thematic Collections” to maintain this harmony.
Consistency, Professionalism, and Testing Your Visuals
- Use Professional Photos: Whenever possible, opt for high-quality, professional images. Tophinhanhdep.com offers “Stock Photos” and “Beautiful Photography” that exude professionalism. While personal photos can add a unique touch, ensure they meet professional standards in terms of resolution and composition.
- Maintain Consistency: Decide on one or two background images or a consistent style from Tophinhanhdep.com’s “Image Inspiration & Collections” and use them thoughtfully throughout your presentation. This creates a cohesive design that guides your audience smoothly from one slide to the next. For consistent application, remember to utilize the “Slide Master” view.
- Test for Readability: Always test your slides on the actual display equipment you’ll be using (e.g., a projector, a large monitor). What looks good on your laptop screen might be difficult to read in a dimly lit conference room or on a large, projected surface. Check text legibility, color perception, and overall visual impact under presentation conditions.
Expanding Your Visual Horizons: Tophinhanhdep.com Beyond PowerPoint
The stunning images and robust tools available on Tophinhanhdep.com are not limited to just PowerPoint presentations. They can significantly enhance a wide array of your digital and print documents, ensuring visual consistency and professionalism across all your communications.
Think about other documents where a captivating background or high-quality image can make a difference. For instance, when creating reports, proposals, or even digital flyers, incorporating an appropriate background image can make the content more engaging. A business report can gain a professional edge with a subtle, abstract background from Tophinhanhdep.com’s “Abstract” or “Wallpapers” sections, reinforcing your “Visual Identity.” Likewise, marketing materials can achieve greater impact with striking “Beautiful Photography” or “Aesthetic” images tailored to the product or service.
Tophinhanhdep.com’s “Image Tools,” such as “Compressors” and “Optimizers,” are invaluable for preparing images for web use or email attachments, ensuring fast loading times without compromising visual quality. If you’re designing digital art for social media, the “Digital Art” and “Graphic Design” resources, coupled with the “AI Upscalers,” can help you create professional-grade visuals. Even for documents like PDFs, while specific editing software handles the actual integration, the quality of the image sourced from Tophinhanhdep.com fundamentally dictates the final aesthetic. A high-resolution image ensures that your PDF documents, whether for sharing or printing, appear polished and professional. The goal is always to present your information in the most visually appealing and coherent way possible, and Tophinhanhdep.com is designed to be your go-to partner in achieving this, offering “Creative Ideas” for every visual challenge.
Conclusion
Setting a picture as a background in PowerPoint is a simple yet profoundly effective way to transform your presentations from ordinary to extraordinary. By following the step-by-step guide outlined above, you can effortlessly integrate high-quality images that captivate your audience and amplify your message.
Remember that the success of your visual presentation hinges not just on adding an image, but on choosing the right image and applying it thoughtfully. Tophinhanhdep.com stands as your premier resource, offering an extensive collection of “Wallpapers,” “Backgrounds,” and “Beautiful Photography” across various themes like “Nature,” “Abstract,” and “Aesthetic.” Moreover, our “Image Tools” – including “Converters,” “Compressors,” “Optimizers,” and “AI Upscalers” – empower you to perfect every visual element.
By embracing “Visual Design” best practices, focusing on “High Resolution” imagery, and drawing inspiration from “Image Inspiration & Collections,” you can ensure your PowerPoint presentations are not just seen, but remembered. Elevate your next presentation with Tophinhanhdep.com and leave a lasting visual impression.
Frequently Asked Questions (FAQs)
Q: How can I make a picture the background for all slides in PowerPoint? A: To apply a picture background to all slides, navigate to the “View” tab and select “Slide Master.” Choose the top-most master slide, right-click, and select “Format Background.” Then, choose “Picture or texture fill” and insert your desired image. This will automatically apply it to all current and future slides inheriting from that master. Alternatively, after setting a background on a single slide via the “Format Background” pane, click “Apply to All” at the bottom of the pane.
Q: Can I use any image as a background in PowerPoint? A: Yes, technically you can use any image. However, for professional results, it’s highly recommended to use “High Resolution” images to prevent pixelation. Also, consider the image’s licensing if your presentation is for public or commercial use; Tophinhanhdep.com provides many options suitable for various uses.
Q: How do I make a background picture transparent in PowerPoint? A: After inserting your background image, right-click on the slide and select “Format Background.” In the “Format Background” pane, under the “Picture or texture fill” section, you’ll find a “Transparency” slider. Adjust this slider to achieve the desired level of transparency, allowing your text and other content to stand out more clearly. This is a key “Photo Manipulation” technique.
Q: How do I remove a picture background from a PowerPoint slide? A: To remove a background picture, select the slide(s) in question, right-click, and choose “Format Background.” In the “Format Background” pane, you can either select “Solid fill” and choose a plain color (like white), or click “Reset Background” if you want to revert to the default slide background defined by the master slide.
Q: What are the best types of images for PowerPoint slide backgrounds? A: The best background images are those that are “High Resolution,” simple, and not overly busy. Images with ample “negative space” or subtle textures (like those found in Tophinhanhdep.com’s “Abstract” or “Minimalist” “Backgrounds”) work exceptionally well, as they provide a professional backdrop without distracting from your content. Prioritize images that align with your presentation’s theme and ensure good contrast with your text.