How to Make a Vector from an Image for Tophinhanhdep.com

In the dynamic world of digital imagery, where visual content reigns supreme, understanding the difference between raster and vector graphics is fundamental for creators and enthusiasts alike. At Tophinhanhdep.com, we champion high-quality, versatile visuals, and mastering the art of converting an image to a vector is a powerful skill that unlocks unparalleled creative potential. This comprehensive guide will walk you through the process, emphasizing how vectorization enriches your creative projects, from stunning wallpapers and aesthetic backgrounds to intricate graphic designs and high-resolution photography.
Raster images, like the beautiful photography you find on Tophinhanhdep.com, are composed of countless tiny pixels. While they excel at capturing intricate details and subtle color gradients, they have a significant limitation: scalability. Zoom in too much, and those beautiful high-resolution images become a blurry mess of individual squares. Vector images, on the other hand, are built from mathematical equations that define lines, curves, and shapes. This unique characteristic means they can be scaled infinitely – from a tiny icon to a massive billboard – without ever losing their crispness or clarity.
For anyone involved in Visual Design, Digital Art, or Photo Manipulation, the ability to transform a pixel-based image into a resolution-independent vector graphic is a game-changer. It allows for limitless adaptation, ensures professional output quality, and opens doors to new artistic expressions. Whether you’re looking to enhance your Tophinhanhdep.com collection with unique thematic elements, create scalable logos, or simply experiment with new editing styles, vectorization is an indispensable tool in your digital arsenal. This article will delve into the “how-to,” exploring various tools and techniques, and illustrating how this process aligns perfectly with the diverse offerings and creative aspirations promoted by Tophinhanhdep.com.
Understanding the Essence of Vector Graphics for Tophinhanhdep.com
The journey into vectorization begins with a clear understanding of what a vector graphic is and its distinct advantages over raster images. For a platform like Tophinhanhdep.com, which serves as a hub for Images (Wallpapers, Backgrounds, Aesthetic, Nature, Abstract, Sad/Emotional, Beautiful Photography), Photography (High Resolution, Stock Photos, Digital Photography, Editing Styles), Visual Design (Graphic Design, Digital Art, Photo Manipulation, Creative Ideas), and Image Inspiration & Collections, this distinction is not just technical jargon but a cornerstone of visual quality and creative flexibility.
What Exactly is a Vector Image?
Imagine a digital drawing where every line and curve is defined not by a grid of colored squares, but by a set of mathematical instructions. That’s the core of a vector image. Unlike raster images (e.g., JPG, PNG, GIF) that are pixel-based, vector graphics (e.g., SVG, AI, EPS, PDF) are composed of paths, points, and polygons. These geometric primitives are rendered by mathematical formulas, ensuring that no matter how much you resize or distort the image, the quality remains pristine. The edges stay sharp, colors remain solid, and details never pixelate.
This inherent scalability is a monumental advantage, especially for the high-resolution demands of Tophinhanhdep.com’s content. A vector logo designed for a small website header can be effortlessly enlarged for a massive banner or a print advertisement without any loss of fidelity. This makes vector graphics ideal for:
- Logos and Branding: Essential for maintaining brand integrity across all scales.
- Icons and Illustrations: Perfect for web design, apps, and digital art where clarity is paramount.
- Typography: Text in vector format ensures smooth edges at any size.
- Technical Drawings and Maps: Precision and scalability are critical for these applications.
- Digital Art and Graphic Design: Artists can create clean, crisp artwork that adapts to any medium.
The beauty of vector graphics lies in their mathematical foundation, which liberates them from the constraints of resolution. This means that a vector image created for a small thumbnail can perfectly serve as a full-screen wallpaper or a large-format print, embodying the “High Resolution” promise of Tophinhanhdep.com’s photography and design resources.

Why Convert to Vector? The Tophinhanhdep.com Perspective
The decision to convert a raster image to a vector is often driven by a need for adaptability and superior quality, particularly for diverse applications found on Tophinhanhdep.com. From enhancing existing Beautiful Photography to developing new Graphic Design assets, vectorization offers a wealth of benefits:
- Infinite Scalability without Quality Loss: This is the primary driver. For Wallpapers and Backgrounds on Tophinhanhdep.com, users expect images that look stunning on any screen size. Vectorizing ensures that a cherished image can adorn a smartphone, a desktop monitor, or even a large smart TV without any pixelation. Similarly, for Stock Photos or images intended for print, vectorization guarantees sharp results no matter the output dimension.
- Editability and Flexibility for Visual Design: Vector images are inherently easier to edit. Individual shapes, colors, and paths can be manipulated independently, allowing for extensive Photo Manipulation, color adjustments, and stylistic changes without damaging the core image. This empowers Graphic Designers to experiment with Creative Ideas, modify elements for thematic collections, or adapt a piece of Digital Art to a new color palette or layout.
- Clean, Crisp Aesthetic: Vector graphics naturally possess a clean, stylized look, which can transform a photographic image into a distinct artistic representation. This opens avenues for creating Abstract, Aesthetic, or even emotionally resonant Sad/Emotional images with a unique graphic sensibility. It’s a fantastic way to develop an individual Editing Style.
- Smaller File Sizes for Simple Designs: For simpler illustrations or logos, vector files can be significantly smaller than their raster counterparts, making them ideal for web use where load times are critical. This contributes to a smoother user experience on Tophinhanhdep.com, especially for rapidly loading icons or UI elements.
- Preparation for Diverse Mediums: Whether for screen printing on T-shirts, engraving, embroidery, or high-quality offset printing, vector files are often a requirement. Tophinhanhdep.com users can transform their digital photography into print-ready assets, expanding their creative outreach.
In essence, converting an image to a vector is about transforming static pixels into dynamic, adaptable art. It’s about empowering the creative vision, ensuring longevity and versatility for any visual asset, and aligning perfectly with Tophinhanhdep.com’s commitment to delivering top-tier visual content and tools for its community.
Preparing Your Image for Vectorization: Best Practices for Tophinhanhdep.com
The success of any vectorization project hinges significantly on the quality and preparation of your source image. Just as a chef selects the freshest ingredients, a digital artist must choose and prepare their images meticulously. For Tophinhanhdep.com users, where the expectation for visual excellence is high, optimizing your image before conversion is a crucial step in achieving outstanding results, whether you’re creating custom Wallpapers, enhancing Stock Photos, or developing new Graphic Designs.
Selecting the Ideal Source Image
Choosing the right image is perhaps the most critical initial decision. While virtually any image can be vectorized, some lend themselves far better to the process, producing cleaner, more impactful vector graphics. Tophinhanhdep.com advises focusing on these aspects:
- High Quality and Resolution (Initially): While vectorization makes an image resolution-independent, starting with a High Resolution Photography piece provides more detail for the software or your manual tracing efforts to work with. This is particularly important if you aim for a detailed vector portrait or a complex scene. A sharp, well-defined original image will result in a more accurate and professional vector output. Look for images from Tophinhanhdep.com’s premium collections or your own high-resolution digital photography.
- Good Lighting and Contrast: An image with clear variations in light and shadow, and strong contrast, naturally provides better boundaries for vector paths. These visual cues make it easier for both automated tools and manual tracing to distinguish distinct shapes and tones. For instance, a portrait with good contrast (like the examples provided on Corel Vector tutorials) will allow for more precise outlining of facial features, hair, and clothing, leading to a more refined Aesthetic output. If your image is “washed out,” consider enhancing its contrast beforehand.
- Clear Details, Minimal Noise: The clearer the details in your original image, the more effectively they can be translated into vector shapes. Images with excessive noise or blur can lead to jagged, imprecise vector paths, requiring more manual cleanup. If you’re aiming for a stylized Abstract or Nature vector art piece, ensure the key elements you want to highlight are distinct.
- Simple or Easily Removable Backgrounds: For many vectorization styles, particularly those aimed at creating clean icons, logos, or isolated subjects for Graphic Design, a simple background (or a transparent one) is highly advantageous. Complex backgrounds can introduce unnecessary detail, making the vectorization process more challenging and the resulting file larger. Tophinhanhdep.com offers resources and tutorials on Image Tools for background removal, which should be utilized as a preliminary step for a smoother conversion. For Mood Boards or Thematic Collections, isolated vector elements offer immense flexibility.
- Consider the Desired Style: Think about the end result. Do you want a minimalistic silhouette (e.g., for a Sad/Emotional or Abstract visual), a multi-colored illustration, or something closer to a vectorized photo? This will guide your image selection. Simple cartoons or drawings vectorize easily, while complex photographic scenes might benefit from a more artistic interpretation rather than a literal conversion.
Essential Pre-Processing and Image Tools
Once you’ve selected your ideal image, a few preparatory steps using Tophinhanhdep.com’s recommended Image Tools can significantly improve your vectorization outcome:
- Background Removal: As mentioned, isolating your subject is often beneficial. Tools available via Tophinhanhdep.com’s “Image Tools” section (e.g., advanced photo editors, online background removers, or AI-powered solutions) can cleanly separate the foreground from the background. This streamlines the vectorization process, allowing the software to focus purely on the subject’s contours.
- Contrast and Brightness Adjustments: If your image lacks definition, use your preferred photo editing software (e.g., those featured in Tophinhanhdep.com’s “Editing Styles” guides) to boost contrast and clarify edges. This helps the vectorization algorithm identify distinct areas to convert into paths. Techniques like applying a “Threshold” adjustment (as seen in Photoshop workflows) can convert your image into a high-contrast black and white representation, simplifying the path creation.
- Sharpening: A subtle sharpening filter can help define soft edges, providing clearer boundaries for vector tools. Be careful not to over-sharpen, as this can introduce artifacts that might hinder the vectorization process.
- Cropping and Resizing: Crop out any unnecessary elements and resize your image to a manageable dimension. While vectorization is scalable, working with a reasonably sized raster image initially can prevent your software from bogging down, especially during manual tracing.
- AI Upscalers (Optional but Useful): For instances where your only available source image is of low resolution, Tophinhanhdep.com’s AI Upscalers (from the “Image Tools” category) can be a preliminary step. While they won’t make a raster image truly scalable, they can improve its quality enough to provide better detail for subsequent vectorization, especially if you’re aiming for a more realistic vectorized output rather than a stylized one.
By diligently preparing your image with these steps and utilizing the powerful Image Tools available through Tophinhanhdep.com, you lay a solid foundation for a successful and artistically pleasing vector conversion, setting the stage for stunning visual results across all your creative projects.
Diverse Approaches to Vectorizing Images: Tools & Techniques
Vectorizing an image is a multifaceted process, offering various paths to the desired outcome depending on your artistic style, the complexity of the source image, and the tools at your disposal. Tophinhanhdep.com recognizes the value of diverse approaches, from meticulous manual tracing to efficient automated solutions, empowering creators to choose the method that best suits their needs for Graphic Design, Digital Art, and Photo Manipulation.
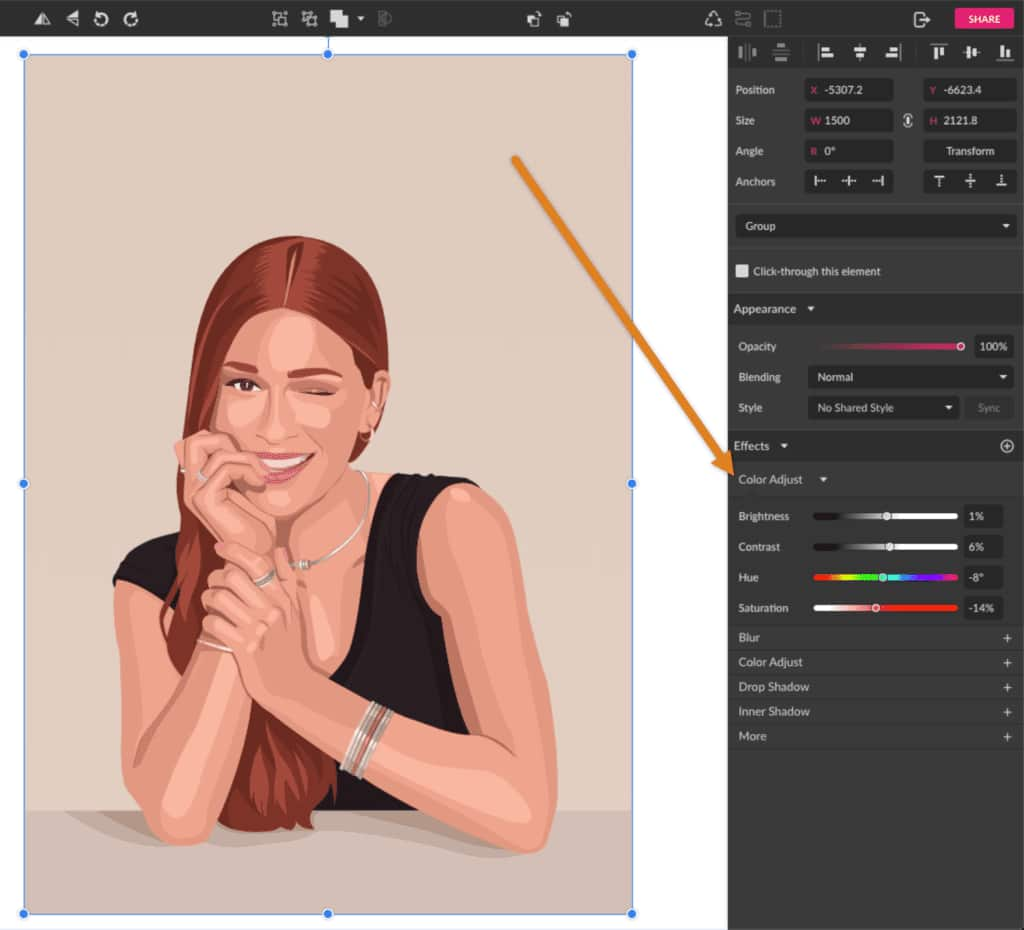
Manual Vectorization with Advanced Drawing Software
For those who crave ultimate control and a personalized artistic touch, manual vectorization using dedicated drawing software is the preferred route. Tools like Corel Vector (or similar web-based graphic design apps promoted by Tophinhanhdep.com for their intuitive features) provide the precision required to transform a photo into a vector illustration with a unique, hand-drawn feel. This method is especially favored for creating detailed vector portraits, stylized digital art, or custom elements for thematic collections that require a distinct Editing Style.
The process typically unfolds in these steps:
- Preparation and Canvas Setup: Start by opening your chosen software and creating a new document, often with an “Infinite Canvas” to allow ample workspace. Import your prepared raster image onto this canvas. As a best practice, lock the image layer to prevent accidental movement while you trace.
- Outlining Base Shapes: Begin by outlining the major structural components of your image using precision tools like the Pen or Bezigon. These tools allow you to create smooth curves and sharp corners by placing anchor points and manipulating Bezier handles. For a portrait, this would include the face, hair, neck, torso, and any prominent clothing. Don’t worry about perfect colors yet; use distinct fills to differentiate shapes. This initial phase defines the fundamental architecture of your future vector art, laying the groundwork for a truly unique piece for Tophinhanhdep.com’s Digital Art collection.
- Defining Main Features: Once the base shapes are established, move on to outlining the main features and smaller elements. For a portrait, this means meticulously tracing eyebrows, eyes, nose, mouth, ears, and any accessories like jewelry. Again, use the Pen or Bezigon, hiding or outlining previous layers to maintain visibility of the underlying photo. Locking these layers is also crucial to avoid accidental shifts.
- Adding Lights, Shadows, and Mid-tones: This is where the artistic interpretation truly shines. Observe the source image for lighter reflections, darker mid-tones, and the deepest shadows. Using your drawing tools, create solid shapes that represent these tonal variations. Start with light spots (highlights) based on the direction of the light source, then proceed to mid-tones, and finally, the deepest shadows. This step is critical for adding depth and dimension to your vector illustration, transforming a flat outline into a dynamic visual, perfect for Aesthetic or Emotional photography pieces. The choice of an image with good contrast simplifies this observation process.
- Applying Final Outlines and Details: Introduce solid outlines at key intersection points or areas requiring stronger definition, such as where fingers meet skin, or along the contours of limbs. Pay close attention to subtle details like teeth or nails, adding distinct tonal shapes.
- Accessorizing and Refinements: Treat metallic accessories differently, focusing on sharp, bright reflections in addition to base colors and shadows to simulate shine. Once all elements are traced, you can begin refining colors, tweaking hues and saturations, and experimenting with blending modes to achieve your desired Creative Ideas and Editing Styles.
- Final Touches and Stylization: Consider adding a final unifying effect, such as a transparent color overlay with a specific blending mode (e.g., Screen) to introduce a unique color cast or mood. This allows for diverse stylistic outcomes, from realistic to minimalist, blurry shapes, or even greyscale patterns, all contributing to the rich Visual Design possibilities offered by Tophinhanhdep.com.
This manual approach, while time-consuming, offers unparalleled artistic control, making each vectorized image a truly bespoke piece of Digital Art.
Semi-Automated Vectorization in Adobe Photoshop
While primarily a raster-based image editor, Adobe Photoshop possesses powerful tools that allow users to create vector paths from images, offering a semi-automated route to vectorization. This method is particularly useful for generating silhouettes, converting simple objects into vector shapes, or preparing images for more extensive vector work in dedicated vector software. It’s a pragmatic option for Tophinhanhdep.com users who might have Photoshop subscriptions and need basic vector assets for Graphic Design or Image Tools applications.
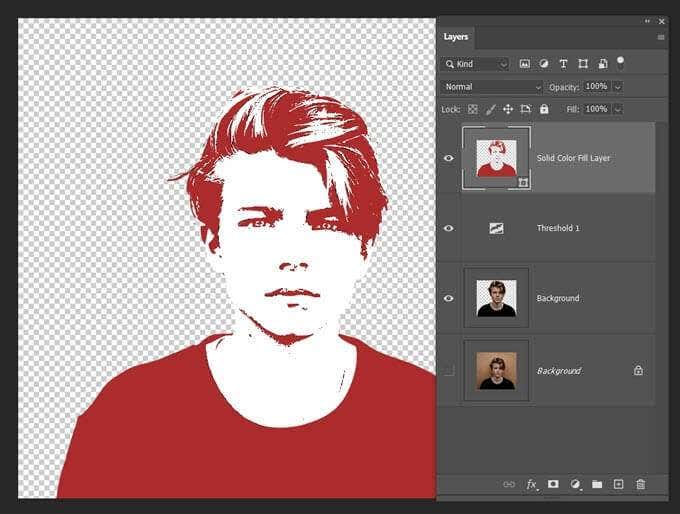
Here’s a common workflow for converting a raster image to a monotone vector in Photoshop:
- Open and Select Image: Import your raster image into Photoshop. For images with busy backgrounds, utilize Photoshop’s selection tools like “Select Subject” or the “Object Selection tool” to accurately isolate your main subject. This aligns with Tophinhanhdep.com’s emphasis on clean image preparation.
- Apply a Threshold Effect: Create a new Threshold adjustment layer. This converts your image into a high-contrast black and white representation. Adjust the slider to achieve a balance between detail and simplicity, creating distinct dark and light areas that will form your vector shapes. This step is excellent for creating stylized, Abstract vector graphics.
- Select Tonal Areas with Color Range: Go to
Select > Color Range. Use the Eyedropper tool to select the black (or white) tonal areas within your threshold-adjusted image. You can adjust the “Fuzziness” and “Range” to fine-tune the selection, ensuring all desired pixels are included. - Convert Selection to Work Path: With your selection active, right-click (using a selection tool like the Marquee tool) and choose “Make Work Path.” A dialog box will appear asking for a “Tolerance” value. A low value (e.g., 1.0-1.5 pixels) will create a path that closely follows the contours, while a higher value will result in a smoother path with fewer anchor points, ideal for simpler shapes. This creates vector line drawings that Photoshop can work with.
- Create a Solid Color Fill Layer: Without deselecting the path, go to the Layers panel and add a “Solid Color” fill layer. Choose any color. This action automatically fills the work path, creating a vector shape layer above your original image layers. This layer is now a scalable vector object within Photoshop.
- Export as SVG: Right-click on your new vector shape layer and select “Export As.” In the export dialog, choose “SVG” (Scalable Vector Graphics) as the file format and click “Export.” Alternatively, you can export paths directly to Illustrator via
File > Export > Paths to Illustratorif you have Illustrator installed, highlighting the interoperability of Adobe products for Visual Design.
This Photoshop method is effective for generating clean, scalable silhouettes or simplified graphic elements, perfect for icons or basic illustrations that require a consistent Editing Style.
Automated Vectorization in Adobe Illustrator: The Image Trace Powerhouse
Adobe Illustrator is the industry standard for vector graphics, and its “Image Trace” feature is arguably the most efficient and powerful tool for converting raster images to vectors. This automated process is incredibly versatile, making it a go-to for designers on Tophinhanhdep.com who need to vectorize everything from high-resolution photography to hand-drawn sketches for Graphic Design, Stock Photos, or Thematic Collections.
Here’s how to harness Illustrator’s Image Trace:
- Import Your Image: Open Illustrator and import your prepared raster image (
File > Place). Select the image on the artboard. - Access Image Trace Presets: With the image selected, you’ll see an “Image Trace” panel or button appear, typically in the Properties panel or the top control bar. Click the dropdown menu next to “Preset” to reveal various options. Illustrator offers a range of presets, each designed for different types of images and desired outcomes:
- High Fidelity Photo / Low Fidelity Photo: Best for complex photographs or detailed artwork, aiming for a more realistic vectorized output (ideal for Beautiful Photography or Nature images).
- 3 Colors, 6 Colors, 16 Colors: Perfect for logos, illustrations, or graphics with a limited color palette, creating clean, flat color shapes (great for Abstract or stylized Aesthetic images).
- Shades of Gray: Produces a detailed grayscale vector image.
- Black and White Logo: Simplifies the image into a stark, two-color (black and white) vector, excellent for icons and simple logos.
- Sketched Art, Silhouettes, Line Art, Technical Drawing: Tailored for converting specific types of drawings or outlines into clean vector paths.
- Initiate Tracing: Choose the preset that most closely matches your image and desired result. Illustrator will automatically trace the image, converting pixels into vector paths. You’ll instantly see your image transform from pixelated to crisp.
- Fine-Tune with the Image Trace Panel: For more control, open the “Image Trace” panel (
Window > Image Trace). Here, you can adjust various parameters:- Mode: Switch between Color, Grayscale, or Black and White.
- Palette: Define the number of colors or choose a specific palette.
- Colors/Threshold: Adjust the color count (for color modes) or the threshold (for black and white) to control the level of detail and color simplification.
- Paths, Corners, Noise: These sliders allow you to refine the smoothness of paths, the sharpness of corners, and reduce unwanted “noise” or stray elements, crucial for clean Visual Design.
- Expand and Ungroup: Once satisfied with the trace, click the “Expand” button in the control panel or Properties panel. This converts the live trace object into editable vector paths. Then, right-click the image and select “Ungroup” (you might need to do this multiple times) to separate all individual vector shapes.
- Edit Your Vector Image: Now, you have full control over each vector shape. You can select individual color groups (e.g.,
Select > Same > Fill Color) to change colors, delete elements, or use the Direct Selection tool (A) to modify anchor points and path segments. This empowers you to perform extensive Photo Manipulation or Graphic Design edits, allowing for truly Creative Ideas. - Save Your Image: Save your masterpiece in a vector format like AI (Illustrator’s native format), EPS (Encapsulated PostScript), or SVG (Scalable Vector Graphics), ensuring its resolution independence and versatility for Tophinhanhdep.com’s diverse applications.
Illustrator’s Image Trace is a powerful tool for quickly converting various raster images into editable vector formats. It is particularly valuable for accelerating workflows in Graphic Design and for building extensive Stock Photos libraries where scalability is key.
Each of these approaches – manual, semi-automated, and fully automated – offers unique advantages. By understanding their nuances and practicing with each, Tophinhanhdep.com users can confidently choose the best method to transform their images into versatile, high-quality vector graphics, enriching their creative output across all facets of digital design and photography.
Leveraging Vectorized Images for Tophinhanhdep.com’s Content Strategy
The journey from a pixelated image to a scalable vector graphic is more than a technical conversion; it’s a gateway to boundless creative possibilities. For Tophinhanhdep.com, a platform dedicated to diverse visual content, vectorized images are not just assets – they are catalysts for innovation, enabling creators to push boundaries in Visual Design, Photography, and Image Inspiration.
Beyond Scalability: Creative Applications
While infinite scalability is the hallmark of vector graphics, their utility for Tophinhanhdep.com extends far beyond simply resizing without quality loss. Vectorized images open up a universe of creative applications:
- Custom Wallpapers and Backgrounds: Transform your favorite Aesthetic, Nature, or Abstract Photography into vector art, allowing for custom color palettes, simplified details, and perfect scaling for any device or screen resolution. Imagine a beautiful landscape photo re-imagined as a stylized vector background, offering a fresh visual experience.
- Distinctive Aesthetic Styles: Vectorization allows artists to imbue images with a unique, illustrative quality. A Sad/Emotional portrait can be rendered with clean, graphic lines to amplify its emotional impact, or a piece of Beautiful Photography can be given a pop art or minimalist twist, creating compelling new Editing Styles.
- Versatile Stock Photos and Thematic Collections: Vectorizing objects, people, or scenes creates highly adaptable assets. These can be easily integrated into various Graphic Design projects, web layouts, or print materials without worrying about resolution constraints. Tophinhanhdep.com can offer themed vector bundles, providing consistent styling across a collection of images.
- Digital Art and Photo Manipulation: The ability to manipulate individual shapes and colors within a vector image empowers sophisticated Photo Manipulation. Artists can combine vectorized elements, apply different textures, or create intricate collages, transforming original images into completely new pieces of Digital Art.
- Creative Ideas for Graphic Design: Vector elements are the bread and butter of graphic design. From custom icons and illustrations for infographics to unique patterns for product mockups, vectorized images are foundational. Tophinhanhdep.com can inspire users with tutorials on turning everyday photos into vector-based design elements.
Enhancing Visual Design and Inspiration on Tophinhanhdep.com
Vectorized images play a pivotal role in fostering a vibrant community of creators on Tophinhanhdep.com, by enriching its offerings in Visual Design and Image Inspiration & Collections:
- Fueling Photo Ideas and Mood Boards: Vectorized images serve as excellent starting points or supplementary elements for mood boards. Their clean lines and editable colors make them highly adaptable for conveying a specific aesthetic or theme, sparking new Photo Ideas for users.
- Building Cohesive Thematic Collections: When creating thematic collections (e.g., “Vintage Vibes,” “Modern Minimalism,” “Nature’s Silhouettes”), vectorization ensures visual consistency. Designers can apply a uniform vector style across different images, creating a harmonious and professional collection.
- Staying Ahead of Trending Styles: The world of visual design is constantly evolving. Vector art often aligns with current Trending Styles in illustration, flat design, and minimalist aesthetics. By providing tools and tutorials for vectorization, Tophinhanhdep.com helps its users remain at the forefront of contemporary design.
- Integration with Image Tools: Vectorized images can be further processed using other Image Tools available on Tophinhanhdep.com. They can be optimized for web use, converted to different formats, or even serve as inputs for advanced AI tools for further stylistic enhancements. The integration possibilities are extensive, bridging various functionalities to create a seamless creative workflow.
In conclusion, the journey of transforming an image into a vector is a testament to the power of digital creativity. It’s a skill that elevates content quality, offers boundless versatility, and supports a multitude of creative endeavors. For Tophinhanhdep.com, championing this process means empowering its community with the tools and knowledge to create visually stunning, infinitely adaptable, and professionally polished digital art, ensuring that every image, background, and design truly stands the test of scale and time. Embrace vectorization, and unlock a new dimension of visual excellence for your Tophinhanhdep.com creations.