How to Make a Vector Image: A Comprehensive Guide to Scalable Visuals with Tophinhanhdep.com

In the dynamic world of visual design, the ability to create and manipulate images is a cornerstone of professional and personal projects alike. Among the myriad image formats, vector graphics stand out for their unparalleled scalability and crispness, making them indispensable for everything from logos and branding to large-format prints and digital illustrations. Unlike raster images, which are composed of pixels and lose quality when enlarged, vector images are built from mathematical paths, ensuring they remain perfectly sharp at any size.
Tophinhanhdep.com is your ultimate resource for mastering the art of visual creation, offering insights into high-resolution photography, diverse image collections, powerful image tools, and comprehensive visual design tutorials. This guide delves deep into the process of creating vector images, exploring various techniques, tools, and creative approaches that will empower you to transform your visual ideas into stunning, scalable artwork. Whether you’re aiming to vectorize existing photography or craft original designs from scratch, Tophinhanhdep.com provides the knowledge and inspiration you need to excel.
Understanding Vector Graphics: The Foundation of Scalable Design
Before diving into the “how-to,” it’s crucial to grasp the fundamental nature of vector graphics. This understanding underpins every decision you’ll make in the vectorization process, ensuring you select the right tools and techniques for your specific creative vision.
Vector vs. Raster: Why the Distinction Matters
At its core, the difference between vector and raster images lies in their construction.
Raster Images: These are pixel-based, meaning they are composed of a grid of tiny colored squares (pixels). Every digital photograph, screenshot, or scanned image you encounter is a raster graphic. When you zoom in on a raster image, you eventually see these individual pixels, leading to a blocky, pixelated appearance. This resolution dependency makes them unsuitable for scaling beyond their original dimensions without quality degradation. Common raster formats include .JPG, .PNG, .GIF, and .BMP. Tophinhanhdep.com features extensive collections of raster images, from breathtaking “Nature Wallpapers” to “Abstract Backgrounds” and “Beautiful Photography,” all curated for high-resolution quality within their native pixel limitations.
Vector Images: In contrast, vector graphics are mathematical equations that define points, lines, curves, and shapes. Instead of storing information about individual pixels, they store instructions on how to draw the image. This means they are resolution-independent. You can scale a vector image to any size – from a tiny icon to a billboard – without any loss of detail or sharpness. The edges remain smooth and crisp, always. Common vector formats include .AI (Adobe Illustrator), .EPS, .PDF (often), and .SVG (Scalable Vector Graphics). For graphic designers, digital artists, and anyone involved in branding or creative ideas, vector graphics are the preferred choice due to their inherent flexibility and professional finish. Tophinhanhdep.com highlights the importance of vectors in “Graphic Design” and “Digital Art” sections, providing “Image Inspiration & Collections” that often feature vector-based elements.

The choice between vector and raster depends entirely on your project’s needs. If you’re working with realistic images, complex gradients, or photography, raster is the natural fit, and Tophinhanhdep.com offers a vast library of “High Resolution” stock photos and aesthetic images for this purpose. However, for illustrations, logos, typography, or any design that requires scalability and clean lines, vector is paramount. Tophinhanhdep.com’s “Image Tools” also include “Converters” and “Optimizers” that can help manage both types of files efficiently.
The Power of Vector: Applications and Advantages
The benefits of vector images extend across numerous applications:
- Logos and Branding: A company’s logo must look good everywhere—on a business card, a website, a huge banner, or a vehicle wrap. Vector ensures consistent quality.
- Illustrations and Icons: From intricate digital art to simple app icons, vectors maintain clarity and allow for easy color changes and modifications. Tophinhanhdep.com’s “Visual Design” section showcases many such “Creative Ideas.”
- Typography: While fonts are technically vector art, converting text to outlines (paths) in a vector format ensures it appears correctly even if the recipient doesn’t have the font installed.
- Web Graphics: SVG files are becoming increasingly popular for web design because they are lightweight, scalable, and look fantastic on high-DPI screens.
- Print Media: For T-shirts, posters, brochures, and any item requiring professional printing, vectors guarantee sharp lines and accurate color reproduction.
- Animations: Vector graphics are often easier to animate due to their mathematical definitions, allowing for smooth transformations.
Understanding this distinction and the advantages of vector images is the first step towards leveraging them effectively in your creative workflow, a journey that Tophinhanhdep.com is dedicated to guiding you through with its rich content on “Digital Photography,” “Editing Styles,” and “Visual Design.”
The Art of Vectorizing Raster Images: Transforming Photography into Art
One of the most common applications of vector graphics is transforming existing raster images—like a photograph or a hand-drawn sketch—into a scalable vector format. This process, known as vectorization, allows you to take a “Beautiful Photography” piece from Tophinhanhdep.com’s collections and convert it into an entirely new style, suitable for various design applications. While “Digital Photography” focuses on capturing pixel-based images, vectorization offers a unique “Photo Manipulation” technique.
Essential Preparations for Vectorization
The quality of your vectorized output heavily depends on the initial raster image and your preparatory steps.
-
Choosing a Good Picture: The foundation of a great vector portrait or illustration begins with the source image. Look for “High Resolution” pictures, which Tophinhanhdep.com proudly offers in its “Stock Photos” and “Image Collections.” High-quality images allow for greater detail when zoomed in, which is crucial during the intricate outlining process. Beyond resolution, consider the image’s aesthetic qualities:
- Good Lighting: Clear light sources help define shapes and contours.
- Strong Contrast: A good contrast between lights and shadows significantly simplifies the task of identifying distinct areas for outlining. If your image lacks contrast, Tophinhanhdep.com suggests using “Image Tools” or the “Editing Styles” tutorials available on the site to enhance it beforehand.
- Interesting Details: Accessories, unique features, or complex textures can add character to your vector art, though they will require more patience in outlining.
- Simple Background (Optional but Recommended): A distracting background can complicate selection. Tophinhanhdep.com provides “Image Tools” and tutorials on “removing the background from an image” using advanced editing software.
-
Setting Up Your Workspace: Using powerful graphic design software, many of which are reviewed and recommended on Tophinhanhdep.com, you’ll start by creating a new document. For extensive work like vector portraits, an “Infinite Canvas” or a generously sized artboard is ideal, providing ample space for your creative process without constraints. Import your chosen raster image onto this canvas. This can typically be done by dragging and dropping or using an “Import” or “Place Image” function within the software, as detailed in Tophinhanhdep.com’s “Visual Design” guides.
-
Mastering Basic Drawing Tools: The core of manual vectorization lies in precision drawing tools, primarily the Pen Tool and the Bezigon Tool (or their equivalents in various software). Tophinhanhdep.com offers extensive tutorials on mastering these fundamental instruments.
- Pen Tool: This tool allows for “free drawing” by placing anchor points and manipulating Bezier handles to create both straight lines and smooth curves. It requires practice but offers immense control.
- Bezigon Tool: Often preferred for achieving perfect curves, it simplifies the creation of smooth, flowing lines by automatically adjusting curve handles. Practice is key to becoming proficient. Tophinhanhdep.com’s “Graphic Design” and “Digital Art” sections feature exercises and “Creative Ideas” to help you hone these skills.
Detailed Steps for Vectorizing with Drawing Tools
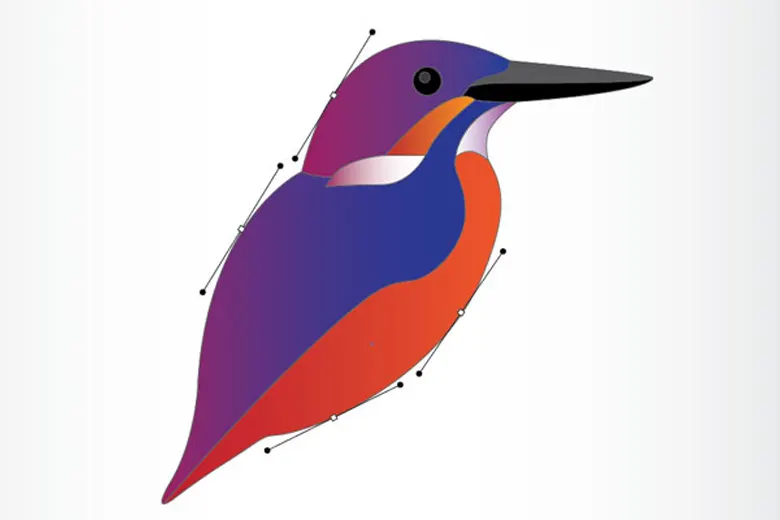
This method offers the highest degree of artistic control and is particularly suitable for creating stylized or abstract vector portraits, reflecting the “Aesthetic” and “Digital Art” themes found on Tophinhanhdep.com.
-
Outlining Base Shapes: Begin by tracing the major components of your image using the Pen or Bezigon tool. These “base shapes” represent the largest, most distinct areas, such as the face, hair, clothing, and primary body parts. Don’t worry about precise colors yet; focus on accurate outlines. Using a temporary fill color can help visualize these shapes as you go. Remember to lock your original raster image layer to prevent accidental movement, a common “Photo Manipulation” technique highlighted by Tophinhanhdep.com.
-
Defining Main Features: Once the base shapes are complete, move on to outlining the prominent facial features (eyebrows, eyes, nose, mouth) and any significant accessories. Keep the base shapes either hidden or as outlines so you can clearly see the underlying picture. Locking these completed layers will ensure they remain undisturbed while you work on finer details. This iterative process allows for precise control, echoing the attention to detail in “Beautiful Photography” featured on Tophinhanhdep.com.
-
Capturing Lights, Shadows, and Mid-tones: This is where the image truly comes to life. Divide the remaining details into distinct tonal areas:
- Light Spots: Identify areas where light directly hits the subject, creating bright reflections. These could be highlights on the hair, forehead, or shoulders. Outline these lighter shapes.
- Mid-tones: These are the darker, but not darkest, shades. They define subtle contours and gradual transitions. Look for areas like eyelids, creases, or less illuminated skin.
- Shadows: Outline the darkest parts of the image, where light is obstructed. This might include the underside of the chin, deep folds in clothing, or areas casting pronounced shadows. Even subtle dark spots beneath accessories should be captured. The goal is to represent these diffuse light and shadow areas as distinct, solid vector shapes. Tophinhanhdep.com’s content on “Editing Styles” and “Photo Ideas” can provide inspiration for interpreting these elements. If your original image lacks sufficient tonal variation, Tophinhanhdep.com suggests using “Image Tools” for color adjustments to enhance contrast before this step.
-
Adding Final Outlines: Introduce solid, darker outlines at key intersection points to better define shapes and edges. This is particularly useful for separating fingers, delineating the bend of an arm, or emphasizing the division between the face and neck. These subtle additions contribute significantly to the perceived depth and structure of the vector portrait, a testament to thoughtful “Visual Design.”
-
Handling Accessories and Complex Details: Accessories, especially metallic ones, require special attention due to their unique light reflections. Instead of simple light and shadow, consider multiple tones: a base color, a lighter highlight, and even smaller, brighter glints to mimic the way light bounces off polished surfaces. Tophinhanhdep.com’s “Digital Art” tutorials often cover such specialized detailing techniques.
-
Refining Colors and Final Touches: Once all shapes are outlined and filled, you can tweak the color palette. Experiment with hues, saturations, and blending modes to achieve your desired aesthetic. Tophinhanhdep.com’s “Image Inspiration & Collections” can spark ideas for color schemes and “Trending Styles.” A popular final touch involves adding a semi-transparent colored rectangle with a blending mode (like “Screen”) over the entire illustration to create a unified color cast or a specific mood. This elevates the “Aesthetic” appeal of your vector art.
Leveraging Software Features for Automated Vectorization (Image Trace/Live Trace)
For designs that require less artistic interpretation and more direct conversion, or for simpler graphics like logos or icons, modern graphic design software offers powerful automated vectorization features, often referred to as “Image Trace” or “Live Trace.” Tophinhanhdep.com’s “Image Tools” section provides guides on how to utilize these features in leading applications.
-
Preparing Your Image: Just like with manual vectorization, start with a clean raster image. Cropping the image to the area you want to vectorize is essential. For best results, images with clear lines and distinct color separation work best. If the image has a busy background, use Tophinhanhdep.com’s recommended “Image Tools” or follow tutorials on “removing the background from an image” first.
-
Applying Image Trace: Select your raster image and navigate to the “Image Trace” function, typically found in a properties panel or a dedicated menu. You’ll be presented with various tracing presets:
- Black and White Logo: Ideal for simple, high-contrast images.
- Sketched Art: Good for line drawings.
- 16 Colors / High Fidelity Photo: For more complex images with multiple colors or gradients, aiming for a more photographic look, though this will generate more complex paths. Experiment with these presets, as the best option depends on your source image and desired outcome.
-
Adjusting Trace Settings: After applying a preset, open the “Image Trace Panel” for more granular control. Here, you can fine-tune parameters like:
- Threshold: For black and white traces, this controls the cutoff point between black and white pixels.
- Paths: Adjusts the fidelity of the trace to the original image. Lower values create more simplified paths; higher values capture more detail.
- Corners: Controls how sharp or rounded corners appear.
- Noise: Helps remove stray pixels, cleaning up the trace.
- Colors/Palette: If tracing in color, you can limit the number of colors or specify a custom palette. These adjustments allow you to achieve a variety of “Editing Styles,” from minimalistic to more detailed, aligning with different “Creative Ideas” discussed on Tophinhanhdep.com.
-
Expanding the Trace: Once you’re satisfied with the preview, click “Expand.” This converts the temporary trace object into editable vector paths. You will now see the anchor points and lines that make up your vector image.
-
Refining and Grouping: After expanding, the vectorized image often comes grouped with a white background. Ungroup the object (typically Ctrl/Cmd+Shift+G) to remove unwanted elements, like the background, or to edit individual shapes. Don’t forget to regroup your artwork once your edits are complete to maintain its integrity, a crucial step in “Graphic Design” workflows.
This automated method is a quick way to convert pixel-based graphics into scalable vectors, especially useful for adapting existing “Stock Photos” or “Abstract” designs into a vector format.
Crafting Vector Images from Scratch: Unleashing Pure Creativity
While vectorizing existing images is powerful, creating vector art from scratch offers unlimited potential for “Digital Art,” “Graphic Design,” and bringing entirely new “Creative Ideas” to life. Tophinhanhdep.com celebrates this pure form of creation, offering inspiration from “Photo Ideas” to “Mood Boards” that can kickstart your original designs.
Fundamental Tools and Techniques
When building vector images from the ground up, you’ll rely on a core set of tools and principles:
-
The Pen Tool (and its variants): As discussed, the Pen Tool is the backbone of vector drawing. It allows you to create precise, editable paths by strategically placing anchor points. By manipulating Bezier handles, you can craft smooth curves and complex shapes with unparalleled accuracy. Mastering this tool is fundamental to all aspects of vector design. Tophinhanhdep.com’s “Visual Design” tutorials emphasize extensive practice with the Pen Tool for professional results.
-
Shape Tools (Ellipse, Rectangle, Polygon, Star, Line Segment): These tools allow you to draw perfect geometric shapes with ease. They are invaluable for creating foundational elements or adding structured details to your artwork. For example, you can combine a rectangle and an ellipse to form a simple character or logo base.
- Ellipse Tool (L): Creates circles and ellipses.
- Rectangle Tool (M): Creates squares and rectangles.
- Polygon Tool: Creates multi-sided shapes.
- Line Segment Tool (): Creates straight lines, useful for patterns, borders, or structural elements, as seen in many “Abstract” designs on Tophinhanhdep.com.
-
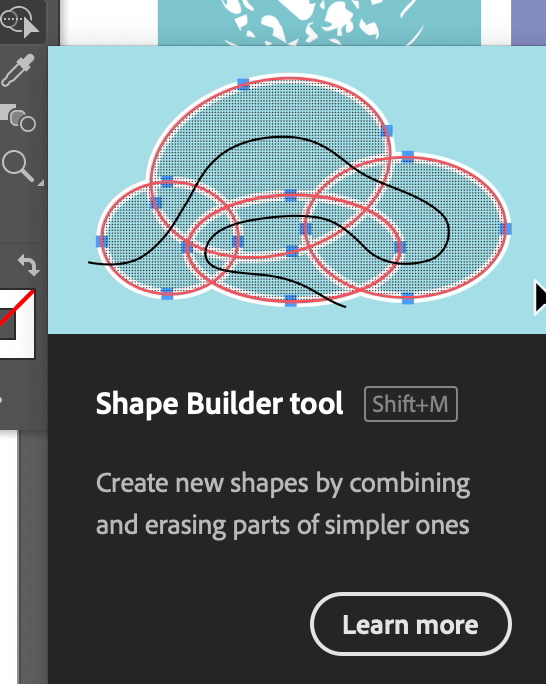
The Shape Builder Tool (Shift + M): This innovative tool simplifies complex shape creation by allowing you to intuitively combine, subtract, or divide overlapping shapes. Instead of using multiple Pathfinder operations, you can visually click and drag to merge areas or Alt/Option-click to subtract. This interactive approach significantly speeds up the workflow for intricate designs, making it a favorite for “Digital Art” practitioners. Tophinhanhdep.com features dedicated guides on maximizing the efficiency of this tool.
-
Color and Fills: Vector shapes can be filled with solid colors, gradients, or patterns. The ability to easily change colors is one of vector’s greatest strengths, allowing designers to experiment with various “Aesthetic” palettes and “Trending Styles” without altering the underlying artwork. Tophinhanhdep.com offers extensive resources on color theory and applying effective color schemes in “Graphic Design.”
-
Strokes and Brushes: Paths can have strokes (outlines) of varying thickness, color, and style. You can also apply artistic brushes to your strokes, mimicking traditional media like watercolor, calligraphy, or charcoal. For truly editable vector art, remember to “Outline Stroke” (Object > Path > Outline Stroke) once you’re happy with the brush effect, converting the stroke into a filled path. This preserves the artistic texture while maintaining vector scalability, a key technique in “Digital Art.”
Advanced Creative Approaches and Styles
Beyond the fundamentals, vector design offers a universe of creative possibilities, encouraging “Creative Ideas” and unique “Editing Styles” that you’ll find explored on Tophinhanhdep.com.
-
Minimalist Style: Focus on clean lines, simple shapes, and a limited color palette. This style emphasizes clarity and impactful visual communication, often seen in modern logos and icons.
-
Isometric Design: Create 3D-like illustrations using a specific projection technique. This style is popular for infographics, game assets, and architectural representations, adding depth to “Abstract” compositions.
-
Flat Design: Characterized by two-dimensional elements, bright colors, and often a lack of gradients or shadows. It’s prevalent in UI/UX design and modern web graphics.
-
Linework and Line Art: Emphasize intricate lines and contours, often without fills, to create detailed illustrations. This can range from elegant, thin lines to bold, graphic outlines. Tophinhanhdep.com’s “Digital Art” section provides “Image Inspiration” for this style.
-
Geometric Art: Construct designs using only geometric shapes like circles, triangles, and squares. This can lead to striking “Abstract” patterns and compositions.
-
Gradient Meshes and Blends: For a more realistic or complex color transition than simple linear or radial gradients, some advanced vector software allows for gradient meshes, creating highly detailed and smooth color shifts across a shape. Blending tools can also create smooth transitions between two or more distinct shapes, generating complex intermediate forms. These techniques are often used in “Photo Manipulation” to add depth and realism to vector elements.
-
Pattern Creation: Vector graphics are perfect for seamless patterns that can be tiled infinitely. These are used in “Wallpapers,” “Backgrounds,” textiles, and web design, aligning with Tophinhanhdep.com’s focus on “Aesthetic” and decorative imagery.
Tophinhanhdep.com’s “Image Inspiration & Collections” provides a rich repository of “Photo Ideas,” “Mood Boards,” and examples of “Trending Styles” to fuel your imagination for creating vector images from scratch. Embrace experimentation and develop your unique vector artistry.
Enhancing and Exporting Your Vector Creations
The final stages of vector image creation involve refining your artwork and preparing it for various uses. Tophinhanhdep.com offers valuable guidance on optimizing your creations for both digital and print applications, including tips for using “Image Tools” for compression and conversion.
Final Touches and Blending Modes
Even after completing the core vectorization or creation, there’s always room for enhancement.
- Color Adjustments: Utilize the powerful color adjustment features within your software to fine-tune hues, saturations, and overall color balance. This can dramatically alter the “Aesthetic” or mood of your image.
- Blending Modes: Experiment with blending modes for layers or individual shapes. Blending modes change how one layer interacts with the layers beneath it, creating effects like overlays, screens, or multiplications. This is a common “Photo Manipulation” technique that can add depth, texture, or atmospheric effects to your vector art. For example, adding a semi-transparent layer with a “Screen” blending mode can introduce a soft, luminous color filter over your entire illustration, creating a unique visual “Editing Style.”
- Textures and Patterns: Incorporate vector-based textures or patterns to add visual interest. These can be subtle overlays or dominant design elements, enhancing the “Visual Design” of your work. Tophinhanhdep.com offers curated collections of vector assets, including patterns and brushes, to enrich your designs.
- Compositional Review: Step back and evaluate the overall composition. Are the elements balanced? Is there a clear focal point? Make any necessary adjustments to ensure a strong and harmonious design, guided by the principles of “Graphic Design” and “Creative Ideas” championed by Tophinhanhdep.com.
Saving and Utilizing Your Vector Artwork
Properly saving and exporting your vector images is crucial for maintaining their quality and ensuring compatibility across different platforms and uses. Tophinhanhdep.com’s “Image Tools” section is specifically designed to help you with these final steps, offering “Converters,” “Compressors,” and “Optimizers” for various image formats.
-
Native Vector Formats (.AI, .EPS): Always save your primary working file in the native format of your design software (e.g., .AI for Adobe Illustrator). This preserves all layers, editable paths, and specific software features, allowing for future modifications. These files are the ultimate source for “Digital Art” projects.
-
Scalable Vector Graphics (.SVG): For web use, logos, and icons, .SVG is the ideal format. It’s lightweight, scales perfectly in browsers, and maintains crispness on all screen resolutions. Exporting to .SVG from your design software is straightforward, and Tophinhanhdep.com encourages its use for optimized web visuals.
-
Portable Document Format (.PDF): While often associated with documents, .PDF can contain vector data, making it a versatile format for sharing vector artwork, especially for print. Ensure you select “Preserve Illustrator Editing Capabilities” or similar options during export to maintain vector integrity.
-
Exporting Vector Paths (to other vector software): Sometimes you might vectorize an image in one program and want to refine it in another. Many tools offer an “Export Paths to [Another Software]” function (e.g., “Paths to Illustrator”). This allows you to transfer the underlying vector structure for further manipulation in specialized vector editors.
-
Raster Exports for Specific Needs (.PNG, .JPG): While the core strength of vector is scalability, you will often need raster versions for specific applications (e.g., social media, website banners that don’t support SVG, or high-resolution “Wallpapers” from your vector art).
- .PNG: Ideal for images with transparency (e.g., logos without backgrounds) or when you need lossless compression. You can export at any resolution from your vector source.
- .JPG: Best for complex images without transparency where file size is a concern, as it uses lossy compression. When exporting to raster, always consider the final output size and resolution (e.g., 72 DPI for web, 300+ DPI for print) to ensure optimal quality. Tophinhanhdep.com’s “Image Optimizers” can help reduce file sizes of these raster exports without significant quality loss.
-
Considering AI Upscalers: If you initially started with a lower-resolution raster image and couldn’t achieve perfect vectorization, or if you need to create “High Resolution” raster outputs from your vectors for specific applications, Tophinhanhdep.com’s “Image Tools” include “AI Upscalers.” These advanced tools can intelligently enhance the resolution of raster images, which can be useful as an intermediary step or for generating high-quality raster versions of your vector art for pixel-based platforms.
By following these steps for saving and exporting, you ensure that your painstakingly crafted vector images are ready for any platform, adhering to the diverse needs of “Images,” “Photography,” and “Visual Design” as covered by Tophinhanhdep.com.
Tophinhanhdep.com: Your Comprehensive Hub for Visual Excellence
Tophinhanhdep.com stands as a beacon for visual creators, offering a vast ecosystem of resources to ignite “Creative Ideas,” refine “Editing Styles,” and access powerful “Image Tools.” From curating stunning “Wallpapers” and “Backgrounds” that evoke “Aesthetic” and “Nature” themes, to showcasing “Beautiful Photography” and delving into “Abstract” or “Sad/Emotional” visual narratives, our platform is designed to inspire every facet of your visual journey.
Our “Photography” section empowers you with insights into “High Resolution” imaging, “Stock Photos,” and advanced “Digital Photography” techniques. For those looking to master “Image Tools,” Tophinhanhdep.com provides in-depth guides on “Converters,” “Compressors,” “Optimizers,” and cutting-edge “AI Upscalers,” ensuring your visuals are always perfected.
In the realm of “Visual Design,” we unlock the secrets of “Graphic Design,” “Digital Art,” and “Photo Manipulation,” fostering a community where “Creative Ideas” flourish. Furthermore, our “Image Inspiration & Collections” serve as a boundless source of “Photo Ideas,” “Mood Boards,” “Thematic Collections,” and insights into “Trending Styles,” helping you stay ahead of the curve.
The journey of creating vector images, whether through transforming existing photos or conceptualizing original designs, is a testament to the power of “Visual Design” and the precision of “Digital Art.” Tophinhanhdep.com is committed to providing you with the most current and comprehensive knowledge, tools, and inspiration to make that journey seamless and rewarding. Dive into our extensive resources today and unleash the full potential of your visual creativity.