How to Transform Raster Images into Scalable Vector Art in Adobe Illustrator

In the dynamic world of digital imagery, understanding the distinction between raster and vector graphics is paramount. While raster images, composed of individual pixels, excel at capturing intricate detail, they inevitably lose quality when scaled. Vector images, on the other hand, are built from mathematical paths and shapes, allowing them to be scaled infinitely without any degradation in clarity or sharpness. For designers, photographers, and content creators focusing on visual excellence, the ability to convert a pixel-based image into a resolution-independent vector graphic is an invaluable skill. This comprehensive guide from Tophinhanhdep.com will walk you through the process of vectorizing images using Adobe Illustrator, integrating best practices that align with our focus on stunning images, high-resolution photography, powerful image tools, visual design, and endless inspiration.
Whether you’re looking to turn a logo sketch into a crisp, scalable asset, transform a photo into a graphic art piece, or prepare an image for print on various products, Adobe Illustrator’s Image Trace feature is your go-to solution. It’s a largely automated process that yields professional results, perfect for enhancing your digital art and creative ideas.
The Fundamental Difference: Raster vs. Vector Graphics

Before diving into the “how-to,” it’s essential to grasp the core differences that make vectorization such a powerful technique in visual design. This understanding will inform your choices throughout the process and highlight why vector graphics are often the preferred format for elements like logos, illustrations, and line art found in our vast collections of Wallpapers, Backgrounds, and Aesthetic images.
Understanding Raster Images
Most images you encounter online—from “Nature” photography to “Abstract” wallpapers—are raster images. These images are fundamentally grids of tiny squares, called pixels, each containing specific color information. When viewed at their original size or smaller, raster images can display incredible detail and subtle color gradients, making them ideal for “Beautiful Photography” and complex visual scenes. Common raster file formats include JPG, PNG, GIF, and BMP.
However, the pixel-based nature of raster graphics presents a significant limitation: scalability. When you try to enlarge a raster image beyond its original resolution, the individual pixels become visible, leading to a “pixelated” or blurry appearance. This issue is particularly problematic in “Graphic Design” and “Digital Art” where assets often need to be resized for various applications, from a small website icon to a large billboard. Even with advanced “AI Upscalers,” while quality can be improved, the underlying pixel structure remains, limiting true infinite scalability.
The Power of Vector Graphics
In stark contrast, vector graphics are composed of points, lines, curves, and shapes, all defined by mathematical equations. Instead of storing information about individual pixels, a vector file stores instructions on how to draw these geometric objects. This mathematical foundation is the secret to their unparalleled scalability. No matter how much you zoom in or enlarge a vector image, the lines remain crisp, the curves stay smooth, and the colors remain solid. This makes them perfectly suited for “High Resolution” demands across all design mediums.
Vector files typically come in formats like SVG, EPS, AI (Adobe Illustrator), and PDF (when saved with vector data). They are lightweight for simple designs and are crucial for applications where precision and adaptability are key. From corporate logos to intricate “Digital Art” illustrations, vector graphics ensure your visuals maintain their integrity across all platforms and print sizes.
Why Vectorization is Essential for Modern Visual Design
For anyone working with “Visual Design” or aiming to create “Creative Ideas” that are versatile and professional, vectorizing images is a critical skill. On Tophinhanhdep.com, where we champion quality images and robust “Image Tools,” understanding this conversion is a cornerstone.
- Infinite Scalability: As mentioned, this is the primary benefit. A vectorized logo can be used on a business card, a website banner, or a large vehicle wrap without any loss of quality. This ensures brand consistency and professional appearance, vital for any “Graphic Design” project.
- Crisp Lines and Clear Edges: Unlike raster images that can look jagged at large sizes, vectors always have perfectly sharp edges and smooth curves, which is crucial for professional-looking “Digital Art” and illustrations.
- Smaller File Sizes (for simple designs): For graphics with fewer colors or complex details (like a simple “Black and White Logo” or “Line Art”), vector files can be significantly smaller than their raster counterparts, aiding in faster loading times for web applications and making them easier to manage with “Image Compressors” or “Optimizers.”
- Easy Editing: Once converted, vector images are fully editable. You can easily change colors, reshape paths, and modify individual elements, offering unparalleled flexibility for “Photo Manipulation” and creating diverse “Editing Styles.”
- Print Quality: For any print medium, from brochures to t-shirts, vector graphics are the gold standard. They ensure your designs look sharp and professional, avoiding the blurry outcomes often associated with scaled raster images. This is particularly important for physical products that might feature “Aesthetic” or “Thematic Collections” designs.
Preparing Your Image for Optimal Vectorization in Illustrator
The success of your vectorization process in Adobe Illustrator largely depends on the quality and characteristics of your source image. While Illustrator’s Image Trace is powerful, feeding it a well-prepared image will yield the best results, whether you’re working with “Stock Photos” or your own “Digital Photography.”
Selecting the Right Source Image
Not all images are equally suited for vectorization. Understanding which images convert best will save you time and produce superior vector art.
- Simplicity is Key: Images with clear, defined lines and fewer colors generally produce cleaner vector results. Think “Line Art,” logos, icons, or graphic illustrations rather than highly detailed “Nature” scenes or “Beautiful Photography” with complex gradients. While it’s possible to vectorize photos, simpler subjects with good contrast often work better.
- High Contrast: The Image Trace tool works by detecting differences in color and tone to define paths. Images with strong contrast between elements will result in more accurate and defined vector shapes.
- Clean Backgrounds: An image with a white or transparent background is often easier to vectorize, as it helps the tool isolate the main subject. If your image has a busy background, you might consider isolating the subject in an image editing tool like Photoshop first, which can also be part of a broader “Photo Manipulation” workflow.
- Resolution (for detailed photos): While vectorization aims for resolution independence, starting with a reasonably high-resolution raster image can help capture more initial detail, especially if you’re using presets like “High Fidelity Photo.” This aligns with our commitment to “High Resolution” content at Tophinhanhdep.com. However, for simple line art, lower resolution can sometimes be fine.
- File Formats: JPG, PNG, GIF, and TIFF are common raster formats that Illustrator can easily import for vectorization.
For this tutorial, let’s consider a simple, high-contrast image, perhaps a stylized “Abstract” shape or a recognizable character outline, which lends itself well to the vector format for use in logos or icons.
Setting Up Your Adobe Illustrator Document
Once you have your chosen image, the first step in Illustrator is to prepare your workspace.
- Create a New Document: Open Adobe Illustrator and create a new document. The canvas size isn’t critical at this stage since vectors are scalable, but choosing a standard size like A4 or a common web dimension provides a good starting point. For “Visual Design” projects intended for print, set the color mode to CMYK; for digital use (like web “Wallpapers” or “Backgrounds”), RGB is appropriate. Resolution settings are less critical for the final vector but can influence how the initial raster image appears.
- Import Your Image: Go to
File > Placeand select the raster image you wish to vectorize. Click on your artboard to place the image. If necessary, resize the image by holding down Shift (to maintain proportions) and dragging a corner handle.
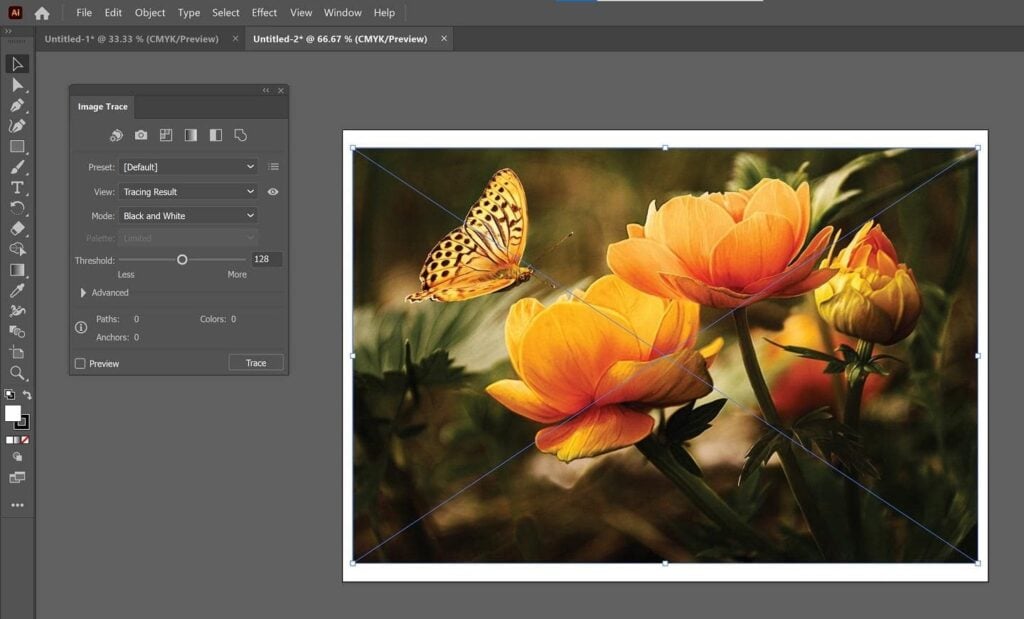
Mastering the Image Trace Tool: A Step-by-Step Guide
Adobe Illustrator’s Image Trace is a powerful feature designed to convert raster images into vector paths with remarkable precision. This tool is a cornerstone of “Image Converters” for professional “Graphic Design.”
Importing Your Image and Accessing Image Trace
With your image placed on the artboard, the vectorization process begins.
- Select the Image: Click on the placed raster image with the Selection tool (black arrow).
- Activate Image Trace: Once the image is selected, the Image Trace options will become available. You’ll typically find them in the
Propertiespanel underQuick Actionsor in a toolbar above your artboard (especially in theEssentials Classicworkspace). You can also open the dedicatedImage Tracepanel by going toWindow > Image Trace. - Apply Initial Trace: Click the
Image Tracebutton directly, or choose a preset from the dropdown menu if you have a clear idea of your desired outcome. Illustrator will perform an initial trace, converting your pixel image into what now appears to be a vector. This transformation can be quite dramatic, taking a blurry pixelated image and giving it sharp, clean edges, a testament to the tool’s effectiveness for “Digital Art” and logo design.
Exploring Image Trace Presets for Diverse Styles
Illustrator provides a range of presets, each tailored for different types of images and desired “Editing Styles.” Choosing the right preset is crucial for achieving the best result for your specific “Photo Ideas” or “Creative Ideas.”
- High Fidelity Photo / Low Fidelity Photo: These are ideal for converting detailed “Photography” or complex “Digital Art” into vectors, retaining a significant amount of color and detail. “High Fidelity” aims to preserve more nuances, while “Low Fidelity” simplifies colors for a more stylized look. These are often used when vectorizing elements from “Nature” or “Aesthetic” images.
- 3 Colors, 6 Colors, 16 Colors: Perfect for logos, illustrations, or artwork with a limited color palette. These presets reduce the image to a specified number of flat colors, excellent for creating clean “Graphic Design” assets or minimalist “Abstract” designs.
- Shades of Gray: Produces a detailed grayscale vector image, useful for monochromatic artwork or detailed sketches.
- Black and White Logo: Creates a simple, two-color (black and white) logo. This is fantastic for converting hand-drawn sketches or minimalist icons into crisp vector formats.
- Sketched Art, Silhouettes, Line Art, Technical Drawing: These presets are designed for specific types of black-and-white or line-based images, converting them into clean vector outlines. They are particularly useful if you’re looking to create “Image Inspiration & Collections” with a distinct artistic style.
Experiment with these presets based on your source image and desired “Visual Design” outcome. For example, if you’re vectorizing a character from a “Stock Photo” with many colors, “High Fidelity Photo” might be a good starting point. If it’s a simple drawing, “Line Art” or “Black and White Logo” might be more suitable.
Fine-Tuning with Advanced Image Trace Settings
After applying an initial preset, you’ll often want to fine-tune the vectorization. The Image Trace panel (accessible via Window > Image Trace) offers a wealth of options for this.
- Mode: Switch between
Color,Grayscale, andBlack and Whiteto adjust the color depth of your vector. - Palette: For
Colormode, chooseAutomatic(Illustrator determines the colors),Limited(you specify the number of colors), or aDocument Libraryif you have predefined colors. - Colors Slider: When in
Limitedcolor mode, drag this slider to increase or decrease the number of colors in your vector. This is a powerful way to simplify complex images into cleaner “Aesthetic” designs or achieve a specific “Editing Style.” - Threshold (for Black & White): In
Black and Whitemode, this slider controls the cutoff point between black and white pixels. Increasing it makes more areas black, while decreasing it makes more areas white. - Advanced Dropdown: This section offers granular control over the tracing process:
- Paths: Controls how tightly Illustrator traces the original image. Higher values create more detailed paths but can also introduce more ’noise.'
- Corners: Adjusts the sharpness of corners. Higher values result in sharper corners, while lower values produce smoother, rounder corners.
- Noise: Determines the minimum number of pixels that will be considered part of a traced shape. Increasing noise can help eliminate tiny, unwanted specks (artifacts) from your vector, cleaning up the overall “Graphic Design.”
- Method: Choose between
Abutting(creates cut-out paths that touch) andOverlapping(creates stacked paths). - Ignore White: This is a highly useful option for many vectorization tasks, especially when creating logos or “Line Art.” Checking this box will make all white areas transparent, leaving only the colored or black shapes. This is invaluable when you want to remove the background from an image instantly, aiding in “Photo Manipulation” for clean compositions.
As you adjust these settings, observe the live preview of your image. This iterative process allows you to achieve the perfect balance between detail, simplicity, and your desired “Visual Design” aesthetic. If you find settings you particularly like, you can save them as a new preset for future use, streamlining your workflow for “Thematic Collections” or consistent “Trending Styles.”
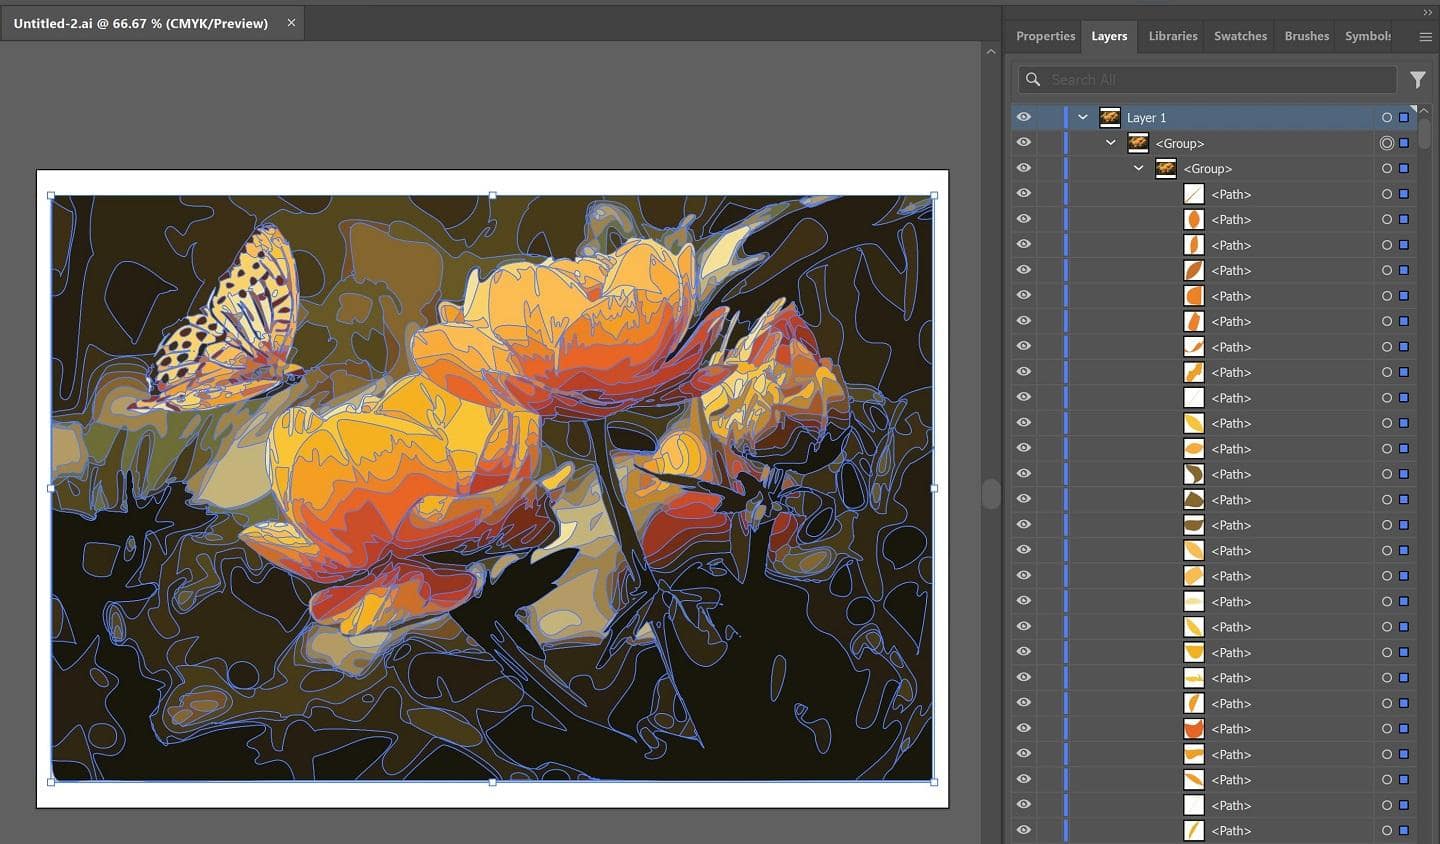
Post-Vectorization: Expanding, Editing, and Refining
Vectorizing an image isn’t just about conversion; it’s about transforming it into a flexible asset for further “Digital Art” and “Graphic Design.” Once the Image Trace process is complete, there are crucial steps to make your vector image fully editable.
Expanding and Ungrouping for Full Editability
The output from Image Trace is initially treated as a single, grouped object. To gain full control over individual shapes and colors, you need to expand and ungroup it.
- Expand the Image: With your traced image still selected, click the
Expandbutton. This button typically appears in thePropertiespanel underQuick Actionsor in the control panel at the top of your Illustrator window. Expanding converts the traced paths into editable vector shapes. You’ll often see blue outlines appear, indicating the individual paths that now make up your image. - Ungroup the Shapes: After expanding, the image will likely be a group of multiple shapes. To edit individual components, right-click the expanded image and select
Ungroupfrom the context menu, or go toObject > Ungroup. You may need toUngroupmultiple times if the image has several nested groups.
Once ungrouped, you can select and manipulate each individual shape, opening up vast possibilities for “Photo Manipulation” and creative redesigns. In the Layers panel (Window > Layers), you’ll now see a multitude of separate paths, especially if you used a High Fidelity Photo preset.
Customizing Colors, Shapes, and Details
With your vector image fully editable, you can now unleash your “Creative Ideas” and apply specific “Editing Styles.”
- Edit Colors:
- Select Similar Colors: To change all instances of a particular color, select one shape with that color using the
Direct Selection Tool(white arrow). Then, go toSelect > Same > Fill Color. This will select all shapes that share that exact fill color. - Apply New Color: With the shapes selected, use the
Filloption in thePropertiespanel or theColorpanel (Window > Color) to choose a new color. This is excellent for quickly re-theming a logo or adapting an “Abstract” design to a new palette. - Delete Colors: You can also hit
BackspaceorDeleteon your keyboard to remove selected color groups, which is a common technique for isolating a subject by deleting the background.
- Select Similar Colors: To change all instances of a particular color, select one shape with that color using the
- Reshape Paths: Use the
Direct Selection Tool(A) to select individual anchor points on a path. You can drag these points to alter the shape’s contours, refine lines, or smooth out imperfections. For more fluid adjustments, theSmooth Tool(hidden under theShaper Tool) or thePencil Toolcan be used to redraw parts of paths. - Add or Remove Elements: Utilize Illustrator’s drawing tools like the
Pen Tool(P),Pencil Tool(N), orShape Tools(Rectangle, Ellipse, Polygon, etc.) to add new vector elements or draw over existing ones. This allows you to integrate additional “Graphic Design” elements or create entirely new “Digital Art” compositions. For example, you might add a custom text element (which you can then outline and convert to vector paths) or draw additional “Aesthetic” shapes. - Simplify Paths: Complex vector images can sometimes have an excessive number of anchor points, making them difficult to edit and increasing file size. Go to
Object > Path > Simplifyto reduce the number of anchor points while preserving the overall shape, resulting in cleaner, more manageable paths. This can act as a lightweight “Optimizer” for your vector files.
Remember that simpler images, like “Black and White Logos,” are generally easier and quicker to manipulate than highly detailed vectorized photos. Practice with different types of images to develop your “Photo Manipulation” and editing skills.
Saving Your Vector Masterpiece
The final, crucial step is to save your vectorized image in an appropriate format to preserve its scalability and editability. This ensures your “High Resolution” work remains flawless.
- Save as Illustrator Document (.ai): Always save your primary, editable file as an Adobe Illustrator document (
.ai). This is your master copy, containing all layers, paths, and Illustrator-specific features. - Export for Use (SVG, EPS, PDF): For external use, such as web deployment, printing, or sharing with other design programs, export your image in a suitable vector format:
- SVG (Scalable Vector Graphics): Widely supported across the web and in various design software, SVG is an excellent choice for web-based “Visual Design” elements, icons, and “Backgrounds.”
- EPS (Encapsulated PostScript): A common format for vector graphics, often used for print and by other professional design software.
- PDF (Portable Document Format): PDFs can contain vector data, making them suitable for print-ready files or sharing vector artwork in a universally viewable format.
To export, go to File > Export > Export As... In the dialog box, give your file a meaningful name and select your desired vector format from the dropdown menu (e.g., SVG). Click Export, and adjust any specific settings in the subsequent dialog (e.g., SVG profiles, styling options) before finalizing.
By maintaining your original AI file and exporting to suitable vector formats, you ensure that your “Digital Art” and “Graphic Design” elements from Tophinhanhdep.com remain versatile, sharp, and ready for any application.
Unleashing Creative Potential: Vector Art and Tophinhanhdep.com’s Vision
Vectorization in Adobe Illustrator is more than just a technical process; it’s a gateway to unlocking immense creative possibilities that perfectly align with Tophinhanhdep.com’s extensive range of topics, from “Image Inspiration & Collections” to advanced “Image Tools.”
Elevating Visual Design and Digital Art
Vector graphics are the backbone of modern “Graphic Design” and “Digital Art.” By mastering vectorization, you can significantly enhance your creative output:
- Creating Unique Logos and Branding: Turn hand-drawn sketches or simple raster concepts into professional, scalable logos. These vectorized logos can then be used consistently across all brand assets, from business cards to websites, ensuring a cohesive and high-quality visual identity. This is a core aspect of professional “Visual Design.”
- Developing Stylized Illustrations: Transform “Nature” photos or “Beautiful Photography” into captivating “Digital Art” illustrations with distinct “Editing Styles.” Vectorization allows for bold, graphic interpretations, flat design aesthetics, or comic-book-like effects, moving beyond realistic imagery into abstract or stylized forms.
- Enhancing UI/UX Design: Vector icons and UI elements are essential for responsive web and app design. They scale flawlessly across different screen sizes, providing crisp visuals for optimal user experience. This directly contributes to creating “Aesthetic” and functional digital products.
- Photo Manipulation for Artistic Effects: Vectorization can be a powerful “Photo Manipulation” technique to create artistic filters or graphic novel effects from photographs. By reducing an image to its core shapes and colors, you can achieve a unique, stylized look that stands out in any “Image Inspiration & Collections.”
Enhancing Photography and Image Collections
While “Digital Photography” primarily deals with raster images, vector art plays a crucial role in complementing and expanding upon photographic work, especially for “Image Inspiration & Collections.”
- Designing Custom Wallpapers and Backgrounds: Create bespoke “Wallpapers” and “Backgrounds” that are perfectly scalable for any device or screen resolution. Combine vectorized elements with high-resolution photography to craft unique “Aesthetic” and “Abstract” compositions. Imagine a vectorized “Nature” silhouette overlaid on a serene photographic background – the possibilities are endless.
- Curating Thematic Collections: Develop consistent visual themes for your “Image Inspiration & Collections” or mood boards. Vectorized icons, borders, or decorative elements can be easily recolored and resized to fit any “Thematic Collections” or “Trending Styles,” ensuring visual harmony across your curated content.
- Overlaying Graphics on Photos: Produce crisp text overlays, arrows, or graphic indicators for your “Stock Photos” or “High Resolution” images without worrying about pixelation. This is perfect for instructional graphics, social media content, or creating “Photo Ideas” with added visual flair.
Integrating with Image Tools and Inspiration
Tophinhanhdep.com is dedicated to providing comprehensive “Image Tools” and fostering “Image Inspiration & Collections.” Vectorization is a powerful addition to this ecosystem.
- Complementing AI Upscalers: While “AI Upscalers” enhance raster image resolution, vectorization offers a different kind of scalability, creating fundamentally resolution-independent assets. Used in conjunction, you can first upscale a low-res image for better detail detection, then vectorize for ultimate flexibility.
- Creating “Image-to-Text” Graphics: If you have graphic text in a raster image, vectorizing it is the ideal way to make it editable and scalable, far surpassing simple “Image-to-Text” conversions that only extract raw text.
- Fueling Creative Ideas: The ability to convert any raster image into an editable vector opens a new dimension for “Creative Ideas.” See a compelling outline in a “Sad/Emotional” photograph? Vectorize it and reuse that shape in a completely new context. Find a striking pattern in an “Abstract” image? Vectorize it and turn it into a repeatable motif. This process is about extracting the essence of a visual and giving it new life.
By embracing vectorization, you not only elevate the technical quality of your visual assets but also empower yourself with unparalleled creative freedom. Tophinhanhdep.com encourages you to explore these techniques, transforming your imagery from static pixels to infinitely adaptable art, inspiring new “Photo Ideas” and pushing the boundaries of “Visual Design.”
In conclusion, knowing how to make a vector image in Adobe Illustrator is a foundational skill for anyone serious about “Graphic Design,” “Digital Art,” or effective visual communication. From turning a “Beautiful Photography” moment into a stylized illustration to ensuring your “Aesthetic” logos are perpetually sharp, Illustrator’s Image Trace tool, combined with careful refinement, provides the means to create truly scalable and versatile art. Embrace this technique and unlock a new level of creativity and professionalism for all your “Images” and “Visual Design” projects at Tophinhanhdep.com.