How to Make a Vector Image in Photoshop: A Comprehensive Guide

In the dynamic world of digital art and visual design, the ability to create and manipulate images is paramount. Among the diverse skills a creative professional or enthusiast can master, vectorization stands out as a highly practical and beneficial technique. While Adobe Photoshop is renowned as the industry standard for pixel-based photo editing and manipulation, it also possesses powerful capabilities to transform raster images into scalable vector graphics. This comprehensive guide, informed by the rich resources and diverse topics available on Tophinhanhdep.com, will walk you through the process of making a vector image in Photoshop, enhancing your “Visual Design” prowess and opening new avenues for “Image Inspiration” and “Photography” applications.
Whether you’re looking to convert a “beautiful photography” piece into a stylized graphic, prepare a logo for “high resolution” printing, or create versatile elements for “mood boards” and “thematic collections,” understanding Photoshop’s vectorization tools is an invaluable asset. This tutorial will cover the fundamental concepts of vector graphics, detail the step-by-step process of converting images, and explore how “Image Tools” like creative consoles can optimize your workflow.
Understanding the Fundamentals: Raster vs. Vector Graphics
Before diving into the practical steps, it’s essential to grasp the core difference between raster and vector graphics, a foundational concept for anyone engaged in “Digital Photography” or “Graphic Design.”
The Indispensable Power of Vector Scalability
A vector graphic is an image constructed from mathematical paths, lines, and curves, defined by starting and ending points, along with other control points. Unlike traditional images that are made up of individual pixels, vector graphics are based on mathematical formulas. This fundamental difference grants them a unique and powerful advantage: infinite scalability without any loss of quality or clarity. Whether you resize a vector graphic for a tiny icon on a webpage or for a massive billboard, it will remain crisp, sharp, and perfectly defined. This makes vector graphics exceptionally well-suited for designs that require “large-size outputs,” such as logos, posters, banners, and “wallpapers” that need to adapt across various screen resolutions.
In contrast, raster (or bitmap) graphics are composed of a grid of individual pixels, each containing specific color information. A “photograph,” for example, is a classic example of a raster image. When you zoom in on a raster image, you eventually begin to see the individual pixels that form it, resulting in a blurry or pixelated appearance. This limitation in scalability underscores why vectorization is a critical skill for maintaining image integrity across different mediums and sizes, especially when working with “High Resolution” demands. For more insights into these distinctions and other “Image Tools,” explore the guides on Tophinhanhdep.com.
Why Photoshop for Vectorization? Navigating the Toolset
Adobe Illustrator is widely recognized as the industry standard and the superior tool for creating and manipulating vector graphics. Its entire architecture is built around paths and shapes, offering unparalleled precision and flexibility for complex “Digital Art” and “Graphic Design” projects. However, many creative professionals and enthusiasts already possess a deep familiarity with Photoshop, or have an Adobe Creative Cloud subscription that primarily focuses on Photoshop. For these users, leveraging Photoshop’s vector capabilities becomes a practical and efficient solution for specific vectorization tasks.
While Photoshop excels in “photo editing,” “photo manipulation,” and creating intricate pixel-based “editing styles,” it also provides a robust set of tools for working with vector shapes and paths. You can draw vector shapes from scratch, select pixels, and convert them into paths. Learning to vectorize an image in Photoshop is about understanding how to adapt its pixel-centric environment to produce scalable vector output. It transforms Photoshop into a versatile “Image Tool,” enabling you to generate vector assets from your “digital photography” or “stock photos,” seamlessly integrating them into “creative ideas” for any “visual design” project. If you’re interested in learning more about vector masks or smart objects within Photoshop, Tophinhanhdep.com offers dedicated tutorials to deepen your understanding.
Preparing Your Image for Optimal Vectorization
The success of your vectorization process in Photoshop heavily depends on the initial quality and characteristics of your source image. Careful preparation ensures cleaner, more precise vector results.
Choosing the Right Source Image for Maximum Impact
To achieve the best possible results when vectorizing in Photoshop, the choice of your source image is crucial. Vector graphics, by their mathematical nature, are best suited for images with defined shapes and clear contrasts. Therefore, it’s ideal to select an image with a simple, uncluttered background—preferably a solid color, or even a transparent background. This simplifies the initial selection and isolation of your subject.
While Photoshop can theoretically attempt to vectorize any image, converting complex “nature” scenes, highly detailed “abstract” artwork, or intricate “sad/emotional” photography with numerous subtle gradients and textures into vectors is often impractical and can lead to overly complex paths or a significant loss of detail. Instead, focus on images with clear subjects and distinct outlines, such as portraits, product shots, or simple illustrations. These allow Photoshop’s vector tools to highlight the details of the subject effectively. “Stock Photos” and carefully composed “Digital Photography” with simplified elements are often excellent candidates for this transformation, lending themselves well to unique “editing styles” and “graphic design” applications. For “photo ideas” and suitable image collections, visit Tophinhanhdep.com.
Essential Pre-Processing: Background Removal and Sharpening Techniques
Once you’ve selected your ideal image, a few pre-processing steps can significantly enhance the quality of your vectorized output.
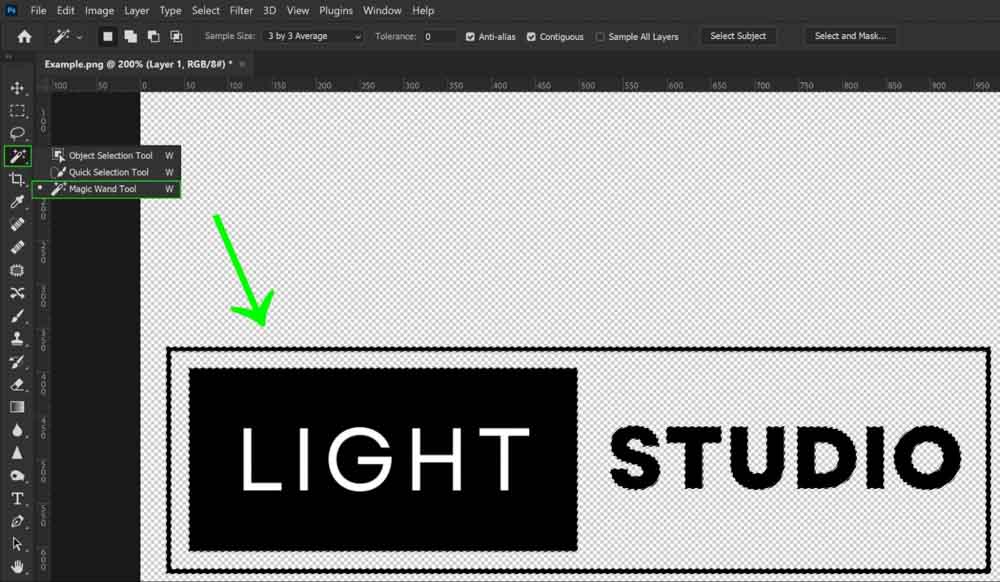
The first crucial step, especially for images with even a slightly busy background, is background removal. If your goal is to vectorize a specific subject within a photo, isolating that subject from its surroundings is paramount. Photoshop offers various tools for this, from the quick and smart “Select Subject” command to more precise methods involving the Pen Tool or Layer Masks. A clean cutout ensures that your vectorized output focuses solely on the intended element. Tophinhanhdep.com provides detailed tutorials on “how to remove background in Photoshop” and “how to remove white background in Photoshop” to assist you with this vital stage.
Following background removal, sharpening the subject can further enhance details and contrast, which are beneficial for Photoshop’s path-creation algorithms. While there are multiple ways to sharpen an image, the High Pass filter is often recommended for its ability to define edges without introducing excessive noise. Navigate to Filter > Other > High Pass and adjust the radius to bring out the desired level of detail. Additionally, for more complex images, you might consider further adjustments using the Sharpen tool or the Curves adjustment layer to increase contrast and define edges more clearly. These steps are integral to developing distinct “editing styles” and ensure your “beautiful photography” translates effectively into vector art.
The Step-by-Step Journey: Transforming Pixels into Paths
With your image prepared, you are ready to embark on the core process of converting its pixel information into scalable vector paths within Photoshop.
From Raster to Threshold: Laying the Foundation for Vector Conversion
- Import Your Image: Begin by opening the prepared image in Photoshop.
- Create a Threshold Adjustment Layer: Go to the Layers panel and click on the “Create new fill or adjustment layer” icon (half-black, half-white circle). Select
Threshold. This adjustment layer converts your image into a stark black-and-white representation, simplifying the tonal information into pure black and pure white areas. - Adjust Threshold Level: In the Properties panel for the Threshold layer, adjust the slider. The goal is to find a balance where the key details of your subject are clearly preserved in either black or white, depending on your desired outcome. This step is critical for defining the contours that will eventually become your vector paths.
- Merge Visible Layers: Once you are satisfied with the threshold result, go to the Layers panel, right-click on any layer, and choose
Merge Visible(orLayer > Merge Visible). This flattens the image into a single black-and-white layer, ready for the next stage. - Refine with the Brush Tool (Optional but Recommended): Now that you have a solid black-and-white image, you can use the Brush tool (shortcut: B) with black or white foreground colors to clean up any unnecessary details, fill small gaps, or smooth out rough edges that the Threshold adjustment might have created. This manual refinement ensures a cleaner vector output. The Brush tool is a cornerstone for “digital drawing” and “post-processing” in “Photo Manipulation,” allowing for precise control.
Precision Path Creation: Leveraging Color Range and Work Paths
- Select Color Range: Go to
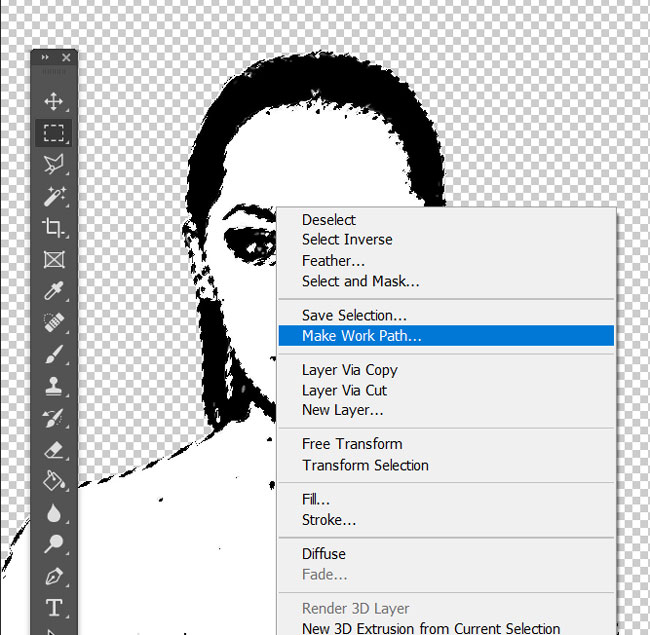
Select > Color Range. In the Color Range panel, choose eitherShadows(to select the black areas) orHighlights(to select the white areas), depending on which part of your image you want to vectorize first. Adjust theFuzzinessandRangesliders to fine-tune your selection, ensuring only the desired tonal areas are active. Click “OK.” You will see “flashing dotted lines” indicating an active selection. - Create a Work Path: With the selection still active, select any selection tool from the left toolbar (e.g., the Rectangular Marquee tool, shortcut M). Then, right-click directly on your image and choose
Make Work Pathfrom the dropdown menu. - Set Tolerance: In the “Make Work Path” dialog box, set the
Tolerancevalue. A value between 1 and 1.5 pixels is generally recommended for portraits and irregular shapes.- Lower Tolerance (e.g., 0.5-1 pixels): Creates a path that more closely follows the exact contours of the pixel selection, resulting in more anchor points and potentially finer detail.
- Higher Tolerance (e.g., 2-10 pixels): Generates a smoother path with fewer anchor points, which can be ideal for simpler objects but might lose intricate details. Experiment with this value based on the complexity of your image and the desired smoothness of the vector output. Click “OK.” This action converts your pixel selection into a scalable vector path. You can view and rename this path in the “Paths” panel.
Enhancing Workflow with Creative Consoles like TourBox
For professionals and avid hobbyists engaged in “Digital Photography,” “Graphic Design,” and “Photo Manipulation,” optimizing workflow is key to efficiency and creativity. This is where specialized “Image Tools” like the TourBox creative console (e.g., TourBox Elite or TourBox Lite) come into play.
TourBox is an ergonomic, one-handed controller designed to seamlessly integrate with creative software, including Photoshop. During the vectorization process, particularly when using the Brush tool for cleanup or making precise adjustments to paths, the TourBox can significantly streamline your work. You can effortlessly adjust brush size, opacity, flow, and other parameters using its customizable knobs and dials, without needing to constantly reach for your keyboard or mouse. This tactile control accelerates tasks, making you feel like a maestro conducting your creative process. The TourBox’s custom actions, presets, and macro operations are invaluable for repetitive steps in “image editing,” allowing for a fluid and intuitive experience that enhances precision and speed, thereby contributing to more efficient “visual design” and “digital art” creation. To learn more about how TourBox can transform your creative process, visit Tophinhanhdep.com.
Finalizing and Exporting Your Scalable Masterpiece
After meticulously converting your image’s pixels into vector paths, the final steps involve adding color and exporting your creation in the appropriate vector format.
Infusing Life: Adding Color and Stylistic Flair to Your Vector Graphic
- Activate Your Path: Ensure your newly created Work Path is active in the “Paths” panel (simply click on it if it’s deselected).
- Create a Solid Color Adjustment Layer: With the path active, go to the Layers panel and click on the “Create new fill or adjustment layer” icon. Select
Solid Color. This will open the Color Picker window. - Choose Your Color: Select any color you desire for your vector graphic. Click “OK.” Photoshop automatically fills your active path with this chosen color, creating a new vector shape layer. This layer is fully editable; you can double-click its color thumbnail to change the color anytime, offering immense flexibility for “creative ideas” and adapting to various “thematic collections.”
This method creates a monochrome vector graphic. To create a multi-colored vector image (e.g., if you vectorized both the ‘Shadows’ and ‘Highlights’ areas separately), simply repeat the “Select Color Range,” “Make Work Path,” and “Solid Color adjustment layer” steps for each distinct tonal area you wish to colorize. This allows for intricate “digital art” compositions from your original “photography.”
Outputting for Impact: Choosing the Right Vector Format
The final crucial step is to export your vectorized image in a format that preserves its scalability.
- Export as EPS (Encapsulated PostScript): For general print and vector compatibility, go to
File > Save a Copy. In the “Save As” dialog box, selectPhotoshop EPSas the format and save your file. EPS is a widely supported vector format, perfect for sending to print houses or using in other design software. - Export as SVG (Scalable Vector Graphics): For web applications, logos, and UI elements, SVG is the preferred format due to its XML-based nature, which makes it lightweight and resolution-independent. Right-click on your vector shape layer in the Layers panel and choose
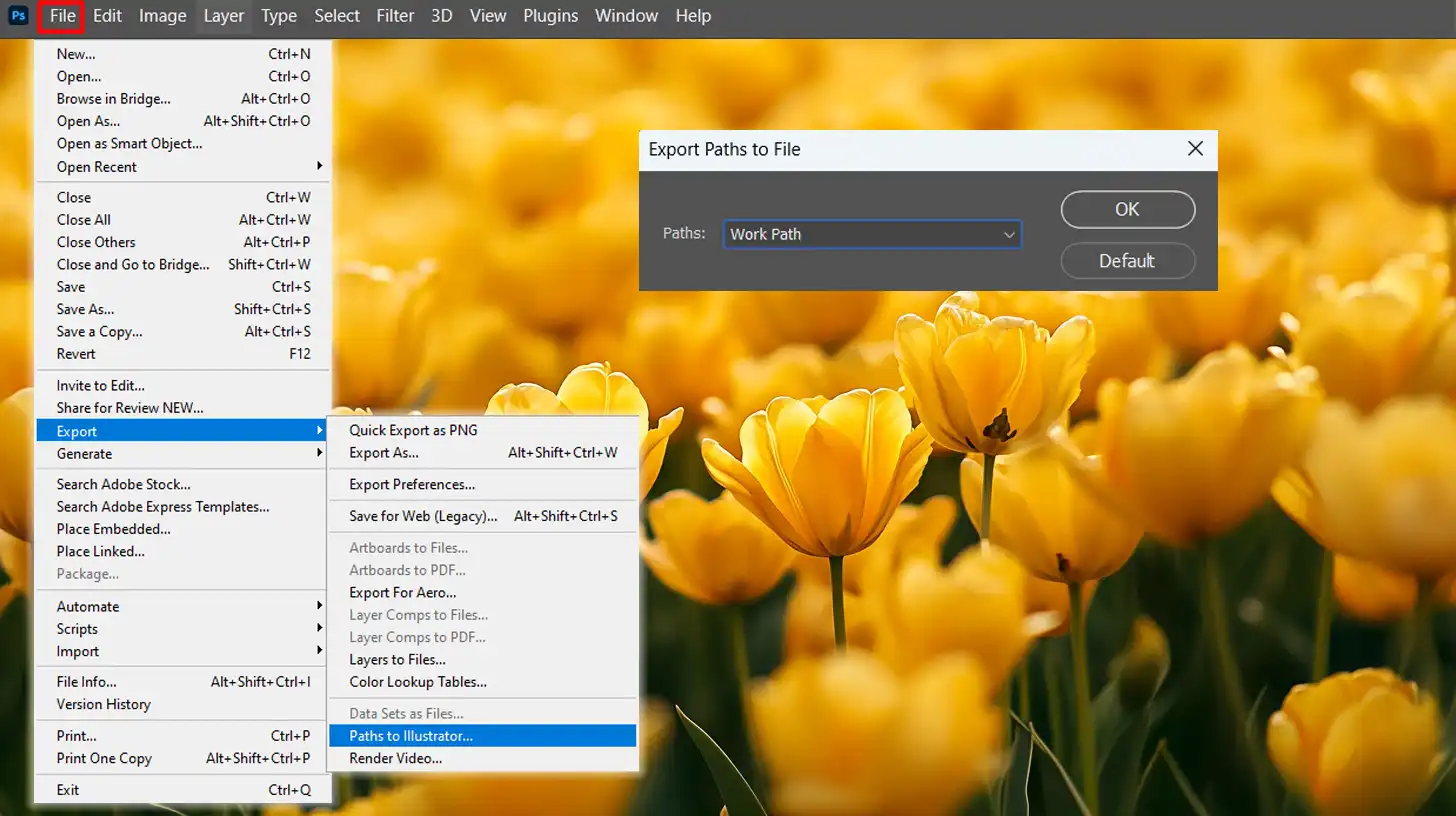
Export As.... In the export dialog, selectSVGfrom the File Settings dropdown menu and clickExport. - Export Paths to Illustrator: If you need to further refine or integrate your vector paths into a more complex vector illustration, you can export them directly to Adobe Illustrator. Go to
File > Export > Paths to Illustrator. This will save your active path as an.aifile, which can then be opened in Illustrator for advanced vector editing. This seamless integration highlights the complementary nature of Adobe’s “Image Tools.”
These export options ensure that your newly created vector graphic retains its crucial scalability, making it suitable for “high resolution” applications, “graphic design” projects, and “visual design” elements on Tophinhanhdep.com.
Expanding Your Creative Horizons: Applications and Further Exploration
Mastering vectorization in Photoshop unlocks a new dimension of creative possibilities, allowing you to bridge the gap between pixel-perfect “Photography” and infinitely scalable “Digital Art.”
Strategic Tool Choice: When to Opt for Photoshop vs. Illustrator
While Photoshop can effectively vectorize images for specific purposes, it’s important to understand its limitations compared to a dedicated vector editor like Adobe Illustrator. Photoshop excels at:
- Photo manipulation and raster effects: Applying textures, complex lighting, and photorealistic effects.
- Simple vectorization: Converting distinct shapes from raster images into scalable outlines for logos, icons, or stylized portraits.
- Integration: Creating vector elements within a raster project.
Illustrator, on the other hand, is the go-to tool for:
- Complex vector creation: Designing intricate illustrations, detailed logos, and entire brand identities from scratch.
- Precision and flexibility: Superior control over paths, anchor points, and vector operations.
- Typography: Advanced text manipulation as vector shapes.
Both applications are part of the Adobe Creative Cloud suite and are designed to complement each other. Often, a workflow involves using Photoshop for initial image processing (like background removal or threshold adjustment) and then exporting paths to Illustrator for final vector refinement. Understanding this synergy empowers you to choose the right “Image Tool” for each specific “Visual Design” challenge.
Discovering More on Tophinhanhdep.com: Vector Art for Every Vision
The skills you’ve acquired in vectorizing images in Photoshop are foundational for countless creative endeavors. On Tophinhanhdep.com, you can explore how these vectorized assets contribute to a wide array of “Image Inspiration & Collections”:
- Aesthetic and Abstract Designs: Transform “beautiful photography” into abstract vector art for unique “wallpapers” or “backgrounds.”
- Graphic Design Elements: Create scalable icons, stylized illustrations, or custom type treatments from any source image. These are perfect for “trending styles” and corporate branding.
- Photo Manipulation: Turn parts of “digital photography” into vector masks or smart objects for non-destructive editing and dynamic “editing styles.”
- Thematic Collections and Mood Boards: Generate consistent visual elements for your “mood boards” or “thematic collections,” ensuring high-resolution quality across all applications.
- Creative Ideas and Tools: Discover more “Image Tools” and “creative ideas” for optimizing your workflow, from advanced converters to AI upscalers that can further enhance image quality.
Tophinhanhdep.com serves as a rich repository for high-resolution images, “stock photos,” and detailed tutorials that cater to every aspect of “visual design” and “digital photography.” Whether you’re seeking “photo ideas,” exploring “sad/emotional” visual narratives, or diving into advanced “graphic design” techniques, the platform offers resources to continually expand your creative abilities.
Conclusion
Vectorizing an image in Photoshop is a powerful technique that bridges the gap between raster and vector graphics, offering designers and artists unparalleled flexibility and scalability. By understanding the core principles of vector art, meticulously preparing your source images, and diligently following the step-by-step process of converting pixels into paths, you can transform ordinary photos into crisp, scalable vector assets.
This skill is not just about technical execution; it’s about expanding your “Visual Design” toolkit, enabling you to produce “high resolution” graphics for a diverse range of applications, from intricate “digital art” projects to professional “graphic design” outputs. Embrace the creative freedom that vectorization offers, and remember that “Image Tools” like creative consoles can further streamline your journey.
We encourage you to practice these techniques, experiment with different images, and explore the vast possibilities they unlock for your creative projects. For more comprehensive guides, endless “Image Inspiration,” and a wealth of resources covering “Photography,” “Visual Design,” and advanced “Image Tools,” continue to explore Tophinhanhdep.com. Your next masterpiece awaits!