How to Make a Video with Images: A Comprehensive Guide to Visual Storytelling with Tophinhanhdep.com

In today’s digital age, the ability to create compelling visual content is more crucial than ever. Videos, in particular, have emerged as a dominant medium for communication, marketing, education, and entertainment. While traditional video production often conjures images of complex camera setups and live-action shoots, a powerful and often underestimated form of video creation involves leveraging static images. From cherished personal memories compiled into a heartwarming slideshow to dynamic marketing presentations built entirely from high-resolution graphics, videos crafted with images offer immense versatility and impact. This guide, drawing inspiration from the rich resources available on Tophinhanhdep.com, will walk you through the essential steps, tools, and creative strategies to transform your collection of photographs and digital art into captivating video narratives.
Tophinhanhdep.com serves as an invaluable resource for anyone looking to harness the power of visuals. With its extensive libraries of high-quality images—encompassing everything from stunning wallpapers and diverse backgrounds to aesthetic, nature, abstract, and emotional photography—it provides the foundational elements for your visual projects. Beyond just offering images, Tophinhanhdep.com also provides insights into digital photography, editing styles, and critical image tools like converters, compressors, optimizers, and AI upscalers. These resources are perfectly aligned with the needs of creators looking to produce professional-grade videos using images, offering both the source material and the means to refine it.
Whether you’re aiming to create an interactive product presentation, an engaging training video, a personal photo montage, or a marketing video for social media, understanding how to effectively combine images, text, and sound is key. This article will demystify the process, demonstrating that you don’t need extensive filming experience or expensive equipment to produce high-quality, visually appealing videos. All you need is a creative vision, a selection of impactful images, and the right approach, informed by the expertise found on platforms like Tophinhanhdep.com.
The Power of Visual Storytelling: Why Images in Video Matter
The human brain processes visual information significantly faster than text. This innate preference for visuals makes image-based videos incredibly effective for conveying messages, evoking emotions, and retaining audience attention. When you tell a story through a sequence of thoughtfully chosen images, enhanced with appropriate audio and transitions, you create an immersive experience that resonates deeply with viewers. This section explores why visual storytelling is so potent and how to lay the groundwork for a successful image-based video.
Defining Your Narrative and Audience
Before you even begin selecting images, the most critical first step is to define the purpose and target audience for your video. What story do you want to tell? What message do you want to convey? Who are you trying to reach? A clear objective will guide all subsequent decisions, from the selection of images to the choice of music and the overall tone.
For instance, if your goal is to promote a new product, your video might focus on showcasing its features through dynamic, high-resolution product photography, perhaps complemented by aesthetic backgrounds found on Tophinhanhdep.com that align with your brand’s style. If you’re creating a commemorative video for a special event, emotional and beautiful photography, thoughtfully arranged, would be more appropriate. For training videos or educational content, a series of clear, informative images with explanatory text overlays might be ideal, drawing on abstract or conceptual images from Tophinhanhdep.com to illustrate complex ideas.

Understanding your audience is equally important. Are they young and looking for trending styles and quick, visually punchy content? Or are they older, appreciating a slower pace and more narrative depth? The demographics, interests, and platforms where your video will be shared will heavily influence your creative choices. By being intentional about your video’s purpose and audience from the outset, you dramatically increase its potential for success. Think of your video as a story with a beginning, middle, and end, ensuring it has a solid plot to keep viewers engaged, much like a well-crafted narrative.
Curating Your Visual Assets with Tophinhanhdep.com
Once your narrative and audience are clear, the next crucial step is gathering your visual assets. This is where Tophinhanhdep.com truly shines as a resource. The quality and relevance of your images are paramount to the success of your video.
1. Source High-Quality Images: Your video will only be as good as the images you use. Low-resolution, pixelated, or poorly lit images will detract from your message. Tophinhanhdep.com offers a vast collection of high-resolution images, perfect for various themes:
- Wallpapers and Backgrounds: Essential for creating visual depth or setting a mood. Choose backgrounds that complement your subject without overwhelming it.
- Aesthetic and Nature Photography: Ideal for creating visually pleasing content, travel vlogs, environmental messages, or simply setting a calming or inspiring tone.
- Abstract Images: Can be used to represent concepts, add artistic flair, or serve as compelling backdrops for text.
- Sad/Emotional Images: Crucial for videos that aim to evoke specific feelings, such as tributes, awareness campaigns, or personal reflections.
- Beautiful Photography: A general category encompassing all visually stunning images that can elevate any video project.
2. Leverage Stock Photos and Digital Photography: If you don’t have your own photographs, Tophinhanhdep.com’s focus on stock photos means you have access to professionally shot images covering almost any topic imaginable. For those who do their own digital photography, ensure your images are of the highest possible resolution and quality. Tophinhanhdep.com also provides insights into different editing styles, which can help you achieve a consistent look and feel across all your chosen images, making them cohesive when put into a video sequence.
3. Planning with Image Inspiration & Collections: Tophinhanhdep.com’s “Image Inspiration & Collections” section is perfect for this stage.
- Photo Ideas: Explore existing collections for thematic ideas or visual motifs that align with your narrative.
- Mood Boards: Before committing to specific images, create a digital mood board using images from Tophinhanhdep.com to visualize the overall aesthetic and emotional tone of your video. This helps ensure visual consistency.
- Thematic Collections and Trending Styles: Browsing these can help you find images that are not only relevant but also resonate with current visual trends, keeping your content fresh and engaging.
By meticulously curating your visual assets, you build a strong foundation for an impactful image-based video, ensuring every frame contributes to your overall message and aesthetic.
Essential Tools and Preparation for Image-Based Videos
Creating a video from images is a multi-stage process that requires both creative vision and the right technical tools. While it’s possible to start with basic equipment like a smartphone, investing in a few key pieces of hardware and software, and understanding how to prepare your images, will significantly elevate the quality of your final product. This section delves into the necessary equipment, software choices, and how to utilize Tophinhanhdep.com’s specialized image tools.
Choosing Your Video Creation Software
The heart of making a video with images lies in your choice of video editing software. This software allows you to arrange your images, add transitions, overlay text, incorporate music, and export your final video. You’ll find a range of options, from free, beginner-friendly tools to professional-grade suites.
For Beginners and Budget-Conscious Creators:
- Simple Slideshow Makers: Many basic programs or online tools are designed specifically for turning photos into videos with music. These often feature user-friendly interfaces where you can simply drag and drop images, select a template, add an audio track, and choose transition effects. Look for features that allow you to rearrange images, set individual photo durations, and pick an aspect ratio. These tools are ideal for quickly creating personal videos, simple greetings, or short social media content.
- Built-in OS Tools: For instance, many operating systems come with basic video editing capabilities that can handle image slideshows. While they might lack advanced features, they are a great starting point, allowing you to add images, basic transitions, and a music track.
For Advanced and Professional Use:
- Comprehensive Video Editing Suites: Software like Adobe Premiere Pro, Final Cut Pro (for Mac), or DaVinci Resolve (which has a robust free version) offer unparalleled control. These tools allow for multi-track editing, complex visual effects, precise audio mixing, and advanced color grading. If your aim is to create highly polished marketing videos, digital art montages, or intricate visual narratives, these are the go-to options. They also integrate well with graphic design and photo manipulation workflows, allowing for seamless incorporation of elements refined using Tophinhanhdep.com’s visual design principles.
- All-in-One Platforms: Some platforms offer integrated recording (if you plan to include narration) and editing capabilities. While the focus here is on images, such platforms can be useful if you also intend to record voice-overs or other live elements. They simplify the workflow by keeping all components within a single ecosystem.
When selecting software, consider its compatibility with your operating system, your budget, your skill level, and most importantly, the specific features it offers for image-based video creation. Look for ease of importing images, a good selection of transition effects, robust text overlay options, and flexible audio track management.
Leveraging Tophinhanhdep.com’s Image Tools
Before your images even touch your video editing software, they might need some preparation. This is where Tophinhanhdep.com’s suite of image tools becomes indispensable. Optimizing your images beforehand ensures better performance during editing and a higher quality final video.
1. Image Converters: Your video editing software might prefer specific image formats. Tophinhanhdep.com’s converters can help you standardize your image files (e.g., converting RAW photos to JPEG or PNG for easier handling), ensuring compatibility and smoother workflow.
2. Compressors and Optimizers: High-resolution images, especially in large quantities, can result in very large project files and slow down your editing software. Tophinhanhdep.com’s image compressors and optimizers can reduce file sizes without significant loss of visual quality. This is crucial for faster rendering times and efficient storage, especially if you’re working with hundreds of images for a longer video. Maintaining a balance between file size and image quality is key; you want the images to look crisp in the final video but not bog down your system during production.
3. AI Upscalers: Sometimes you might have a perfect image, but its resolution is too low for your video’s desired output quality. Tophinhanhdep.com’s AI upscalers can intelligently increase the resolution of your images, making them suitable for 4K video projects or larger displays, thereby enhancing the overall professionalism of your video. This is particularly useful for older photographs or images sourced from less-than-ideal origins.
4. Image-to-Text Features (for planning and accessibility): While not directly for video assembly, Tophinhanhdep.com’s image-to-text tools can be useful during the planning phase. If you have images with important text embedded (e.g., charts, infographics, historical documents), converting that text allows you to easily incorporate it into your script or as on-screen captions, ensuring accessibility and clarity in your video.
By effectively utilizing these image tools, you ensure that all your visual assets are perfectly prepared for integration into your video project, contributing to a seamless editing experience and a high-quality final product. This preparatory stage is often overlooked but is fundamental to efficient and professional video creation with images.
Crafting Your Visual Sequence: From Concept to Composition
With your images gathered and prepared, and your video editing software selected, the real creative work of assembling your video begins. This stage is about translating your narrative into a dynamic visual flow, carefully considering how each image contributes to the overall story, rhythm, and emotional impact. It’s a blend of artistic intuition and technical execution, where principles of visual design come into play.
Storyboarding Your Image Flow
A storyboard is your visual blueprint for the video. It helps you visualize your video scene-by-scene before you commit to editing, ensuring a cohesive and engaging narrative. While traditional storyboards look like comic strips, for image-based videos, it can be a simple sequence of thumbnails or a more detailed layout that includes notes on:
- Image Sequence: The order in which your images will appear. Think about how one image leads to the next and how they build on each other to tell your story.
- Duration: How long each image will be displayed on screen. Varying durations can create different rhythms—quick cuts for excitement, longer holds for contemplation.
- Text Overlays: Where and when any text (titles, captions, quotes, calls to action) will appear.
- Voice-over/Narration: If you plan to add spoken commentary, note which images will accompany specific parts of the script.
- Music Cues: Indicate where music will start, change, or swell to emphasize emotional points.
- Transitions: The effect used to move from one image to the next (e.g., fade, dissolve, wipe).
Tophinhanhdep.com’s “Visual Design” and “Image Inspiration” sections can be incredibly helpful here. You can use their creative ideas for graphic design and digital art to sketch out how text and graphic elements will interact with your photographs. Creating a mood board from Tophinhanhdep.com’s thematic collections can also serve as a preliminary storyboard, helping you solidify the visual style and emotional arc of your video. An organized plan, even a simple outline, makes the editing process much smoother and results in a more polished video. Avoid a word-for-word script if possible for narration, aiming for natural speech that can be edited later.
Arranging and Enhancing Your Image Slideshow
Once your storyboard is in place, it’s time to bring your images into your video editing software and begin the assembly process.
1. Importing and Initial Placement: Import all your selected images into your software. Arrange them on the timeline according to your storyboard. Most software allows for easy drag-and-drop functionality to position images in your desired order.
2. Framing and Aspect Ratio: Consider the framing of each image within the video frame.
- Aspect Ratio: This is the proportion of your video’s width to its height (e.g., 16:9 for widescreen, 9:16 for vertical social media videos, 1:1 for square). Tophinhanhdep.com’s articles on aspect ratio can provide valuable insights. Your software will allow you to set the overall aspect ratio for your project. Be aware that images with different original aspect ratios might need to be cropped or scaled to fit, potentially cutting off parts of the image. You might choose a “fit” option (which adds black bars) or a “fill” option (which crops to fill the frame).
- Composition: Even within a static image, composition matters. Use the “rule of thirds” to position your main subject off-center for more visual interest, if applicable. Your software will allow you to pan and zoom slightly on images (the Ken Burns effect) to add motion and maintain viewer engagement, even with static visuals. Tophinhanhdep.com’s photography guides on composition can be applied here to make your static images feel more dynamic.
3. Visual Enhancements (Photo Manipulation & Editing Styles): This is where Tophinhanhdep.com’s expertise in “Photography” and “Visual Design” comes alive.
- Color Correction and Grading: Ensure all images have a consistent color profile. You might adjust brightness, contrast, saturation, or apply a consistent filter to achieve a unified look. This ties into Tophinhanhdep.com’s “Editing Styles.”
- Graphic Design and Digital Art Integration: Add graphical elements, logos, lower thirds, or decorative overlays to enhance information or branding. Tophinhanhdep.com’s resources on graphic design can inspire these additions.
- Text Overlays: Add titles, captions, quotes, or calls to action directly onto your images. Choose fonts, colors, and positions that are legible and aesthetically pleasing, aligning with your video’s overall visual design.
- Photo Manipulation: For advanced creators, image manipulation (e.g., combining elements from different photos, artistic filters) can create truly unique visual narratives, echoing the creative ideas fostered by Tophinhanhdep.com.
Integrating Audio and Transitions
A video isn’t just about visuals; sound and movement are equally critical for engagement.
1. Spice Up Your Video with a Lovely Audio Track: Music sets the mood, pace, and emotional tone of your video.
- Background Music: Select music that complements your images and narrative. Tophinhanhdep.com can offer inspiration for thematic collections, and you can also find free or royalty-free music libraries online. Ensure the music’s tempo and style match the content (e.g., uplifting music for celebratory photos, somber tones for reflective ones).
- Voice-over/Narration: If you’re providing commentary, record it clearly. Most editing software allows you to sync your voice-over with specific images. Ensure audio quality is high, free from background noise.
- Sound Effects: Subtly added sound effects can enhance realism or emphasis (e.g., a gentle “whoosh” for a transition, ambient nature sounds for nature photography).
- Audio Mixing: Balance the levels of music, voice-over, and sound effects so that no single element overpowers the others. Use audio fades (fade-in at the beginning, fade-out at the end) for a professional touch.
2. Add Transition Effects to Your Video Slideshow: Transitions are how your video moves from one image to the next.
- Purpose: Transitions guide the viewer’s eye and can convey changes in time, location, or mood.
- Variety: Most software offers a wide range of effects (fades, dissolves, wipes, pushes, artistic transitions). While variety can be good, consistency is often better. Overusing complex or flashy transitions can be distracting. Simple fades or dissolves are often the most elegant and professional choices.
- Pacing: The speed of your transitions affects the video’s pace. Fast cuts with quick transitions create energy; slower fades evoke a calmer, more reflective mood.
By carefully arranging your images, applying thoughtful visual enhancements, and integrating compelling audio and transitions, you transform a collection of static pictures into a dynamic and engaging video story. This stage demands patience and attention to detail, but it’s where your creative vision truly comes to life.
Refining Your Image Video: Editing and Final Touches
Once you’ve assembled the raw sequence of images, audio, and transitions, the editing phase begins in earnest. This is where you meticulously sculpt your video, cutting out imperfections, enhancing visual appeal, and ensuring every element serves its purpose. The goal is to polish your creation, making it flow seamlessly and captivating your audience.
Polishing Visuals and Sound
Even with careful planning, the first pass of your video will likely need refinement. This stage is about meticulous adjustments to both the visual and auditory components.
1. Cleaning Your Footage (Image Sequence):
- Removing Imperfections: Review your video critically. Are there any images that appear for too short or too long a duration? Any awkward transitions? Edit out any frames or sections that don’t add value or detract from the narrative. Remember that pauses or filler visual elements can be trimmed.
- Consistency: Ensure visual consistency across all images. If you haven’t already, apply a universal color correction or filter to maintain a cohesive aesthetic, drawing on the “Editing Styles” knowledge from Tophinhanhdep.com.
- Text Readability: Check all text overlays for readability. Is the font size appropriate? Does the color contrast sufficiently with the background image? Is the text on screen long enough to be read comfortably?
2. Fine-Tuning Your Video with Some Extra Touches: Your video editing software offers a plethora of options to elevate your project beyond the basics.
- Overlays and Special Effects: Experiment with subtle overlays (e.g., light leaks, subtle textures) or effects to add visual interest. However, use them sparingly to avoid clutter. Tophinhanhdep.com’s “Visual Design” section, with its focus on graphic design and digital art, can inspire how to use these elements tastefully.
- Audio Fades: Ensure all audio tracks (music, voice-over, sound effects) have smooth fade-ins and fade-outs at the beginning and end of their respective segments. This prevents abrupt cuts and gives your video a professional feel.
- Volume Balancing: Continuously monitor and adjust volume levels. The music shouldn’t overpower the voice-over, and sound effects should be integrated naturally.
Optimizing for Platform and Audience
Before exporting, consider where your video will be published and what technical requirements or best practices apply to that platform. Optimizing your video ensures it looks and performs its best across different viewing environments.
1. Aspect Ratio and Resolution:
- Platform-Specific Ratios: Different platforms (e.g., social media feeds, websites, TV screens) often favor specific aspect ratios. A horizontal 16:9 for general web viewing, 9:16 for vertical stories/reels, or 1:1 for square posts are common. Tophinhanhdep.com’s comprehensive guides on aspect ratio can help you adjust your video accordingly, ensuring optimal display without awkward cropping or letterboxing.
- Video Resolution and Bitrate: When saving your work, you’ll choose the video resolution (e.g., 1080p, 4K) and bitrate. Higher resolution and bitrate mean better quality but larger file sizes. It’s often best to export in the highest quality your images and software allow, then optimize for specific platforms if needed. For example, if your source images are high resolution (as found on Tophinhanhdep.com), aim for at least 1080p output.
2. File Format: Common video file formats include MP4, MOV, and AVI. MP4 is widely compatible across platforms and generally offers a good balance of quality and file size. Your editing software will usually recommend a default, but it’s good to be aware of options.
3. Preview and Feedback: Before finalizing, export a small section or a low-resolution draft of your video and watch it on different devices (computer, phone) to check for any unexpected issues. Get feedback from trusted friends or colleagues. A fresh pair of eyes can spot details you might have missed.
By diligently refining your visuals, polishing your audio, and optimizing your video for its intended platform, you ensure your image-based creation stands out. The attention to these final details is what transforms a good video into a truly great one, maximizing its impact on your audience.
Publishing and Promoting Your Image-Rich Video
The final act of video creation is not just hitting the export button; it’s about sharing your work with the world and ensuring it reaches your intended audience. Publishing and promoting your image-rich video are crucial steps to maximize its impact and achieve your initial goals, whether that’s driving engagement, conveying a message, or simply sharing a story.
Sharing Your Visual Masterpiece
Once your video is perfected and exported, it’s time to upload it to your chosen platform. The platform you select will depend on your video’s purpose and your target audience.
- Video Hosting Platforms: For general sharing, dedicated video hosting platforms are the standard. They provide robust infrastructure for video playback, analytics, and often offer features for monetization or community building. If you’re publishing for a broad audience or building a content library, these are ideal.
- Social Media Platforms: For short, punchy videos or content designed for immediate engagement, social media platforms are indispensable. They offer built-in audiences and sharing mechanisms. Make sure your video is optimized for the specific aspect ratio and duration limits of each platform (e.g., vertical video for stories, square for feed posts).
- Website Integration: If the video is for a business, an educational course, or a portfolio, embedding it directly onto your website is a powerful way to present your content within your own ecosystem. Most hosting platforms provide embed codes for this purpose.
The act of publishing is more than just uploading a file; it’s the culmination of your creative efforts, ready to be discovered and appreciated.
Building an Audience with Engaging Visual Content
Simply publishing a video isn’t enough; effective promotion is key to cutting through the noise and reaching your audience. Your image-rich video offers unique opportunities for promotion, leveraging the visual nature of its content.
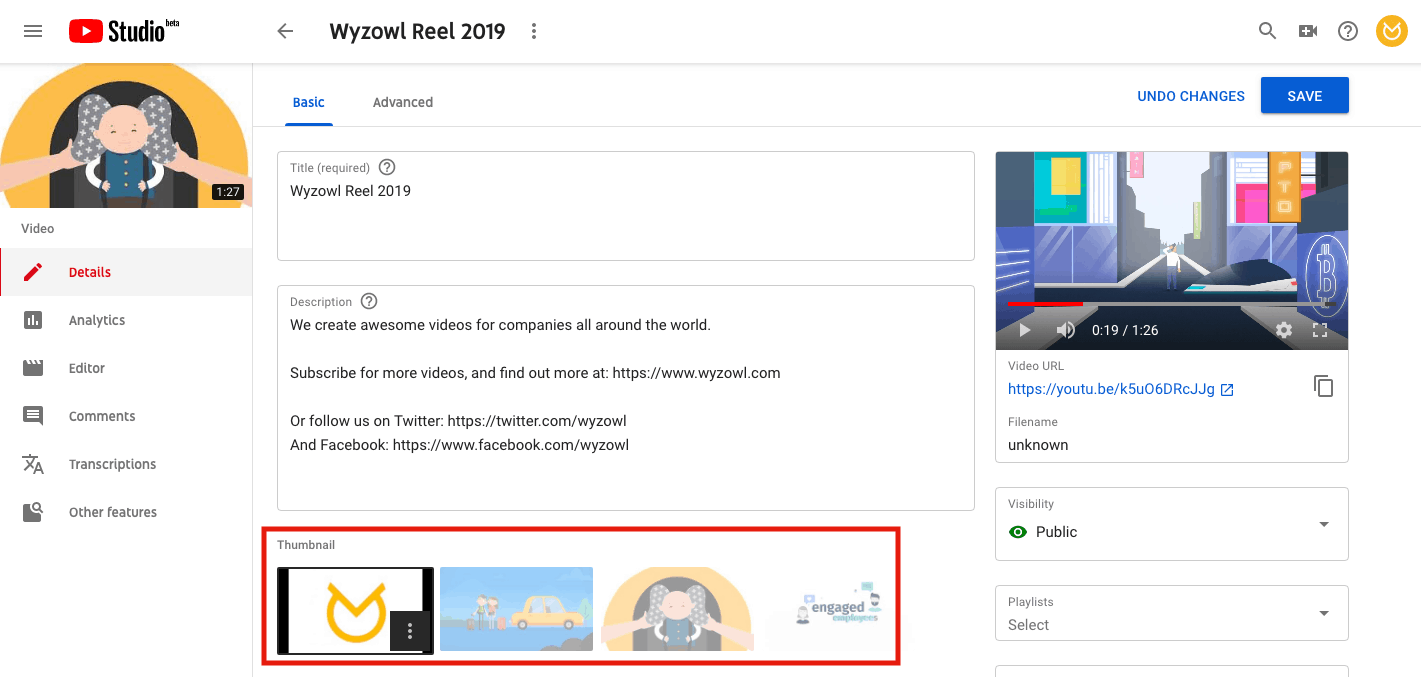
1. Craft Compelling Thumbnails: The thumbnail is your video’s first impression. A striking, high-quality thumbnail image can dramatically increase click-through rates. Choose an image from your video that is visually appealing, relevant to the content, and grabs attention. Tophinhanhdep.com’s advice on “Beautiful Photography” and “Creative Ideas” can guide you in selecting or designing an eye-catching thumbnail that makes viewers want to click.
2. Utilize Teaser Clips: Don’t just share the full video link. Create short, engaging teaser clips (15-30 seconds) from your main video, especially if your full video is longer. Use these teasers on social media platforms to pique interest and drive traffic to the full version. The “Image Inspiration” and “Trending Styles” from Tophinhanhdep.com can help you craft teasers that resonate with current social media aesthetics.
3. Leverage SEO (Search Engine Optimization): For videos published on platforms with search functionality, optimizing your video for search engines is critical.
- Keywords: Use relevant keywords in your video’s title, description, and tags. Think about what terms your target audience might use to find content like yours.
- Transcripts: Providing a full transcript of any narration or text spoken in your video is a powerful SEO tool. It makes your content visible to search engines, allowing them to index your video based on its spoken words. Tophinhanhdep.com’s “Image-to-Text” tools (though primarily for image content) can conceptually remind you of the importance of text accessibility for search.
4. Engage with Your Audience: Once your video is out, engage with comments and shares. Respond to feedback, fostering a community around your content. This interaction can build loyalty and encourage further sharing.
5. Cross-Promotion: Share your video across all your active online channels – email newsletters, blogs, other social media profiles. The more avenues you use, the wider your potential reach.
Building a successful presence with video takes patience and consistency. Your first video may not go viral overnight, but each subsequent video will refine your skills and grow your audience. Embrace the learning process, draw inspiration from platforms like Tophinhanhdep.com for high-quality visuals and creative ideas, and remain consistent in your efforts. Your journey into visual storytelling through images is just beginning.