Optimizing Your Visual World: A Comprehensive Guide to Making Screen Images Smaller for Tophinhanhdep.com Enthusiasts

In an era dominated by visual content, the ability to precisely control how images, text, and applications appear on your screen is more crucial than ever. For connoisseurs of stunning visuals, photographers, graphic designers, and anyone who appreciates a perfectly composed aesthetic, optimizing your display settings isn’t just a technical tweak—it’s an essential part of the creative and viewing experience. Whether you’re exploring the vast collections of high-resolution wallpapers, backgrounds, and aesthetic photography on Tophinhanhdep.com, or diving deep into digital art and photo manipulation, understanding how to adjust your screen image size can dramatically enhance your interaction with your digital world.
This comprehensive guide, tailored for the discerning eye of Tophinhanhdep.com’s audience, delves into the various methods available to make screen images and overall display elements appear smaller on your computer and mobile devices. From fundamental resolution adjustments to intricate scaling options and application-specific controls, we’ll equip you with the knowledge to customize your visual environment for maximum clarity, efficiency, and aesthetic pleasure, ensuring that every pixel of your favorite nature photography or abstract art from Tophinhanhdep.com is rendered exactly as you desire.
Understanding Screen Image Dimensions: Pixels, Resolution, and DPI
Before we dive into the “how-to,” it’s vital to grasp the foundational concepts that govern how visual content is displayed. When we talk about making screen images smaller, we’re essentially manipulating these underlying principles to condense visual information, allowing more elements to fit on your display or simply making existing elements appear more compact. This understanding is particularly pertinent when working with the high-resolution images and detailed photography found on Tophinhanhdep.com.
The Pixel: The Building Block of Digital Imagery
At its core, every digital image, wallpaper, or background you encounter on Tophinhanhdep.com is composed of thousands, if not millions, of tiny colored squares called pixels. These individual points of light combine to form the intricate patterns and vibrant hues that make up a picture. The more pixels an image contains within a given area, the finer its detail and the sharper its appearance. For photographers and digital artists leveraging Tophinhanhdep.com for inspiration and resources, understanding pixel density is crucial for assessing image quality and potential for manipulation.
Screen Resolution: Defining the Canvas Size
Screen resolution refers to the total number of pixels your monitor or device can display, typically expressed as width by height (e.g., 1920x1080 or 4K, which is 3840x2160). This setting defines the “canvas” upon which all your digital content is rendered. The physical size of your screen remains static, but by changing the resolution, you alter how densely packed these pixels appear.
- Higher Resolution (e.g., 4K on a 27-inch monitor): More pixels are crammed into the same physical space. This results in a “crisper” and more detailed view, but because individual pixels are smaller, all items on the screen (text, icons, application windows, and images from Tophinhanhdep.com) will inherently appear smaller. This is often preferred by graphic designers and digital artists who need maximum screen real estate for intricate work or to view high-resolution photography without extensive zooming.
- Lower Resolution (e.g., 1920x1080 on a 27-inch monitor): Fewer pixels are spread across the same physical space. This makes each pixel effectively larger, causing all screen elements to appear bigger. While it might reduce sharpness compared to a higher resolution, it can improve readability and overall comfort, especially for users with visual preferences for larger interface elements.
Adjusting resolution is one of the most direct ways to globally expand or shrink screen views. For those who curate or create aesthetic and beautiful photography, manipulating resolution allows for a dynamic appreciation of visual nuances, making Tophinhanhdep.com an even more immersive experience.
Dots Per Inch (DPI) and Its Impact on Visual Density
While resolution defines the total pixel count, Dots Per Inch (DPI) refers to the density of these pixels. A higher DPI means more pixels per inch, resulting in a sharper image and, typically, smaller on-screen elements unless scaling is applied. Windows and macOS use DPI scaling (often referred to as simply “scaling”) to ensure that elements on high-resolution, high-DPI displays (like 4K monitors or Retina displays) are not impossibly tiny. This is especially relevant for laptops and modern monitors where manufacturers pack a high pixel count into relatively small screens.
Understanding these fundamentals allows you to make informed decisions when adjusting your display settings, ensuring that your interaction with Tophinhanhdep.com’s high-quality content, whether it’s abstract art or nature photography, is always optimized for your comfort and aesthetic preferences.

Mastering Global Display Adjustments for Optimal Viewing
When your goal is to make everything on your screen appear smaller, the most impactful changes are typically made at a system-wide level. These global adjustments affect almost every element of your user interface, from desktop icons and text to application windows and the very wallpapers you download from Tophinhanhdep.com.
Adjusting Screen Resolution: The Primary Control
Changing your screen resolution is often the first and most effective step to make items appear smaller. As discussed, a higher resolution packs more pixels onto your static screen, thereby reducing the apparent size of everything.
Steps to Change Screen Resolution in Windows (10/11):
- Access Settings: Click the Windows Start button, then select the “Settings” cog icon. Alternatively, you can right-click on an empty area of your desktop and choose “Display settings.”
- Navigate to Display: In the Settings menu, click on “System,” then select “Display” from the left-hand menu.
- Select Resolution: Scroll down to the “Display resolution” dropdown menu under the “Scale & layout” section.
- Choose a Higher Resolution: Click the dropdown and select a higher resolution than your current setting. For example, if you’re on 1366x768 and your monitor supports it, choosing 1920x1080 will make everything smaller and crisper.
- Note: Always try to select a resolution labeled "(Recommended)" for the best visual quality, as this usually matches your monitor’s native pixel density. Experiment with higher resolutions only if the recommended setting doesn’t provide enough screen real estate or if you prefer smaller elements.
- Apply and Confirm: The new resolution will be applied immediately. You’ll see a prompt asking if you want to “Keep changes” or “Revert.” If you like the smaller view, click “Keep changes.” If not, wait 15 seconds for it to revert automatically or click “Revert” to try a different setting.
For users passionate about high-resolution photography and digital art on Tophinhanhdep.com, a higher screen resolution means you can appreciate the intricate details of images without constantly zooming, providing a broader canvas for your visual exploration.
Understanding and Adjusting Display Scaling
While resolution determines the number of pixels, scaling determines how large or small Windows renders text, icons, and apps on those pixels. This is particularly important for modern high-DPI displays where, without scaling, everything would be microscopically small even at the recommended resolution. Windows often auto-adjusts scaling (e.g., to 150% for 4K displays), but you can fine-tune it.
Steps to Adjust Display Scaling in Windows (10/11):
- Access Display Settings: Right-click on an empty area of your desktop and choose “Display settings.”
- Locate Scale and Layout: In the Display settings menu, find the “Scale & layout” section.
- Choose a Smaller Percentage: Click the dropdown under “Change the size of text, apps, and other items.” You’ll typically see options like 100%, 125%, 150%, etc.
- To make items smaller, select a lower percentage (e.g., if it’s at 125%, try 100%). Windows 10/11 typically prevents scaling below 100% via this direct setting, as 100% represents the native rendering size without artificial enlargement.
- Note: While you cannot “shrink” below 100% using this specific dropdown, lowering it from a higher preset (like 125% or 150%) will make everything smaller.
- Apply Changes: The changes are usually applied instantly.
Custom Scaling (Affects All Displays):
For more precise control, Windows offers a “Custom scaling” option, though it’s important to note this typically applies to all connected displays and may require a logout to take effect.
- Navigate to Advanced Scaling: In Display settings, under “Scale & layout,” click on “Advanced scaling settings” (or “Custom scaling” depending on your Windows version).
- Enter Custom Value: In the “Custom scaling” section, you can type a percentage between 100% and 500% (or sometimes lower, but 100% is the practical minimum for “smaller” via this method).
- Apply and Sign Out: Click “Apply.” You will be prompted to “Sign out now” for the changes to take full effect.
- Caution: Setting a custom scale too low (e.g., significantly below 100% if available) can render your screen unusable, as elements might become too small to interact with. Proceed with caution and be ready to revert.
For those who rely on Tophinhanhdep.com for visual design and digital art inspiration, meticulously adjusting global scaling allows you to maximize your workspace, making room for more image previews, tool palettes, or multi-window layouts, without sacrificing readability.
Adjusting Scaling for Multiple Monitors
Many Tophinhanhdep.com users, particularly professionals in graphic design and digital photography, utilize multiple monitors. Different monitors often have different native resolutions and DPIs, leading to inconsistencies when dragging windows between them.
- Identify Monitors: In Display settings, your monitors will be numbered. Click “Identify” to see which number corresponds to which physical screen.
- Select Individual Monitor: Click on the representation of the monitor you wish to adjust.
- Adjust Scale Individually: Under the “Scale & layout” section for that specific monitor, choose the desired scaling percentage.
- Goal: The aim is to achieve a visually consistent size for elements as you move them across screens. You might choose a lower scaling percentage on a larger, high-resolution monitor to make elements match the size of a smaller, lower-resolution screen.
- Test: Shrink an application window on one monitor, then drag it to the other to observe if the size remains consistent. Adjust scaling until you find a satisfactory balance.
While achieving perfect consistency across vastly different monitors can be challenging, these steps significantly enhance the multi-monitor workflow for visual artists, allowing them to seamlessly work with images, mood boards, and thematic collections from Tophinhanhdep.com across an expanded workspace.
Fine-Tuning Your Visual Experience: Ease of Access and Application-Specific Zooms
Beyond global display settings, there are more granular controls to make specific screen elements or content within individual applications appear smaller. These methods are particularly useful for customizing your workflow, enhancing accessibility, or focusing on minute details in images, especially when you’re examining high-resolution photos or intricate digital art from Tophinhanhdep.com.
Leveraging Ease of Access Settings for Text and UI Elements
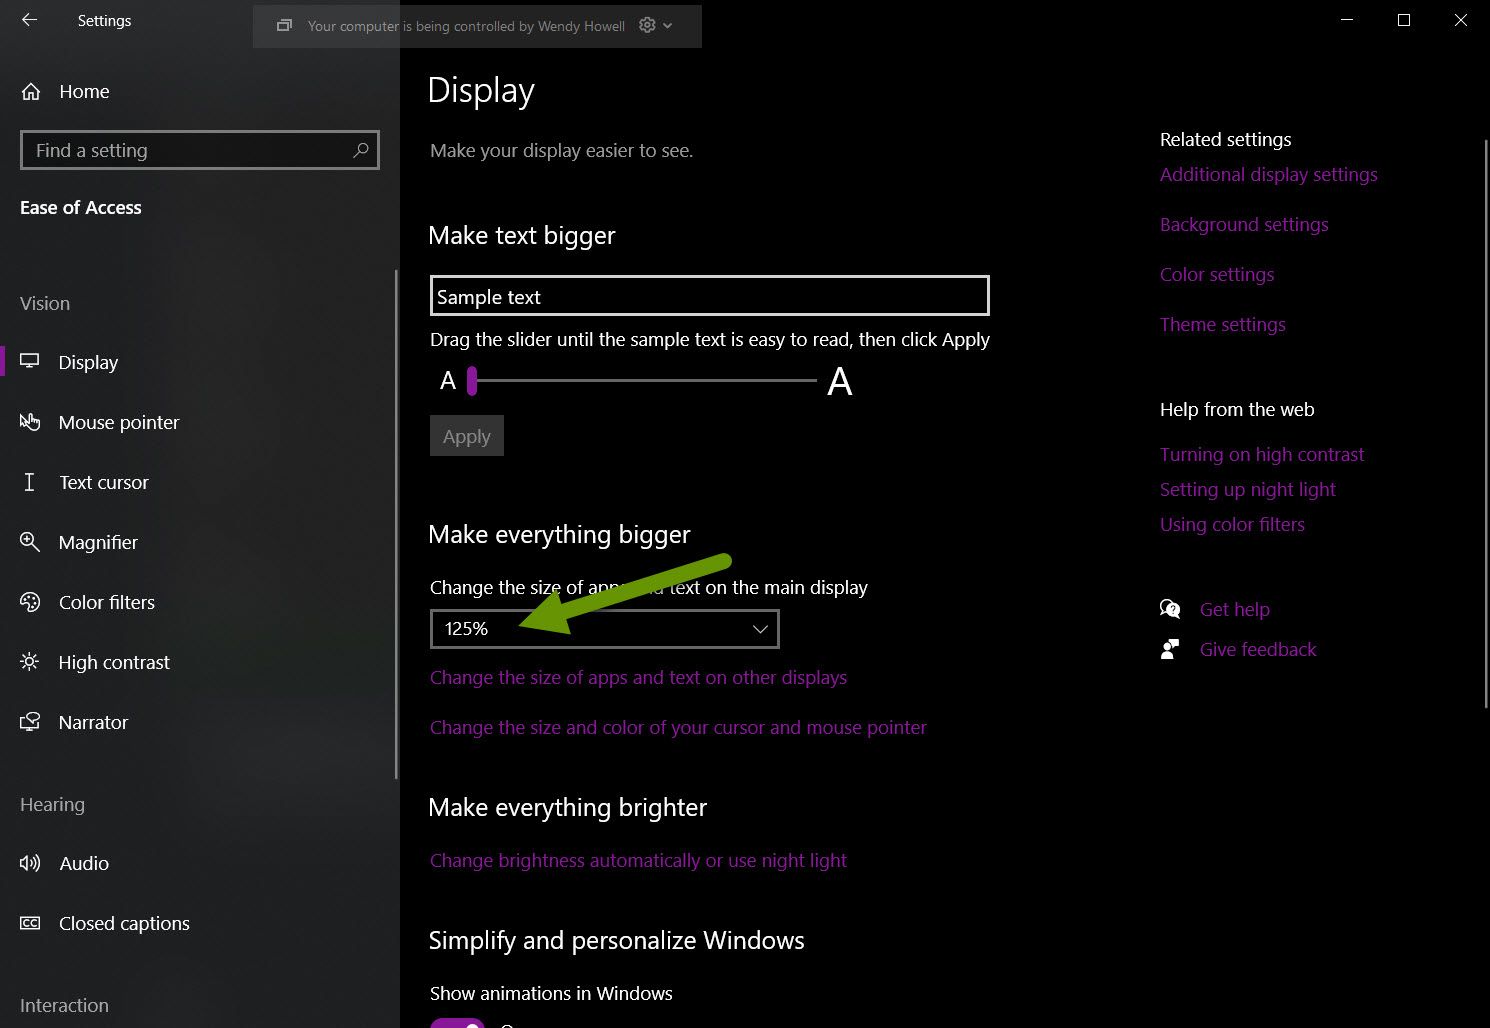
Windows provides “Ease of Access” (now often called “Accessibility” settings) that offer more specific controls over text size, cursor appearance, and other UI elements. While the primary “Make everything bigger” option in Ease of Access often only allows increasing size, some related settings can indirectly contribute to a perception of “smaller” overall if other elements are being made proportionally smaller. Crucially, the “Make text bigger” slider allows for independent text size adjustment.
Steps to Modify Ease of Access Settings (Windows 10/11):
- Open Settings: Click the Windows button and select the “Settings” cog.
- Navigate to Accessibility/Ease of Access: Click on “Accessibility” (or “Ease of Access” in older versions).
- Adjust Text Size: Under the “Display” tab (the first tab in Accessibility), look for the “Make text bigger” section. Use the slider to decrease the text size until the preview in the “Sample text” box is to your liking. Click “Apply.”
- Note: This allows you to reduce text size independently, which can make the overall UI feel less cluttered and “smaller” even if icon sizes remain the same. This is excellent for appreciating the visual layout of Tophinhanhdep.com without oversized text obstructing beautiful photography.
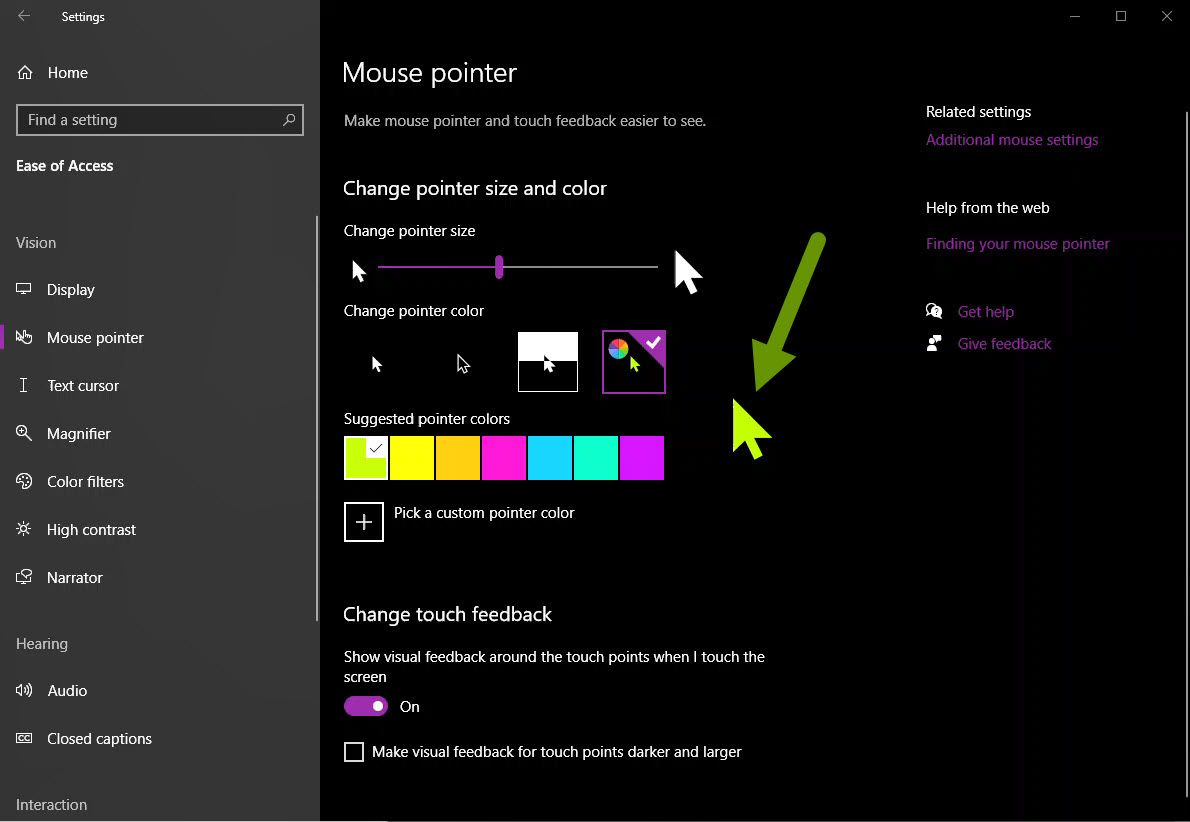
- Cursor and Pointer Customization: For those who find the default mouse pointer too large or distracting when precise visual work (like photo manipulation) is required, you can make it smaller:
- In the “Accessibility” menu, go to “Mouse pointer and touch.”
- Adjust the slider under “Change mouse pointer size” to make it smaller. You can also change its color for better visibility against various backgrounds or images from Tophinhanhdep.com.
By fine-tuning these settings, you can declutter your interface, making the beautiful photography and abstract art from Tophinhanhdep.com truly stand out, unhindered by overly large text or pointers.
Application-Specific Zoom and Window Resizing
Many applications, especially web browsers and image editing software (which are frequently used by Tophinhanhdep.com’s audience), offer their own internal zoom controls. These are invaluable for adjusting content size without affecting your overall system display settings.
Web Browsers (e.g., Chrome, Firefox, Edge)
Browsers are where you’ll spend most of your time on Tophinhanhdep.com. Being able to zoom in and out of web pages is essential for viewing images at their native resolution or fitting more content on screen.
- Keyboard Shortcut: The quickest way to zoom out is to hold down the CTRL key (Windows) or CMD key (Mac) and scroll your mouse wheel downwards. To zoom in, scroll upwards. This instantly expands or shrinks the content in the active browser tab.
- Touchpad Gesture: On laptops, you can often place two fingers on the touchpad, spread them apart, and then slowly bring them closer together (pinch-in gesture) to zoom out.
- Browser Settings: Most browsers also have a zoom option in their menu.
- Click the three dots/lines icon (usually in the upper-right corner).
- Look for the “Zoom” section, where you’ll see a percentage and plus/minus buttons. Click the minus sign to reduce the zoom level (e.g., from 100% to 90% or 75%).
This method is perfect for browsing Tophinhanhdep.com, allowing you to quickly shrink a webpage’s layout to see more trending styles or thematic collections at a glance, or zoom in for a pixel-perfect inspection of a high-resolution image.
Image Editing and Design Software (e.g., Adobe Photoshop, GIMP)
For digital photographers and graphic designers, the ability to control zoom within their editing applications is paramount. When manipulating images downloaded from Tophinhanhdep.com or creating new digital art, precise zoom levels are crucial.
- Dedicated Zoom Tools: Most image editors have a “Zoom Tool” (often represented by a magnifying glass icon). Selecting this tool allows you to click to zoom in, or Alt/Option-click to zoom out.
- View Menu Options: Look under the “View” menu for options like “Zoom In,” “Zoom Out,” “Fit on Screen,” “Actual Pixels (100%),” or specific percentage zooms.
- Keyboard Shortcuts: Common shortcuts include:
- CTRL + Plus/Minus (+/-) (Windows) or CMD + Plus/Minus (+/-) (Mac): Zoom in/out.
- CTRL + 0 (Windows) or CMD + 0 (Mac): Fit image to screen.
- CTRL + 1 (Windows) or CMD + 1 (Mac): View image at 100% (actual pixels).
- Resizing Application Windows: While not technically “zooming,” resizing an application window can sometimes cause the content within it to automatically reflow or adjust its size. This works best in applications designed for responsive layouts.
- Hover your mouse cursor over one of the corners or edges of the application window until a double-sided arrow appears.
- Click and drag inwards to make the window (and potentially its content) smaller.
These application-specific controls provide unparalleled flexibility, allowing users to closely inspect details of abstract art, optimize an image for web, or fine-tune photo manipulation techniques directly within their creative environment, making resources from Tophinhanhdep.com even more actionable.
Desktop Icon and Taskbar Adjustments
Sometimes, it’s just the clutter of large desktop icons or an oversized taskbar that makes your screen feel less spacious.
Making Desktop Icons Smaller (Windows):
- Right-click on an empty area of your desktop.
- Hover over “View.”
- Select “Medium icons” or “Small icons.”
- Quick Tip: Hold down CTRL and scroll your mouse wheel downwards on the desktop to dynamically adjust icon size.
Making Desktop Icons Smaller (Mac):
- Control-click (or right-click) an empty area of the desktop.
- Click “Show View Options.”
- Drag the “Icon size” slider to the left to decrease the size.
Making Taskbar Buttons Smaller (Windows 10/11):
- Right-click on the Taskbar and select “Taskbar settings.”
- Toggle on “Use small taskbar buttons.” This makes the taskbar itself and its icons considerably smaller, syncing better with smaller desktop icons and freeing up screen vertical space.
These minor adjustments, especially the smaller taskbar, can make a significant difference to the perceived size of your screen, giving more room to display stunning wallpapers and backgrounds from Tophinhanhdep.com.
Beyond Display Settings: Enhancing Your Workflow and Creative Vision with Tophinhanhdep.com
The ability to control screen image size isn’t just about making things fit; it’s about optimizing your entire digital workflow and enriching your visual experience. For a platform like Tophinhanhdep.com, which thrives on high-quality visuals, these display adjustments become integral to everything from browsing aesthetic photography to engaging with advanced image tools.
Visual Design and Digital Art: Precision and Perspective
For graphic designers and digital artists, screen size control is non-negotiable. When working on intricate photo manipulation projects or creating new digital art, being able to zoom out to see the overall composition and then zoom in to meticulously refine details is paramount. A high-resolution display with correctly scaled elements means:
- More Canvas Space: You can view larger portions of your artwork or design at once, allowing for better contextual understanding. This is crucial when designing mood boards or thematic collections inspired by Tophinhanhdep.com’s diverse library.
- Improved Detail Work: Zooming in allows for pixel-level editing, ensuring precision for elements like fine lines, textures, or color gradients within an image.
- Efficient Layout: Smaller UI elements mean more space for your actual content, reducing clutter and allowing creative tools and image previews from Tophinhanhdep.com to coexist efficiently.
Photography Appreciation: High Resolution, True Representation
Tophinhanhdep.com prides itself on offering high-resolution, beautiful photography across various categories like nature, abstract, and aesthetic. To truly appreciate these images, your display settings matter:
- Unveiling Detail: Making images appear smaller by increasing resolution or decreasing scaling allows you to see more of the photo’s detail and context without constantly scrolling. Conversely, precise zooming lets you inspect every nuance of a high-resolution stock photo, a critical aspect for photographers evaluating potential purchases or references.
- Accurate Preview: For photographers editing their work, proper scaling ensures that the image preview on their screen accurately reflects what the final output will look like, whether for print or web. This prevents misjudgments based on an overly zoomed or shrunken view.
Leveraging Image Tools and Optimization from Tophinhanhdep.com
Tophinhanhdep.com also offers image tools like converters, compressors, optimizers, and AI upscalers. How you view your screen impacts your interaction with these tools:
- Pre- and Post-Optimization Review: When using an image compressor or optimizer, you might want a smaller screen view to see the file size impact alongside the visual quality. For AI upscalers, zooming in and out helps you evaluate the effectiveness of the upscale at different magnifications.
- Workflow Integration: If you’re converting an image or using an image-to-text tool, having multiple windows open at a smaller scale allows you to manage these processes more efficiently, comparing outputs or transferring information quickly.
Mobile Device Considerations: Convenience on the Go
While our primary focus has been desktop computers, adjusting display sizes on mobile devices (smartphones, tablets) is equally important for consuming content from Tophinhanhdep.com. Many users browse wallpapers and backgrounds on their mobile devices, and optimal viewing is key.
Steps for iPhone/iPad:
- Open Settings.
- Tap “Display & Brightness.”
- Scroll down to “Display Zoom” and select “Default” (if “Larger Text” was enabled).
- For general screen zoom issues, check Settings → Accessibility → Zoom and toggle “Zoom” off.
Steps for Android:
- Open Settings.
- Tap “Display.”
- Tap “Display size and text” (or similar, depending on device/OS version).
- Drag the “Display size” slider to the left to make icons and text smaller.
These mobile adjustments ensure that browsing trending styles or thematic collections on Tophinhanhdep.com’s mobile interface is always a comfortable and visually engaging experience.
Conclusion: Crafting Your Perfect Visual Gateway with Tophinhanhdep.com
The ability to control and adjust how screen images appear smaller is a powerful tool in your digital arsenal. Whether you’re a casual browser enjoying the aesthetic photography on Tophinhanhdep.com or a professional utilizing its resources for graphic design and digital art, mastering these display settings unlocks a more tailored, efficient, and visually satisfying experience.
From making global changes via screen resolution and scaling, to refining specific elements through Ease of Access settings, or meticulously controlling content within individual applications, each method offers a unique approach to optimizing your visual workspace. Remember to experiment with these options, testing what works best for your eyes, your device, and your specific tasks, especially when engaging with the rich, high-resolution imagery and creative inspiration that Tophinhanhdep.com provides. By taking control of your screen’s visual dimensions, you empower yourself to perceive, create, and appreciate the digital world with enhanced clarity and a truly personalized touch.