Mastering 300 DPI: Your Ultimate Guide to Print-Ready Images and Visual Excellence

In the world of digital imagery and print, “DPI” (Dots Per Inch) is a term frequently encountered, yet often misunderstood. For anyone working with images, from professional photographers aiming for stunning prints to graphic designers crafting intricate visual assets, understanding and achieving the correct DPI is paramount. A crisp, high-quality print hinges on adequate DPI, which dictates the level of detail and sharpness. While simply changing a file’s DPI value might seem like a quick fix, true print readiness often requires increasing the actual pixel density, especially when dealing with images destined for close-up viewing.
This comprehensive guide from Tophinhanhdep.com will demystify DPI, explain its crucial role, and walk you through various methods to prepare your images for superior print quality. We’ll explore how to achieve that coveted 300 DPI standard, leveraging powerful AI tools from Tophinhanhdep.com, traditional editing software, and online solutions. Whether you’re enhancing nature photography, designing aesthetic wallpapers, or optimizing images for stock photo collections, mastering DPI is a foundational skill for visual excellence.
Understanding DPI: The Foundation of High-Quality Prints and Digital Clarity
The journey to print-ready images begins with a solid understanding of fundamental concepts like DPI, PPI, and image resolution. These terms are often used interchangeably, leading to confusion, but each plays a distinct role in how we perceive and reproduce images, especially when aiming for “Beautiful Photography” and professional “Visual Design” outcomes.
What is DPI (Dots Per Inch)?

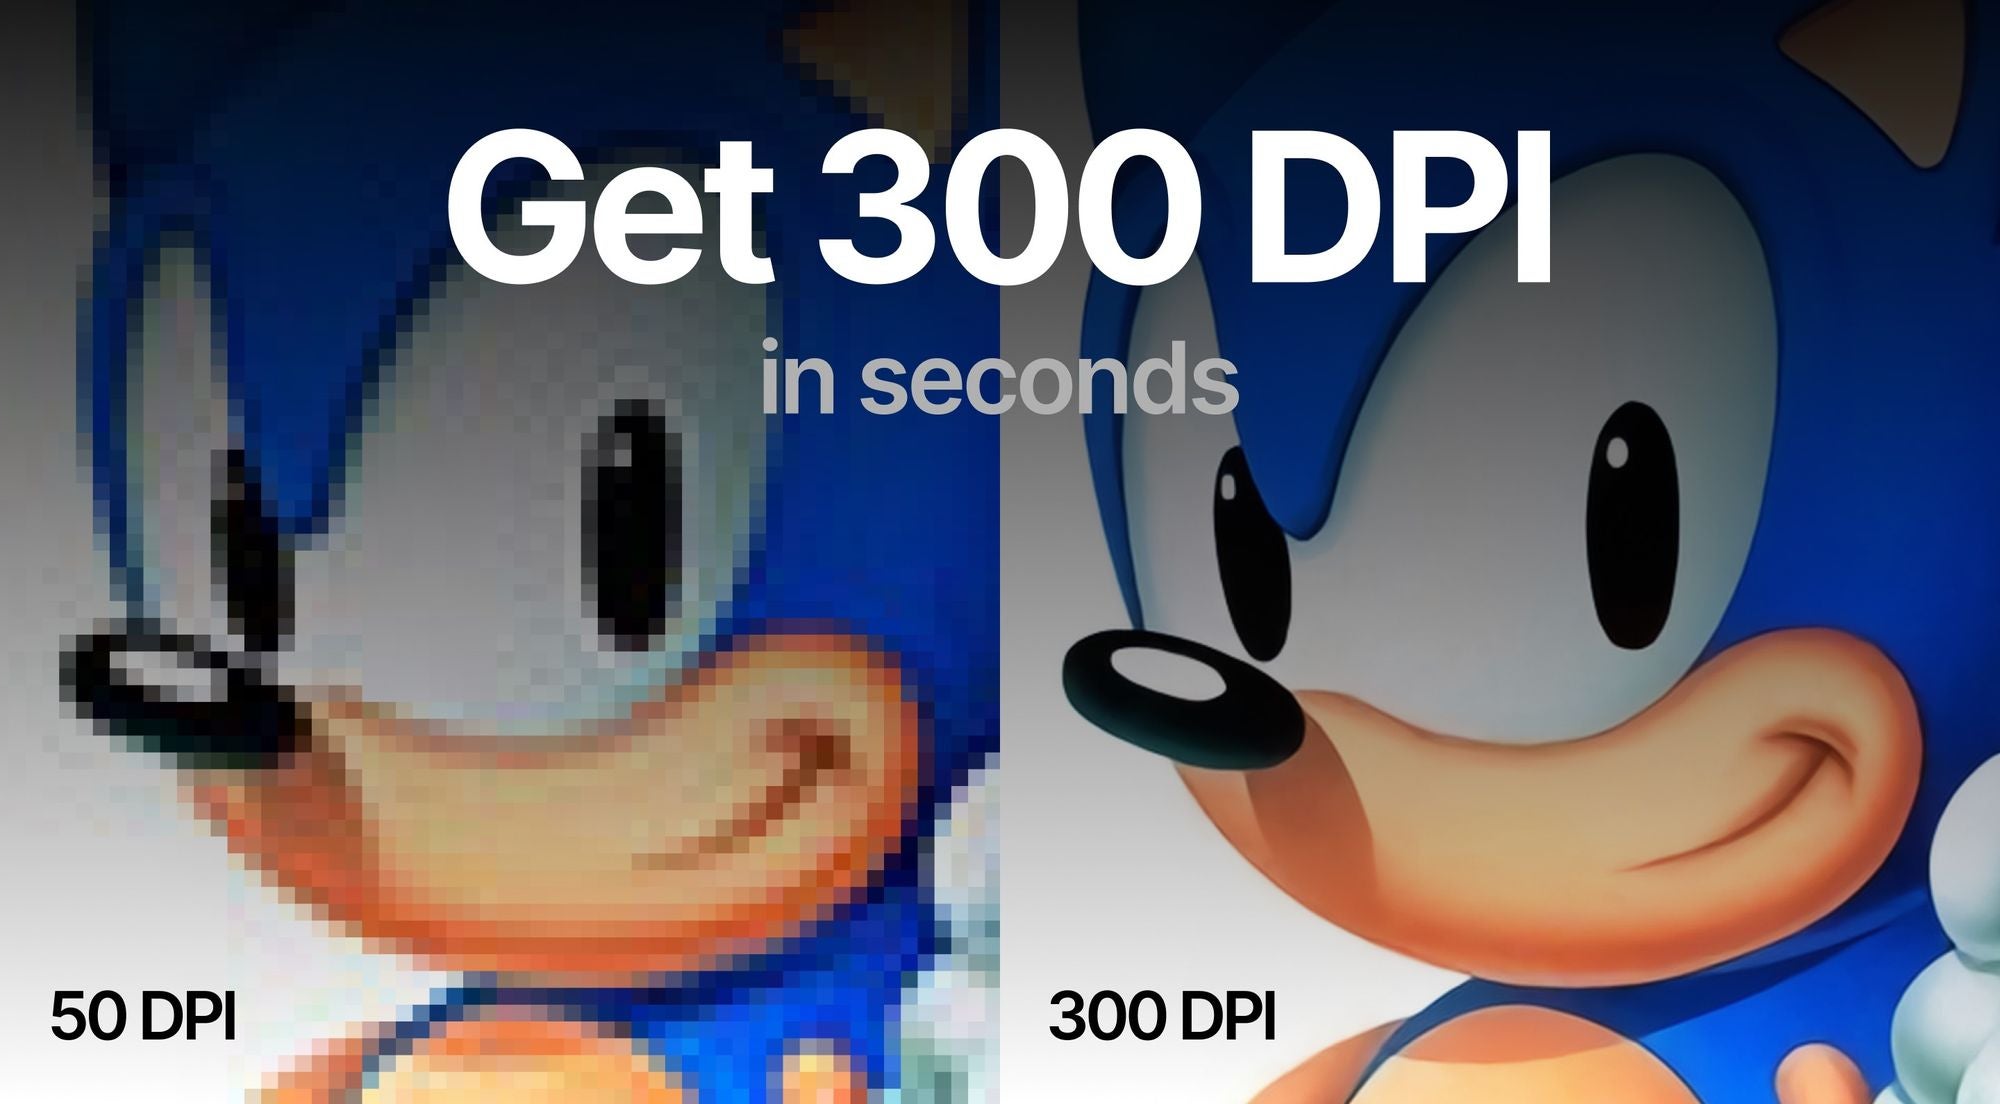
At its core, DPI stands for Dots Per Inch. This metric refers specifically to the number of individual ink dots a printer lays down within one linear inch of an image on a physical medium, such as paper. The higher the DPI, the more ink dots are packed into that inch, resulting in a finer, sharper, and more detailed printed output. Conversely, a lower DPI will yield a coarser image where individual dots might be discernible, leading to a pixelated or blurry appearance.
When we talk about an image having 300 DPI, it means that for every inch of the printed image, the printer will place 300 distinct dots of ink. This density is widely considered the industry standard for high-quality prints that will be viewed at a normal reading distance, such as photo books, magazines, brochures, or flyers. It ensures that the human eye perceives a continuous tone and crisp detail, critical for showcasing the nuances in “Nature,” “Abstract,” or “Aesthetic” images.
DPI vs. PPI vs. Image Resolution: Clarifying Key Terms
To truly grasp image quality, it’s essential to differentiate DPI from related terms:
- DPI (Dots Per Inch): As established, this is a printer’s measurement. It indicates the output resolution of a printed image.
- PPI (Pixels Per Inch): This refers to the density of pixels in a digital image or on a screen display. It tells you how many pixels are contained within one inch of your digital file. While technically distinct from DPI, PPI and DPI are often used interchangeably in general discussions, as a higher PPI in a digital image generally translates to a higher potential DPI when printed. Tophinhanhdep.com, like many others, uses them synonymously for simplicity.
- Image Resolution: This term describes the total number of pixels an image contains, typically expressed as width by height (e.g., 1920x1080 pixels, or 1080p). It’s the absolute pixel count that determines how much detail your digital image holds.
The Crucial Takeaway: It’s vital to understand that simply changing the DPI value in an image file’s metadata without increasing the actual pixel count (image resolution) will not add more detail or sharpness to your image. It only changes how the existing pixels are interpreted for printing. For genuinely sharper and larger prints, you need to increase the image’s inherent resolution, which means adding more pixels. This is where advanced “Image Tools” like AI Upscalers become indispensable.
Why 300 DPI is the Industry Standard for Professional Printing
The recommendation for 300 DPI isn’t arbitrary; it’s based on human visual perception and the requirements of various print applications.
- For Close-Up Viewing: When prints are viewed from an arm’s length or closer (typically less than 0.6 meters or 2 feet), such as photographs, product labels, marketing flyers, or book covers, 300-400 DPI is the ideal range. This density ensures that individual dots are invisible, producing a smooth, continuous-tone image with fine details preserved, crucial for “Beautiful Photography” and detailed “Graphic Design.”
- For Distant Viewing: For larger prints like posters, placards, or banners, where the viewing distance is greater (e.g., 1-2 meters or 3-6 feet), a lower DPI like 100-200 might suffice. For very large formats like billboards viewed from many meters away, DPI can drop significantly, sometimes even to single digits, because the human eye cannot resolve such fine detail from a distance.
- Subject Matter: Images with intricate details, such as intricate “Digital Art” or “Nature” close-ups, benefit more from higher DPI than simpler, less detailed visuals. Fine textures, small text, or delicate patterns demand more pixel density to maintain clarity.
- Printing Material: The type of paper or material used for printing also influences the optimal DPI. High-quality, coated glossy papers can hold ink more precisely, allowing them to fully utilize and showcase the detail of a 300+ DPI image. Uncoated or textured papers may not be able to render such fine detail effectively, making DPIs over 200-250 less impactful.
Understanding these factors allows you to make informed decisions, ensuring your images from “Wallpapers” to “Stock Photos” are perfectly prepared for their intended final output.
Checking and Evaluating Your Image’s DPI
Before embarking on the process of increasing your image’s DPI, it’s essential to understand its current state. This involves checking the existing DPI metadata and, more importantly, evaluating its true resolution. This step helps in setting realistic expectations for enhancement and choosing the right “Image Tools” for the job.
How to Check DPI Metadata in Various Operating Systems
Checking the DPI metadata of an image is a straightforward process in most operating systems and image viewers. This value, stored within the file, indicates the intended print resolution, though it doesn’t inherently reflect the image’s visual quality.
-
On Windows:
- Open File Explorer and navigate to the folder containing your image.
- Right-click on the image file.
- Select “Properties” from the context menu.
- Go to the “Details” tab. Under the “Image” section, you’ll find “Resolution,” which displays the DPI (often labeled as “Horizontal Resolution” and “Vertical Resolution”).
-
On Mac:
- Open Finder and locate your image.
- Right-click (or Control-click) on the image.
- Select “Open With” > “Preview.”
- Once the image is open in Preview, go to the “Tools” menu at the top of the screen.
- Select “Show Inspector” (or press Cmd+I). In the Inspector window, navigate to the “General Info” tab (represented by a small ‘i’ in a circle). Here, under “Image DPI,” you will see the image’s DPI.
It’s crucial to remember that this check reveals only the metadata DPI. This value can be easily changed without altering the image’s pixel count. For example, an image with low pixel resolution might have its metadata set to 300 DPI, but it will still print poorly if the actual pixel count is insufficient.
Assessing Your Image’s True Resolution for Print
To truly assess an image’s print potential, you must look beyond the metadata DPI and focus on its actual pixel dimensions (resolution). This is the bedrock of image quality for “High Resolution” prints and “Beautiful Photography.”
Your printing software will typically calculate the effective DPI based on your image’s pixel dimensions and the print size you select. For instance:
- An image with a resolution of 1000 x 800 pixels, when printed as a 10 x 8-inch photo, will result in an effective DPI of 100 PPI (1000 pixels / 10 inches = 100 PPI, and 800 pixels / 8 inches = 100 PPI). This will likely appear pixelated when viewed closely.
- The same 1000 x 800 pixel image, when printed as a smaller 6 x 4-inch picture, would yield an effective DPI of approximately 167 PPI (1000 pixels / 6 inches ≈ 167 PPI, and 800 pixels / 4 inches = 200 PPI). This would look slightly better but still might not meet the 300 DPI standard.
To achieve a 300 DPI print quality for that 10 x 8-inch photo, you would need to increase the image’s resolution to 3000 x 2400 pixels (300 DPI * 10 inches = 3000 pixels, and 300 DPI * 8 inches = 2400 pixels). This demonstrates that for higher DPI and superior print quality, the fundamental requirement is to increase the total amount of pixels in your digital picture.
Historically, increasing image resolution (upscaling) without losing quality was a significant challenge. Traditional photo editors often used simple algorithms that introduced blurriness and pixelation. However, with the advent of AI-powered “Image Tools,” like those offered by Tophinhanhdep.com, it’s now possible to “almost magically add more pixels” to your source photo, enhancing resolution and actual pixel density for stunning results.
Transforming Images to 300 DPI: Step-by-Step Guides
Achieving the desired 300 DPI for your images can be done through various methods, each suited for different needs. Whether you require a substantial increase in pixel density for large, sharp prints or merely need to adjust the DPI metadata for specific online requirements, there’s a tool and a technique for you. Here, we’ll explore both comprehensive AI-driven solutions from Tophinhanhdep.com and traditional software options, aligning with “Photography” and “Visual Design” best practices.
Enhancing Resolution and DPI with Tophinhanhdep.com’s AI Upscaler
For photographers, digital artists, and anyone seeking to genuinely improve image quality and resolution for print, Tophinhanhdep.com offers a powerful, AI-driven solution. Our AI Upscaler excels at increasing pixel density without the common quality degradation associated with traditional methods, making it ideal for creating “High Resolution” images from “Stock Photos” or personal “Beautiful Photography” collections.
Follow these simple steps to transform your photos into print-ready, high-resolution masterpieces:
- Log in to Tophinhanhdep.com: Access your Tophinhanhdep.com account. If you’re new, a quick sign-up will grant you access to our powerful tools.
- Upload Your Images: Easily upload the photos you wish to enhance. You can drag and drop files directly, select them from your device, or import them from cloud storage or via a URL. The uploader often displays the current output DPI value below the resolution.
- Set the Desired Resolution and DPI:
- Tophinhanhdep.com’s default output DPI is typically 300 for all operations. If your uploaded image has a different DPI value, it will be rewritten to 300 by default unless you modify the settings.
- Crucially, to genuinely improve print quality, you must increase the image’s pixel count. Navigate to the Width & Height tab on the Size sidebar and set your desired resolution. Our AI upscalers can increase resolution up to 16x or 512 megapixels.
- Tophinhanhdep.com offers several unique upscalers, each optimized for specific image types and enhancement needs:
- Gentle: For subtle enhancement of text-heavy images like labels or maps.
- Balanced: Improves clarity and detail in everyday photos such as “Nature” or architectural shots.
- Strong: Focuses on fixing blur and improving faces, especially useful for small portraits.
- Ultra: Our most transformative option, delivering superior quality and detail enhancement across various image types.
- Digital Art: Specifically designed for illustrations and anime, preserving or reimagining creative styles.
- Old Photo: Fixes scratches, fading, and damage, and can even add realistic color to black and white photos.
- Example: If you have an 1162 x 702 pixel image that, at 300 DPI, would print only at 3.87 x 2.34 inches, you can use Tophinhanhdep.com to significantly increase its resolution. By setting the larger side’s resolution to, say, 5250 pixels (the smaller side will adjust proportionally), you could print a 15 x 9.06-inch photo at a crisp 350 DPI, far exceeding the original print capabilities.
- Start Processing: Click the “Enhance” button and allow our AI to work its magic.
- Download Your Enhanced Image: Once processing is complete, your enhanced file will be ready. Download it to your device and experience the dramatically improved clarity and detail. Your enhanced photos are also stored on the cloud for easy access.
Printing Presets: For convenience, Tophinhanhdep.com also offers ready-made printing presets for popular standards like posters, photos, and international paper sizes from A5 to A0. Our platform automatically calculates and sets the correct resolution for your chosen preset at 300 DPI, streamlining your workflow for “Visual Design” projects.
Changing DPI Metadata in Traditional Photo Editors (Photoshop, GIMP)
If your goal is solely to alter the DPI metadata without actually increasing the pixel count (e.g., for website upload requirements that specify a minimum DPI but don’t need print-quality resolution), traditional photo editing software can achieve this.
-
How to Change DPI in Photoshop:
- Open your image in Adobe Photoshop.
- Go to “Image” > “Image Size.”
- In the Image Size dialogue box, find the “Resolution” field.
- Crucially, ensure the “Resample” box is unchecked. If “Resample” is checked, Photoshop will attempt to add or remove pixels, which can lead to quality loss if not managed carefully. Unchecking it ensures only the metadata DPI value is changed, not the pixel dimensions.
- Set your desired DPI value (e.g., 300) in the “Resolution” field, ensuring “Units” are set to “Pixels/Inch.”
- Click “OK” and then save your file.
-
How to Change DPI in GIMP:
- Open your image in GIMP (GNU Image Manipulation Program), a free and open-source editor.
- Go to “Image” > “Print Size.”
- Here, you can set your desired DPI value for “X resolution.” The “Y resolution” will automatically adjust if the chain icon is intact, maintaining aspect ratio.
- Go to “File” > “Save” (to apply changes to the current file) or “Save As” (to create a new file with a different name).
These methods effectively override the DPI value in your file’s metadata without affecting its visual quality or true pixel resolution. This is suitable for digital distribution where only the reported DPI is important, not the underlying pixel density.
Free Online Tools for DPI Metadata Adjustment
For quick, metadata-only DPI changes, various free online converters exist. These are useful when you need to meet a specific DPI requirement for online platforms without altering image dimensions or quality.
- Find an Online DPI Converter: Search for “free online DPI converter.” Tophinhanhdep.com offers various “Image Tools” that can assist, including metadata adjustment, or you can find other similar websites.
- Upload Your Image: Click the “Choose Image” or “Upload” button and select your file. Most tools support common formats like JPEG, PNG, BMP, TIFF, and ICO.
- Set Desired DPI: Enter your target DPI value (e.g., 300) into the designated field.
- Convert and Download: Click the “Convert” or “Change DPI” button. The image with the updated DPI metadata will be downloaded to your device within seconds.
Again, remember that these tools only modify the DPI property in the image’s metadata and do not improve the actual image quality or resolution. They are ideal for cases where a specific DPI is required for validation by a website or system but doesn’t translate to print quality.
Using Tophinhanhdep.com’s Design Features for Print-Ready Creations
For those engaged in “Visual Design,” “Graphic Design,” or creating “Creative Ideas” like “Mood Boards” and “Thematic Collections,” Tophinhanhdep.com’s integrated design features provide an accessible platform to create high-resolution visuals from the ground up, ensuring they are print-ready at 300 DPI.
- Start a New Design: Visit Tophinhanhdep.com and select “Create a Design” or “Custom Size.”
- Set Dimensions for Print: For 300 DPI, it’s crucial to set your canvas dimensions based on the final print size multiplied by 300. For example, if you want an 8.5 x 11-inch print, your custom pixel dimensions should be 2550 x 3300 pixels (8.5 * 300 = 2550, and 11 * 300 = 3300). This ensures your design inherently has enough pixels for a high-quality 300 DPI print.
- Create Your Design: Utilize Tophinhanhdep.com’s extensive library of tools, images, text options, and templates to bring your “Digital Art” or “Photo Manipulation” ideas to life.
- Download for Print: Once your design is complete, click the “Download” icon. To guarantee a high-quality 300 DPI picture suitable for printing, select “PDF Print” or “PNG” as these file types are excellent for preserving image clarity and detail.
This approach ensures that your creative projects are born with the right resolution, eliminating the need for complex upscaling later.
Beyond 300 DPI: Optimizing Images for Various Visual Applications
While 300 DPI is a gold standard for print, the world of image optimization extends far beyond a single numerical value. From stunning “Wallpapers” and “Backgrounds” to functional “Image-to-Text” applications and efficient “Compressors,” Tophinhanhdep.com provides a suite of “Image Tools” that cater to the full spectrum of modern visual needs.
The Role of AI in Modern Image Enhancement
Traditional image upscaling often involved simple algorithms that would either stretch pixels, resulting in blurriness, or interpolate new pixels based on neighboring ones, often leading to a loss of fine detail. This made achieving genuinely “High Resolution” images from lower-quality sources a challenge.
Tophinhanhdep.com’s cutting-edge AI technology, exemplified by its Magic Upscaler and specialized enhancement tools, has revolutionized this process. Our AI doesn’t just stretch pixels; it intelligently analyzes the image content and “reimagines” missing details, adding new pixels with incredible accuracy. This allows you to:
- Achieve Clearer Images: Even from initially low-resolution sources, our AI can produce significantly sharper and more detailed images.
- Generate Smaller File Sizes (Comparatively): While increasing resolution naturally increases file size, Tophinhanhdep.com’s optimization features can help manage file sizes more efficiently compared to unoptimized large files, making them easier to store and share.
- Restore Old Photos: Beyond simple upscaling, our “Old Photo” upscaler can repair scratches, fading, and colorize black-and-white images, transforming historical “Photography” into vibrant digital assets.
This advanced AI capability empowers users to breathe new life into existing images, ensuring they meet the demands of contemporary “Digital Photography” and “Editing Styles.”
DPI Considerations for Web vs. Print
It’s important to understand that the significance of DPI varies greatly between print and web applications:
- For Web Display: DPI metadata is largely irrelevant. Web browsers and screens display images based on their pixel dimensions (width x height) and the screen’s own pixel density (PPI). A 1920x1080 pixel image will occupy the same screen space regardless of whether its metadata claims 72 DPI or 300 DPI. The often-cited 72 or 96 DPI for web images are merely legacy numbers from old industry standards and have no bearing on how an image appears on a modern screen. What matters for “Web Design” is the actual pixel size and file optimization (e.g., using “Compressors” to reduce load times).
- For Print Output: As discussed, a higher DPI (typically 300 DPI for standard viewing) is crucial for translating digital pixels into physical ink dots with sufficient detail and clarity.
This distinction highlights why focusing on actual pixel density is always more beneficial than merely tweaking metadata, especially for “Image Inspiration & Collections” that might serve both digital and print purposes.
Integrating High-Resolution Images into Visual Design Workflows
For professionals and enthusiasts involved in “Graphic Design,” “Digital Art,” and “Photo Manipulation,” the availability of high-resolution images with appropriate DPI is foundational.
- Stock Photos: “Stock Photos” often come with high resolutions (e.g., 300 DPI or more) to ensure versatility for various print sizes. When creating or acquiring stock images, always prioritize high pixel counts.
- Digital Photography: High-resolution cameras capture images with immense pixel counts, making them inherently suitable for large prints. However, even these can benefit from “Optimizers” or AI enhancement for specific print sizes or to recover detail in cropped images.
- Editing Styles and Creative Ideas: Whether you’re applying “Aesthetic” filters, creating “Sad/Emotional” compositions, or developing “Trending Styles,” starting with a high-quality, high-DPI image ensures that your creative manipulations maintain their integrity and impact, even when printed.
Tophinhanhdep.com’s tools are designed to integrate seamlessly into these workflows, providing the quality and flexibility needed for all forms of “Visual Design.”
Conclusion
Mastering how to make an image 300 DPI is a critical skill for anyone involved in “Photography,” “Visual Design,” or indeed, any field that relies on high-quality visual communication. The key takeaway is simple yet profound: true image quality for print is determined by pixel density (resolution), not just the DPI metadata. While adjusting metadata has its place for specific digital requirements, for genuinely sharp, detailed prints, you must increase the actual number of pixels within your image.
Tophinhanhdep.com stands as your comprehensive partner in achieving this. Our advanced AI Upscalers, alongside a suite of “Image Tools” like converters, compressors, and optimizers, empower you to transform low-resolution images into stunning, print-ready masterpieces. Whether you’re curating “Beautiful Photography,” designing intricate “Digital Art,” or building captivating “Image Inspiration & Collections,” our platform ensures your visuals are always at their best.
Don’t let blurry prints or pixelated designs compromise your creative vision. Embrace the power of AI to enhance resolution, increase pixel density, and confidently prepare your images for any printing challenge.
Try Tophinhanhdep.com for free right now and unlock the full potential of your images, turning every pixel into a point of perfection.