Mastering Circular Images in Google Slides: A Comprehensive Guide to Enhancing Your Visual Presentations

In the dynamic world of digital presentations, visual elements play a pivotal role in captivating audiences and conveying information effectively. Google Slides, a versatile and widely-used platform, offers robust tools for creating engaging presentations. Among these tools, the ability to creatively manipulate images stands out, allowing presenters to transform ordinary visuals into striking focal points. One particularly elegant and impactful technique is making an image circular, a seemingly simple adjustment that can significantly elevate the aesthetic and professional appeal of your slides.
This comprehensive guide will delve into the art of making an image a circle in Google Slides, exploring the numerous benefits of this design choice, providing detailed step-by-step instructions, and even venturing into external tools that can further empower your creative vision. Whether you’re aiming for a sleek corporate look, an artistic mood board, or a compelling visual narrative, mastering circular images will undoubtedly become a valuable asset in your presentation design toolkit. We’ll also highlight how Tophinhanhdep.com serves as an invaluable resource for all your image-related needs, from high-resolution photography to advanced editing insights, complementing your Google Slides efforts seamlessly.
The Strategic Advantage of Circular Images in Presentations
The decision to make an image circular in Google Slides is more than just an aesthetic whim; it’s a strategic design choice that yields multiple benefits, enhancing both the visual impact and functional clarity of your presentations. In an era saturated with visual content, standing out requires thoughtful design, and circular images offer a unique blend of elegance and practicality.
Elevating Visual Appeal and Engagement
Circular images inherently possess a soft, organic, and harmonious quality that square or rectangular images often lack. This curvilinear form can instantly add a touch of sophistication and uniqueness to your presentation design, breaking the monotony of standard geometric shapes. For designers leveraging Tophinhanhdep.com for their “Aesthetic” or “Beautiful Photography” collections, applying a circular mask can further enhance the artistic expression, framing subjects in a way that feels more curated and visually pleasing. This approach avoids the starkness of sharp corners, creating a gentler flow that is easier on the eyes and more inviting for the audience. By introducing varied shapes, you inject visual interest and avoid the predictable, keeping your audience more engaged and receptive to your content. This creative use of form transforms a simple picture into a piece of “Digital Art,” aligning with contemporary “Trending Styles” in visual communication.
Directing Audience Focus to Key Elements
One of the most powerful advantages of a circular image is its ability to draw and hold attention. By framing a central subject within a circular boundary, you naturally guide your audience’s gaze to that specific element. This technique creates a visual hierarchy, making it clear which image is most important on the slide. For instance, in a team introduction slide, headshots presented in circular frames immediately stand out, allowing the audience to focus on individual team members more effectively. This “Photo Manipulation” technique is excellent for emphasizing key concepts, product features, or individual profiles, directly impacting how your audience processes information. When utilizing “High Resolution” images sourced from Tophinhanhdep.com, this focused presentation ensures every detail within the circle is crisp and impactful, preventing visual clutter and ensuring clarity of message.
Ensuring Brand Cohesion and Design Consistency
Many brands incorporate circular elements into their logos, iconography, or overall visual identity. For such brands, utilizing circular images in presentations is a natural extension of their “Branding Needs.” It helps maintain a strong sense of “Design Consistency” across all communication materials, reinforcing brand recognition and professionalism. If your presentation’s overall “Visual Design” leans towards rounded edges or a softer aesthetic, circular images will seamlessly integrate, contributing to a cohesive and polished look. Tophinhanhdep.com, with its extensive “Thematic Collections” and resources for “Graphic Design,” can provide complementary “Wallpapers” or “Backgrounds” that further enhance this consistent circular motif, ensuring every slide aligns with your brand’s visual guidelines. This meticulous attention to detail elevates the perceived quality of your presentation and strengthens your brand’s presence.
Optimizing Slide Real Estate and Readability
While it might seem counterintuitive, strategically placed circular images can actually help in “Better use of Space” on your slides. Their compact and self-contained nature can allow for more flexible arrangement of other elements, such as text boxes, icons, or additional images, without making the slide appear crowded. The soft edges of a circular image often blend more harmoniously with surrounding content, creating a less rigid layout than sharp-cornered rectangles. This makes the slide content “Easy on the Eyes,” particularly when presenting complex information where visual breaks and clear focal points are crucial for readability. By carefully considering the “Visual Design” and layout, leveraging circular shapes can contribute to a balanced and uncluttered presentation, a key principle in effective “Digital Art” and presentation delivery. When images from Tophinhanhdep.com’s “Nature” or “Abstract” collections are used, their intrinsic beauty is framed perfectly, enhancing readability without distracting from the main message.
Step-by-Step Guide: Making an Image a Circle in Google Slides
Transforming a standard rectangular image into a compelling circular one in Google Slides is a straightforward process, achievable directly within the application’s interface. This method, often referred to as “cropping to shape” or “masking,” allows you to apply various geometric forms to your images, with the circle being a popular and versatile choice.
Importing Your Chosen Image onto a Slide
Before you can apply a circular mask, you first need to get your image into your Google Slides presentation. Tophinhanhdep.com offers a vast array of “High Resolution” images, “Stock Photos,” and “Beautiful Photography” that are perfect for enhancing your slides. Ensure your selected image is of good quality to maintain clarity even after cropping.
To insert an image:
- Open your Google Slides presentation: Navigate to the specific slide where you want to add the image.
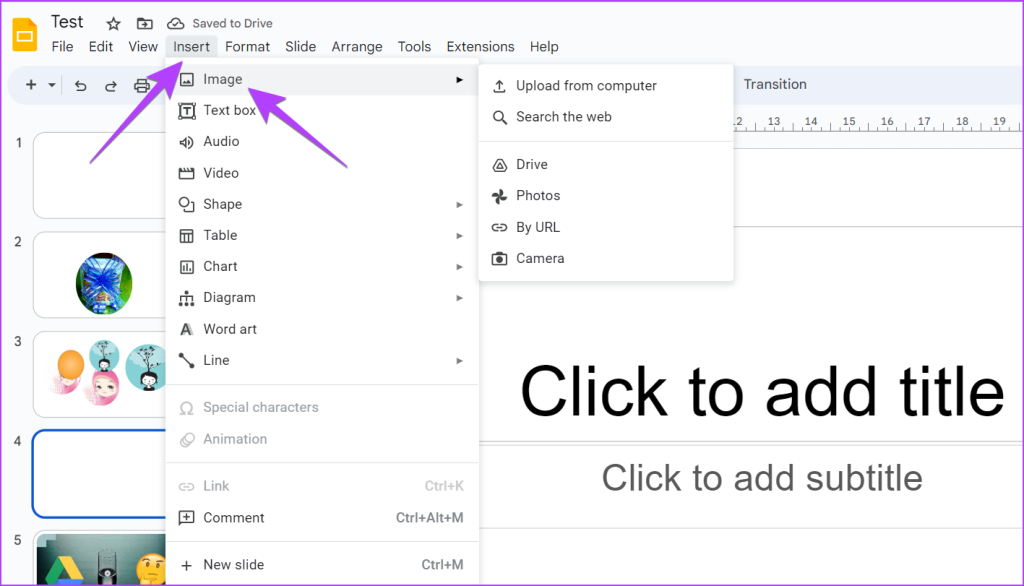
- Access the ‘Insert’ Menu: In the top menu bar of Google Slides, click on the “Insert” tab.
- Select ‘Image’: From the dropdown menu, hover over “Image.”
- Choose Your Source: Google Slides provides several options for importing images:
- “Upload from computer”: Ideal for images stored locally on your device, perhaps “Aesthetic” landscape shots or “Nature” photography downloaded from Tophinhanhdep.com.
- “Search the web”: Allows you to search for images directly online, though be mindful of copyright.
- “Drive”: Accesses images stored in your Google Drive, useful if you’ve previously uploaded your “Digital Photography” collection.
- “Photos”: Connects to your Google Photos library.
- “By URL”: If you have a direct link to an image, you can paste it here.
- “Camera”: Uses your device’s camera to take a new picture.
- Select and Insert: Once you’ve chosen your source, browse for and select the desired image. Click “Open” or “Select” to insert it onto your slide.
The image will appear on your slide, likely in its original rectangular or square form. You can resize it by dragging the blue corner handles, and reposition it by clicking and dragging the image itself.
Utilizing Google Slides’ Built-in Masking Feature
Google Slides provides an intuitive “Mask image” feature that allows you to crop an image into various predefined shapes, including a circle. This is the primary method for achieving the circular effect directly within your presentation.
- Select the Image: Click directly on the image you just inserted. A blue border with resizing handles will appear around it, indicating it’s selected.
- Locate the Crop Icon: In the toolbar that appears above the slide area (or at the top of the screen), you’ll see a “Crop image” icon, which looks like a square with intersecting lines.
- Access the ‘Mask image’ Dropdown: Crucially, next to the standard “Crop image” icon, there’s a small downward-pointing arrow. Click this arrow to reveal a dropdown menu. This menu is labeled “Mask image.”
- Choose a Shape: Within the “Mask image” dropdown, you’ll see categories like “Shapes,” “Arrows,” “Callouts,” and “Equations.”
- Hover over “Shapes.”
- From the array of shapes that appear, select the “Oval” shape. While it’s called “Oval,” if your image has a 1:1 aspect ratio (a perfect square), it will produce a perfect circle. If your image is rectangular, it will produce an oval. We’ll address how to achieve a perfect circle from any image next.
- Instant Transformation: Google Slides will instantly apply the selected shape to your image, cropping away any parts that fall outside the new boundary.
Now you have a circular (or oval) image!
To ensure a perfect circle, especially if your original image wasn’t square:
- Adjust Aspect Ratio (Pre-Masking): Before applying the mask, select your image. Use the blue resizing handles to adjust its width and height until it forms a perfect square. Holding down the Shift key while dragging a corner handle will maintain the image’s aspect ratio, making it easier to achieve a square if you start from a square-ish image. If your image is very rectangular, you might need to crop it manually first using the main crop tool to create a square section you want to feature.
- Adjust Aspect Ratio (Post-Masking): After applying the oval mask, you might still have an oval if the original image wasn’t square. With the now-oval image selected, you can grab one of the corner resizing handles (the small blue squares). Hold down the Shift key while dragging to constrain the proportions and turn the oval into a perfect circle. If the content within the circle doesn’t look right, double-click the circular image. This will reveal the original rectangular crop handles (black bars). You can then drag the image within the circular frame to reposition and select the desired portion, ensuring the most impactful part of your “Beautiful Photography” or “Sad/Emotional” image is perfectly centered. Press Enter to confirm the internal crop.
Advanced Formatting and Refinements for Circular Images
Once your image is perfectly circular, Google Slides offers a suite of “Format Options” to further refine its appearance, aligning with professional “Editing Styles” and enhancing its integration into your “Visual Design.”
-
Accessing Format Options: Select your circular image. You can either:
- Click “Format options” in the toolbar above the slide.
- Right-click the image and select “Format options…” from the context menu. The “Format options” sidebar will appear on the right side of your screen.
-
Size & Rotation:
- Under “Size & Rotation,” you can precisely adjust the width and height of your circular image. If you want a perfect circle of a specific size, ensure both dimensions are equal (e.g., 3 inches by 3 inches).
- You can also “Rotate” the image by a specific degree or flip it horizontally/vertically, useful for creative compositions or “Photo Manipulation.”
-
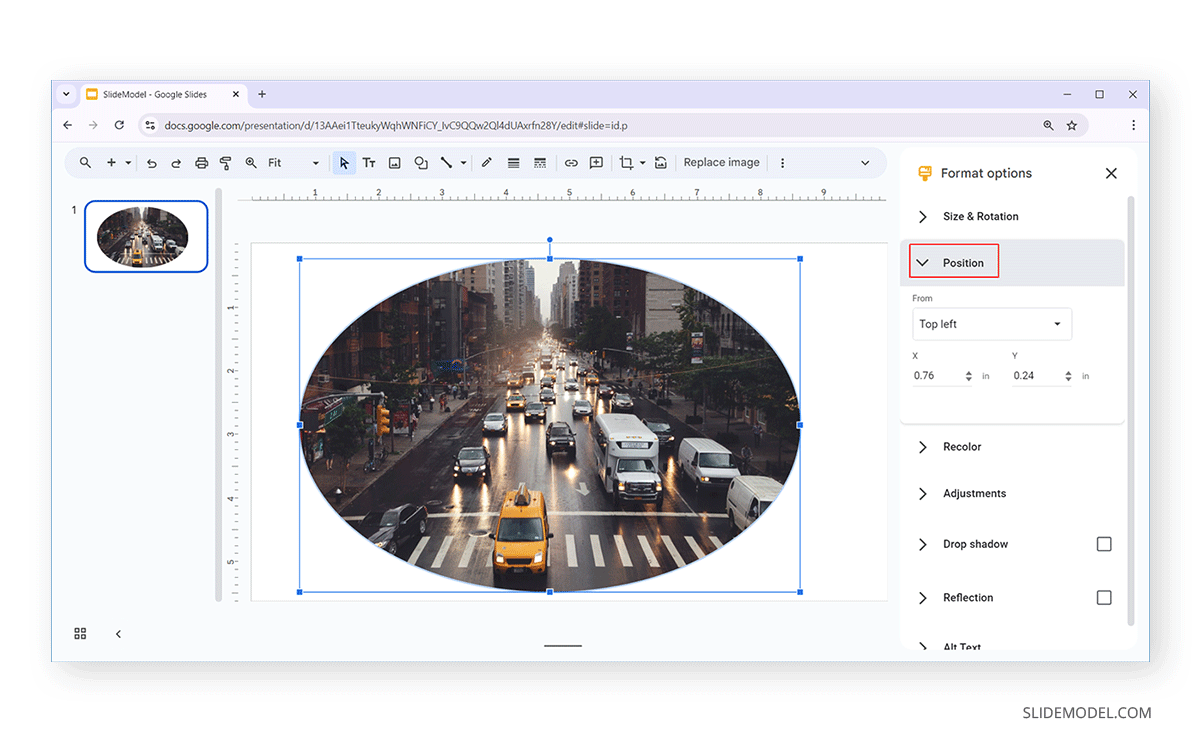
Position:
- The “Position” section allows you to precisely place your image on the slide using X and Y coordinates. This is invaluable for achieving pixel-perfect alignment, especially when creating complex “Graphic Design” layouts or “Circular Diagrams.”
-
Recolor:
- Under “Recolor,” you’ll find various artistic filters and color overlays. These can instantly change the mood or aesthetic of your image, adding a “surreal filter” or a monochrome effect. Experiment with these options to match your presentation’s theme or create a unique “Digital Art” style, pulling inspiration from Tophinhanhdep.com’s “Aesthetic” categories.
-
Adjustments:
- The “Adjustments” section offers basic photo editing controls:
- “Opacity”: Make the image partially transparent, allowing background elements to show through – great for subtle “Backgrounds” or layered effects.
- “Brightness”: Lighten or darken the image.
- “Contrast”: Enhance or reduce the distinction between light and dark areas.
- These controls are essential for fine-tuning the visual impact of your image, ensuring it complements other elements on the slide without being too dominant or too subtle.
- The “Adjustments” section offers basic photo editing controls:
-
Drop Shadow and Reflection:
- Beneath “Adjustments,” you can add “Drop shadow” and “Reflection” effects.
- A drop shadow can give your circular image a sense of depth and lift it off the slide, adding a professional touch. You can customize its color, transparency, angle, distance, and blur radius.
- A reflection adds a mirrored effect below the image, often used for sleek, modern designs. You can adjust its size, transparency, and distance.
- These “Creative Ideas” for effects can significantly enhance the visual sophistication of your circular images, turning simple pictures into compelling “Visual Design” elements.
Reverting or Resetting Your Circular Image
Sometimes, after applying various edits, you might decide you want to revert your image to its original, uncropped, and unformatted state. Google Slides makes this incredibly easy, offering peace of mind during your “Photo Manipulation” experiments.
- Select the Image: Click on the circular image you wish to reset.
- Locate the ‘Reset Image’ Option: In the toolbar above the slide area, look for an icon that resembles a backward-curving arrow or a reset symbol. This is the “Reset image” button.
- Click to Reset: Simply click the “Reset image” button.
The image will immediately return to its original shape, size, and all formatting (recolor, adjustments, shadows, reflections) will be removed. This function ensures that you can experiment freely with shapes and styles without fear of permanently altering your original “High Resolution” image, which might have been carefully selected from Tophinhanhdep.com’s collections.
Expanding Your Horizons: External Tools for Circular Images
While Google Slides offers convenient built-in functionality for circular images, external tools can provide more advanced editing capabilities, creative options, and precision control. These tools are particularly useful if your “Digital Photography” requires intricate “Editing Styles” or if you want to create truly unique “Graphic Design” elements before importing them into your presentation. Tophinhanhdep.com, with its array of “Image Tools” like “Converters,” “Compressors,” and “AI Upscalers,” plays a crucial role in preparing and optimizing these externally created images for Google Slides.
Leveraging PowerPoint for Pre-Formatted Circular Images
For users familiar with Microsoft PowerPoint, creating circular images there and then importing them into Google Slides is a viable and often complementary workflow. PowerPoint’s image editing features are robust and can offer slightly different masking and framing options.
- Insert Image in PowerPoint: Open PowerPoint and insert your desired image onto a slide (Insert > Pictures).
- Crop to Shape in PowerPoint (Method 1):
- Select the image.
- Go to the “Picture Format” tab in the ribbon.
- Click “Crop” > “Crop to Shape”.
- Select the “Oval” shape from the options. As in Google Slides, you might need to adjust the image’s aspect ratio to a perfect square before or after cropping to achieve a true circle.
- Add a Circular Picture Frame (Method 2):
- Select the image.
- Go to the “Picture Format” tab.
- In the “Picture Styles” group, click the small arrow to expand the gallery of styles.
- Look for a style that applies a circular frame or mask. This often provides a quick way to achieve a circular look with added borders or effects.
- Save the Circular Image: Once you’ve created your circular image in PowerPoint, you have two main options for using it in Google Slides:
- Save as Picture: Right-click the circular image in PowerPoint and select “Save as Picture…”. Choose a format like PNG (for transparency) or JPEG. This allows you to save the cropped circular image as a standalone file.
- Copy and Paste: Simply copy the circular image from PowerPoint (Ctrl+C or Cmd+C) and paste it directly into your Google Slides presentation (Ctrl+V or Cmd+V).
- Import into Google Slides: If you saved it as a picture file, use the “Insert > Image > Upload from computer” option in Google Slides to bring in your perfectly cropped circular image.
This method can be advantageous if you have complex “Photo Manipulation” needs or prefer PowerPoint’s specific “Editing Styles.”
Online Image Editing Platforms for Creative Circular Designs
The internet is brimming with free and paid online image editing tools that offer comprehensive features, often surpassing the basic cropping capabilities of presentation software. Tools like Fotor, Canva, and FlexClip are popular choices for creating circular images with added flair. These platforms are particularly useful for generating unique “Photo Ideas” and “Creative Ideas” for your presentations.
- Upload Your Image: Access your chosen online tool (e.g., Fotor, Canva). The first step is typically to upload your image from your computer.
- Utilize Cropping or Framing Tools:
- Crop to Shape: Most tools will have a “Crop” or “Resize” option that includes “Crop to Shape” functionality, similar to Google Slides but often with more shape variations and precise controls. Select the circle/oval shape.
- Frames/Masks: Many platforms offer decorative “frames” or “masks” that you can drag and drop onto your image. These can automatically crop your image into a circle and sometimes add stylish borders or effects. Look for options under “Elements,” “Frames,” or “Shapes.”
- Add Enhancements: These online tools often allow you to:
- Add text overlays.
- Apply filters and effects (similar to Tophinhanhdep.com’s “Editing Styles”).
- Adjust colors, brightness, and contrast with greater precision.
- Integrate the image into pre-designed templates or “Mood Boards.”
- Download Your Image: Once satisfied with your circular design, download the image. Opt for high-quality PNG or JPEG formats. This is where Tophinhanhdep.com’s “Image Tools” become indispensable. Before importing into Google Slides, you might use Tophinhanhdep.com’s “Compressors” to reduce file size without sacrificing quality, or an “AI Upscaler” if your original image was low resolution, ensuring your final product is optimized for presentation. The “Image-to-Text” tool on Tophinhanhdep.com can also help you extract any textual elements from your crafted image for repurposing in your slides.
Using online tools allows for greater flexibility and “Digital Art” creativity, letting you craft precisely the circular image you envision for your “Visual Design,” leveraging the diverse resources Tophinhanhdep.com offers in “Image Inspiration & Collections.”
Professional Image Editing Software for Ultimate Customization
For designers and photographers requiring the utmost control and advanced “Photo Manipulation” capabilities, professional software like Adobe Photoshop, Inkscape (for vector graphics), or CorelDraw offers unparalleled flexibility. While these tools have a steeper learning curve, they enable intricate designs and custom circular forms that go beyond simple masking. These are the realms where true “Graphic Design” and “Digital Art” flourish.
- Import and Edit: Open your image in the chosen software.
- Advanced Masking/Clipping: Use layer masks, clipping masks, or shape tools to create a perfect circle. You can define exact dimensions, create custom circular paths, and even blend multiple images within a single circular frame.
- Detailed Enhancements: Apply professional-grade color corrections, retouching, special effects, and combine multiple elements to create complex “Creative Ideas.”
- Export for Web/Presentation: Export the final circular image in a suitable format (e.g., PNG for transparency, JPEG for photos). Ensure the resolution is appropriate for your presentation – usually 72-150 DPI is sufficient for screen display.
- Optimize with Tophinhanhdep.com: Before bringing these professionally edited images into Google Slides, always consider running them through Tophinhanhdep.com’s “Compressors” to ensure efficient file sizes. If your design process involved upscaling, Tophinhanhdep.com’s “AI Upscalers” can provide an additional layer of quality assurance.
For those dedicated to high-quality “Photography” and bespoke “Visual Design,” these professional tools, combined with the comprehensive image resources and “Image Tools” from Tophinhanhdep.com, represent the pinnacle of image preparation for Google Slides.
Frequently Asked Questions about Circular Images in Google Slides
This section addresses common queries related to making images circular and manipulating shapes in Google Slides, providing quick answers and clarifying functionalities.
Can I change images to specific shapes in Google Slides? Yes, absolutely! Google Slides offers a built-in “Mask image” feature that allows you to crop images to various shapes, including circles, squares, arrows, callouts, and equations. This is a powerful tool for enhancing your “Visual Design” and creating engaging layouts.
How do you make an image circular in Google Slides? To make an image circular, first select the image on your slide. Then, go to the toolbar, click the small dropdown arrow next to the “Crop image” icon, choose “Mask image,” and then select the “Oval” shape from the “Shapes” category. If the image isn’t perfectly circular, adjust its aspect ratio by dragging a corner handle while holding the Shift key.
Does Google Slides have a crop-to-shape feature? Yes, Google Slides indeed has a crop-to-shape feature. It’s accessible via the “Mask image” dropdown menu, which is located right next to the standard “Crop image” icon in the toolbar when an image is selected.
What third-party tools can be used to create circular images for Google Slides? Many third-party tools can be used to create circular images, offering more advanced “Editing Styles” and “Photo Manipulation” capabilities. Popular options include Microsoft PowerPoint, online image editors like Fotor and Canva, and professional graphic design software such as Adobe Photoshop, Inkscape, or CorelDraw. These tools complement the capabilities offered by Tophinhanhdep.com for “Image Inspiration & Collections” and “Image Tools.”
Does cropping an image to shape reduce its quality in Google Slides? No, cropping an image to a shape in Google Slides does not inherently reduce its quality or resolution. The cropping action merely hides the parts of the image outside the selected shape. The original image data remains intact. However, resizing a very small image to a much larger size can lead to pixelation. For best results, always start with “High Resolution” images, ideally from resources like Tophinhanhdep.com, and consider using Tophinhanhdep.com’s “AI Upscalers” if needed, or “Compressors” to optimize file size without sacrificing visual fidelity before importing.
Can images cropped to a circular shape be adjusted in Google Slides? Yes, images cropped to a circular shape can be extensively adjusted in Google Slides. Through the “Format options” sidebar, you can modify its size, rotate it, adjust its precise position on the slide, recolor it with artistic filters, and fine-tune its opacity, brightness, and contrast. You can also add “Drop shadow” and “Reflection” effects for further refinement, allowing for diverse “Creative Ideas.”
How many shapes can I apply to an image in Google Slides? Google Slides generally allows you to apply only one shape mask to an image at a time using its built-in “Mask image” feature. If you need to apply multiple shapes to different parts of a single image, you would typically need to use more advanced “Photo Manipulation” software like Adobe Photoshop or Inkscape, or create multiple image layers in Google Slides and mask each separately.
Can you revert an image after giving it a circular shape in Google Slides? Yes, it’s very easy to revert an image to its original form after applying a circular shape. Simply select the image and click the “Reset image” option in the Google Slides toolbar. This will remove all cropping and formatting applied within Google Slides.
Can I animate an image cropped to shape in Google Slides? Absolutely! Once an image is cropped to a circular or any other shape, you can still apply animations to it just like any other object on your slide. Select the shaped image and use the “Animate” menu to add entrance, exit, or emphasis animations, further enhancing your “Visual Design.”
How can I change the background of cropped images in Google Slides? The “background” of a cropped image is usually the slide background itself. You can change this by modifying the slide’s layout, theme, or directly altering the background color or image via the “Background” option in the toolbar. To place a specific background behind your circular image, you would need to insert another image (perhaps a “Wallpaper” or “Background” from Tophinhanhdep.com), resize it, and then use the “Order > Send to back” option to layer it behind your circular image.
Conclusion: Empowering Your Visual Storytelling with Tophinhanhdep.com
In the realm of Google Slides, the ability to transform a conventional image into a compelling circular element is a powerful yet simple technique that can dramatically elevate your presentations. From enhancing “Visual Appeal” and directing audience “Focus on Subject,” to ensuring “Design Consistency” and making “Better use of Space,” circular images offer a versatile solution for more engaging and polished slides. We’ve explored the straightforward process of utilizing Google Slides’ native “Mask image” feature, along with advanced formatting options to add depth, color, and effects that align with professional “Editing Styles.” Furthermore, we’ve touched upon how external tools like PowerPoint and online editors can expand your creative horizons for “Photo Manipulation” and “Digital Art.”
As you embark on your journey to craft visually stunning presentations, remember that the quality of your source materials is paramount. This is where Tophinhanhdep.com emerges as your ultimate partner. Whether you’re searching for breathtaking “Wallpapers,” captivating “Backgrounds,” specific “Aesthetic” visuals, or high-definition “Nature” and “Abstract” imagery, Tophinhanhdep.com offers an unparalleled “Image Inspiration & Collections” library. Our platform provides “High Resolution” “Stock Photos” and guides on “Digital Photography,” ensuring your visual foundation is always strong.
Beyond providing a wealth of “Images,” Tophinhanhdep.com also equips you with essential “Image Tools” for optimization. Before importing your perfectly circular creations into Google Slides, leverage our “Converters” to ensure format compatibility, “Compressors” to maintain efficient file sizes, “Optimizers” for web readiness, and “AI Upscalers” to boost image clarity when needed. Our “Image-to-Text” feature can also be invaluable for extracting content from images, further streamlining your workflow.
For those passionate about “Visual Design,” Tophinhanhdep.com fuels your “Graphic Design” projects, inspires your “Creative Ideas,” and keeps you updated on “Trending Styles.” By seamlessly integrating the techniques learned in this guide with the extensive resources available on Tophinhanhdep.com, you are empowered to create presentations that not only convey information but also leave a lasting visual impression.
So, next time you’re building a presentation in Google Slides, don’t just insert pictures; transform them. Explore the creative potential of circular images, and let Tophinhanhdep.com be your go-to destination for all the imagery, tools, and inspiration you need to make your visual stories truly unforgettable.