How to Transform Your Images into Scalable Vector Art on Tophinhanhdep.com

In the vast and vibrant world of digital imagery, understanding the difference between raster and vector graphics is fundamental for anyone looking to create, optimize, or distribute visual content. On Tophinhanhdep.com, where we celebrate everything from stunning Wallpapers and Aesthetic Backgrounds to advanced Image Tools and Visual Design principles, the ability to convert an image into a vector format is a highly sought-after skill. Vectorization ensures your designs remain crisp and professional, regardless of how much you scale them, making it indispensable for logos, illustrations, and large-format prints.
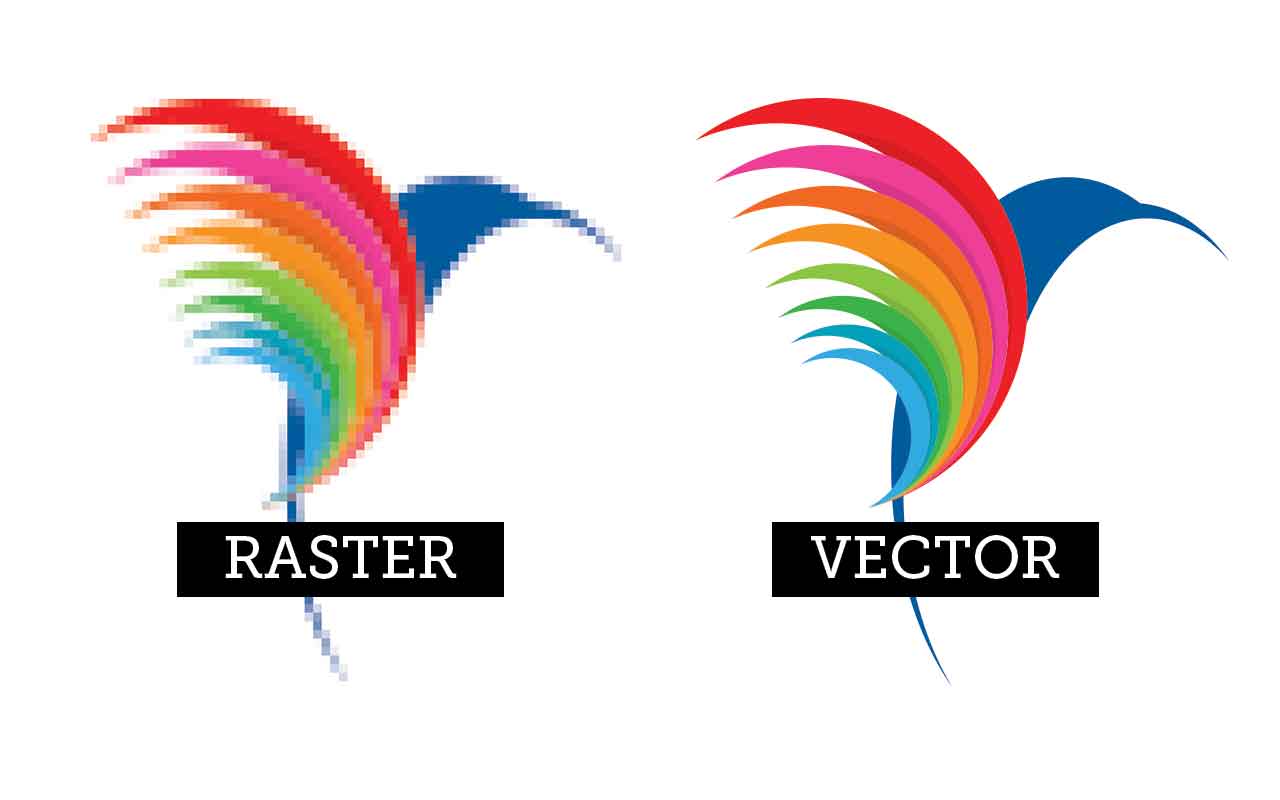
Unlike raster images, which are composed of a fixed grid of pixels (think of your everyday JPEGs and PNGs from Beautiful Photography or High-Resolution Stock Photos), vector graphics are built from mathematical paths, points, and curves. This mathematical foundation allows them to be scaled infinitely without any loss of quality or pixelation, a stark contrast to raster images which become blurry when enlarged. This guide, drawing upon expert techniques and insights, will walk you through various methods to transform your raster images into versatile vector art, specifically tailored for enhancing your work within the Tophinhanhdep.com ecosystem.
Understanding the Power of Vector Graphics
Before diving into the “how-to,” let’s solidify our understanding of why vectorization is a cornerstone of professional visual design. Imagine you have a striking Abstract design or a carefully crafted logo. If it’s a raster image, enlarging it for a billboard or a large poster would result in a pixelated, unprofessional appearance. However, if it’s a vector, you could blow it up to cover an entire building, and its edges would remain perfectly smooth and sharp. This inherent scalability is the primary advantage of vector images, making them ideal for a wide array of applications:
- Logos and Branding: A company logo needs to look good on a business card, a website, a t-shirt, and a billboard. Vector formats ensure this consistency.
- Illustrations and Digital Art: Many forms of graphic design and digital art benefit from the clean lines and scalable nature of vectors.
- Print Media: Posters, banners, brochures, and merchandise all require images that can withstand significant resizing for high-quality printing.
- Web Graphics: Scalable Vector Graphics (SVG) are increasingly popular for web design, offering resolution independence and smaller file sizes for simple graphics.
On Tophinhanhdep.com, where users seek Image Inspiration & Collections and leverage Image Tools like AI Upscalers and Converters, understanding vector graphics enhances your creative toolkit. While AI Upscalers can improve the apparent resolution of raster images, they don’t fundamentally change them into resolution-independent vectors. True vectorization is a distinct process, transforming pixel-based data into mathematical descriptions that can be manipulated and scaled without degradation.
The choice between raster and vector often depends on the type of image and its intended use. Detailed photographs of Nature or complex Beautiful Photography are typically best suited as high-resolution raster images, as their intricate tonal variations and subtle textures are hard to replicate with vectors without immense complexity. However, for graphic elements, clear illustrations, or stylized portraits (like those found in Visual Design and Creative Ideas), vector is the undisputed champion. This guide focuses on bridging that gap, showing you how to take a raster image and convert it into a vector format suitable for diverse creative projects on Tophinhanhdep.com.

Vectorization with Tophinhanhdep.com’s Dedicated Vector Tool
Creating a vector portrait from a photograph can be a deeply rewarding process, transforming a realistic image into a stylized, scalable piece of digital art. This method, often facilitated by a dedicated vector graphics app like the one available on Tophinhanhdep.com, focuses on manual tracing and layering to achieve a unique illustrative style. It demands patience but rewards with a custom, high-quality vector output that complements various Visual Design and Digital Art projects.
Preparing Your Source Image
The foundation of a successful vector portrait lies in selecting the right source image. Look for a portrait with excellent lighting, clear contrast, and interesting details. High-resolution images are preferred, as you’ll be zooming in frequently to capture fine nuances. If the background is distracting, consider using Tophinhanhdep.com’s background removal tools to isolate your subject, ensuring a clean canvas for vectorization. For this tutorial, we imagine a striking portrait with good light, distinct shadows, and perhaps some accessories to add visual interest, aligning with Tophinhanhdep.com’s focus on captivating Images and Photography.
Once your image is ready, open Tophinhanhdep.com’s vector graphics app. Create a new document, ideally with an “Infinite Canvas” option if available, to give yourself ample working space. Import your chosen image by dragging it directly onto the canvas or using the “Place Image” function. To prevent accidental movement during your intricate tracing work, remember to lock the image layer in your layers panel.
Building the Vector Portrait Layer by Layer
The core of this method involves meticulously outlining the major components of your image using drawing tools like the Pen or Bezigon (or their equivalents in Tophinhanhdep.com’s vector graphics app). Start with the largest, most fundamental “base shapes”: the face, hair, clothing, neck, and any prominent background elements you wish to include. The choice between the Pen (for more freehand drawing) and the Bezigon (for perfect curves) is yours; feel free to combine them. Initially, focus on outlines, using temporary fill colors if it helps visualize the segments.
Once the base shapes are established and locked, move on to the “main features”: eyebrows, eyes, mouth, and any accessories. This iterative process of outlining ensures that each element is captured as a distinct vector shape. Keep the original photo visible as a guide, either by temporarily hiding your vector fills or reducing their opacity. This approach mirrors the precision required in Digital Art and Photo Manipulation, where every detail contributes to the final aesthetic.
Refining Details: Lights, Shadows, and Outlines
The magic truly happens when you start delineating the interplay of light and shadow, giving depth and dimension to your vector portrait. This phase can be broken down into four key steps: lights, mid-tones, shadows, and final outlines.
- Light Spots: Observe where the light hits your subject most intensely – the highlights on the hair, face, shoulders, or even subtle glints on clothing or lips. Using the Pen or Bezigon tools, create solid shapes that represent these lighter areas. Don’t aim for photographic blurriness; instead, interpret these soft light reflexes as distinct, clean vector shapes. An image with good contrast simplifies this step, helping you clearly identify these tonal shifts. If your image lacks punch, you might apply a “Color Adjust” effect to boost contrast temporarily.
- Mid-tones: Progress to outlining the “mid-tones” – the areas that are darker than the highlights but not yet deep shadows. These might include subtle variations on the skin, the folds of eyelids, or the texture of teeth and nails. This adds another layer of complexity and realism to your vectorized image.
- Shadows: Next, tackle the “shadows” – the darkest parts of the image, such as the left side of the face, the neck, or areas under accessories. These shapes are crucial for defining form and depth. Even a black blouse will have variations in its dark tones due to light reflection, requiring careful outlining of these subtle differences.
- Final Outlines: Conclude with “final outlines,” adding stronger, darker lines where necessary to delineate distinct shapes or intersections, such as the lines of fingers, the bend of arms, or the division between the face and neck. These crisp lines enhance definition and bring clarity to the illustration.
Lastly, pay special attention to accessories. Metal elements, like bracelets or earrings, reflect light differently. Represent these with multiple layers of lighter shades and small, bright reflexes on top of a base color, capturing their metallic sheen. For complex accessories like necklaces, incorporate both highlights and subtle shadows to give them form.
Once these layers are complete, you have a fully vectorized portrait. On Tophinhanhdep.com, you can further enhance this by tweaking the color palette, experimenting with hues and saturations, or even adding a “final touch” with a blending mode overlay (like “Screen”) to create a unique color effect. This meticulous approach ensures that your vector portrait is not only scalable but also a beautiful piece of Digital Art, ready for any application from Wallpapers to specialized Graphic Design projects.
Vectorizing in Tophinhanhdep.com’s Image Editing Software
While a dedicated vector application is ideal for detailed manual tracing, Tophinhanhdep.com’s image editing software (similar to what’s traditionally known as “Photoshop”) also offers robust capabilities for converting raster images into vectors, particularly for stylized effects. This method is excellent for creating clean, scalable monochrome or limited-color vector representations from your existing images. It’s a highly practical skill for designers and artists who need to adapt images from their Photography collections into scalable graphics.
From Pixels to Paths: The Foundation
To begin, open your chosen raster image in Tophinhanhdep.com’s image editing software. As with the previous method, selecting an image with a simple or easily removable background (perhaps a portrait with clear contrast) will yield the best results. Tophinhanhdep.com offers various tools for background removal, ensuring your subject is isolated for vectorization.
The initial step involves making a precise selection around the main subject. The software provides several tools for this:
- Quick Selection Tool or Magic Wand: Good for selecting areas based on color similarity.
- Select Subject: An AI-powered feature that intelligently identifies and selects the prominent subject in a photo, saving considerable time, especially for portraits. You can usually find this under the “Select” menu.
- Object Selection Tool: Provides more control for complex objects or groups within an image.
Once a selection is made, you can refine its edges using “Select & Mask” to ensure a clean outline. Output this refined selection to a new layer, effectively separating your subject from its background. This meticulous selection process lays the groundwork for accurate vector conversion, ensuring that only the desired elements are transformed.
Crafting Detail with Threshold and Color Range
With your subject isolated, the next crucial step is to apply a “Threshold” adjustment layer. This powerful tool transforms your image into a high-contrast black and white representation, simplifying complex pixel data into stark tonal areas. Adjust the threshold slider until the key details of your image are clearly defined in black and white. This step is vital as it interprets the original image’s tonal variations into solid shapes that can be easily vectorized. For instance, a value of around 51 might work well for a portrait, but experimentation based on your specific image is encouraged.
After achieving a satisfactory threshold effect, you’ll use the “Color Range” command (typically found under the “Select” menu). This feature allows you to select pixels based on their color or tonal range. In this context, you’ll use it to select all the black and white tonal areas created by the threshold effect. By picking up a range of colors with the eyedropper tools and viewing the grayscale preview, you can ensure all significant black (or white) areas are selected. This selection forms the basis of your vector paths.
Finalizing Your Vector Shape
With the tonal areas selected, the next step is to convert these pixel-based selections into vector paths. Right-click on your image while any selection tool is active, and choose “Make Work Path” from the context menu. A “Tolerance” value dialog will appear. This value dictates how closely the vector path follows the original pixel contours. A lower tolerance (e.g., 1.0 to 1.5 pixels) creates more anchor points and a more detailed, yet potentially less smooth, path. A higher tolerance results in fewer anchor points and smoother curves, ideal for simpler shapes. For portraits, a value around 1.0-1.5 is often a good starting point, but always experiment to find the optimal balance for your image.
Once the work path is created, you can save it in the “Paths” panel. To visualize your new vector, create a “Solid Color” adjustment layer from the Layers panel. This instantly fills your work path with a solid color, creating a true vector shape layer. This layer is now a scalable vector representation of your image’s chosen tonal areas. For images with more color complexity, you can repeat the “Color Range” and “Make Work Path” steps for different tonal areas (e.g., “Highlights” for the white parts), creating multiple vector layers.
To ensure your vector shape is a single, unified entity, select all parts of the shape using the “Shape Selection Tool” and merge them. This prepares your vector for export. The final step involves exporting your vector image as an SVG file. Right-click on your vector shape layer, select “Export As…”, and choose SVG as the format. This process effectively transforms a raster image into a scalable vector graphic directly within Tophinhanhdep.com’s image editing software, providing a flexible asset for various Visual Design and Image Inspiration & Collections needs. Alternatively, you can save it as a Photoshop EPS format, which also preserves vector data. This method allows you to take any image, from a photo to a graphic, and convert it into a vector format that can be resized indefinitely without losing quality, a valuable addition to your Image Tools arsenal.
Automated Vectorization with Tophinhanhdep.com’s Vector Design Software
For users seeking a quicker and often more automated approach to vectorization, Tophinhanhdep.com’s vector design software (akin to “Illustrator”) offers powerful “Image Trace” functionality. This method is particularly efficient for transforming raster logos, line art, or even complex photos into scalable vector artwork, suitable for Graphic Design and Digital Art projects where speed and precision are both important.
Leveraging Image Trace Presets
Begin by opening your raster image in Tophinhanhdep.com’s vector design software. Similar to the other methods, an image with a clear subject and good contrast will yield better results. Once the image is placed and selected on your artboard, look for the “Image Trace” panel or button, usually found in the properties panel or a dedicated menu.
The strength of this tool lies in its diverse range of presets, each designed to interpret raster data in a specific way:
- High Fidelity Photo / Low Fidelity Photo: These are excellent for detailed photographs or complex artwork, aiming to preserve as much visual information as possible. High Fidelity maintains more detail but results in more complex vector paths.
- 3 Colors, 6 Colors, 16 Colors: Perfect for logos, illustrations, or graphics with a limited color palette. These presets reduce the image to the specified number of flat colors, simplifying the vector output.
- Shades of Gray: Produces a detailed grayscale vector image, ideal for black and white photography or artwork.
- Black and White Logo: Designed for simple, high-contrast logos, resulting in a clean two-color (black and white) vector.
- Sketched Art, Silhouettes, Line Art, Technical Drawing: These specialized presets are tailored for specific artistic styles, converting images into predominantly line-based, monochrome vector drawings.
Select the preset that best matches the visual style you aim for. For instance, if you’re vectorizing a stylized portrait or complex artwork from your Aesthetic Images collection, “High Fidelity Photo” might be appropriate. For a clear logo, one of the “Colors” presets or “Black and White Logo” would be more suitable. Upon selecting a preset, the software automatically traces the image, converting pixels into vector paths. You’ll immediately notice the transformation: sharp, scalable shapes replace the original pixels, ensuring quality no matter the zoom level.
Post-Tracing Refinements and Editing
After the initial “Image Trace” process, your image is technically vectorized, but it’s still treated as a single tracing object. To gain full editability, you need to “Expand” the traced image. This command, typically found in the properties panel, converts the tracing object into individual vector shapes and paths. Following this, “Ungroup” the elements (right-click on the image and select “Ungroup” or use the menu option) to separate the various colored shapes into distinct, editable components.
At this stage, your image consists of numerous layers or groups of paths, each representing a specific color area from the original. You can now fine-tune your vector art:
- Color Adjustment: Select specific color groups using tools like the “Direct Selection Tool” and the “Select > Same > Fill Color” command (or similar on Tophinhanhdep.com’s vector design software). This allows you to globally change the color of all similar shapes, offering immense flexibility for color palette adjustments to fit your Visual Design needs.
- Shape Modification: Using the Pen or Brush tools, you can modify existing vector paths, fill in gaps, or add new shapes and colors. This is where you can further stylize the image, perhaps simplifying complex areas or enhancing certain features.
- Detail Simplification: If the initial trace created too many intricate shapes, you can use path simplification tools to reduce the number of anchor points, making the vector file smaller and easier to manage, without significant loss of visual integrity.
This detailed editing capability, after the automated tracing, makes Tophinhanhdep.com’s vector design software a powerful tool for converting raster images into truly adaptable vector art. Whether you’re working on Abstract designs, Sad/Emotional art, or practical Graphic Design projects, this blend of automation and manual refinement provides comprehensive control over the vectorization process.
Saving, Optimizing, and Exploring Vector Possibilities
Once your image has been successfully transformed into a vector, the final, crucial step is to save it in an appropriate vector format and consider how it integrates into your broader creative workflow on Tophinhanhdep.com. This ensures its scalability, versatility, and compatibility with various applications, from print to web.
The most common and recommended vector file formats include:
- SVG (Scalable Vector Graphics): An XML-based vector image format for two-dimensional graphics with support for interactivity and animation. SVG is widely supported across web browsers and design software, making it an excellent choice for web graphics and general use.
- AI (Tophinhanhdep.com Vector Design Software Document): This is the native file format for Tophinhanhdep.com’s vector design software. It preserves all layers, paths, and editing capabilities, making it the ideal master file for continued work.
- EPS (Encapsulated PostScript): A widely used vector format compatible with most design and print software. It’s a robust choice for professional printing.
- PDF (Portable Document Format): While primarily a document format, PDFs can embed vector graphics and maintain their scalability. They are often used for sharing designs for review or for print-ready files.
To save your vectorized image, navigate to “File > Export” or “File > Save As” within your chosen Tophinhanhdep.com software, and select your desired vector format. Always keep an editable master file (e.g., in AI format) for future modifications.
Beyond saving, consider the broader implications for your work on Tophinhanhdep.com:
- Image Optimization: While vector files are inherently scalable, complex vector art with thousands of paths can still be large. Use Tophinhanhdep.com’s Image Tools like “Compressors” and “Optimizers” to manage file sizes, especially for web deployment. Even vector files can benefit from careful optimization of anchor points and path complexity.
- Integration with Photography and Visual Design: Vectorized images can be combined with High Resolution Photography to create mixed-media designs. For example, a vector portrait could be layered over a beautiful photographic background. This aligns with Tophinhanhdep.com’s focus on Creative Ideas and diverse Editing Styles.
- Expanding Creative Horizons: Vectorization opens up possibilities for new styles, such as minimalistic designs, abstract interpretations, or even grayscale patterns. Experiment with these different aesthetics to expand your Image Inspiration & Collections. You can transform Sad/Emotional images into powerful graphic statements or enhance Beautiful Photography with vectorized graphic elements.
- Future-Proofing Your Assets: By having vector versions of your key visual assets (like logos or branding elements), you ensure they remain usable and high-quality for any future application, from digital marketing to large-scale physical installations.
In conclusion, mastering the art of converting an image to a vector image, whether through manual tracing with Tophinhanhdep.com’s dedicated vector tool, strategic manipulation within Tophinhanhdep.com’s image editing software, or automated tracing in Tophinhanhdep.com’s vector design software, is an invaluable skill. It empowers you to create versatile, high-quality visual content that truly stands the test of scale, perfectly aligning with the rich array of imaging, photography, and design topics celebrated on Tophinhanhdep.com. By embracing vector graphics, you unlock a new dimension of creative control and professional polish for all your visual projects.