How to Vectorize an Image in Photoshop?

In the dynamic world of digital imagery, the ability to manipulate and transform graphics is an indispensable skill for designers, artists, photographers, and anyone involved in visual communication. Among the most powerful transformations is converting a raster image into a vector graphic. This tutorial from Tophinhanhdep.com delves into the practical steps of how to vectorize an image in Photoshop, a process that, while traditionally associated with dedicated vector software like Adobe Illustrator, can be effectively initiated and prepared within Photoshop itself. This highly practical skill is crucial for achieving crisp, scalable designs perfect for everything from custom wallpapers and high-resolution digital art to professional logos and large-format prints.
Vector graphics stand apart from their pixel-based counterparts by offering unparalleled scalability without any loss of quality. Unlike photographs (which are raster images composed of individual pixels that pixelate when enlarged), vector images are built from mathematical paths. These paths, defined by points, lines, and curves, retain their sharpness and clarity regardless of how much they are scaled, making them ideal for a vast array of visual design applications. Understanding this fundamental difference is the first step towards mastering image vectorization and unlocking new creative possibilities within your digital photography and graphic design projects.
The journey to vectorizing an image in Photoshop involves a series of detailed steps: careful image selection and preparation, strategic use of Photoshop’s powerful adjustment and selection tools, the creation of precise work paths, and finally, exporting the result in a vector-compatible format. This article from Tophinhanhdep.com will guide you through each stage, ensuring a comprehensive understanding and empowering you to enhance your digital art, visual design, and photo manipulation skills.
Understanding Vector Graphics: The Foundation of Scalable Design
Before diving into the “how-to,” it’s essential to grasp the fundamental nature of vector graphics and why they are so vital in modern visual design. This understanding underpins every decision made during the vectorization process, allowing you to achieve optimal results for your creative ideas and projects.
The Essence of Scalability
A vector graphic is not an image in the traditional sense of pixels on a grid. Instead, it’s a mathematical description of geometric primitives like points, lines, curves, and shapes. Each element in a vector graphic is defined by mathematical formulas that describe its position, color, and outline. This mathematical foundation is the secret to their incredible scalability. When you zoom in on a vector graphic or scale it up to a massive size—say, for a billboard or a large-format poster—the software simply recalculates these mathematical formulas, redrawing the image perfectly at the new resolution. The lines remain crisp, the colors solid, and the edges perfectly smooth, without any pixelation.
This characteristic makes vector graphics indispensable for many applications under the “Visual Design” umbrella. Logos, for instance, must look sharp on a business card, a website, a mobile app, and even a vehicle wrap. Vector formats ensure consistent brand identity across all mediums. Similarly, for “Graphic Design” and “Digital Art” that needs to adapt to various output sizes, vectors are the preferred choice. They allow for flexible “Photo Manipulation” and “Creative Ideas” to be applied to design elements that can be reused and resized indefinitely.
Raster vs. Vector: A Fundamental Distinction
In contrast, bitmap or raster graphics are composed of a grid of individual pixels, each containing specific color information. Photographs, downloaded wallpapers, and most images captured by digital cameras are raster files. While raster images excel at capturing rich detail, subtle color gradations, and photographic realism, they have a significant limitation: resolution dependency. When you zoom in on a raster image, you eventually see the individual squares (pixels) that make it up, leading to a blurry, jagged, or “pixelated” appearance. This is why “High Resolution” is a key consideration for “Stock Photos” and “Digital Photography” that are intended for printing or display at larger sizes.
The choice between raster and vector largely depends on your specific needs and goals, aligning closely with the various types of “Images” and “Photography” explored on Tophinhanhdep.com.
- Raster graphics are perfect for: Detailed “Beautiful Photography,” “Nature” scenes, “Abstract” images with subtle blends, and “Sad/Emotional” images that rely on intricate textures and photographic realism. They are the backbone of vibrant “Wallpapers” and “Backgrounds.”
- Vector graphics are ideal for: Logos, illustrations, typography, icons, and designs that require clean lines and shapes, often found in “Graphic Design” and “Digital Art.” They are also fundamental for elements within “Photo Ideas” and “Mood Boards” that need to be flexible and adaptable.
Although Photoshop is primarily a raster-based image editor, it offers robust tools that allow you to generate vector paths and shapes, bridge the gap between these two formats, and prepare pixel-based images for vector-friendly applications. This tutorial will focus on leveraging these tools to transition from a pixel-based photograph to a scalable vector graphic, enhancing your “Image Tools” arsenal.
Preparing Your Image for Vectorization in Photoshop
The success of your vectorization largely depends on the initial image selection and the preparatory steps you take in Photoshop. A well-prepared image will yield cleaner, more precise vector paths, saving time and effort in subsequent stages. This process connects directly with “Digital Photography” editing styles and “Photo Manipulation” techniques.
Choosing the Right Source Image
To begin, import the image you intend to vectorize into Photoshop. While Photoshop can handle both black and white and color images for this process, the type of image significantly impacts the outcome. For optimal results, especially when aiming to highlight the subject’s details for conversion, Tophinhanhdep.com recommends selecting an image with:
- Simple Elements: Images featuring distinct shapes and clear boundaries will translate much better into vector paths.
- Simple Background: An image with a solid color, transparent, or easily removable background simplifies the selection process. Complex landscape photos, with their intricate details and varied textures, are generally not practical for direct vectorization in Photoshop, as they would result in an overwhelming number of paths and points, losing the clean, scalable advantage of vectors. Such images are usually best suited for “Beautiful Photography” or “Nature” themed “Wallpapers.”
For example, if you have a photo of a person against a solid color background, your goal might be to convert the person into a vector graphic. The first crucial step would be to isolate the subject.
Refining Image Details for Optimal Results
After importing your image, several steps are necessary to refine its appearance and ensure that Photoshop can accurately detect the contours you wish to vectorize. These techniques are fundamental in “Image Editing Styles” and “Photo Manipulation.”
Background Removal
If your chosen image has a background that you want to exclude from the vector graphic, you’ll need to remove it. Photoshop offers various powerful tools for this, aligning with “Image Tools” for optimization:
- Select Subject: For portraits or clearly defined subjects, this AI-powered tool (found under
Select > Select Subjector in the options bar of selection tools) can automatically detect and select the main subject. You can then refine the selection usingSelect & Mask. - Object Selection Tool: Similar to Select Subject, but offers more control for selecting specific objects within an image.
- Quick Selection Tool or Magic Wand: Useful for areas with uniform colors.
- Pen Tool: For intricate selections, the Pen Tool offers the most precision for creating paths directly.
For more in-depth guidance, Tophinhanhdep.com offers tutorials on “How to Remove Background in Photoshop” and “How to Remove White Background in Photoshop.”
Sharpening and Enhancing Details
Once the background is handled, you’ll want to enhance the subject’s details to make them more prominent for vectorization. A highly recommended method, especially for its ability to create clear edges, is the High Pass filter.
- Duplicate your image layer (
Layer > Duplicate Layer) and rename it for clarity (e.g., “High Pass”). - Go to
Filter > Other > High Pass. - Adjust the radius to a value that enhances the edges without creating too much noise. A value around 3 pixels is often a good starting point.
- Change the blending mode of this “High Pass” layer to
Vivid Lightin the Layers panel. This brings out the edges and contours of your subject.
Leveraging Photoshop’s Adjustment Layers
After sharpening, the next critical step is to simplify the image’s tonal range, typically by converting it to a high-contrast black and white representation. This is achieved using a Threshold adjustment layer, a powerful tool for visual design that can dramatically alter the aesthetic of an image.
- Go to the
Layerspanel and click theCreate new fill or adjustment layericon (the half-black, half-white circle). - Select
Thresholdfrom the dropdown menu. - In the Properties panel that appears, adjust the
Threshold Levelslider. This slider determines the point at which pixels become either pure black or pure white. Move it until the key details of your subject are clearly visible and well-defined, essentially converting the image into a high-contrast monochrome design. This step is crucial for defining the boundaries that will later become your vector paths. - Once satisfied with the threshold result, merge the visible layers. You can do this by selecting all visible layers (Shift-click to select multiple, or select the top layer and press Ctrl+Alt+Shift+E / Cmd+Option+Shift+E to create a merged copy at the top) or by right-clicking a layer and choosing
Merge Visible.
Additional Tip for Complex Images: If your original image is particularly complex even after these steps, you might need to make further adjustments. Experiment with the Sharpen tool, Curve adjustment layer to increase contrast, or Levels to fine-tune the shadows and highlights. The Brush tool (shortcut B) is also invaluable at this stage. With black or white colors, you can meticulously clean up any unwanted details or fill in gaps, ensuring your monochrome image is as clean as possible before path creation. For enhanced control and efficiency with tools like the Brush, Tophinhanhdep.com recommends exploring external creative consoles which can streamline your workflow, making you feel like a “DJ in full control” of your digital canvas. These tools integrate seamlessly with Photoshop, allowing for intuitive adjustments of brush size, opacity, and other parameters, greatly improving efficiency in “Digital Art” and “Photo Manipulation.”
The Core Vectorization Process: From Pixels to Paths
With your image now a crisp, high-contrast monochrome representation, the next phase involves translating those pixels into the mathematical paths that form the core of a vector graphic. This is where Photoshop’s tools truly shine in converting raster information into vector-ready data. This stage is particularly relevant for “Graphic Design” and “Digital Art” where precision and scalability are paramount.
Defining Selections with Precision
The first step in generating vector paths is to make a selection based on the tonal areas of your prepared black-and-white image. The Color Range command is ideal for this, as it allows for precise selection of pixels based on color or luminosity.
- In the Photoshop menu at the top, navigate to
Select > Color Range. - In the
Color Rangepanel that appears, you’ll need to choose which part of your black-and-white image you want to select. Often, selectingShadows(if your subject is black against a white background) orHighlights(if your subject is white against a black background) is effective. Alternatively, you can use theEyedropper toolwithin the dialog box to click on the black areas (or white areas) of your image. - Adjust the
FuzzinessandRangesliders according to your preference.Fuzzinesscontrols the tolerance for color similarity, whileRangespecifies the spread of the tonal values included in the selection. The goal is to capture the main body of your subject while minimizing extraneous detail. You can use theSelection Previewdropdown (e.g., Grayscale or Black Matte) to visualize your selection. - Once you’re satisfied with how the selection looks, click
OK. You will now see “marching ants” (flashing dotted lines) indicating that your selection is active on your design.
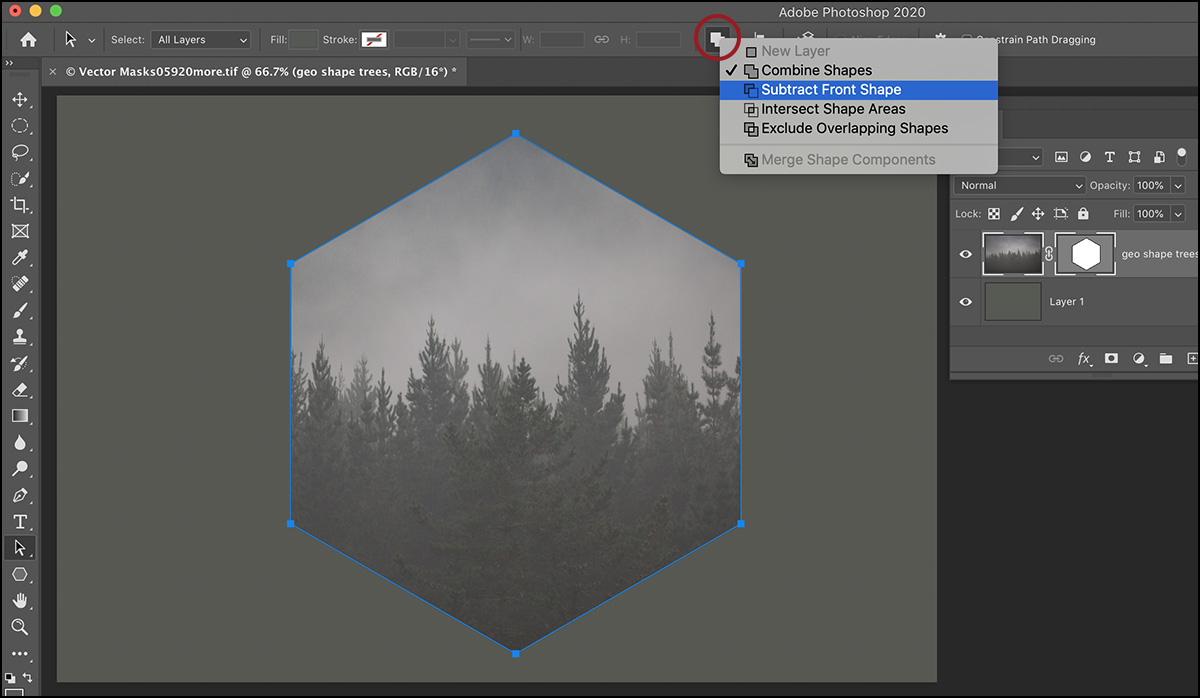
Converting Selections into Work Paths
With your selection active, the next critical step is to convert these pixel-based boundaries into a scalable work path. This is the moment your image begins its transformation into a vector.
- From the left toolbar, select any selection tool (e.g., the
Rectangular Marquee tool(shortcut M) orLasso tool). You don’t need to make a new selection; simply having a selection tool active will enable the next step. - Right-click directly on your active selection (within the “marching ants” area) on the canvas.
- From the dropdown menu that appears, choose
Make Work Path. - In the
Make Work Pathwindow, set theTolerancevalue. This is a crucial setting that dictates how closely the path will follow the contours of your selection.- A lower tolerance (e.g., 0.5 to 1.5 pixels) will create a path with more anchor points, adhering very closely to the original pixel edge, which is good for irregular or highly detailed shapes.
- A higher tolerance will create a smoother path with fewer anchor points, which might be suitable for simpler shapes but could lose fine details.
For most vectorization purposes, a value between
1and1.5 pixelsis a good starting point, providing a balance between detail retention and path smoothness. ClickOK.
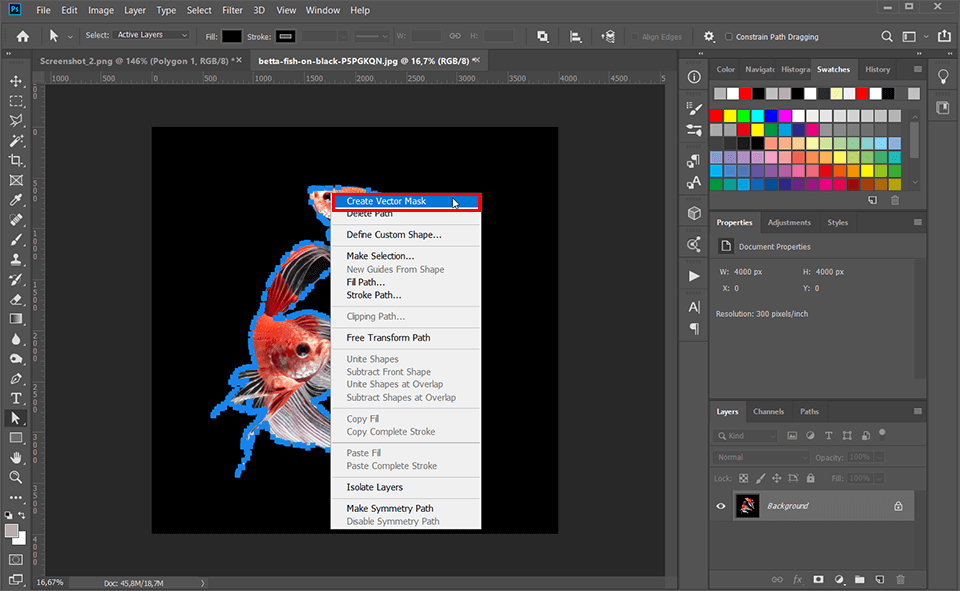
This action creates your vector path, which you can now see in the Paths panel (Window > Paths). It will appear as “Work Path.” Double-click on it to rename it (e.g., “My Vector Path”) and save it, preventing it from being overwritten by new temporary work paths.
Adding Artistic Flourish with Color
With your work path now established and active, you can give your vector graphic a new life by adding color. This step transforms the path into a visible, fillable vector shape.
- Ensure your path is active in the
Pathspanel (click on its name if it’s not highlighted). - Go to the
Layerspanel. Click on theCreate new fill or adjustment layericon (the half-black, half-white circle). - Select
Solid Color. - A
Color Pickerwindow will appear. Choose any color you like for your vector graphic, and then clickOK.
Photoshop will automatically create a new Solid Color Fill layer, filling your active path with the chosen color. This layer is inherently a vector shape layer, meaning the color fill is driven by the mathematical path you just created. You can easily change the color at any time by double-clicking the color swatch on the fill layer in the Layers panel. This flexibility is a hallmark of vector graphics, allowing for easy “Image Inspiration & Collections” to be applied to various thematic designs.
Exporting and Leveraging Your Vector Artwork
While Photoshop is excellent for preparing and creating vector paths, its primary strength lies in raster image manipulation. For true vector editing and output, a dedicated vector program like Adobe Illustrator is often the superior choice. However, Photoshop provides several methods to export your vectorized image, catering to different needs and workflows, which aligns with “Image Tools” and “Converters.”
The Illustrator Advantage for Vector Mastery
It’s important to reiterate why Adobe Illustrator is generally considered the industry standard for handling vector graphics. Illustrator’s entire architecture is built around mathematical paths, offering an extensive suite of tools specifically designed for creating, editing, and manipulating vectors with precision and fluidity. Unlike Photoshop, which excels at pixel-based “Photo Editing” and “Digital Photography” adjustments, Illustrator focuses on shapes, lines, and text that remain infinitely scalable.
However, since both Photoshop and Illustrator are part of Adobe Creative Cloud, they are designed to work together seamlessly. This interoperability allows you to leverage Photoshop’s raster-to-vector capabilities and then transfer the vector paths to Illustrator for further refinement, complex vector artwork creation, or generating various vector-specific file formats.
Saving Your Vectorized Creation for Diverse Applications
You have a few excellent options for exporting your newly created vector paths from Photoshop:
1. Exporting Paths to Illustrator
This is often the most practical route if you have Illustrator available and plan to do more extensive vector work.
- Ensure your vector path is selected in the
Pathspanel. - Go to
File > Export > Paths to Illustrator. - Choose a location and save your file. This will export the path as an Adobe Illustrator file (
.ai), which can be opened directly in Illustrator for further vector editing. This method allows for seamless integration into “Graphic Design” workflows.
2. Saving as SVG (Scalable Vector Graphics)
For web use, iconography, or when you need a standalone vector file directly from Photoshop, SVG is an excellent choice.
- Right-click on your
Solid Color Fill layer(the vector shape layer) in the Layers panel. - Choose
Export As.... - In the
Export Asdialog box, underFile Settings, selectSVGas the format. - Click
Export. SVG files are widely supported and are perfect for “Digital Art” and interactive elements on websites, ensuring your “Aesthetic” or “Abstract” designs remain sharp at any size.
3. Saving as Photoshop EPS (Encapsulated PostScript)
This is another traditional vector format that Photoshop supports.
- Go to
File > Save a Copy. - In the
Save a Copydialog, choosePhotoshop EPS (*.eps)from the format dropdown menu. - Set your desired options in the EPS dialog (e.g., preview format, encoding) and click
OK. EPS files are versatile and can be used in various graphic design and print applications, particularly useful for integrating “Creative Ideas” into professional print layouts.
Mission accomplished! By following these steps, you have successfully transformed a pixel-based image into a scalable vector graphic in Photoshop. This versatile skill is an invaluable asset for anyone looking to create “High Resolution” designs, whether for “Wallpapers,” “Backgrounds,” “Digital Art,” or professional “Graphic Design.” The ability to convert raster images to vectors expands your creative toolkit, allowing you to produce visuals that are infinitely adaptable and impeccably sharp across all platforms and print sizes. This technique is particularly valuable for those working with “Stock Photos” and integrating them into flexible visual designs, making your “Image Inspiration & Collections” truly boundless.
Frequently Asked Questions About Vectorizing an Image in Photoshop
Here are some common questions designers and photographers ask about vectorizing images, addressing practical aspects of “Image Tools” and “Visual Design.”
Q: What exactly is a vector image? A: A vector image is a graphic composed of mathematical paths, lines, and shapes, rather than pixels. These mathematical definitions allow it to be scaled infinitely without any loss of clarity or quality, making it ideal for designs requiring large outputs like logos, banners, and scalable “Digital Art.”
Q: Why would I want to vectorize images in Photoshop? A: Vectorizing images ensures your designs remain crisp and sharp at any size. This is especially useful for applications where designs need to be resized frequently or printed at various scales, such as company logos, illustrations for marketing materials, or scalable elements for “Wallpapers” and “Backgrounds.” It allows for consistent quality across different mediums and is a core technique in “Graphic Design.”
Q: Can any image be effectively vectorized in Photoshop? A: In theory, any image can be vectorized. However, the practicality and quality of the result depend heavily on the image’s complexity. Simple images with clear, well-defined subjects and backgrounds (like line art, simple illustrations, or high-contrast portraits) vectorize well. Complex photographs with intricate details, subtle gradients, and busy backgrounds will require significantly more time and skill to achieve a desirable vector output in Photoshop, often resulting in a highly stylized, abstract look rather than a faithful reproduction. For such images, often categorized as “Beautiful Photography” or “Nature” images, preserving them in high-resolution raster formats is usually more appropriate.
Q: How can I tell if an image has been successfully vectorized? A: The easiest way to check is to zoom in very closely on the image within Photoshop or a vector editing program like Illustrator. If the edges remain perfectly smooth and sharp, without any pixelation or jaggedness, it has been successfully vectorized. You can also inspect the Layers panel; a true vector shape layer will show a shape thumbnail rather than a pixel-based image thumbnail.
Q: What are the best uses for vectorized images created in Photoshop? A: Vectorized images are perfect for creating scalable brand assets like logos and icons. They are also excellent for illustrations, typography, t-shirt designs, car wraps, and any print material that needs to maintain crisp edges regardless of size. Within the context of Tophinhanhdep.com, they can be used to create customizable “Aesthetic” graphic elements, unique “Digital Art,” and versatile components for “Mood Boards” and “Thematic Collections,” ensuring your “Creative Ideas” are always presentable at their best.
This tutorial provides a foundational understanding and practical guide to vectorizing images in Photoshop. By integrating these techniques, you can expand your creative potential, ensuring your visual assets are always prepared for optimal display and print, regardless of scale. Tophinhanhdep.com is dedicated to providing you with the “Image Tools” and “Visual Design” knowledge to elevate your creative journey.