How to Make an Image Bigger Without Losing Quality: A Comprehensive Guide

In the vibrant world of digital imagery, where visuals dictate engagement and first impressions are paramount, the ability to manipulate images without compromising their integrity is a highly sought-after skill. At Tophinhanhdep.com, we understand the critical role that stunning, high-resolution visuals play, whether you’re curating aesthetic wallpapers, preparing backgrounds for a creative project, showcasing beautiful photography, or optimizing images for a professional portfolio. Yet, a common dilemma many digital creators face is the need to enlarge a small image, only to find it descends into a blurry, pixelated mess. This frustration stems from fundamental aspects of digital image construction, but thankfully, advancements in image tools and editing styles offer powerful solutions.
This guide from Tophinhanhdep.com delves deep into the art and science of image enlargement. We’ll explore why images lose quality when scaled up, introduce you to a suite of effective tools—ranging from sophisticated AI upscalers to versatile digital photography software—and provide step-by-step instructions and best practices to ensure your enlarged images remain crisp, clear, and perfectly suited for any application. Whether your goal is to meet specific website uploading requirements, prepare an image for high-quality printing, or simply enhance a cherished photograph, mastering the techniques outlined here will empower you to transform your visual content with confidence and precision.

Understanding Image Enlargement: Why Quality Matters
The quest to make an image bigger often begins with a specific need: perhaps a background image for a desktop that requires higher dimensions, an abstract art piece for a larger canvas print, or a crucial detail in a nature photograph that needs to be highlighted. However, simply “stretching” a small image rarely yields satisfactory results. Before we dive into the “how-to,” it’s essential to understand the “why” behind image degradation during enlargement.
The Pixel Predicament: Why Images Blur
At its core, most digital images we encounter on the web—such as JPEG and PNG files—are raster images, also known as bitmap images. Imagine a mosaic made up of thousands, or even millions, of tiny colored squares. Each of these squares is a pixel, and it holds a specific color value at a fixed position within the image grid. The collective arrangement of these pixels forms the complete picture.
When you shrink an image, you are essentially compressing these pixels, discarding some of the redundant information. This often results in a visually acceptable outcome because the remaining pixels are packed closer together, making imperfections less noticeable. However, the reverse is true when you attempt to enlarge a bitmap image. Without additional information, the image editing software has no new details to add. Instead, it “stretches” the existing pixels, making them larger and more visible. This stretching causes the characteristic blurriness, blockiness, or “pixelation” that diminishes image quality. The software tries to interpolate, or guess, the colors of the new pixels it’s adding between the existing ones, but traditional methods often fall short, leading to a loss of sharpness and detail. This is particularly problematic for high-resolution photography, where every detail counts, or for aesthetic images intended to convey a specific mood without visual artifacts.

The Imperative of High-Resolution Imagery for Tophinhanhdep.com
For a platform like Tophinhanhdep.com, which champions images for wallpapers, backgrounds, aesthetic compositions, and beautiful photography, maintaining exceptional visual quality is non-negotiable. Low-quality, pixelated images can significantly detract from the user experience, making content appear unprofessional or unappealing. High-resolution images, on the other hand, offer numerous advantages:
- Versatility: They can be scaled down for web use without losing detail, or enlarged to a certain extent for printing or high-definition displays while retaining clarity. This aligns with our focus on providing diverse images suitable for various uses.
- Professionalism: Crisp, clear visuals immediately elevate the perceived quality of your content, reflecting positively on your brand or personal portfolio. This is crucial for digital photography and stock photos.
- Impact: Detailed images are more engaging and impactful. Whether it’s the intricate patterns in an abstract piece or the subtle textures in a nature shot, high resolution ensures these elements are fully appreciated.
- Future-Proofing: As screen technologies advance, demanding higher pixel densities (e.g., 4K, 8K displays), starting with high-resolution sources ensures your images remain stunning for years to come.
Ultimately, the goal isn’t just to make an image physically “bigger,” but to make it qualitatively bigger – more detailed, sharper, and more impactful, preserving the artistic intent and technical excellence.
The Role of AI in Image Enhancement
The traditional limitations of pixel stretching have been significantly overcome with the advent of Artificial Intelligence (AI) in image processing. AI upscalers, a cornerstone of modern image tools, leverage machine learning algorithms trained on vast datasets of images to intelligently “reconstruct” missing details when an image is enlarged. Instead of merely stretching pixels, AI analyzes patterns, textures, and edges within the existing data to generate new, convincing pixels that blend seamlessly, adding detail that wasn’t explicitly present in the original small image.
This technological leap is particularly exciting for Tophinhanhdep.com’s audience, as it offers a robust solution for enhancing everything from digital art to beloved photographs. AI-powered tools can:
- Preserve Detail: By understanding context, AI can add fine details to hair, skin, fabric, or natural elements that would otherwise become blurry.
- Remove Noise: Many AI upscalers also incorporate noise reduction, cleaning up artifacts that become more prominent when an image is enlarged.
- Sharpen Edges: AI can intelligently sharpen soft edges without introducing artificial-looking halos or artifacts.
- Upscale Significantly: Where traditional methods might falter beyond a certain enlargement factor, AI can often achieve 2x, 4x, 8x, or even greater upscaling with impressive results.
The integration of AI into image editing styles marks a new era for visual design, making high-quality enlargement accessible to a broader audience and pushing the boundaries of what’s possible with photo manipulation.
Essential Tools and Techniques for Seamless Image Upscaling
Making an image bigger without losing quality requires the right tools and a understanding of their capabilities. From cutting-edge AI-powered solutions to time-tested professional software and even basic operating system utilities, Tophinhanhdep.com explores a range of options suitable for various skill levels and needs.
Leveraging AI-Powered Upscalers for Effortless Clarity
AI upscalers represent the pinnacle of modern image enlargement technology, offering often superior results with minimal effort. These tools are perfect for anyone seeking to quickly improve image resolution for backgrounds, wallpapers, or general digital photography.
Tophinhanhdep.com’s AI Image Enlarger
As a leading platform for visual content, Tophinhanhdep.com offers its own advanced AI image enlarger, designed to deliver stunning results with just a single click. This tool is built to intelligently increase image size and resolution, ensuring that your aesthetic and high-resolution images retain their beauty and sharpness.
How to make images bigger without losing quality with Tophinhanhdep.com’s AI Enlarger:
- Access the Tool: Navigate to the “Image Tools” section on Tophinhanhdep.com and select the “AI Upscalers” option.
- Upload Your Image: Click “Edit a photo” or “Upload a photo” and select the small image you wish to enlarge.
- Activate AI Enlarger: Locate the “Adjust” or “Enhance” section in the left toolbar and choose the “AI Enlarger” tool.
- Automatic Upscaling: The AI will automatically process and enlarge your small picture, enhancing its resolution. You can typically view a before-and-after comparison to appreciate the improvement.
- Apply and Download: Once satisfied, click “Apply” and download your high-quality picture in popular formats like JPG or PNG, ready for your wallpapers, mood boards, or graphic design projects.
This AI solution is ideal for beginners and professionals alike who prioritize efficiency and quality, removing the complexities of manual pixel adjustments.
ON1 Resize AI (Premium Solution)
Previously known as Perfect Resize, ON1 Resize AI is a powerful standalone software and a plugin for professional editing suites like Adobe Photoshop and Lightroom. It uses advanced AI to intelligently enlarge images while meticulously preserving sharpness and detail, making it an excellent investment for digital photography and stock photo professionals.
Key benefits:
- Fractal-based Interpolation: Beyond simple pixel stretching, ON1 Resize AI utilizes advanced algorithms to interpolate new pixels, effectively “creating” detail rather than just guessing.
- High-Quality Output: Known for producing exceptionally clean and sharp enlargements, even from relatively small originals.
- Workflow Integration: Seamlessly integrates with existing professional photography workflows.
While a premium tool, its capabilities make it invaluable for those who frequently need to upscale images for large prints or high-definition digital displays.
Mastering Traditional Photo Editors for Precision
While AI upscalers offer convenience, traditional photo editing software provides granular control and a deeper understanding of the enlargement process. These tools are often preferred for photo manipulation and intricate visual design tasks.
Adobe Photoshop
Photoshop remains the industry standard for graphic design and advanced image editing. While it requires a learning curve, its capabilities for enlarging images are extensive.
How to make an image bigger in Photoshop:
- Open Your Image: Launch Photoshop and open your small picture via “File” > “Open.”
- Access Image Size: Go to “Image” > “Image Size” on the top menu bar.
- Set Dimensions and Resolution: In the pop-up window, you can enter new values for width, height, and resolution.
- Crucial Setting: Resample: For optimal quality, select “Preserve Details (2.0)” or “Bicubic Smoother” (for enlargements) from the “Resample” dropdown. “Preserve Details (2.0)” is particularly effective as it reduces noise artifacts.
- Tip: If your image is an editable layer, consider converting it to a “Smart Object” (“Layer” > “Smart Objects” > “Convert to Smart Object”) before resizing. Smart Objects allow non-destructive scaling, meaning you can resize multiple times without cumulative quality loss.
- Fine-tuning (Optional but Recommended):
- Sharpening: After initial enlargement, you might apply a “High Pass” filter (“Filter” > “Other” > “High Pass”) on a duplicated layer with “Soft Light” blending mode to enhance edge sharpness.
- Noise Reduction: Use “Filter” > “Noise” > “Reduce Noise” to mitigate any new noise introduced by the enlargement.
- Export: Click “File” > “Export” > “Export As” or “Save As” to save your enlarged, high-quality image. Choose JPG or PNG, considering the balance between file size and quality.
Photoshop offers unparalleled control for photographers and graphic designers seeking precise photo manipulation and editing styles.
GIMP (GNU Image Manipulation Program)
GIMP is a free and open-source alternative to Photoshop, offering a robust set of features for image manipulation and editing. It’s an excellent choice for those who need powerful tools without the cost.
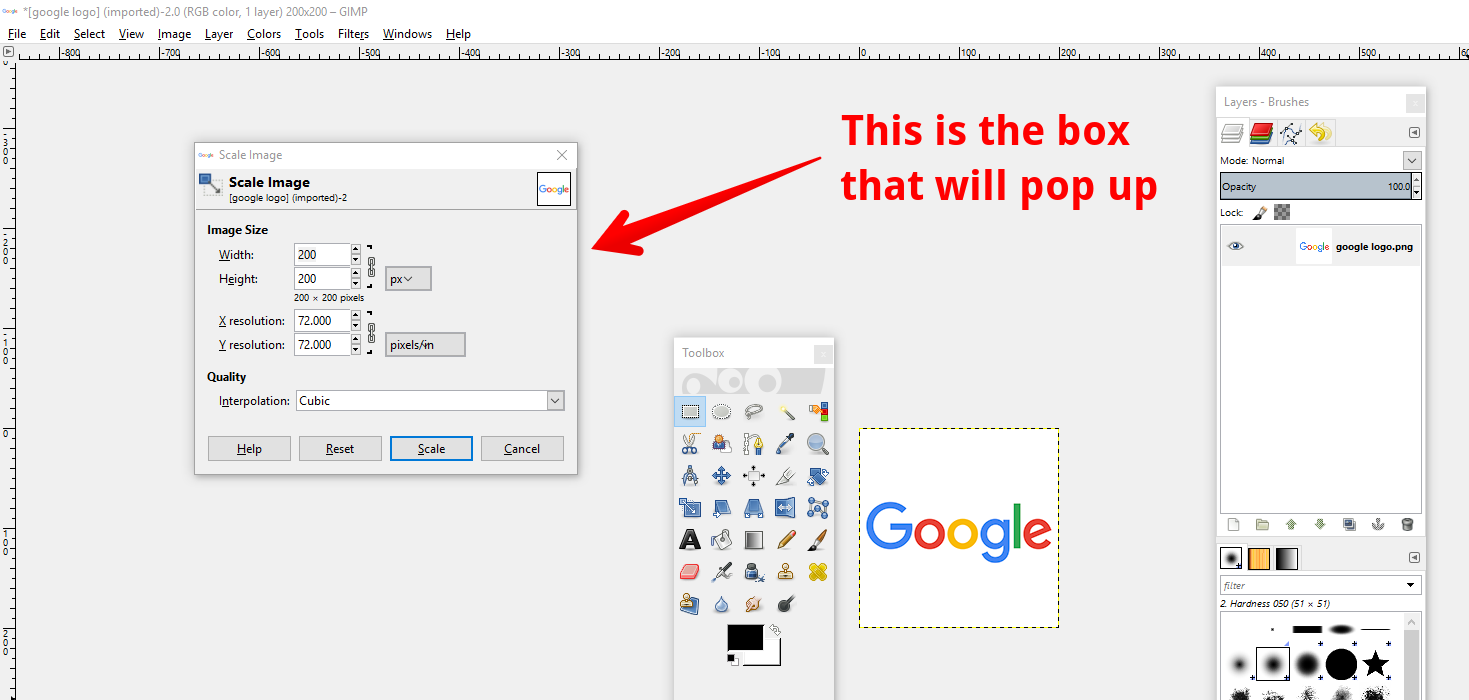
How to make small pictures bigger and clear in GIMP:
- Open Image: Open your small picture in GIMP via “File” > “Open.”
- Scale Image: Go to “Image” > “Scale Image” on the top navigation bar.
- Input Dimensions: Enter your target width and height, and adjust the resolution if needed.
- Interpolation Method: In the “Interpolation” section, choose “NoHalo” (or “Sinc (Lanczos3)” in older versions). This method is designed to preserve sharpness during enlargement, similar to Photoshop’s “Preserve Details.”
- Scale and Export: Click “Scale” to apply the changes, then “File” > “Export As” to save your enlarged image.
GIMP is a versatile tool that allows users to perform high-resolution digital photography tasks and create stunning visual art without financial barriers.
IrfanView (Windows-only)
IrfanView is a lightweight, fast, and free image viewer and editor for Windows. It provides a clever resampling method for enlarging images.
How to enlarge images using IrfanView:
- Open Image: Open your image in IrfanView (“File” > “Open”).
- Resize/Resample: Go to “Image” > “Resize/Resample.”
- Set New Size: Enter your desired width and height in the “Set new size” fields.
- Resample Method: Under “Size method,” check “Resample” and select “Lanczos (slowest)” from the filter dropdown menu. This filter is known for producing good results for upscaling.
- Apply Sharpen: Check the box next to “Apply Sharpen After Resample” to further enhance clarity.
- Save: Click “OK” and then “File” > “Save As” to save your enlarged picture.
IrfanView is a pragmatic choice for Windows users seeking a straightforward and effective way to manage image dimensions.
Online Tools: Befunky and Image Resizer
For quick, browser-based solutions without software installation, online image tools like Befunky and generic “Image Resizer” websites can be highly convenient.
- Befunky: A user-friendly online photo editor, Befunky offers a “Resize” tool within its “Edit” section. You can enter target dimensions or percentages, then apply and save. It’s suitable for basic enlargements of backgrounds and simple photos.
- Image Resizer: Many websites are dedicated solely to resizing. You upload your image, specify new dimensions or percentages, and download the output. While often simple, their effectiveness in maintaining quality during enlargement can vary; look for those advertising “high quality” or “AI-powered” features.
These online image tools are excellent for quick adjustments for social media or website requirements, aligning with the “Image Tools” category on Tophinhanhdep.com.
Quick and Easy Resizing with Built-in OS Tools
For minor adjustments or when advanced software isn’t readily available, your operating system’s built-in tools can offer basic enlargement capabilities. However, their ability to maintain quality for significant scaling is limited.
MS Paint (Windows)
MS Paint is a fundamental graphics editor included with Windows. It’s simple for basic edits, including resizing.
How to make a picture bigger in MS Paint:
- Open with Paint: Right-click your image file and select “Open With” > “Paint.”
- Resize/Skew: In the “Home” tab, click “Resize.”
- Adjust Percentages: Choose “Percentage” and increase the “Horizontal” and “Vertical” values (e.g., 150% for 1.5x enlargement). Ensure they are equal to maintain the aspect ratio.
- Save: Click “OK” and then “File” > “Save As” to save your enlarged image.
While functional, MS Paint uses basic interpolation, so expect noticeable quality loss for larger enlargements.
Preview (Mac)
Mac users have Preview, a versatile application for viewing and basic editing of images and PDFs.
How to make a picture larger in Preview:
- Open Image: Open your image in Preview (double-click the image or drag to the Preview icon).
- Adjust Size: Go to “Tools” > “Adjust Size.”
- Modify Dimensions: Enter new values for width or height. Ensure “Scale proportionally” is checked to prevent distortion. You can also adjust resolution (pixels/inch).
- Save: Click “OK” to apply, then “File” > “Save” (Cmd + S) to save your changes.
Preview offers slightly better interpolation than MS Paint but is still best for moderate enlargements.
Best Practices for Professional Image Enlargement and Visual Design
Successfully enlarging an image without losing quality isn’t just about selecting the right tool; it also involves adhering to best practices that ensure visual integrity and optimal results for diverse applications, from high-resolution stock photos to artistic digital art. Tophinhanhdep.com emphasizes these strategies to elevate your visual design.
Optimizing Images for Print and Digital Display
The intended use of your enlarged image – whether for a large-format print, a high-definition wallpaper, or a web background – significantly influences the best approach.
1. Always Start with the Highest Resolution Source
This is the golden rule of image enlargement. The higher the number of pixels in your original image, the more data there is for any enlargement tool (AI or traditional) to work with. This provides a better foundation for preserving detail and clarity. If you’re sourcing images for your aesthetic collections or thematic collections, always opt for the largest available size.
2. Choose Suitable File Formats for the Task
The file format plays a crucial role in maintaining quality, especially for “high-resolution” photography.
- For Enlargement (Working Files): If available, work with RAW files (from digital cameras) or uncompressed TIFF files. These formats retain the maximum amount of image data, making them ideal for significant manipulation before final output.
- For Output (Lossless): When saving enlarged images where quality is paramount (e.g., for print, professional stock photos), PNG (for images with transparency or sharp edges/text) and TIFF (especially for printing) are excellent choices as they are lossless formats. They preserve every pixel, preventing further degradation.
- For Output (Lossy, Web): For web use, JPEG is standard due to its smaller file size. However, JPEG uses lossy compression, meaning some data is discarded each time it’s saved. If you must use JPEG, save it once at the highest quality setting after all edits are complete. WebP is an increasingly popular format for the web, offering superior compression to JPEG while maintaining good quality.
3. Consider the Printing Medium and Viewing Distance
If you’re preparing images for printing (a key aspect of graphic design and digital art), understand that the required resolution (DPI - dots per inch) varies.
- Standard Photos (8x10, 5x7): 300 DPI is typically desired for sharp prints.
- Large Prints (Posters, Banners): Lower DPI (e.g., 150-200 DPI) might be acceptable as they are viewed from a greater distance.
- Viewing Distance: A high-quality print viewed from a distance doesn’t need as many pixels per inch as one held close. Factor this into your target dimensions and resolution.
4. Print a Testing Output Before the Final Result
Especially for large prints or important projects, always perform a small test print of a critical section of your enlarged image. This “test strip” allows you to assess the actual print quality, color accuracy, and sharpness before committing to a full, potentially costly, final print. This step is vital for ensuring your “beautiful photography” translates perfectly from screen to paper.
Advanced Strategies for Maintaining Visual Integrity
Beyond the basic steps, these techniques can further refine your enlarged images, particularly for demanding visual design applications or when striving for pixel-perfect clarity in your images.
1. Utilize AI-Powered Image Enlargers First
As highlighted earlier, dedicated AI upscalers (like Tophinhanhdep.com’s AI Enlarger or ON1 Resize AI) are often the best starting point for significant enlargements. Their intelligent algorithms generate detail, providing a much stronger base for subsequent manual refinements than traditional scaling methods. Think of them as giving your small image an intelligence boost before you start detailed photo manipulation.
2. Sharpen the Photo After Resizing, Not Before
Sharpening before enlargement can accentuate existing pixelation or noise. It’s best to apply sharpening after the image has been scaled to its target size. Use tools that offer precise control over sharpening radius and threshold to avoid introducing halos or an overly processed look. Many AI upscalers include intelligent sharpening as part of their process, but a final touch-up in Photoshop or GIMP can be beneficial.
3. Upscale the Images Gradually (When Not Using AI)
If you’re using traditional interpolation methods (non-AI), avoid jumping directly from a very small size to a very large one in a single step. Instead, enlarge the image in smaller increments (e.g., 10-20% at a time), saving and reopening the image (or duplicating the layer) between steps. This allows the interpolation algorithm to work with slightly more data at each stage, potentially leading to a smoother result, though it’s more time-consuming. This method is less critical with advanced AI upscalers, which are designed for single-step, large-factor enlargements.
4. Pick the Right Interpolation Method (When Using Traditional Software)
Interpolation is how software “fills in” the new pixels when an image changes size. The choice of method significantly impacts the outcome, especially in digital photography.
- Bicubic Smoother / Preserve Details (Photoshop): Ideal for enlarging as it creates smoother transitions between pixels. “Preserve Details (2.0)” is the most advanced for upscaling.
- NoHalo / Sinc (Lanczos3) (GIMP, IrfanView): These algorithms are also designed to produce sharper, less pixelated results for enlargements by considering a wider range of surrounding pixels.
- Nearest Neighbor: Generally avoided for enlargement as it simply duplicates existing pixels, leading to harsh, blocky results. Only useful for very specific pixel-art effects.
- Bilinear: Offers a slightly smoother result than Nearest Neighbor but is still prone to blurriness for significant enlargements.
Understanding and selecting the appropriate interpolation method is a foundational skill in photo manipulation and ensures that your artistic vision is translated effectively into larger formats.
Beyond Resizing: Integrating with Tophinhanhdep.com’s Offerings
The process of making images bigger and clearer is intrinsically linked to the broader spectrum of offerings at Tophinhanhdep.com. Once you’ve successfully upscaled your images, you can seamlessly integrate them into various creative endeavors:
- Image Collections & Inspiration: Use your newly enlarged, high-resolution images to contribute to thematic collections, mood boards, or trending styles on Tophinhanhdep.com. Inspire others with crystal-clear nature shots, vibrant abstract designs, or captivating beautiful photography.
- Visual Design & Graphic Art: Whether you’re a graphic designer creating large-format posters or a digital artist preparing your work for high-definition displays, the tools and techniques discussed ensure your creations maintain their intended impact. Our “Visual Design” section provides further inspiration for integrating these enhanced visuals.
- Wallpapers & Backgrounds: Enlarged images are perfect for creating stunning desktop or mobile wallpapers, ensuring they look sharp across different screen resolutions. Explore our vast array of categories like “Wallpapers” and “Backgrounds” to complement your creations.
- Photography Portfolio: For photographers, the ability to deliver high-resolution, print-ready images is essential. Our focus on “High Resolution” and “Stock Photos” means we champion content that looks impeccable at any size.
By mastering image enlargement, you not only solve a technical problem but also unlock greater creative potential, allowing your visuals to truly stand out.
Frequently Asked Questions About Image Enlargement
Navigating the complexities of image enlargement can bring up several common questions. Tophinhanhdep.com aims to provide clear and concise answers to help you achieve the best possible results for your images.
1. Can I make a small picture bigger and clearer?
Yes, absolutely! While traditional methods often result in blurriness, modern tools—especially those utilizing AI-powered upscaling technology, like Tophinhanhdep.com’s AI Enlarger—are specifically designed to make pictures bigger and clearer by intelligently adding detail rather than just stretching pixels. Professional software like Photoshop and GIMP, used with appropriate settings, can also yield excellent results.
2. How do you make a JPEG bigger?
You can make a JPEG bigger using any of the tools mentioned in this article (e.g., Tophinhanhdep.com’s AI Enlarger, Photoshop, GIMP, IrfanView, online resizers). The process generally involves uploading the JPEG, entering your desired larger dimensions, and selecting an advanced interpolation or AI-powered setting to preserve quality. Remember that JPEG is a lossy format, so always start with the highest quality JPEG available to minimize further degradation during enlargement. Saving the final enlarged image as a PNG or TIFF might be preferable if maximum quality retention is critical for print.
3. How do I make a picture look bigger?
To make a picture look bigger while maintaining or improving its visual quality, you should use image enlargement tools that employ smart algorithms (like AI upscalers) or advanced interpolation methods (like Bicubic Smoother or Lanczos). These methods focus on reconstructing details and smoothing pixel transitions, making the enlarged image appear sharper, clearer, and more impactful than a simple pixel stretch. Tophinhanhdep.com’s specialized image tools are perfect for this task.
4. Why do images become blurry when resized?
Images become blurry during enlargement because they are typically raster (bitmap) images composed of fixed pixels. When you make such an image larger without adding new information, the software simply stretches the existing pixels. This stretching makes individual pixels more visible, leading to a blocky or pixelated appearance, and the lack of new detail causes overall blurriness.
5. Can I enlarge any image without losing quality?
While modern AI upscalers can achieve remarkable results, the fundamental principle remains: the better the quality of the original image, the better the enlarged output will be. An extremely small, low-resolution, or highly compressed image will have very little initial data to work with, limiting even AI’s ability to perfectly reconstruct details. Always start with the highest possible resolution source for optimal enlargement.
6. What is the best method to enlarge an image?
The “best” method depends on your needs:
- For superior quality and ease of use: AI-powered upscalers (like Tophinhanhdep.com’s AI Enlarger or premium tools like ON1 Resize AI) are generally the most effective.
- For maximum control and professional work: Adobe Photoshop with “Preserve Details (2.0)” or Smart Objects offers extensive customization.
- For free, open-source options: GIMP with “NoHalo” or “Sinc (Lanczos3)” interpolation provides a strong alternative.
- For quick online resizing: Tools like Befunky or general online image resizers can work for minor adjustments, but always verify quality.
7. How can fractal interpolation help in resizing images?
Fractal interpolation is an advanced mathematical technique used by some image enlargement software (like ON1 Resize AI) to fill in missing details during scaling. Unlike simpler methods that guess pixel colors based on immediate neighbors, fractal algorithms analyze the image for repeating patterns and self-similar structures at different scales. This allows them to generate new pixels that are more consistent with the image’s inherent detail, resulting in smoother transitions and sharper edges without introducing artificial-looking artifacts.
8. Are there any tips to improve image quality before resizing?
The most crucial tip is to start with the highest quality original image you can get. If you’ve already edited the image, ensure you save a version with minimal compression (e.g., as a TIFF or high-quality PNG) before attempting enlargement. After enlargement, you can apply gentle sharpening, adjust contrast, and use noise reduction tools to further refine the image quality.
Conclusion
The ability to seamlessly make an image bigger without sacrificing its inherent quality is a valuable asset in today’s visually-driven digital landscape. Whether you are a professional photographer seeking to enhance high-resolution stock photos, a graphic designer crafting compelling visual art, or an enthusiast curating aesthetic backgrounds and wallpapers, the insights and tools provided by Tophinhanhdep.com empower you to elevate your visual content.
We’ve explored the fundamental reasons behind image degradation during enlargement, highlighting the pixel-based nature of most digital images and the challenges of simple stretching. Crucially, we’ve showcased how revolutionary AI-powered upscalers, including Tophinhanhdep.com’s own advanced AI Image Enlarger, have transformed this process, intelligently reconstructing details to deliver stunningly clear and sharp results even from smaller originals. Complementing these cutting-edge solutions, we’ve also delved into the precision offered by professional software like Adobe Photoshop and GIMP, and the convenience of online and built-in operating system tools for various needs.
Beyond just the tools, we’ve emphasized best practices, from starting with the highest resolution source to choosing appropriate file formats, considering printing mediums, and employing strategic post-enlargement sharpening. These techniques are vital for ensuring that your enlarged images not only meet technical specifications but also retain their artistic integrity and visual impact, perfectly aligning with Tophinhanhdep.com’s commitment to high-quality images and inspiring visual design.
In a world saturated with imagery, quality makes all the difference. By leveraging the right tools and embracing these expert tips, you can confidently transform your small pictures into big, beautiful, and breathtaking visuals, ready to captivate your audience and fulfill your creative vision. Explore Tophinhanhdep.com today to discover more image inspiration, powerful tools, and resources to master your digital photography and visual design endeavors.