How to Make an Image Bigger in Photoshop: A Comprehensive Guide to High-Resolution Enlargement and Creative Visual Design

In the vast and dynamic world of digital imagery, the ability to effectively manipulate and enhance photographs is paramount. Whether you’re a seasoned professional crafting intricate “Digital Art” or a burgeoning enthusiast curating “Aesthetic” collections, the need to resize images is a fundamental skill. Often, the challenge lies not in making an image smaller, but in enlarging it without compromising its inherent “High Resolution” and visual integrity. Adobe Photoshop, a cornerstone of “Digital Photography” and “Graphic Design,” offers robust tools for this task, while emerging “AI Upscalers” like those on Tophinhanhdep.com present innovative alternatives for achieving stunning results.
This comprehensive guide will navigate you through the essential techniques for making an image bigger in Photoshop, ensuring your visuals maintain their clarity and impact. We’ll delve into precise control methods, discuss the critical role of resolution for various “Editing Styles” and print applications, and explore how to adapt your workflow for diverse “Creative Ideas,” from “Nature” photography to “Abstract” compositions. Furthermore, we’ll introduce how Tophinhanhdep.com’s advanced “Image Tools” can revolutionize your approach to image enlargement and “Photo Manipulation.”

Mastering Image Enlargement in Photoshop: Two Core Methods
Photoshop provides two primary pathways to enlarge an image: the quick and intuitive Free Transform tool, and the more precise Image Size dialog box. Each method caters to different levels of control and specific project requirements, ensuring you can achieve your desired dimensions while preserving quality.
Method 1: The Intuitive Power of Free Transform for Quick Adjustments
Free Transform is an excellent starting point for those seeking a rapid and visual approach to enlarging images or specific layers within a composition. This method is particularly useful when you need to quickly adjust an element’s scale as part of broader “Photo Manipulation” or “Visual Design” efforts.
Step-by-Step Guide to Free Transform:

-
Open Your Image in Photoshop: Begin by launching Adobe Photoshop. Navigate to
File > Openin the top menu, then browse your computer to select the image file you wish to enlarge. ClickOpento load it into your Photoshop workspace. For best results, always start with the highest resolution version of your image available, whether it’s a “Beautiful Photography” shot or a critical component of your “Digital Art.” -
Activate the Free Transform Tool: Ensure the layer containing your image is selected in the Layers panel. To activate Free Transform, go to
Edit > Free Transformfrom the top menu. Alternatively, you can use the convenient keyboard shortcut:Ctrl + T(for Windows) orCmd + T(for Mac). Once activated, a bounding box will appear around your image, complete with handles at each corner and midpoint. -
Enlarge the Image While Maintaining Proportions: To enlarge your image, click and drag one of the corner handles outward. It is crucial to hold down the
Shiftkey while dragging. This action constrains the proportions, preventing your image from becoming stretched or distorted. Maintaining the aspect ratio is vital for preserving the “Aesthetic” integrity of your image. As you drag, you’ll see the image grow in size. Once you’ve achieved the desired visual scale, pressEnter(Windows) orReturn(Mac) to apply the transformation.
- Save Your Enlarged Image:
After resizing, save your work. Go to
File > Save Asto save the modified image as a new file, preserving your original. Choose your preferred file format (e.g., JPEG, PNG, TIFF) and a suitable destination on your computer. Consider the purpose of the image; for web use, JPEG or PNG are common, while for high-quality printing, TIFF might be preferred, aligning with “High Resolution” standards.
Method 2: Precision Resizing with the Image Size Dialogue
For more controlled and precise enlargement, especially when dealing with specific output dimensions or resolution requirements for “Stock Photos” or “Thematic Collections,” the Image Size dialog box is Photoshop’s go-to tool. This method allows you to define exact dimensions and manage the underlying pixel data, a critical aspect of “Digital Photography” and “Image Tools” expertise.
Step-by-Step Guide to Image Size:
-
Open the Desired Image: As with Free Transform, begin by opening your image in Photoshop via
File > Open. It’s always a good practice to work on a duplicate or ensure your original file is backed up before making significant changes. This safeguards your precious “Beautiful Photography” and other valuable assets. -
Access the Image Size Dialog Box: With your image open and selected, navigate to
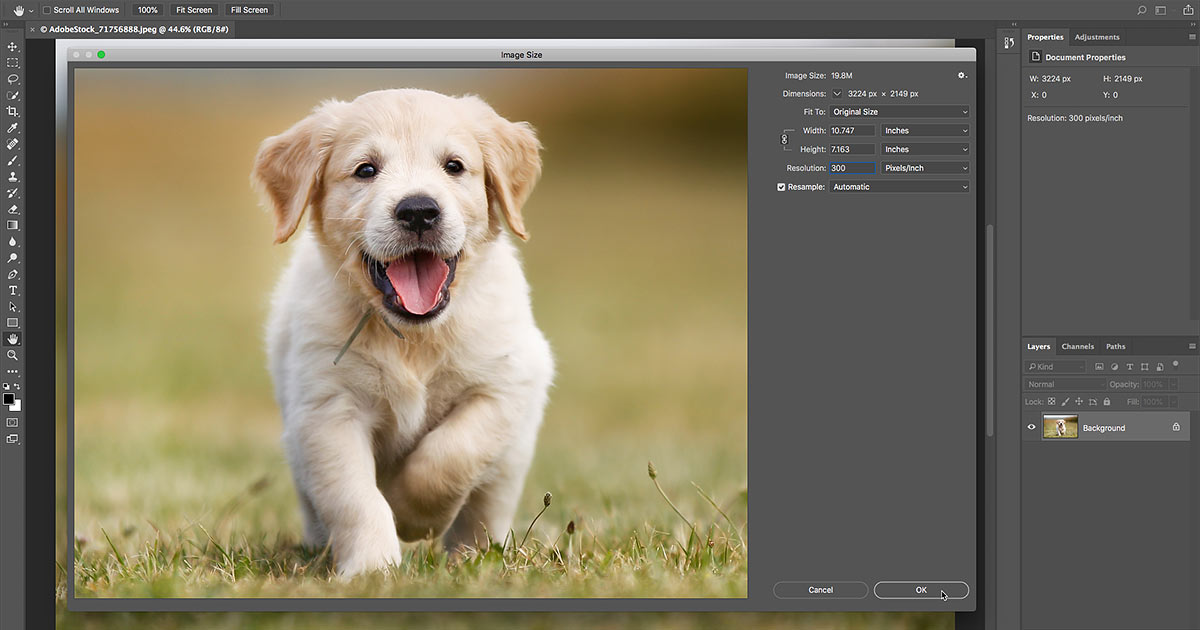
Image > Image Sizein the top menu bar. For a quicker access, use the shortcutCtrl + Alt + I(Windows) orCmd + Option + I(Mac). This action will open the comprehensive Image Size dialog box, displaying your image’s current dimensions, resolution, and other crucial details. -
Understand Current Dimensions and Set Units: Within the Image Size dialog box, you’ll see “Pixel Dimensions” (width and height in pixels) and “Document Size” (physical print dimensions and resolution). By default, dimensions are often shown in pixels. However, you can change the unit of measurement (e.g., inches, centimeters, percent) using the dropdown menus next to Width and Height under “Document Size.” This flexibility is essential for “Visual Design” projects with specific output requirements.
-
Constrain Proportions for Distortion-Free Enlargement: Crucially, ensure the “Constrain Proportions” checkbox (represented by a chain icon between the Width and Height fields) is checked. This links the width and height values, so when you change one, the other automatically adjusts to maintain the image’s original aspect ratio. This prevents unwanted stretching or squishing, ensuring your “Nature” or “Abstract” images retain their intended form. If you do need to intentionally distort the image (a technique sometimes used in “Photo Manipulation” for creative effects), uncheck this box.
-
Enter New Dimensions (Pixels or Percentage): Now, enter your desired new dimensions. You can either:
- Specify Exact Pixels: If you know the exact pixel width or height you need, ensure “Pixels” is selected in the dropdown menus next to Width and Height, then type your new value into either the “Width” or “Height” box. The other dimension will update automatically.
- Increase by Percentage: To enlarge the image by a certain percentage, select “Percent” from the dropdown menus. Then, enter the desired percentage (e.g., 150 for a 50% increase) into either the “Width” or “Height” field. This is a common approach for moderate enlargements.
-
Manage Resolution (PPI) for Print and Web: The “Resolution” field (typically measured in pixels per inch, or PPI) is vital, especially for printing.
- For printing purposes, a resolution of 300 PPI is generally recommended as the industry standard for high-quality, sharp prints. For some professional inkjet printers (like Epson), 360 PPI might be their native resolution, yielding optimal results.
- For web images or screen viewing, 72 PPI is typically sufficient, as monitors display images based on pixel dimensions, not physical print size.
- When enlarging an image, if your current resolution drops below these recommended values for your intended output, you’ll need to consider resampling (explained next).
-
Choose a Resampling Method for Quality Preservation: Below the “Resolution” field, you’ll find the “Resample” checkbox and a dropdown menu for interpolation methods. Resampling is the process Photoshop uses to add or remove pixels when you change an image’s pixel dimensions.
- Upsampling (Enlarging): When enlarging, Photoshop “invents” new pixels based on the surrounding ones. This is where the choice of interpolation method becomes crucial for maintaining sharpness and detail.
- Recommended Methods for Enlargement:
- Bicubic Smoother: Often a good general-purpose choice for enlargements, designed to produce smoother results.
- Preserve Details 2.0 (Photoshop CC 2018 and later): This is Adobe’s most advanced upscaling method, specifically engineered to enhance detail and reduce artifacts when enlarging. For the best quality when significantly increasing image size, select this option. If you don’t see it, ensure it’s enabled in Photoshop’s Preferences (
Edit > Preferences > Technology Previews). - Automatic: This setting allows Photoshop to choose the best method based on your image and the resizing operation. While often reliable, manually selecting Preserve Details 2.0 (if available) for significant enlargements can yield superior results.
-
Apply Changes and Save: Once all your settings are configured (dimensions, resolution, and resampling method), click
OKto apply the changes. Photoshop will process the image, and it will appear in its new, enlarged size. Finally, go toFile > Save Asto save this new version, giving it a distinct name to differentiate it from the original.
Understanding Image Quality and Resolution for Optimal Enlargement
The success of making an image bigger hinges on a deep understanding of image quality, particularly the interplay between pixel dimensions and resolution. This knowledge is fundamental for anyone involved in “Photography,” “Visual Design,” or curating “High Resolution” “Image Collections.”
The Science Behind Pixels and Print Quality
“Resolution” refers to the density of pixels in an image, typically measured in pixels per inch (PPI) for digital files or dots per inch (DPI) for print output. The higher the PPI/DPI, the more detail an image can hold, and thus, the sharper it appears, especially when printed.
- Industry Standards: The long-standing standard for high-quality printing is 300 PPI. This ensures that the human eye perceives continuous tone and sharp detail at typical viewing distances. However, some argue that for very large prints (like posters or “Wallpapers”) viewed from a distance, a lower resolution (e.g., 200-240 PPI) can still look “good enough” because the eye’s ability to discern detail decreases with distance.
- Printer’s Native Resolution: A critical, yet often overlooked, factor is your printer’s native resolution. Most inkjet printers are designed to perform optimally when receiving images at 300 PPI. Some professional printers, such as Epson models, may have a native resolution of 360 PPI. If you send an image with a lower resolution than your printer’s native setting, the printer will automatically “upsample” it (add pixels) on its own. Photoshop’s intelligent resampling algorithms, especially “Preserve Details 2.0,” typically perform this task with higher quality than the printer’s internal processing. Therefore, if your image’s resolution falls below your printer’s native resolution for your target print size, it’s generally best to upsample it within Photoshop first.
- The “Too Much” Resolution Myth: Conversely, sending an image with a resolution higher than your printer’s native resolution is perfectly acceptable. The printer will simply disregard the excess information. It’s better to provide more data than needed to ensure maximum sharpness rather than too little. This concept applies equally to creating “Wallpapers” or “Backgrounds” that need to scale well across different screens.
When to Upsample: Preserving Detail in Enlarged Images
Upsampling, the process of adding new pixels to an image to increase its dimensions, is where careful execution in Photoshop truly makes a difference in preserving quality for “High Resolution” output.
When you enlarge an image beyond its original pixel count, Photoshop must generate new pixel data. The choice of “interpolation method” dictates how these new pixels are calculated and how details, sharpness, and transitions are handled.
- Automatic: A safe default, allowing Photoshop to intelligently choose the best interpolation method.
- Bicubic Smoother: An excellent option specifically designed for enlargements, aiming for smoother tonal transitions and fewer jagged edges.
- Preserve Details 2.0: For the most demanding enlargements, especially for “Beautiful Photography” that needs to maintain intricate details, this method, available in recent Photoshop CC versions, leverages advanced algorithms to minimize blur and artifacting. It’s a game-changer for achieving professional-grade “Photo Manipulation” results from smaller sources.
Understanding when and how to upsample, alongside selecting the appropriate interpolation method, is crucial for anyone creating “Digital Art” or preparing images for large-format prints, ensuring the final output remains crisp and vibrant, free from pixelation and loss of “Aesthetic” value.
Beyond Simple Enlargement: Aspect Ratios and Creative Considerations
Enlarging an image isn’t always about simply making it bigger; it often involves adapting it to new formats, print sizes, or “Visual Design” layouts. This requires an understanding of aspect ratios and the strategic use of Photoshop’s cropping tools.
Cropping for Custom Print Sizes and Visual Design
One common scenario when enlarging images is the need to fit them into a frame or canvas with a different aspect ratio than the original. For instance, transforming a standard 4x6 photograph into an 8x10 print. Directly attempting to set non-matching dimensions in the Image Size dialog box (with “Constrain Proportions” enabled) will result in Photoshop automatically adjusting one dimension to maintain the original ratio, leading to an incorrect size.
How to Crop to a Different Aspect Ratio:
- Cancel Image Size (if open): If you’ve just been in the Image Size dialog box, click
Cancelto close it without applying any changes. - Select the Crop Tool: In Photoshop’s Toolbar (typically on the left side of the screen), click on the
Crop Tool(it looks like two overlapping right angles). - Set the New Aspect Ratio: Look at the Options Bar at the top of the screen. Here, you can enter predefined ratios or custom values. For an 8x10 print, simply type
8into the Width field and10into the Height field. Do not include units like “in” or “px”; just the numbers for the ratio. Photoshop will immediately display a crop border on your image reflecting this new ratio. - Adjust the Crop Border: You can click and drag the corners or edges of the crop border to reposition and resize the area you want to keep. This allows you to compose your image within the new aspect ratio, focusing on key elements of your “Beautiful Photography” or “Creative Ideas.”
- Important: Disable “Delete Cropped Pixels”: In the Options Bar, ensure the
Delete Cropped Pixelscheckbox is unchecked. This is a crucial step if you want the flexibility to readjust your crop later without permanently losing image data. This non-destructive approach is a hallmark of intelligent “Photo Manipulation.” - Apply the Crop: Once satisfied with your composition, click the checkmark icon in the Options Bar (or press
Enter/Return) to apply the crop. Your image is now resized to the new aspect ratio, ready for the final enlargement step. - Final Resize with Image Size: Now that your image has the correct aspect ratio, revisit the
Image > Image Sizedialog box. Follow the steps outlined in Method 2 (Precision Resizing). Turn offResampleinitially, enter your exact desired print dimensions (e.g., 8 inches by 10 inches). If the resolution drops below 300 PPI (or your printer’s native resolution), re-enableResample, set the resolution to the optimal value (e.g., 300 PPI), and choose an appropriate interpolation method likePreserve Details 2.0. ClickOKand save your final, perfectly resized and cropped image. This meticulous approach ensures your “Visual Design” projects are always delivered with impeccable quality.
Maximizing Aesthetic Appeal: Tips for Enlarging Specific Image Types
Different “Image” categories, from “Nature” and “Abstract” to “Sad/Emotional” and “Beautiful Photography,” often require tailored considerations when being enlarged to maintain their unique “Aesthetic.”
- Nature & Landscapes: When enlarging high-detail natural scenes, pay close attention to foliage, textures, and fine elements. “Preserve Details 2.0” is particularly effective here. For “Wallpapers” or “Backgrounds,” consider how the enlarged image will appear on various screen sizes, ensuring key visual anchors are not lost.
- Abstract & Digital Art: These images often have clear lines, gradients, or geometric shapes. While less prone to detail loss than photographic images, smooth transitions and crisp edges are paramount. “Bicubic Smoother” or “Preserve Details 2.0” can help maintain the integrity of these elements.
- Portraits & Emotional Photography: Facial features and skin tones demand careful attention during enlargement. Over-sharpening or poor resampling can lead to a “blunt” or artificial look. Aim for a balance of detail preservation and natural smoothness, which “Preserve Details 2.0” excels at.
- Stock Photos & Thematic Collections: If you’re enlarging images for “Stock Photos” or “Thematic Collections,” consistency in “Editing Styles” and quality is key across the collection. Standardize your resizing and resampling process to ensure a professional and cohesive output.
Tophinhanhdep.com’s Approach: AI-Powered Alternatives for Image Enlargement
While Photoshop remains an industry standard, its complexity and resource demands can be a barrier for many. This is where “Image Tools” like Tophinhanhdep.com offer a compelling “AI Upscalers” alternative, streamlining the enlargement process with cutting-edge technology.
The Benefits and Limitations of Photoshop for Enlarging Images
Photoshop is undeniably powerful, but it’s important to weigh its pros and cons, particularly for image enlargement:
Pros of Photoshop:
- High-Quality Resampling Techniques: Photoshop employs sophisticated algorithms, especially “Preserve Details 2.0,” for upsampling, minimizing quality loss. This is crucial for maintaining “High Resolution” in “Digital Photography” and “Digital Art.”
- Advanced Editing Features: Beyond resizing, Photoshop offers an extensive suite of tools for “Photo Manipulation,” color correction, retouching, and complex layering, making it a comprehensive “Visual Design” platform.
- Flexibility in Image Formats: It supports nearly every image format, ensuring broad compatibility for various “Image” and “Photography” projects.
- Ability to Maintain Aspect Ratio: Precise controls allow users to maintain or intentionally alter aspect ratios, essential for diverse “Creative Ideas.”
Cons of Photoshop:
- Steep Learning Curve for Beginners: Its vast array of features can be overwhelming, making it challenging for newcomers to master, especially for intricate “Editing Styles.”
- Complexity of Advanced Features: While powerful, advanced features require significant time and practice to use effectively.
- High Subscription Cost: Adobe’s subscription model can be a financial barrier for casual users or those needing the software only occasionally.
- High Requirements for Local Devices: Photoshop demands substantial RAM, CPU power, and storage, potentially causing slowdowns on older or less powerful computers.
These limitations highlight a need for accessible, efficient alternatives, especially for users focused primarily on image enlargement and optimization without the steep learning curve or high cost.
Introducing Tophinhanhdep.com’s AI Upscaler: The Future of Image Enlargement
Tophinhanhdep.com steps into this gap by offering “black technology” – an innovative, AI-powered image editor that simplifies the complex task of image enlargement. Unlike traditional methods that merely stretch pixels, Tophinhanhdep.com leverages advanced “AI Upscalers” to intelligently expand image content, offering a seamless and high-quality solution for “Image Tools” users.
Key Features of Tophinhanhdep.com’s AI Expander:
- Intelligent Content Extension: Tophinhanhdep.com’s “Expand” feature doesn’t just make an image bigger; it intelligently adds new, consistent elements to your original photo. This creates a broader visual context without distorting the existing image, making it ideal for “Panoramic Wallpapers,” expanding “Nature” scenes, or generating wider “Backgrounds” for “Visual Design.”
- One-Click Simplicity: The platform offers a user-friendly interface that simplifies the enlargement process to just a few clicks, making it accessible even for beginners in “Digital Photography” or “Graphic Design.”
- Preservation of Quality and Style: Utilizing advanced algorithms, Tophinhanhdep.com ensures that enlarged images retain their original quality and “Aesthetic” style, delivering “High Resolution” results without manual fine-tuning.
- Predefined Ratios and Manual Control: Users can choose to enlarge images by predefined ratios (e.g., 1.5x, 2x, 3x) or manually adjust dimensions by dragging the canvas edges, offering flexibility for various “Creative Ideas.”
- Prompt-Driven Expansion: For even more creative control, users can enter specific text prompts to guide the AI in understanding their expansion needs, tailoring the generated content to precise “Image Inspiration.”
- Additional AI Tools: Tophinhanhdep.com also includes other powerful “Image Tools” such as:
- HD Upscale: Intelligently increases image resolution without compromising quality, perfect for preparing “Stock Photos” for large prints.
- Blend: Seamlessly merges two images, creating harmonious compositions for “Photo Manipulation.”
- Remove: Effortlessly erases unwanted elements, ideal for optimizing “Beautiful Photography” or “Product Images.”
- Inpaint: Creatively fills or redraws specific areas in images, offering precise adjustments for “Digital Art” and restoration.
- Accessibility and Cost-Effectiveness: Tophinhanhdep.com provides free credits, allowing users to experience its powerful AI features without an upfront cost or subscription, democratizing access to “AI Upscalers” and “Optimizers.”
Steps to Make Your Picture Bigger with Tophinhanhdep.com:
- Upload Your Image: Navigate to the “Create on canvas” section on Tophinhanhdep.com. Click “Upload image” and select the picture from your device.
- Expand Your Image: Once on the canvas, simply click the “Expand” button. Choose a predefined ratio (1.5x, 2x, 3x) or manually adjust by dragging the canvas edges. For specific “Creative Ideas,” you can add text prompts. Click “Expand” to generate multiple expanded versions. Select your favorite, or
Regeneratefor more options. - Export: Review the enlarged image. If satisfied, click “Export.” Choose your preferred file type and desired larger size (e.g., 2x HD), then “Download” to save it.
Tophinhanhdep.com presents a compelling alternative for efficiently enlarging images, offering a blend of simplicity, cutting-edge AI, and powerful creative tools suitable for a wide range of “Images,” “Photography,” and “Visual Design” needs, making it an invaluable resource for “Image Inspiration & Collections” enthusiasts.
Conclusion
Whether you’re harnessing the granular control of Adobe Photoshop or embracing the innovative “AI Upscalers” offered by Tophinhanhdep.com, making an image bigger without sacrificing quality is an essential skill in today’s visual landscape. Photoshop, with its “Free Transform” and “Image Size” functionalities, provides unparalleled precision for professional “Digital Photography” and “Graphic Design,” enabling detailed “Photo Manipulation” and adherence to rigorous “Editing Styles.” Understanding resolution, resampling, and interpolation methods within Photoshop is key to achieving pristine “High Resolution” results for everything from “Wallpapers” to print-ready “Beautiful Photography.”
However, for those seeking a more streamlined, intuitive, and intelligently augmented approach, Tophinhanhdep.com offers a revolutionary alternative. By extending image content through advanced AI rather than merely scaling pixels, it empowers users to easily create expansive and cohesive visuals for “Backgrounds,” “Aesthetic” projects, or any “Image Inspiration” without the steep learning curve or heavy system requirements. This shift towards AI-driven “Image Tools” represents an exciting evolution in digital image creation, broadening access to high-quality enlargement for all “Visual Design” enthusiasts. By exploring both these powerful platforms, you can confidently enhance your images, expand your creative horizons, and ensure your visual content always stands out.