How to Make an Image Black and White: A Comprehensive Guide for Stunning Monochrome Photography

The world of photography is vibrant and ever-evolving, yet amidst the dazzling array of colors, the timeless appeal of black and white imagery continues to captivate artists and viewers alike. Far from being a relic of the past, converting a color photo to black and white can be a powerful artistic choice, often revealing a deeper emotional resonance, enhancing textures, and focusing attention on the raw essence of a subject. If you’ve ever found yourself puzzled by the array of sliders in your photo editor, or frustrated when your attempts result in a dull gray mess, take heart. This comprehensive guide from Tophinhanhdep.com will demystify the process, offering a range of methods and artistic insights to help you create truly stunning monochrome images.
At Tophinhanhdep.com, we specialize in everything visual – from captivating images for wallpapers and backgrounds, to in-depth resources on photography techniques and image tools. Our goal is to inspire your visual design journey with creative ideas and rich image inspiration & collections. This article on mastering black and white conversion is a perfect example of our commitment to helping you transform your digital photography into works of art, whether for high-resolution prints, stock photos, or aesthetic digital art.

The Enduring Appeal of Monochrome Photography: Why Go Colorless?
Before diving into the “how,” it’s crucial to understand the “why.” Why would one deliberately strip an image of its color? Many consider black and white a downgrade, but in reality, it’s a transformative art form that offers unique advantages:
- Highlighting Texture and Form: Colors can often distract from the intricate details and tactile qualities of a subject. Black and white, however, forces the eye to appreciate the interplay of light and shadow, emphasizing textures, patterns, and the underlying structure of objects. Imagine a rugged mountain landscape or the delicate folds of fabric – monochrome enhances their tactile presence.
- Focusing on Silhouettes and Contrast: Without color, the stark contrast between light and dark becomes paramount. This allows for dramatic silhouettes and powerful compositions, guiding the viewer’s gaze and creating a sense of depth and mood that might be lost in a colored image. This is particularly effective for nature and abstract photography, where form takes precedence.
- Evoking Emotion and Mood: Black and white photography often carries a profound emotional weight. It can imbue an image with a sense of nostalgia, drama, timelessness, or sobriety, making it feel more sad/emotional or profoundly beautiful photography. A colorless pic can sometimes communicate much more subtle feelings than a vibrant one. Adding a light noise or grain, for instance, can instantly transport the viewer to a retro era, offering a distinct aesthetic that’s highly sought after.
- Creating Timeless Aesthetics: Black and white photos transcend fleeting color trends, often possessing a classic and enduring quality that makes them perfect for aesthetic presentations or long-lasting thematic collections. They encourage a different kind of observation, focusing on composition and tonal relationships.
Ultimately, converting an image to black and white isn’t about removing something; it’s about adding a new dimension of artistic expression and allowing specific elements of the photograph to shine.
Foundational Principles for Stunning Black and White Images
Achieving a truly stunning black and white image goes beyond simply desaturating colors. It begins with mindful photography and an understanding of how light, contrast, and composition translate into monochrome. These principles are key for anyone engaged in digital photography aiming for high-resolution results that excel as stock photos or visual design assets.
Starting with Quality: The RAW Advantage
Our first and most critical tip, especially for those serious about photography and editing styles, is this: Never shoot in black and white unless you’re shooting in RAW format. While it might seem counterintuitive to avoid your camera’s monochrome mode, shooting in JPG black and white mode actually discards a tremendous amount of color information. Your DSLR or mirrorless camera is designed to capture a full spectrum of tones, recreating real-life colors. If you limit it to only shades of black, white, and gray at the point of capture in JPG format, you are severely reducing the data available for post-production.

When you convert an image to black and white in post-processing, you retain the full color data from the RAW file. This allows you immense control over how each original color tone translates into a shade of gray. You can selectively lighten or darken areas that were originally red, blue, green, etc., to fine-tune your monochrome image. Without this underlying color data, your editing options become significantly limited, and you’ll struggle to achieve the rich contrasts and nuanced tonal shifts that define truly great black and white photography. Shooting in RAW ensures you have the maximum potential for manipulation, making it a no-brainer for professional-grade results.
Mastering Light, Contrast, and Composition
Not every color photo will translate well into black and white. Effective monochrome imagery relies heavily on the elements that remain: light, shadow, texture, and composition. When considering photo ideas for black and white, look for scenes with:
- Strong Contrast: Dramatic differences between light and dark areas are crucial. This can be natural (e.g., harsh sunlight and deep shadows) or artificial.
- Rich Textures: Surfaces with visible textures (e.g., weathered wood, rough stone, intricate fabrics) become more prominent in black and white.
- Compelling Shapes and Forms: Without color, the geometric and organic shapes within an image take on greater significance. Silhouettes, repeating patterns, and leading lines become powerful compositional tools.
- Emotional Depth: Portraits or scenes that convey strong emotion often gain gravitas and timelessness in monochrome.
- Absence of Distracting Colors: If a scene’s impact relies purely on color, it might not be a strong candidate for black and white. However, if colors are distracting, removing them can enhance the message.
Understanding these elements will guide your initial photographic choices and your subsequent editing, helping you create impactful visual designs that truly shine.
Top Software and Tools for Black and White Conversion in 2025
Whether you’re a beginner or a seasoned professional, there’s a tool out there for converting images to black and white that suits your workflow. From simple, built-in options to sophisticated editors, Tophinhanhdep.com explores the best ways to achieve stunning monochrome effects.
User-Friendly Desktop Solutions
For those seeking straightforward and intuitive ways to make a picture black and white without a steep learning curve, several programs offer excellent results. These are ideal for quick edits, general image conversion, or preparing images for wallpapers and backgrounds.
1. PhotoWorks: Effortless Monochrome Magic
PhotoWorks stands out as an incredibly user-friendly picture editor for Windows and Mac, designed with simplicity and power in mind. Its approach to black and white conversion is refreshingly direct:
Steps to Make a Black and White Image in PhotoWorks:
- Start PhotoWorks: Launch the program and import your desired picture.
- Turn Photo Black and White: Navigate to the “Enhancement” tab and simply check the “Black and White” box. This instantly removes color.
- Move the Tone Sliders for Further Adjustment: For fine-tuning, use the “Tone” sliders. Adjust “Whites” and “Highlights” to manage bright areas, and “Shadows” and “Blacks” to enhance darker tones. This allows you to sculpt the contrast.
- Save Your Work: Once satisfied, click “Save” to apply the changes.
PhotoWorks also offers extensive creative possibilities, from simple brightness and contrast corrections to complex portrait retouching. For those looking to add a vintage mood, the “Effects” tab provides dozens of gorgeous presets that can achieve retro perfection without manual adjustments.
2. Make a Black and White Picture in Paint
For Windows users who need a quick, no-frills solution without installing new software, MS Paint can be a surprising option. While basic, it’s pre-installed and serves its purpose for simple conversions.
Steps to Convert an Image in Paint:
- Open Paint: Launch Microsoft Paint and import your image.
- Go to the Image Menu to Find the Black & White Converter: Open the “Image” menu and select “Properties.” Then, check the “Black and White” box. (Note: This option might vary or be absent in older versions of Paint. Paint 3D in Windows 10/11 offers more features.)
- Save Your Work After Changing Colors: Click the “Save” icon to keep your new grayscale image.
While Paint lacks advanced controls, it’s a quick solution for basic image conversion.
3. Turn Your Photos Into Grayscale in Microsoft Publisher
If your workflow involves creating designs like calendars, greeting cards, or business cards within Microsoft Publisher, you can also perform basic image edits here.
Steps to Grayscale in Publisher:
- Launch Microsoft Publisher: Start the program, create a new project, and import your photo.
- Make Your Image Black and White: Left-click your image to open the editing panel. Choose “Recolor,” then select “Grayscale” from the dropdown list.
- Apply the Changes: Click “Save” to keep the edited image. Consider saving it under a new name to preserve the original colored version.
Publisher is not a dedicated image editor, but for simple tweaks within your document design, it gets the job done.
4. Create Black and White Effect with Movavi Photo Editor
Movavi Photo Editor provides another intuitive desktop solution for quick and easy image enhancements, including black and white conversion. It balances user-friendliness with powerful features, making it suitable for transforming any image into a masterpiece.
Steps to Make Your Image Black and White with Movavi Photo Editor:
- Open Movavi Photo Editor: Download, install, and open the program. Click “Add image” to select your photo.
- Go to the Color Options: In the “Adjust” tab, click “Manually” and scroll to the “Color” section to find the “Saturation” option.
- Move the Slider to Create the Black and White Effect: Drag the “Saturation” slider all the way down to -100. This instantly converts your photo to black and white. Alternatively, go to the “Effects” tab and select the “Grayscale” filter for an instant conversion with adjustable intensity.
- Save the Edited Image: Click “Save” to keep your new monochrome photo.
Movavi, like PhotoWorks, is excellent for straightforward editing styles and preparing images for various uses.
Advanced Control with Adobe Photoshop
Adobe Photoshop is widely regarded as the industry standard for digital art, photo manipulation, and high-resolution image editing. For those seeking maximum control and artistic flexibility in creating black and white images, Photoshop offers sophisticated tools. This is where advanced visual design concepts truly come to life.
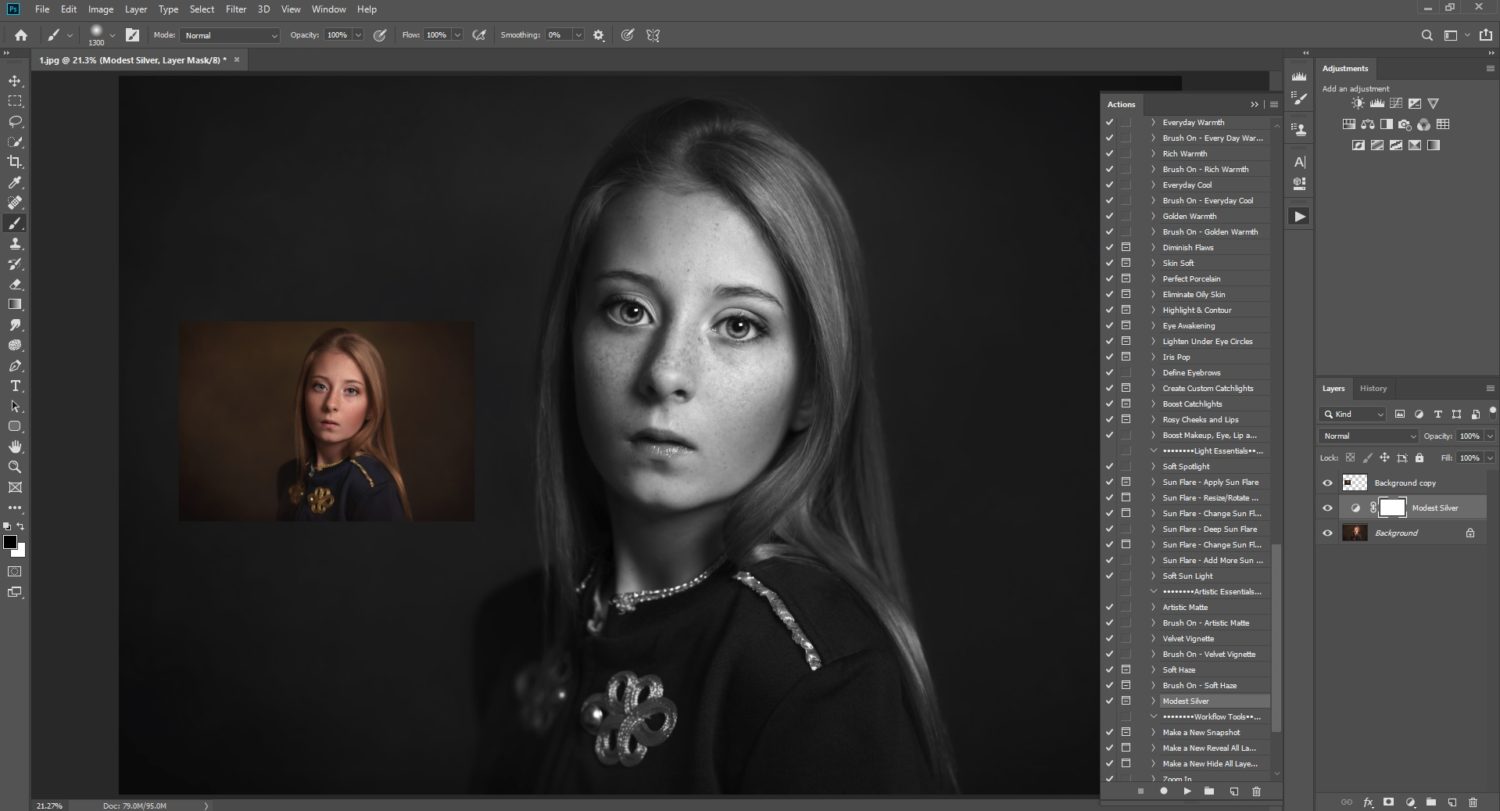
5. Convert Your Images to Black and White with Photoshop
Photoshop offers multiple methods, but the most recommended is using an Adjustment Layer for non-destructive editing. This approach preserves your original image, allowing for endless adjustments.
Steps to Make a Photo Black and White in Photoshop:
- Open Photoshop: Launch the program and open the image you wish to edit.
- Create a Black and White Adjustment Layer: Go to
Layer > New Adjustment Layer > Black & White. This creates a new layer specifically for monochrome conversion without altering the original image data. - Move the Sliders to Adjust the Effect: The Black & White Adjustment Layer comes with sliders for each color (Red, Yellow, Green, Cyan, Blue, Magenta). Moving these sliders allows you to control how light or dark each original color appears in the grayscale conversion. For instance, darkening the “Blues” can make a sky more dramatic. You can also select pre-made presets for different looks.
- Save Your Work: Once satisfied, save your image (e.g.,
File > Save Asto create a new file, orCtrl+Sto save changes to a layered file).
This adjustment layer method is superior to simply desaturating an image (Image > Adjustments > Desaturate or Hue/Saturation with saturation at -100) because it provides granular control over the tonal values derived from the original colors.
Advanced Techniques within Photoshop for Richer Tones: Beyond the basic Black & White Adjustment Layer, Photoshop offers even more powerful methods for truly expressive monochrome:
- Gradient Map for Tonal Control: Instead of (or in addition to) the Black & White Adjustment Layer, a Gradient Map can create rich, nuanced tones. By setting the black and white points, and slightly offsetting them (e.g., black to a very dark gray (RGB 5,5,5) and white to a very light gray (RGB 250,250,250)), you can achieve deeper blacks and brighter whites without clipping, providing a more “film-like” feel. This is a favorite technique for achieving profound contrast.
- Hue/Saturation Adjustment Layer (Strategic Use): While fully desaturating is generally less flexible, a Hue/Saturation layer can be used before a Black & White Adjustment Layer to subtly manipulate colors that will then be interpreted by the black and white conversion, allowing for even more refined tonal control.
- Selective Color Adjustment Layer: This powerful tool allows you to target specific color ranges (Reds, Yellows, Greens, etc.) and adjust their CMYK values. When applied beneath a Gradient Map or Black & White layer, it can dramatically alter how those colors translate into grayscale, offering incredible control over luminosity and contrast for different elements in your image.
- Color Balance Adjustment Layer: Used similarly, Color Balance can subtly shift the color casts in shadows, midtones, and highlights before the monochrome conversion layer, influencing the final gray tones.
These layers, when used in conjunction, allow for a non-destructive workflow where every aspect of the monochrome conversion can be precisely controlled, making Photoshop an indispensable tool for serious visual design and photo manipulation.
Creating a Photoshop Action to Streamline Conversion
For photographers who frequently convert images to black and white with specific settings, creating a Photoshop Action can significantly automate the process, saving time and ensuring consistency across image collections.
Steps to Create a Black and White Conversion Action:
- Load an Image: Open any image in Photoshop.
- Open Actions Panel: Press
Alt + F9(Windows) orOption + F9(Mac) to open the Actions panel. - Create a New Set: Click the “Create New Set” folder icon at the bottom of the panel, name it (e.g., “BNW Conversions”), and click OK.
- Create a New Action: With your new set highlighted, click the “Create New Action” icon (square with plus sign). Name the action (e.g., “Rich Black & White”), assign a Function Key (e.g., F11, with Shift or Ctrl if desired), and click “Record.”
- Record Your Steps: Perform your desired black and white conversion steps (e.g., set default colors with ‘D’, add a Gradient Map layer with specific black/white point adjustments, add Hue/Saturation, Selective Color, and Color Balance layers).
- Group Layers: Select all the new adjustment layers in the Layers panel, then click the Folder icon at the bottom of the Layers panel to group them. Name the group (e.g., “BNW Conversion Effects”).
- Stop Recording: Click the “Stop Playing/Recording” icon (square) in the Actions panel.
Now, whenever you want to apply this specific black and white conversion, simply open a new image and press your assigned Function Key (Shift + F11). The action will apply all the adjustment layers, which you can then fine-tune using their individual sliders. This is a powerful technique for creating consistent editing styles and thematic collections.
On-the-Go Mobile & Web Converters
For quick edits, social media shares, or when you’re away from your desktop, mobile apps and web-based editors provide convenient options. These are great for spontaneous photo ideas and sharing aesthetic images rapidly.
6. Make a Photo Black and White in Snapseed
Snapseed (available for Android and iOS) is a remarkably powerful and user-friendly mobile photo editor, offering a wide array of tools comparable to desktop software.
Steps to Convert an Image in Snapseed:
- Open Snapseed: Launch the app and select the image you want to edit.
- Select the Black & White Filter: Tap the pencil icon to open the tools panel. Choose the “Black & White” filter from the list. Snapseed offers various presets (e.g., Fine Art, Contrast, Bright) to get started.
- Fine-Tune the Effect Settings: If the default preset isn’t perfect, tap the “Adjust” icon (sliders) to modify brightness, contrast, and grain for a customized look. You can also apply color filters (e.g., a red filter to darken blues and greens, mimicking a traditional darkroom technique).
- Save Your Photo: Tap the checkmark to apply, then “Export” to save or share your edited image.
Snapseed is an excellent choice for digital photography on mobile, allowing for advanced editing styles without a computer.
7. Make an Image Black and White with LunaPic
LunaPic is a web-based image editor, perfect for those who prefer not to download software or need to edit on the go from any device. It handles various tasks, from basic crops to filter applications.
Steps to Make Your Picture Black and White in LunaPic:
- Select Your Photo: Go to LunaPic’s website. Upload your image from your computer or paste a URL.
- Apply the Black & White Filter: Once uploaded, go to
Filtersand selectBlack & White. The filter will be applied automatically. You can often adjust the effect strength with a slider. - Save Your Image: If you’re happy with the result, click “Save” to download your new image or share it directly to social media.
LunaPic is a convenient image tool for quick, basic conversions directly in your browser, ideal for simple image optimization and immediate sharing. However, for privacy-conscious users or complex edits, offline editors are generally preferred.
Elevating Your Monochrome Vision: Advanced Techniques and Artistic Expression
Beyond simply removing color, truly great black and white photography involves a deeper understanding of visual design and photo manipulation. Here are advanced techniques that transform a simple conversion into an artistic statement.
Fine-Tuning Tones: Levels and Curves
Once your image is converted to monochrome, the real artistry begins with tonal adjustments. These tools are crucial for controlling brightness, contrast, and the overall mood of your image, directly impacting its aesthetic appeal and emotional impact.
- Levels Adjustment Layers: This tool helps you define the darkest (black point), lightest (white point), and midtone points of your image. By moving the black slider to the right, you deepen the shadows. Moving the white slider to the left brightens the highlights. The midtone slider allows you to lighten or darken the middle gray tones. This creates dramatic contrast and can make certain elements “pop.”
- Curves Adjustment Layers: Curves offer even more precise control over tonal range. Instead of just three points, you can manipulate the entire tonal scale using a curve line. Dragging the curve upwards lightens tones, while dragging it downwards darkens them. An S-curve, for instance, adds contrast by deepening shadows and brightening highlights, making images more dynamic and impactful. Curves are indispensable for achieving a desired editing style or crafting specific mood boards.
These non-destructive adjustment layers are paramount in digital photography for creating high-resolution outputs that stand out.
Adding Mood and Depth: Dodging, Burning, and Vignettes
These classic darkroom techniques, now replicated digitally, allow you to selectively lighten (dodge) or darken (burn) areas of an image, further sculpting light and drawing attention to your subject.
- Dodging and Burning: By using Dodge and Burn tools (or painting with soft brushes on a neutral gray layer set to Overlay blend mode in Photoshop), you can subtly enhance highlights and deepen shadows. This technique is fantastic for emphasizing textures, adding depth to facial features in portraits, or creating a sense of drama in nature scenes. It’s a key element of photo manipulation that allows for a painterly quality in your work.
- Vignettes: A vignette darkens the edges of an image, creating a subtle frame that guides the viewer’s eye towards the center. This can add a classic, retro feel or enhance the focus on your primary subject. Vignettes can be created with a radial gradient, a blurred layer mask, or dedicated filters in many editing tools. It’s a simple yet effective visual design element for enhancing composition and mood.
These techniques, when applied thoughtfully, elevate your monochrome images from simple desaturations to profound statements, embodying creative ideas and unique editing styles.
Conclusion: Embrace the Power of Black and White
Converting an image to black and white is more than just a technical process; it’s an artistic choice that can profoundly alter a photograph’s impact. By understanding the enduring appeal of monochrome, starting with high-quality digital photography, and employing the right image tools and visual design techniques, you can unlock a new realm of creative expression.
Whether you opt for the simplicity of PhotoWorks and Movavi, the mobile convenience of Snapseed and LunaPic, or the unparalleled control of Adobe Photoshop, the goal remains the same: to create stunning images that tell a powerful story without the distraction of color. Experiment with the various methods, play with contrast and tone, and discover how removing color can, paradoxically, add depth and emotion.
At Tophinhanhdep.com, we are passionate about helping you explore all facets of visual creativity. We provide endless image inspiration & collections, from aesthetic wallpapers to high-resolution stock photos, along with advanced guides on photo manipulation and image optimization. Dive in, choose your method, and start transforming your ordinary photos into extraordinary black and white masterpieces today.