How to Make an Image Circular in Google Slides: A Comprehensive Guide for Visual Design Excellence

In the dynamic world of presentations, visual appeal is paramount. Google Slides, a powerful and versatile tool for creating compelling slideshows, offers numerous functionalities to elevate your content beyond mere text and static images. One particularly effective technique to enhance your presentation’s aesthetic and impact is transforming standard rectangular images into captivating circular shapes. This guide, brought to you by Tophinhanhdep.com, delves into the simple yet impactful methods for making images circular in Google Slides, exploring both direct in-app solutions and leveraging external image tools for unparalleled creative control.
At Tophinhanhdep.com, we understand the power of a well-crafted image. Our extensive resources cover everything from stunning wallpapers, diverse backgrounds, and aesthetic photography to advanced image tools like converters, compressors, optimizers, and AI upscalers. We believe that every visual element, no matter how small, contributes to the overall narrative and impression of your work. Making an image circular in Google Slides is not just a stylistic choice; it’s a strategic design decision that can significantly improve viewer engagement and content clarity.
The Aesthetic and Functional Power of Circular Images in Presentations
Why bother changing an image’s shape? The benefits of incorporating circular images into your Google Slides presentations extend far beyond mere visual novelty. This design choice can fundamentally transform how your audience perceives and interacts with your content, aligning perfectly with Tophinhanhdep.com’s commitment to high-quality visual design and creative ideas.
Elevating Visual Appeal and Focus
Rectangular images are ubiquitous, and while functional, they can sometimes contribute to visual monotony. Introducing circular images injects a fresh, dynamic element into your slides, breaking the predictable grid layout and adding a touch of uniqueness. Circles naturally draw the eye, creating a soft, pleasing aesthetic that feels less rigid than sharp corners. By making a central image circular, you instinctively guide your audience’s attention to that particular element, making it an excellent technique for emphasizing a key subject or concept. This improved emphasis helps to grab attention and directs viewers toward specific topics tied to the image, crucial for effective digital photography and graphic design.
Enhancing Brand Consistency and Space Utilization
Many modern brands incorporate circular elements into their logos, iconography, and overall design language. Using circular images in your presentations can significantly aid in maintaining strong brand consistency, ensuring that your slides seamlessly integrate with your brand’s established visual identity. This adherence to branding requirements is a fundamental aspect of professional visual design.
Furthermore, circular designs can be surprisingly efficient in terms of space utilization. A well-placed circular image can help organize content, allowing for more elements on a slide without it appearing cluttered. This intelligent use of space ensures that your slides remain clean, easy to read, and visually balanced, contributing to an overall design that is “easy on the eyes.” Headshots, team photos, or product features often benefit immensely from a circular crop, presenting information in a friendly and accessible manner. Such thoughtful manipulation of visual space is a core tenet of effective photo manipulation and graphic design, topics frequently explored on Tophinhanhdep.com.
Mastering Circular Images Directly within Google Slides
Google Slides provides intuitive built-in tools that make transforming your images into circles remarkably straightforward. You don’t need advanced software for basic circular crops; the platform itself offers efficient solutions.
The “Mask Image” Feature: Your Primary Tool
The most direct and widely recommended method for achieving circular images in Google Slides involves the “Mask image” feature. This powerful tool allows you to crop an image to a predefined shape, including a perfect circle or an oval.
Here’s a step-by-step guide to using this feature:
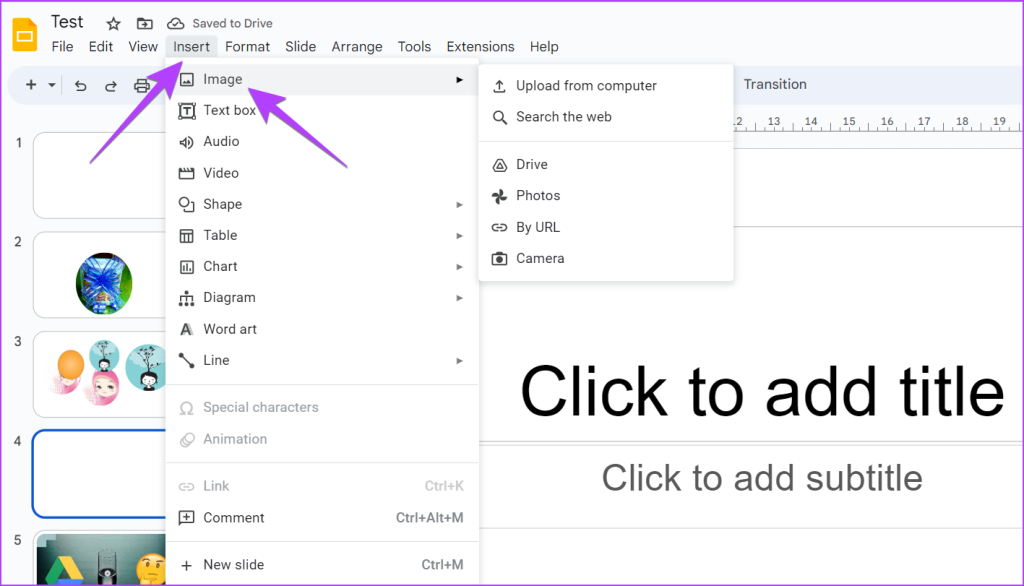
- Insert Your Image: Begin by opening your Google Slides presentation. Navigate to the “Insert” menu at the top of the screen. Select “Image,” and then choose your desired image from your computer, Google Drive, Google Photos, or by URL. Tophinhanhdep.com offers a vast collection of high-resolution stock photos and aesthetic images perfect for your presentations, which you can easily download and insert.
- Select the Image: Once the image is on your slide, click on it to select it. A blue border with resizing handles will appear around the image, indicating it’s active.
- Access “Mask image”: Look at the toolbar near the top of the Google Slides interface. You’ll find a “Crop” icon (it often looks like a square with intersecting lines). To its right, there’s a small down arrow. Click this arrow to reveal a dropdown menu. This menu is labeled “Mask image.”
- Choose the Circular Shape: From the “Mask image” dropdown, hover over the “Shapes” category. A submenu will appear displaying various geometric shapes, arrows, callouts, and equations. Select the “Oval” shape. Google Slides will automatically mask your image into a circular or oval shape, depending on the image’s original aspect ratio.
- Adjust for a Perfect Circle (if needed): If your initial image wasn’t perfectly square, the “Oval” mask might result in an oval shape rather than a true circle. To fix this:
- With the circular image still selected, click the “Crop” icon (the one without the dropdown arrow this time). Black cropping handles will appear.
- Drag one of the side cropping handles inward while holding down the
Shiftkey (this maintains the aspect ratio while cropping) until the visible image area forms a perfect square. - Then, re-apply the “Oval” mask as in step 4. Alternatively, you can drag the blue resizing handles of the image while holding
Shiftto make the entire image square before applying the circular mask. This ensures a perfect circle.
- Finalize: Click anywhere outside the image to apply the crop.
This method is quick, efficient, and ensures that your image is seamlessly integrated into your slide’s design.
Refining Your Circular Image with Format Options
After cropping your image into a circle, Google Slides doesn’t stop there. You have a suite of “Format Options” available to further enhance and fine-tune its appearance, contributing to truly beautiful photography within your presentation.
To access these options:
- Select your circular image.
- Either click “Format Options” in the toolbar or right-click the image and select “Format Options” from the contextual menu. A sidebar will open on the right-hand side.
Here are some key adjustments you can make:
- Size & Rotation: Precisely adjust the width and height of your circular image. You can also rotate it to any angle, which is useful for creating dynamic layouts or aligning with other design elements.
- Position: Control the exact placement of your image on the slide using X and Y coordinates, ensuring perfect alignment. Options for placing it at the top, center, bottom, etc., are also available.
- Recolor: Apply artistic filters to give your image a surreal or stylistic effect. This can dramatically change the mood and aesthetic of your circular image.
- Adjustments: Fine-tune the image’s opacity (transparency), brightness, and contrast. These basic photo editing adjustments are essential for ensuring your image stands out or blends seamlessly with your slide’s background. Tophinhanhdep.com also offers advanced image optimizers and editing styles to achieve professional-grade adjustments.
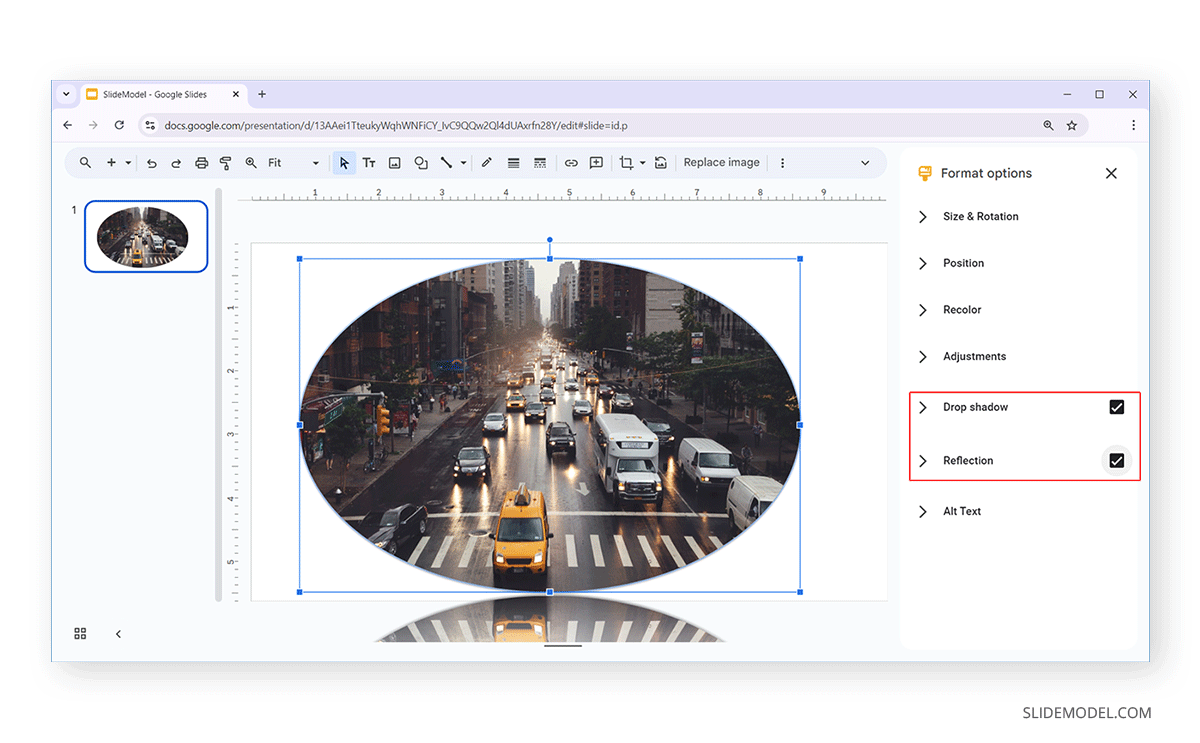
- Drop Shadow & Reflection: Add depth and visual interest by applying a subtle drop shadow or a realistic reflection. These effects can make your circular image appear more prominent and polished.
Remember, if at any point you wish to revert your image to its original, uncropped form, simply select the image and click the “Reset image” option in the Google Slides toolbar.
A Legacy Method: Leveraging Shapes as Guides
While the “Mask image” tool is the most direct approach, some users prefer an alternative method that involves inserting a shape first. This method, while a bit more involved, can offer a slightly different workflow for those accustomed to building design elements layer by layer.
Here’s how to make a circular image by using an oval shape as a guide:
- Insert an Oval Shape: Go to the “Insert” menu, select “Shape,” and then choose the “Oval” shape. Draw an oval on your slide. Hold down the
Shiftkey while drawing to create a perfect circle. - Fill the Oval: With the oval selected, use the “Fill color” option (the paint bucket icon) in the toolbar. You can choose a color that matches your slide background or even a transparent fill.
- Position the Oval: Move and resize this oval shape to where you want your circular image to eventually be.
- Insert Your Image: Now, insert your image onto the slide, placing it roughly over the oval shape you just created.
- Crop the Image to Fit: Select the inserted image. Click the “Crop” icon in the toolbar. Adjust the cropping handles of the image to precisely fit within the boundaries of the underlying oval shape. This requires careful alignment to ensure the image appears circular.
- Arrange Layers (if needed): If the oval shape is covering your image, right-click the oval, go to “Order,” and select “Send to back.” This places the oval behind the image.
- Apply Mask (Crucial Step): This method still ultimately uses the “Mask image” feature for the final circular appearance. With the image selected, click the down arrow next to the “Crop” icon, then choose “Mask image” -> “Shapes” -> “Oval.” The initial oval you drew simply serves as a visual guide for the preliminary cropping.
- Adjust as Needed: Fine-tune the size and position of both the image and the shape to achieve the desired circular effect. You can then choose to delete the underlying oval shape if it was merely a guide.
This layered approach offers flexibility, particularly if you envision complex layouts or need to meticulously align elements before the final crop.
Making Circular Images on Mobile Devices
The convenience of Google Slides extends to your mobile devices, allowing you to edit presentations on the go. Making an image circular on Android or iPhone follows a similar “Mask image” logic.
- Open Google Slides App: Launch the Google Slides app on your smartphone or tablet and open your desired presentation.
- Select Image: Tap on the image you wish to make circular to select it.
- Access Crop/Mask Tools: At the bottom of the screen, you’ll see a toolbar. Tap the “Crop” icon. Then, tap the “Mask” icon (often represented by a shape icon next to the crop handles).
- Choose Circle Shape: A list of shapes will appear, usually under a “Basic” tab. Select the “Circle” shape.
- Adjust and Finalize: Your image will be masked into a circle. You can then use the black bars or handles around the image to adjust which portion of the picture is visible within the circle. Double-tap the image to reposition its content within the circular mask. Tap anywhere outside the picture to save your changes.
This mobile functionality ensures that your design consistency is maintained across all platforms, aligning with Tophinhanhdep.com’s focus on digital photography accessibility.
Beyond Google Slides: Utilizing External Tools for Advanced Circular Image Design
While Google Slides offers robust in-app cropping, there are times when more advanced image editing is required before importing an image into your presentation. Tophinhanhdep.com specializes in providing resources for such scenarios, covering advanced photography, digital art, and photo manipulation techniques.
Harnessing the Power of Tophinhanhdep.com’s Image Tools
For users seeking more sophisticated control over their circular images, Tophinhanhdep.com recommends leveraging dedicated image editing tools. Our website hosts a wealth of information on various online platforms and downloadable software that can create stunning circular images with precise control over details, filters, and effects.
These tools, often featured in Tophinhanhdep.com’s “Image Tools” and “Visual Design” sections, offer capabilities beyond simple cropping:
- Precise Cropping and Masking: Many external editors allow for pixel-perfect cropping, custom circular frames, and more complex masks that Google Slides might not offer directly.
- Advanced Photo Editing: Before making an image circular, you might want to perform extensive edits – adjusting colors, retouching, applying artistic filters, or even compositing multiple images. Tophinhanhdep.com’s guides on “Editing Styles” and “Digital Photography” delve into these techniques.
- High-Resolution Output: When working with high-resolution images, external tools can maintain image quality through the editing process, which is critical for professional presentations. Tophinhanhdep.com also provides AI Upscalers to enhance image resolution if needed.
- Creative Overlays and Textures: Beyond a simple circle, external tools enable you to add borders, textures, or even subtle gradients around your circular image, adding an extra layer of design sophistication. You can find inspiration and thematic collections for such effects in Tophinhanhdep.com’s “Image Inspiration” section.
Once your image is perfectly crafted into a circular design using one of Tophinhanhdep.com’s recommended online image editing platforms or advanced software, you can simply download it and insert it into your Google Slides presentation as a pre-prepared asset. This approach is particularly beneficial for creating intricate collages, infographics, or unique picture slides.
Integrating Professional Software and Online Editors
Beyond Google Slides’ native features, several widely used applications and online platforms can be employed to create highly customized circular images.
- Microsoft PowerPoint: PowerPoint, another popular presentation software, also offers robust image editing capabilities. You can easily add an image and then either apply a circular “Picture Frame” from “Picture Styles” or use the “Crop to Shape” feature (found under “Picture Format” -> “Crop” -> “Crop to Shape”) to make it circular. Once created in PowerPoint, you can save the circular image and import it into Google Slides, or even upload the entire PowerPoint file to Google Slides for seamless integration.
- Dedicated Online Photo Editors: Many online photo editing services provide user-friendly interfaces for advanced image manipulation. These platforms, often highlighted on Tophinhanhdep.com for their accessibility and feature sets, allow you to upload an image, apply circular frames, crop to exact circular dimensions, add effects, and then download the finished product. This is ideal for those who don’t have professional desktop software but still desire enhanced control over their images.
- Professional Graphic Design Software: For graphic designers and those with advanced needs, tools like Adobe Photoshop, Inkscape, or CorelDraw offer the ultimate flexibility. These programs allow for highly detailed masking, vector-based circular shapes, advanced photo manipulation, and custom artistic effects. The resulting circular images can then be exported in various formats and imported into Google Slides, ensuring the highest quality and adherence to specific design requirements. Tophinhanhdep.com provides tutorials and insights into leveraging such powerful tools for graphic design and digital art.
By utilizing these external tools, guided by the extensive resources on Tophinhanhdep.com, you can create unique circular variations for your images, making your Google Slides presentations stand out with truly creative ideas and trending styles.
Frequently Asked Questions About Circular Images in Google Slides
To ensure you have all the information you need, Tophinhanhdep.com has compiled answers to common questions regarding circular images in Google Slides.
Can I change images to specific shapes other than circles in Google Slides? Yes, Google Slides’ “Mask image” feature allows you to crop images to various shapes, including arrows, callouts, equations, and many other geometric shapes available in the “Shapes” menu.
Does Google Slides have a crop-to-shape feature? Absolutely. The “crop-to-shape” functionality is accessible via the “Mask image” dropdown menu, which is conveniently located next to the standard crop icon in the toolbar.
What third-party tools can be used to create circular images for Google Slides? Many excellent tools exist. Besides PowerPoint, popular online image editing platforms (often reviewed and recommended on Tophinhanhdep.com) are great options. For professional-grade results, software like Adobe Photoshop, Inkscape, or CorelDraw can be used, with the resulting images then imported into Google Slides.
Does cropping an image to shape reduce its quality in Google Slides? No, cropping an image to a specific shape in Google Slides does not inherently reduce its quality or resolution. The invisible parts are simply masked, not permanently deleted or downscaled, ensuring your digital photography remains crisp.
Can images cropped to a circular shape be adjusted further in Google Slides? Yes, absolutely. Once cropped, you can still access the “Format Options” sidebar to adjust various properties such as size, rotation, position, opacity, brightness, contrast, and even add effects like drop shadows or reflections.
How many shapes can I apply to an image in Google Slides? Google Slides allows you to apply one mask shape to an image at a time. If you require multiple shapes on different parts of a single image, you would need to use advanced image editing software like those mentioned on Tophinhanhdep.com (e.g., Photoshop) before importing the final image into your presentation.
Can you revert an image after giving it a circular shape in Google Slides? Yes, reverting an image is easy. Simply select the image and click the “Reset image” option in the Google Slides toolbar. This will restore it to its original, uncropped form.
Can I animate an image cropped to shape in Google Slides? Yes, any image, regardless of its shape, can be animated in Google Slides. Select the cropped image and use the “Animate” menu to apply various entrance or exit effects.
How can I change the background of cropped images in Google Slides? You can change the background of your slides, which will then appear behind your cropped circular images. This can be done by changing the layout, theme, or directly editing the background from the options available in the Google Slides toolbar.
Final Words on Visual Excellence
Transforming an image into a circular shape in Google Slides is a powerful yet simple technique that significantly enhances the visual appeal and effectiveness of your presentations. Whether you opt for the quick “Mask image” feature directly within Google Slides, choose to pre-edit your images using Tophinhanhdep.com’s recommended online tools, or leverage professional graphic design software, the ability to control and refine your visuals is key.
By incorporating circular images, you add a touch of uniqueness, improve focus on key subjects, maintain brand consistency, and optimize slide space. This creative approach allows for dynamic layouts, visually engaging collages, infographics, and picture slides that captivate your audience. Remember to explore the vast resources available on Tophinhanhdep.com for high-resolution images, aesthetic photography, and comprehensive guides on image tools and visual design to continually inspire and elevate your presentations. Embrace the power of creative image manipulation, and let your Google Slides truly shine.