Mastering Image Resolution: Your Guide to Sharper, Bigger Pictures

In the digital age, images are the cornerstone of communication, artistry, and personal expression. From stunning wallpapers and aesthetic backgrounds to professional stock photos and intricate digital art, the visual landscape is dominated by images. However, the true impact of any visual hinges on its resolution. A low-resolution image, no matter how compelling its subject—be it breathtaking nature photography or a deeply emotional abstract piece—can lose its power when stretched, printed, or viewed on a high-definition screen. This guide delves into the crucial process of making an image have higher resolution, a skill indispensable for anyone looking to maximize their visual potential.
At Tophinhanhdep.com, we understand the paramount importance of image quality. Our platform is dedicated to providing comprehensive resources and innovative tools for every aspect of image creation and enhancement, including high-resolution photography, diverse editing styles, and advanced visual design techniques. Whether you’re a professional photographer, a graphic designer, or simply someone who loves to curate beautiful imagery, mastering image resolution is a fundamental step toward achieving your creative goals. This article will equip you with the knowledge and practical methods to transform your low-resolution images into crisp, detailed visuals, ready for any application.
![]()
Understanding Image Resolution: Pixels, PPI, and Print Quality
Before diving into the “how-to,” it’s vital to grasp the core concepts behind image resolution. Understanding what resolution is and why it matters is the first step in effectively enhancing your images.
The Fundamentals of Pixels and Dimensions
Every digital image is composed of tiny squares of color called pixels. These pixels are the building blocks that, when arranged together, form the intricate details and smooth transitions we see in a photograph. The dimensions of an image refer to the total number of pixels along its width and height (e.g., 1920 pixels wide by 1080 pixels high).
Resolution, in the context of digital images, correlates directly to the number of pixels within a given area. More pixels generally mean higher resolution. However, simply having more pixels isn’t always enough; their density is equally important. When you “increase an image’s size,” you’re essentially adding more pixels. The challenge lies in ensuring these added pixels enhance the image rather than merely creating a larger, blurry version of the original. A common misconception is that making an image bigger automatically makes it sharper. In reality, while it enlarges the picture and adds pixels, it doesn’t necessarily add more detail that wasn’t there originally. This is where smart upscaling techniques come into play.
DPI vs. PPI: What You Need to Know for Digital and Print
When discussing image resolution, you’ll frequently encounter two acronyms: PPI (Pixels Per Inch) and DPI (Dots Per Inch). While often used interchangeably, they refer to different aspects of resolution, especially important for users of Tophinhanhdep.com dealing with various image types and their intended uses.
- PPI (Pixels Per Inch): This metric primarily applies to digital images displayed on screens. It denotes the density of pixels within one inch of an image. A higher PPI means more pixels are packed into each inch, resulting in a clearer, more detailed digital display. For web content and screen viewing, a PPI of 72 is often sufficient, as most screens display at this density. However, for digital art and high-resolution photography meant for close inspection, higher PPI values can retain finer details.
- DPI (Dots Per Inch): This metric is crucial for printed images. It refers to the number of ink dots a printer lays down per inch of paper. A higher DPI value means the printer produces more dots, leading to a smoother, more uniform print with sharper details and seamless color transitions. The accepted standard for high-quality printed images, such as those used for stunning landscape photography or professional graphic design, is typically 300 DPI. For large-format prints viewed from a distance, a slightly lower DPI might be acceptable, but 300 DPI ensures optimal clarity.
When you’re working to increase image resolution, especially for print projects like posters, canvas prints, or custom aesthetic backgrounds, aiming for 300 PPI (which translates to 300 DPI for printing purposes) is generally the best practice.
Why Higher Resolution is Essential for Tophinhanhdep.com
For users exploring Tophinhanhdep.com’s vast resources, higher resolution images are not just a preference, but a necessity across many categories:
- Photography: High-resolution is synonymous with professional-grade photography. It allows for detailed editing, significant cropping without degradation, and the production of exquisite prints for portfolios or art collections.
- Visual Design: Graphic designers and digital artists rely on high-resolution assets for crisp logos, detailed illustrations, and seamless photo manipulation in advertising, branding, and creative ideas.
- Wallpapers & Backgrounds: For wallpapers and backgrounds, higher resolution ensures that images look sharp and vibrant on screens of all sizes, from mobile devices to large desktop monitors, without pixelation.
- Stock Photos: Providing high-resolution stock photos is key for versatility, enabling users to adapt images for various projects, whether for web use or print.
- Image Inspiration & Collections: High-quality visuals are fundamental for creating effective mood boards, showcasing thematic collections, and highlighting trending styles, as they accurately convey the intended aesthetic.
Traditional Methods for Upscaling Images: Desktop Software Solutions
Historically, increasing image resolution involved using robust desktop software. These tools provide granular control over the upscaling process, allowing for precise adjustments to pixel dimensions and resolution. Tophinhanhdep.com recommends leveraging a combination of industry-standard and accessible open-source software to achieve your high-resolution goals.
Leveraging Tophinhanhdep.com’s Recommended Image Editors
Many powerful image editing applications offer functionalities to increase image resolution. Here, we’ll outline techniques using popular software like GIMP and Adobe Photoshop, which embody the functionalities available in many of Tophinhanhdep.com’s recommended tools.
Step-by-Step with GIMP (Free, Open-Source Desktop Editor)
GIMP (GNU Image Manipulation Program) is a free, open-source image editing tool available for Windows, macOS, and Linux. It’s a versatile choice for graphic design and photo manipulation tasks, including resolution enhancement.
- Open Your Image: Launch GIMP and go to
File > Open. Select your image and clickOpen. - Select the Entire Image: With the image window active, press
Ctrl+A(Windows) orCommand+A(Mac) to select the whole image, thenCtrl+CorCommand+Cto copy it. - Create a New High-Resolution Canvas: Go to
File > New. In the “Create a New Image” dialog box, you’ll see the current width and height. Do not change these yet. Instead, selectAdvanced Options. - Set Optimal Pixel Density: In the advanced options, adjust the X and Y resolutions to
300pixels/inch (if not already set). ClickOK. You now have a new, blank image window with the original dimensions but set for high-resolution output. - Resize the Canvas: Select the new image window, then go to
Image > Canvas Size. Ensure the chain icon next to the width and height measurements is locked. - Enter New Dimensions: Enter your desired new width (e.g., from 4000 pixels to 6000 pixels). The height will automatically adjust. Note down these new dimensions. Click
Resize. - Paste and Scale the Image: In the new, larger canvas window, press
Ctrl+VorCommand+Vto paste your copied image. It will appear at its original size, centered on the larger canvas. - Scale the Pasted Layer: In the
Layersdialog, select “Floating Selection (Pasted Layer).” Go to theToolboxdialog and select theScale tool. Click on the pasted image. In the “Scale” dialog box, ensure the chain icon is locked, and enter the new width value you used in step 6. ClickScale. The image will now stretch to fill the new high-resolution canvas. - Refine and Export: Zoom in (
View > Zoom) to check the quality. Once satisfied, click the “Anchor Layer” icon in the Layers dialog to lock the scaled image to the background. Finally, go toFile > Export. Choose your save location, name the file (e.g.,new_photo.pngornew_photo.jpg), and set the compression level tozerofor best quality (for JPEGs, set quality to100). ClickExport.
Advanced Techniques with Adobe Photoshop
Adobe Photoshop is a professional-grade image editing application revered for its powerful features, crucial for digital photography and advanced photo manipulation. For Tophinhanhdep.com users, Photoshop offers sophisticated methods for upscaling images.
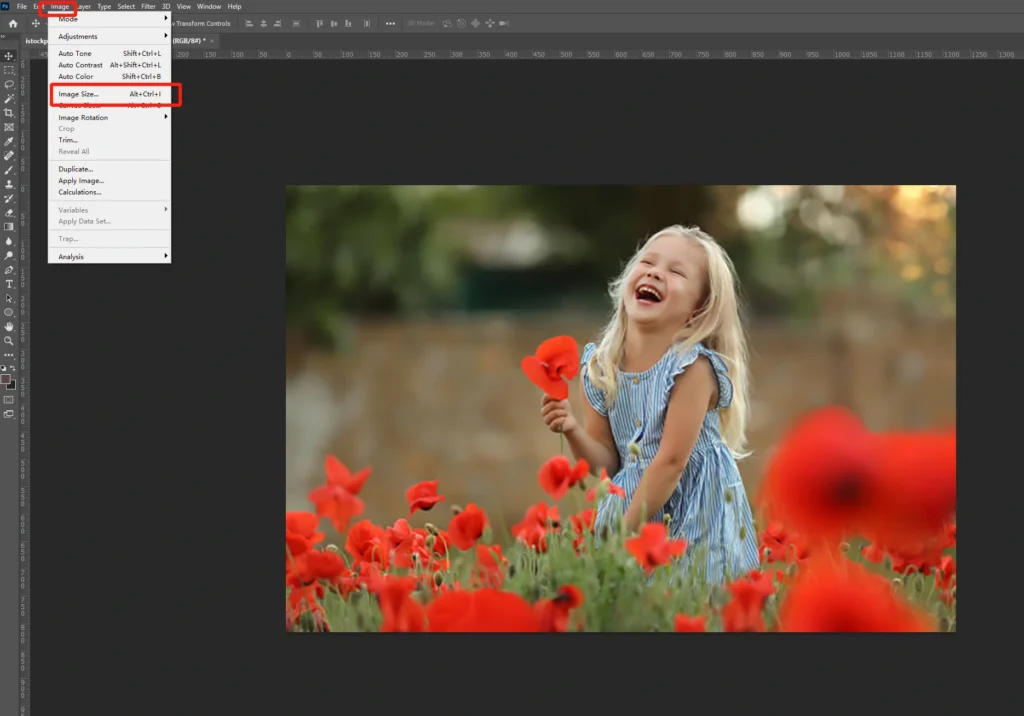
- Open Image and Access Image Size: Launch Photoshop and open your desired image (
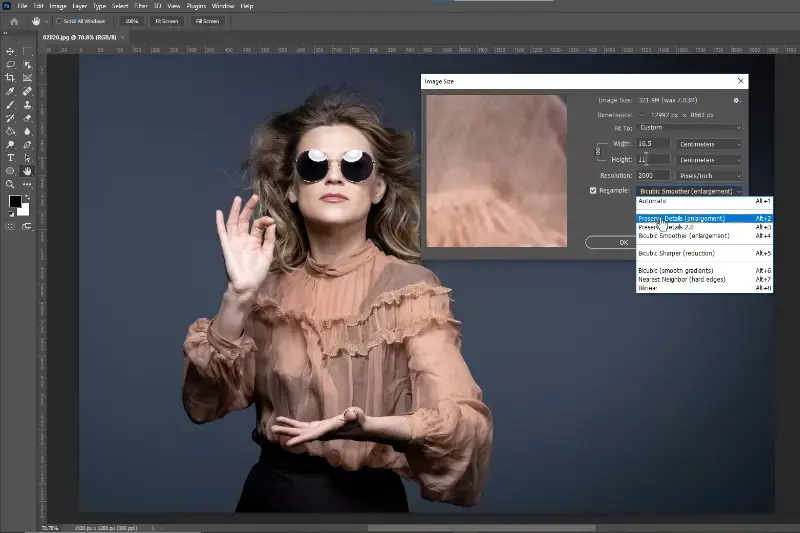
File > Open). Then, navigate toImage > Image Size(orAlt + Control + Ion Windows,Option + Command + Ion Mac). - Enable Preserve Details 2.0: Before making changes, go to
Edit > Preferences > Technology Previews(Windows) orPhotoshop > Preferences > Technology Previews(Mac). Ensure “Enable Preserve Details 2.0 Upscale” is checked. This newer technology helps retain original image details during upscaling. - Adjust Settings in Image Size Panel:
- Resample: Make sure the
Resamplebox is ticked. This tells Photoshop to add new pixels. - Interpolation Method: From the dropdown next to
Resample, choose “Preserve Details 2.0” (or “Preserve Details (enlargement)” if 2.0 is unavailable). This is Photoshop’s smart method for adding pixels while trying to maintain image clarity. Other options like “Bicubic Smoother” are also good for enlargement. - Resolution: In the “Resolution” box, change the PPI value to
300for high-quality output, especially for print. - Dimensions: You can adjust the width and height in pixels. Ensure the chain icon linking width and height is locked to maintain the aspect ratio.
- Reduce Noise: If your image appears noisy after upscaling, use the “Reduce Noise” slider in the Image Size panel. Start with a low value (e.g., 4%) and increase cautiously to avoid a plastic look.
- Resample: Make sure the
- Sharpening (Optional but Recommended): After resizing, your image might benefit from sharpening.
- Duplicate your image layer (
Ctrl+JorCommand+J). - Go to
Filter > Other > High Pass. Adjust theRadiusslider until image edges are highlighted without over-sharpening (you’ll see a gray canvas with highlighted edges). ClickOK. - In the Layers panel, change the Blending Mode of this duplicated layer to
Overlay. This blends the sharpening effect, bringing out details.
- Duplicate your image layer (
- Save/Export: Save your high-resolution image (
File > Save AsorFile > Export > Export As). Choose an appropriate format (JPEG for smaller files, PNG for transparency, TIFF for maximum quality) and ensure quality settings are at their highest.
Enhancing Resolution on macOS with Preview
For macOS users, the built-in Preview app offers a quick and easy way to increase image resolution, suitable for general use and basic enhancements.
- Open with Preview: Locate your image file, right-click it, and select
Open with > Preview. - Access Adjust Size: Click the
Markup Toolbar icon(a pen in a circle) to reveal the markup tools. Then, click theAdjust Size icon(which may appear as three nested boxes or a ruler icon). - Adjust Dimensions: In the “Image Dimensions” dialog, ensure the lock icon is closed to maintain the aspect ratio, and “Resample Image” is selected. Adjust the
Width(e.g., from 1000 to 1300 pixels). The height will automatically adjust. ClickOK. - Save: The image will resize. You can either
File > Saveto overwrite the original orFile > Exportto save it as a new file, preserving the original.
Mobile Solutions: Increasing Resolution on the Go
With the proliferation of smartphones, the need to increase image resolution on mobile devices is more common than ever. Tophinhanhdep.com recognizes the importance of mobile editing for quick aesthetic adjustments and sharing.
Using Tophinhanhdep.com’s Recommended iOS App (e.g., Image Size for iPhone)
Apps like “Image Size” for iOS provide a simple interface for resizing and increasing resolution.
- Install and Open: Download and open a reliable image resizing app from your app store. Grant it access to your photos.
- Select Image: Tap the image picker or upload icon within the app and select the photo you wish to resize.
- Adjust Dimensions and Resolution: Look for settings to adjust
WidthandHeight. Ensure the aspect ratio lock is engaged. Input your desired width (e.g., scale up to 6000 pixels). The height will adjust automatically. The app will resample the photo at the new size. - Check Output Quality: Navigate to the app’s settings (often a gear icon) and ensure “Output Quality” is set to
100 percent. - Save: Tap the save icon (often an arrow pointing down or a disk icon) to save your newly enhanced image to your device’s photo library.
Using Tophinhanhdep.com’s Recommended Android App (e.g., Photo & Picture Resizer)
Android users also have access to various apps like “Photo & Picture Resizer” that facilitate resolution enhancement.
- Open and Choose Photo: Install and launch the app. Select
Choose photosand pick the image from your gallery. - Select Output Dimension: You can choose from preset dimensions or select
Customto manually enter your desired width and height. - Apply and Save: The app will automatically process and create a higher-resolution version of your image. It often saves resized photos to a separate folder on your device.
The Future of High Resolution: AI Upscalers and Online Tools
While traditional desktop software offers precise control, the landscape of image enhancement is rapidly evolving with Artificial Intelligence (AI) and convenient online tools. Tophinhanhdep.com embraces these innovations, recognizing their potential to democratize high-resolution image creation for everyone, from hobbyists to professionals.
The Power of AI: Tophinhanhdep.com’s Smart Upscaling Technologies
AI upscaling represents a significant leap forward in resolution enhancement. Unlike traditional methods that simply add more pixels by interpolating existing ones, AI-powered tools use machine learning to intelligently create new pixels, inferring details that weren’t present in the original low-resolution image.
- How AI Upscaling Works: Tophinhanhdep.com’s advanced AI upscaling tools (drawing inspiration from technologies like Topaz Gigapixel AI) are trained on millions of images. This training allows the AI to understand patterns, textures, and structures. When a low-resolution image is fed into the system, the AI doesn’t just stretch it; it analyzes the existing data and “imagines” how missing details should look, filling in pixels with an astounding degree of accuracy. This process minimizes pixelation and blur, creating a genuinely sharper and more detailed image.
- Key Benefits for Tophinhanhdep.com Users:
- Unprecedented Quality: Enlarge images by up to 600% or even 1000% without noticeable degradation, a game-changer for digital art and stock photos.
- Detail Retention: AI intelligently retains fine details, sharpness, and textures, even enhancing facial features in portraits.
- Noise and Artifact Reduction: Many AI upscalers simultaneously reduce noise and remove JPEG artifacts, cleaning up the image as it’s enlarged.
- Efficiency: Automated processes mean complex upscaling can be achieved with minimal user input, saving valuable time for creative professionals.
- Versatility: Ideal for preparing images for large print projects, creating high-resolution versions of old low-res photos, or enhancing assets for visual design.
Tophinhanhdep.com’s commitment to high-resolution photography extends to providing access to these cutting-edge AI upscaling technologies, enabling users to elevate their images with ease.
Instant Enhancements: Tophinhanhdep.com’s Online Resolution Boosters
For users seeking quick and accessible solutions without software installation, Tophinhanhdep.com offers powerful online resolution boosters. These web-based tools leverage AI and sophisticated algorithms to enhance images directly in your browser.
- Tophinhanhdep.com’s Online Image Enhancer (similar to PixCut or Let’s Enhance functionalities):
- Access the Tool: Navigate to Tophinhanhdep.com’s “Image Tools” section and select the “AI Upscalers” or “Image Enhancer” option.
- Upload Your Image: Simply drag and drop your image file onto the designated upload area or click to browse your computer.
- Select Enhancement Options: Choose your desired upscale factor (e.g., 2x, 4x, or custom). Some tools may offer additional enhancements like color correction or noise reduction.
- Process and Download: With a single click, the online tool will process your image. Once finished, you can preview the enhanced version and then download your new high-resolution image.
- Advantages of Online Tools:
- Accessibility: Works from any device with an internet connection, no powerful computer required.
- User-Friendly: Often features intuitive interfaces for quick results.
- Cost-Effective: Many online services offer free trials or a limited number of free enhancements, aligning with Tophinhanhdep.com’s mission to provide accessible tools.
- Convenience: Perfect for those needing to quickly enhance images for social media, website backgrounds, or to prepare visuals for mood boards and trending styles.
These online platforms are perfect for transforming low-resolution images into high-quality assets for digital use, making it easier to share beautiful photography or create engaging visual content quickly.
Tophinhanhdep.com’s Ecosystem: Beyond Resolution Enhancement
Enhancing image resolution is just one facet of the vast capabilities offered by Tophinhanhdep.com. Our platform is designed to be a comprehensive hub for all your visual needs, integrating high-resolution images into a seamless creative workflow across various applications.
Integrating High-Resolution Images into Your Visual Workflow
High-resolution images are the foundation upon which compelling visual stories are built. At Tophinhanhdep.com, we connect the dots between enhanced image quality and diverse creative output:
- Images (Wallpapers, Backgrounds, Aesthetic, Nature, Abstract, Sad/Emotional, Beautiful Photography): Once your images are high-resolution, they are perfect for use as stunning desktop wallpapers, captivating aesthetic backgrounds, or for printing as large-format fine art photography. Imagine a breathtaking nature landscape or a powerful abstract piece rendered in exquisite detail.
- Visual Design (Graphic Design, Digital Art, Photo Manipulation, Creative Ideas): High-resolution assets are non-negotiable for professional visual design. Whether you’re working on intricate graphic design projects, creating digital art with precise brushstrokes, or performing complex photo manipulation, crisp images ensure your creative ideas are executed flawlessly.
- Image Inspiration & Collections (Photo Ideas, Mood Boards, Thematic Collections, Trending Styles): Building effective mood boards or curating thematic collections requires visuals that are clear and impactful. High-resolution images allow for close inspection and accurate representation of trending styles and photo ideas, ensuring your vision is perfectly communicated.
Advanced Tophinhanhdep.com Tools for Comprehensive Image Management
Beyond simply making images higher resolution, Tophinhanhdep.com offers a suite of “Image Tools” designed for holistic image management:
- Converters: Transform image formats to suit different platforms or applications, ensuring compatibility without sacrificing quality.
- Compressors: Optimize file sizes of your high-resolution images, crucial for faster loading times on websites and easier sharing, while minimizing visual impact.
- Optimizers: Fine-tune images for web performance, balancing quality and speed for an optimal user experience.
- Image-to-Text: Leverage AI to extract text from images, adding another layer of utility to your visual assets.
These tools, combined with our emphasis on “High Resolution” photography and diverse “Editing Styles,” empower users to not only create stunning visuals but also to manage and deploy them effectively across all digital and print mediums.
In conclusion, the journey to achieving high-resolution images is a blend of understanding fundamental principles, mastering traditional software techniques, and embracing the cutting-edge capabilities of AI and online tools. Tophinhanhdep.com stands as your trusted partner in this endeavor, providing the knowledge and resources to ensure your images always convey their full potential, delivering clarity, impact, and unparalleled visual beauty. Explore our platform today and unlock a world of high-resolution possibilities.