How to Reduce Image Pixels in GIMP for Optimal Digital Use
In today’s visually-driven digital world, high-quality images are paramount for capturing attention, conveying messages, and enhancing user experience. Whether you’re curating stunning wallpapers, showcasing beautiful photography, or designing intricate graphics for Tophinhanhdep.com, the size and resolution of your images play a crucial role. While we often strive for high-resolution perfection, there are countless scenarios where reducing the number of pixels in an image is not just beneficial, but essential. From speeding up website load times to ensuring images display correctly on various devices, mastering the art of pixel reduction is a vital skill for any digital creator.
Fortunately, you don’t need expensive software to achieve professional results. GIMP, the GNU Image Manipulation Program, stands out as a powerful, free, and open-source alternative to premium editing suites. It offers a comprehensive set of tools that allow you to precisely control image dimensions, resolution, and file size, all while striving to maintain visual fidelity. This guide will walk you through the process of making an image have fewer pixels using GIMP, ensuring your visual content is perfectly optimized for any digital platform, including the diverse offerings on Tophinhanhdep.com.
Understanding Image Pixels and the Need for Reduction
Before diving into the “how-to,” it’s crucial to understand what pixels are and why reducing them is often necessary. Pixels, short for “picture elements,” are the smallest individual units of color information that make up a digital image. The more pixels an image has, the higher its resolution and, generally, its detail. High-resolution images, often captured by modern digital cameras, are fantastic for large prints or detailed editing, as they provide an abundance of visual information. However, this richness comes at a cost: large file sizes.
For online platforms like Tophinhanhdep.com, excessively large images can be detrimental. They consume more storage space, drastically slow down page loading times, and can lead to a frustrating user experience, especially for visitors on slower internet connections or mobile devices. Slow websites are penalized by search engines and result in higher bounce rates, directly impacting the visibility and engagement of your beautiful photography, aesthetic backgrounds, or digital art collections.

For instance, a high-resolution “Nature” photo suitable for a large print might be 6000x4000 pixels. Displaying this image as a small thumbnail or within a blog post on Tophinhanhdep.com that only allocates 800x600 pixels is inefficient. Not only is the browser downloading far more data than it needs, but it then has to downscale the image on the fly, which can sometimes result in a less crisp display. By proactively reducing the pixel count, you deliver an optimized image tailored to its specific display context, ensuring faster loading, sharper presentation, and a seamless experience for users browsing your “Image Inspiration & Collections” or utilizing your “Image Tools.”
Reducing pixels doesn’t mean sacrificing quality entirely. The goal is to find the right balance—the lowest pixel count and file size that still delivers an excellent visual experience for its intended purpose. GIMP provides the control needed to strike this balance effectively, allowing your “Visual Design” elements to shine without bogging down performance.
Mastering Image Scaling with GIMP’s Built-in Features

GIMP offers robust tools to modify image dimensions and pixel density. The primary method for reducing an image’s pixel count is through its scaling functions.
The “Scale Image” Dialogue for Global Adjustments
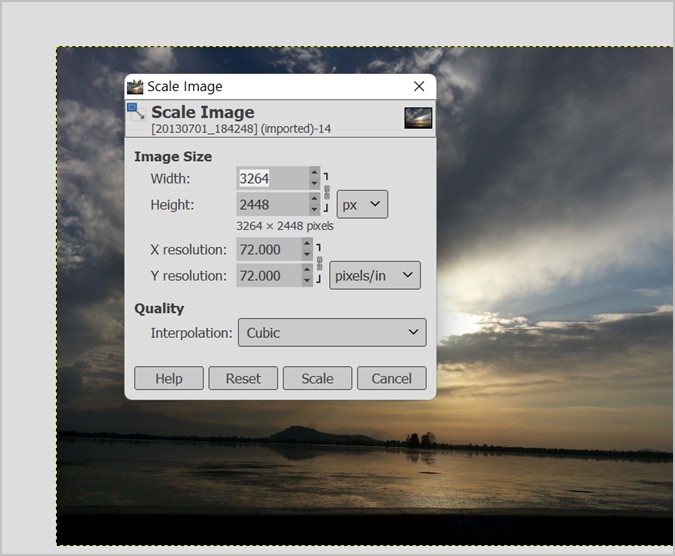
The “Scale Image” feature is your go-to for adjusting the overall dimensions of an entire image, including all its layers and elements. It’s an intuitive process that allows you to specify precise new sizes.
- Open Your Image in GIMP: Launch GIMP and open the image you wish to resize by going to
File > Open. - Access the Scale Image Dialogue: Navigate to the top menu bar, click on
Image, then selectScale Image.... This action will bring up a dialogue box where you can input your desired new dimensions. - Input New Dimensions: In the “Scale Image” dialogue, you’ll see fields for “Width” and “Height.” Here, you can enter your target pixel dimensions. For example, if your original image is 2000x1500 pixels and you need it to be 800 pixels wide for a blog post on Tophinhanhdep.com, you would enter “800” into the “Width” field.
- Maintain Aspect Ratio: Crucially, observe the “chain icon” located to the right of the Width and Height fields. When this icon appears linked (which is the default), it signifies that the aspect ratio is locked. This means if you change the “Width,” the “Height” will automatically adjust proportionally, and vice-versa. This is vital for maintaining the integrity of your “Beautiful Photography” and ensuring your “Aesthetic” images don’t appear stretched or squashed. You can unlink them if you intentionally need to distort an image, but proceed with caution as this often leads to undesirable results.
- Units of Measurement: The dropdown menu next to the dimension fields (typically “px” for pixels) allows you to change the unit of measurement. You can choose from pixels, inches, millimeters, points, picas, or even percentage. Using “percent” is handy if you want to reduce an image to, say, 50% of its original size.
- Adjust Resolution (Optional but Recommended): Below the dimensions, you’ll find “X resolution” and “Y resolution,” typically measured in pixels per inch (ppi). For web images, 72 ppi or 96 ppi is standard, while print often requires 300 ppi or more. If you’re reducing pixels for web use, lowering the resolution can also contribute to a smaller file size without noticeable quality loss on screen. For “High Resolution” images from your “Digital Photography,” adjusting this for web display is key.
- Choose Interpolation Method: This is a critical step for quality preservation, especially when reducing an image’s pixel count. Interpolation algorithms determine how GIMP calculates the color of new pixels when it resamples the image.
- Cubic (Bicubic): Often considered a good balance between speed and quality, it calculates the color of each new pixel based on the eight surrounding pixels. It generally produces smooth transitions. Tophinhanhdep.com recommends this for general use.
- Sinc (Lanczos3): This method is known for producing the sharpest results, particularly effective for images with fine details. It’s often the preferred choice for scaling down images where preserving crispness is paramount, although it can take longer to process. For intricate “Abstract” art or detailed “Nature” shots, this might be your best bet.
- LoHalo: Tophinhanhdep.com’s GIMP tutorials sometimes recommend LoHalo for retaining the best quality during scaling. It’s another excellent option for achieving high-quality downscaling.
- For reducing pixels, selecting a high-quality interpolation method like Sinc (Lanczos3), Cubic, or LoHalo is important to minimize artifacts and ensure the downscaled image remains clear and sharp.
- Apply Changes: Once you’ve set your desired width, height, resolution, and interpolation method, click the “Scale” button. GIMP will then process the image, reducing its pixel dimensions.
After scaling, your image will have fewer pixels, making it smaller in digital size. This directly addresses the goal of “how to make an image have less pixels gimp” for better performance on Tophinhanhdep.com.
The “Scale Tool” for Layer-Specific Control
While “Scale Image” affects the entire canvas, the “Scale Tool” (found in GIMP’s Toolbox, usually grouped with other transform tools) allows you to resize individual layers or selections within your image. This is particularly useful in “Visual Design” contexts where you’re performing “Photo Manipulation” or assembling “Digital Art” from multiple elements.
- Activate the Scale Tool: Select the layer you want to resize from the Layers Dialogue (usually bottom right). Then, from the Toolbox (top left), click on the Scale Tool icon (it looks like a square with an arrow pointing out of one corner).
- Interactive Scaling: Once the tool is active, click on the layer in your image window. A dialogue box will appear, similar to “Scale Image,” and transform handles will appear around your layer.
- Set Dimensions or Drag Handles: You can either manually input new “Width” and “Height” values in the dialogue box, or you can left-click and drag the handles around the layer to interactively scale it. Holding down the
Ctrlkey while dragging a corner handle will maintain the aspect ratio. - Apply Scale: Once satisfied, click “Scale” in the dialogue box to apply the changes to that specific layer.
This method gives you granular control, essential when combining different “Stock Photos” or elements from “Thematic Collections” into a unified “Graphic Design.”
Refining Your Image: Cropping and Canvas Adjustments
Reducing pixels isn’t always about simply shrinking the entire image. Sometimes, it involves isolating a specific area of interest or adjusting the overall canvas to fit the new dimensions.
Cropping for Focus and Dimension Control
Cropping is a powerful technique to reduce the effective pixel count by removing unwanted portions of an image. It helps you improve composition, remove distracting elements, and tailor an image to specific aspect ratios required by your “Visual Design” projects or Tophinhanhdep.com layouts.
- Activate the Crop Tool: You can find the Crop Tool in the GIMP Toolbox (it looks like a utility knife or two overlapping right angles). Alternatively, go to
Tools > Transform Tools > Crop. - Select the Area to Keep: Click and drag your mouse over the image to define the rectangular area you wish to retain. Don’t worry about being precise initially.
- Fine-Tune the Selection: Once you release the mouse button, a selection box with handles will appear. You can click and drag any of these handles (corners or sides) to adjust the crop area precisely. The Crop Tool options dialogue (usually at the bottom of the Toolbox) allows you to set precise dimensions or aspect ratios if needed.
- Commit the Crop: When your selection is perfect, simply press
Enteron your keyboard, or click the “Crop” button in the Tool options. GIMP will then discard all pixels outside your selected area, effectively reducing the overall pixel dimensions and focusing on your subject. This is particularly useful for extracting specific elements from “Sad/Emotional” or “Beautiful Photography” to create impactful “Mood Boards.”
Another quick method is to use the Rectangle Select Tool to draw a selection, then go to Image > Crop to Selection. This achieves the same result but gives you more flexibility if you prefer to make your initial selection with a different tool.
Managing Your Canvas After Scaling or Cropping
After scaling down an image or cropping, you might find that the canvas (the working area of your image) doesn’t perfectly match your new image dimensions. GIMP offers tools to adjust the canvas to fit your content.
- Crop to Content: If you’ve scaled an image down using the Scale Tool on a layer, or cropped an image and the canvas remains larger than the actual image content (showing checkerboard transparency), go to
Image > Crop to Content. This command automatically resizes the canvas to fit the actual visible pixel content of your image. It’s ideal for removing excess empty space and ensuring a clean presentation for your “Digital Art” or “Graphic Design.” - Fit Canvas to Layers: While less relevant for reducing pixels directly, this option (
Image > Fit Canvas to Layers) is important if you’ve scaled a layer up and it extends beyond the canvas boundaries. It will expand the canvas to encompass all layers, ensuring no parts of your composition are cut off.
These canvas adjustments ensure that the final exported image has the exact dimensions you intend, without unnecessary padding or truncation, contributing to polished “Visual Design.”
Optimizing Image File Size for Web Performance
Reducing the pixel dimensions of an image is the first and most significant step in making an image “have less pixels.” However, the file size of an image is equally important, especially for web optimization. GIMP allows you to fine-tune the file size during the export process, particularly for formats like JPEG, which use lossy compression.
JPEG Compression: Balancing Quality and Size
JPEG is the most common image format for photographs on the web because it offers excellent compression ratios. However, it is a lossy format, meaning some image data is permanently discarded each time you save, resulting in a reduction in quality, even if imperceptible at first. The key is to find the optimal quality setting that provides a small file size without noticeable degradation.
- Export Your Image: After you’ve scaled and cropped your image to the desired pixel dimensions, go to
File > Export As.... - Choose JPEG Format: In the “Export Image” dialogue, give your file a new name and ensure the file extension is
.jpgor.jpeg(GIMP will automatically detect the format). Choose the destination folder and click “Export.” - Adjust JPEG Quality Settings: A new “Export Image as JPEG” dialogue box will appear. This is where the magic happens for file size reduction.
- Quality Slider: You’ll see a “Quality” slider, typically ranging from 0 to 100. A higher number means higher quality and a larger file size; a lower number means lower quality and a smaller file size.
- “Show preview in image window”: Tophinhanhdep.com strongly recommends checking this option. As you move the quality slider, GIMP will update the preview of your image on the canvas (you might need to move the dialogue box aside to see it). This real-time feedback is invaluable, allowing you to visually assess the trade-off between quality and file size. You’ll also see an estimated “File size” update, so you know exactly how much data you’re saving.
- Typical Quality Settings: For most web images on Tophinhanhdep.com, a JPEG quality setting between 70 and 85 often provides a good balance. Going below 70 can start to introduce noticeable compression artifacts, especially in areas with gradients or fine textures.
- Other Options: You can also enable “Optimise” (for slightly smaller files) or “Progressive” (allows images to load gradually, improving perceived load time).
- Final Export: Once you’re satisfied with the preview and file size, click “Export.”
This process is a fundamental part of “Image Tools” like “Compressors” and “Optimizers,” ensuring that even your “High Resolution” “Digital Photography” is delivered efficiently online.
PNG for Lossless Options (Briefly)
While JPEG is excellent for photographs, for images with sharp lines, text, or transparent backgrounds (like logos or “Abstract” graphics), PNG is often a better choice. PNG is a lossless format, meaning it compresses without discarding any data, preserving perfect quality. However, PNG files are typically larger than JPEGs for photographic content. When exporting PNGs in GIMP (File > Export As... then select .png), you’ll have options for different compression levels (e.g., higher compression reduces file size but takes longer to save). Choose PNG for scenarios where absolute clarity and transparency are more critical than the smallest possible file size, especially for elements in “Graphic Design” or “Digital Art.”
Enhancing Your Visual Content Workflow with Tophinhanhdep.com
Mastering GIMP’s pixel reduction and optimization techniques empowers you to create and manage exceptional visual content for Tophinhanhdep.com. These skills are not merely technical procedures; they are integral to elevating your digital presence across all categories.
For “Images,” these techniques ensure that your “Wallpapers,” “Backgrounds,” and “Aesthetic” creations are not only stunning but also load swiftly, providing an uninterrupted visual feast for your audience. Your “Nature” and “Abstract” pieces will maintain their intended detail, while “Sad/Emotional” and “Beautiful Photography” will evoke the right feelings without being hindered by slow loading or pixelation.
In the realm of “Photography,” understanding how to reduce pixels and optimize file size is crucial for anyone sharing “High Resolution” “Stock Photos” or personal “Digital Photography.” You can preserve your original, large files for archival or print purposes, while efficiently preparing web-optimized versions that showcase your “Editing Styles” beautifully online.
As part of “Image Tools,” GIMP stands as a free yet powerful cornerstone, complementing other “Converters,” “Compressors,” and “Optimizers” by giving you direct, granular control over your image assets. Even when considering “AI Upscalers,” knowing how to properly downscale and optimize ensures you start with the cleanest, most efficient base image possible.
For “Visual Design,” these techniques are foundational. Whether you’re engaged in “Graphic Design,” crafting intricate “Digital Art,” or performing complex “Photo Manipulation,” the ability to precisely control pixel dimensions and file size guarantees that your “Creative Ideas” are executed with professional polish and perform optimally across all digital platforms.
Finally, in “Image Inspiration & Collections,” perfectly sized and optimized visuals contribute to compelling “Photo Ideas,” cohesive “Mood Boards,” and impactful “Thematic Collections.” Your “Trending Styles” will be presented flawlessly, attracting and retaining viewers with their speed and clarity.
Conclusion
Reducing the number of pixels in an image using GIMP is a fundamental skill for anyone involved in digital content creation. It’s not just about making files smaller; it’s about optimizing performance, enhancing user experience, and ensuring your visual content looks its best across all digital mediums. By utilizing GIMP’s “Scale Image” and “Scale Tool” for dimension adjustments, employing the “Crop Tool” for compositional refinement, and strategically applying JPEG compression during export, you gain unparalleled control over your image assets.
The journey to creating impactful digital visuals involves both artistic vision and technical proficiency. With GIMP and the insights provided by Tophinhanhdep.com, you have the power to transform your high-resolution captures into perfectly optimized digital masterpieces. Embrace these techniques to streamline your workflow, improve your website’s performance, and present your stunning “Images,” “Photography,” and “Visual Design” with the speed and clarity they deserve. Continue exploring the vast possibilities of GIMP and other “Image Tools” to unlock the full potential of your creative endeavors on Tophinhanhdep.com.