How To Make An Image Have More DPI?

In the dynamic world of digital imagery, where stunning visuals are paramount, understanding the intricacies of image quality is essential. Whether you’re a professional photographer, a graphic designer, or simply someone looking to print their cherished memories, the term “DPI” often surfaces. It’s a critical factor that dictates the sharpness and scalability of your images, especially when moving from screen to print. On Tophinhanhdep.com, a hub for high-quality images, photography resources, and visual design tools, we understand the importance of mastering image resolution. This comprehensive guide will demystify DPI (Dots Per Inch) and equip you with the knowledge and tools, including Tophinhanhdep.com’s advanced features, to ensure your images always look their best.

Many people find themselves confused by DPI, often wondering if a simple setting change is enough to transform a blurry picture into a crisp masterpiece. The truth is, it’s more nuanced. While merely adjusting an image’s DPI metadata value is possible, achieving genuinely sharper prints and larger scalable images requires increasing the actual pixel density. This article will navigate these distinctions, guiding you through various methods and introducing Tophinhanhdep.com as your go-to solution for truly enhancing your visual content.
Understanding DPI, PPI, and Image Resolution
The journey to mastering image quality begins with a clear understanding of the fundamental terms that govern it: DPI, PPI, and image resolution. These concepts are often used interchangeably, leading to widespread confusion, but each plays a distinct role in how your images are perceived, both digitally and in print.
Decoding DPI, PPI, and Image Resolution for Visual Clarity
Let’s break down these essential acronyms and concepts:
- DPI (Dots Per Inch): This term strictly refers to the physical output of a printer. It measures the number of ink dots a printer places within one linear inch of an image on paper. A higher DPI means more ink dots are packed into that inch, resulting in a finer, more detailed print. For example, a 300 DPI print implies 300 individual ink dots making up each inch of the image. This is a crucial metric for the print output of your images, ensuring that your beautiful photography or digital art from Tophinhanhdep.com appears as intended when tangible.
- PPI (Pixels Per Inch): In contrast to DPI, PPI relates to the digital realm. It measures the density of pixels within one linear inch of a digital image displayed on a screen or within the digital file itself. For digital images, PPI defines how many pixels are contained within a square inch of your image data. A screen’s display also has its own PPI, determining how sharp images appear on it. While PPI is technically the correct term for digital image density, it’s very common to hear “DPI” used in its place, even by professionals, especially when discussing image files destined for print.
- Image Resolution: This refers to the total number of pixels in an image, typically expressed as width x height (e.g., 1920x1080 pixels or 4000x3000 pixels). It’s the absolute pixel count that fundamentally determines how much detail an image holds. A higher resolution image contains more pixels overall, which in turn allows for greater detail and larger print sizes without quality degradation. This is the core factor for the “High Resolution Photography” and “Wallpapers” found on Tophinhanhdep.com, as it dictates the image’s inherent detail.
While DPI and PPI are often used interchangeably, especially in common discourse and even within some software interfaces, it’s vital to remember their technical distinction. For our purposes, particularly when discussing preparing images for print or professional design, when we refer to increasing “DPI” in a digital image, we are often talking about increasing the effective PPI, which requires adding actual pixels.
Why Does DPI Truly Matter for Your Images?
The significance of DPI extends far beyond mere technical jargon; it directly impacts the visual quality and physical dimensions of your printed images. A proper understanding and application of DPI can be the difference between a captivating print and a disappointing one.
The primary reasons DPI matters are:
- Print Quality: Simply put, a higher DPI generally translates to a higher quality print. When more ink dots are packed into each inch, the visual output is smoother, with finer details and less pixellation. This is especially critical for close-up viewing, such as in photo books, brochures featuring aesthetic images, or detailed abstract art prints. A print with insufficient DPI for its viewing distance will appear blurry, pixelated, or “blocky,” losing the subtle nuances of beautiful photography.
- Print Size: DPI directly influences the maximum physical size at which an image can be printed without noticeable quality loss. The relationship is inverse: for a given pixel count, increasing the DPI will result in a smaller physical print size but with higher detail, while decreasing the DPI will result in a larger physical print size but with lower detail. For example, an image that is 3000 pixels wide will print at 10 inches wide at 300 DPI (3000 / 300 = 10), but at 15 inches wide at 200 DPI (3000 / 200 = 15). The larger 15-inch print, however, will show less detail per inch. This balancing act of quality versus size is a cornerstone of “Visual Design” and “Graphic Design,” where creative ideas must translate effectively to physical output.
It’s crucial to reiterate: merely changing the DPI value in an image’s metadata without increasing its actual pixel count does not add detail, sharpness, or clarity. Such a change only tells the printing software how densely to pack the existing pixels. If you have a low-resolution image (e.g., 72 DPI with small pixel dimensions), simply changing its metadata to 300 DPI will result in a much smaller, but still blurry, print because the source data lacks sufficient pixels. To achieve a higher DPI for a given print size with improved quality, you fundamentally need more pixels in your digital image. This is where advanced image tools like AI upscalers come into play, as featured on Tophinhanhdep.com.
Checking Your Image’s Current DPI
Before you embark on the journey of increasing your image’s DPI, it’s helpful to know its current state. Most operating systems and photo editing software provide an easy way to check an image’s metadata, including its DPI (or PPI) value.
- On Windows:
- Open File Explorer and navigate to the folder containing your image.
- Right-click on the image file.
- Select “Properties,” then click on the “Details” tab.
- Under the “Image” section, you’ll find “Horizontal Resolution” and “Vertical Resolution,” which display the DPI value.
- On Mac:
- Open Finder and locate your image.
- Right-click (or Control-click) on the image file.
- Select “Open With,” then choose “Preview.”
- In Preview, go to the “Tools” menu and select “Show Inspector” (or press Command + I).
- In the Inspector window, click the (i) tab (General Info) and then expand the “Image DPI” section to view the resolution.
Understanding your image’s starting point is key to determining the best strategy for enhancement, whether it’s for creating stunning backgrounds, high-resolution stock photos, or vibrant digital art, all available or creatable through Tophinhanhdep.com.
Strategies for Increasing DPI and Enhancing Image Quality
When the goal is to truly improve an image for print or display, simply changing a number in the metadata isn’t enough. Real enhancement involves increasing the actual pixel count. This section delves into the modern methods, particularly leveraging AI technology, to achieve higher DPI with superior image quality.
The Fundamental Principle: Increasing Pixel Density
As we’ve established, for a print to appear sharper at a given size, or to print larger without quality loss, your digital image needs more pixels. This is the core principle behind achieving a higher effective DPI. Historically, increasing an image’s resolution—known as “upscaling” or “resampling”—was a tricky business. Traditional photo editing software used algorithms that would simply “stretch” existing pixels or interpolate new ones by averaging surrounding pixel data. This often resulted in blurry, soft images lacking true detail, as the software was essentially guessing information that wasn’t there. For sensitive photographic details or intricate digital art, this approach was far from ideal.
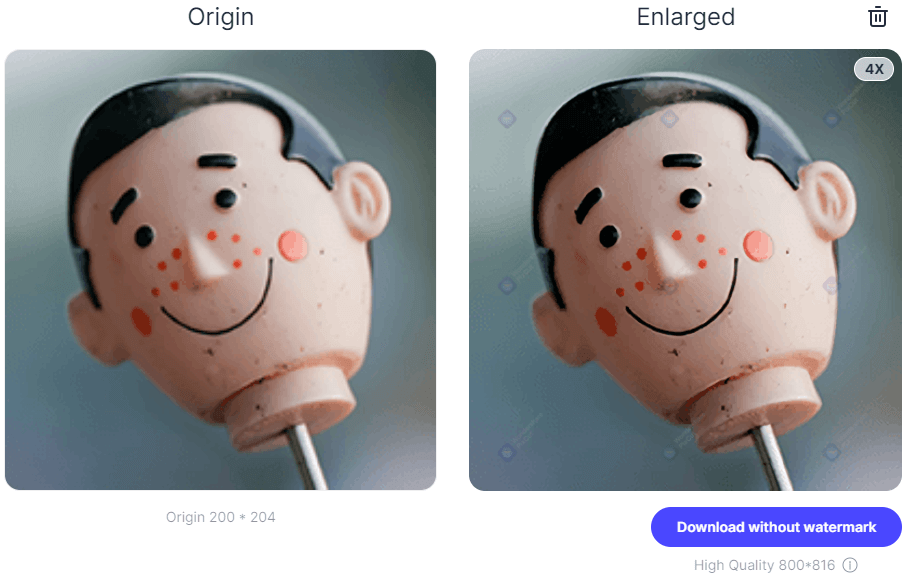
However, the advent of Artificial Intelligence (AI) has revolutionized this process. AI upscaling technology can now intelligently analyze an image, recognize patterns, and generate new, coherent pixel data, effectively “creating” detail where it didn’t exist before. This allows for genuine increases in pixel density, transforming low-resolution images into high-resolution masterpieces suitable for even the most demanding print applications. This breakthrough is particularly valuable for photographers and designers looking to achieve high-resolution, stock photos or convert aesthetic images into print-ready formats.
AI-Powered Upscaling with Tophinhanhdep.com
Tophinhanhdep.com offers a powerful, user-friendly AI upscaler that provides a cutting-edge solution for increasing your image’s DPI and overall quality. This tool goes beyond mere metadata manipulation, adding genuine pixel data to make your photos print-ready and incredibly sharp. Whether you’re working with nature photography, abstract compositions, or even old photos in need of revival, Tophinhanhdep.com’s AI upscaler is designed to deliver exceptional results.
Here’s how you can transform your images using Tophinhanhdep.com’s AI Upscaler:
Step 1. Visit Tophinhanhdep.com and Access the AI Upscaler Navigate to the Tophinhanhdep.com website. Look for the “Image Tools” section or directly search for the “AI Upscaler” feature. You may need to log in to your account or quickly create a new one to access the full capabilities.
Step 2. Upload Your Images Our intuitive interface makes uploading a breeze. You can:
- Drag & drop photos directly into the designated area.
- Select files from your device’s storage.
- Import them from cloud services like Google Drive or by pasting a URL. As you upload, our system will often provide a preliminary output DPI value below the resolution in the uploader, giving you an immediate sense of your image’s current state.
Step 3. Set the Desired Resolution and DPI Once your images are uploaded, Tophinhanhdep.com allows you to customize your enhancement settings:
- Default DPI: Our platform typically defaults to 300 DPI for all operations, ensuring print-ready quality. If your uploaded image has a different DPI value, the output DPI will be adjusted to 300 by default unless you specify otherwise.
- Choose an Upscaler Type: Tophinhanhdep.com offers various AI upscaler algorithms, each optimized for specific image content and enhancement goals. For example:
- Gentle: Ideal for images with text, product labels, or maps, providing subtle improvements.
- Balanced: Perfect for everyday photographs like nature scenes, architecture, or food photography, enhancing clarity and detail.
- Strong: Specialized in fixing blur and improving faces, making it excellent for portraits or sad/emotional photography.
- Ultra: Our most transformative option, delivering superior quality and maximal detail enhancement across a broad range of images.
- Digital Art: Specifically designed for illustrations, anime, and other digital artworks, preserving or reimagining creative styles.
- Old Photo: A powerful tool for repairing scratches, fading, and damage, and even adding realistic color to black & white images, bringing historic photos back to life. All these upscalers can increase resolution significantly, often up to 16x or 512 megapixels, depending on your account plan.
- Customize Resolution: It’s crucial to remember that changing only the DPI value without increasing the actual pixel count won’t add detail. Therefore, ensure you utilize the Width & Height tab on the size sidebar to set your desired output resolution. For instance, if you have a 1162 x 702 (0.9 MP) image that would print at only 3.87 x 2.34 inches at 300 DPI, you can set the larger side’s resolution to, say, 5250 pixels. Our tool will proportionally increase the other dimension, allowing you to print a much larger, crisper photo (e.g., 15 x 9.06 inches at 350 DPI).
Step 4. Start Processing With your settings configured, click the “Enhance” or “Process” button. Our AI algorithms will then get to work, transforming your image. The processing time will vary depending on the original image size, the chosen upscaling factor, and server load.
Step 5. Download Your Enhanced Image Once the processing is complete, your image thumbnail will visibly transform from blurry to clear. A download button will appear, allowing you to save your new high-DPI, high-resolution file to your device. Tophinhanhdep.com also offers cloud storage for your enhanced photos, typically for a limited period, so you can easily access them later.
Leveraging Printing Presets: To further simplify the process, Tophinhanhdep.com provides various ready-made printing presets. You can select from popular standards for posters, photos, or international paper sizes (from A5 to A0). Our app will automatically calculate and set the appropriate resolution for your chosen preset at a standard 300 DPI, ensuring hassle-free print preparation for any “Image Inspiration & Collections” you might have.
Through Tophinhanhdep.com’s AI upscaling, you can effortlessly achieve the high-quality, high-DPI images necessary for professional printing, stunning aesthetic visuals, and incredibly detailed photography.
When to Simply Change DPI Metadata (Without Upscaling)
While Tophinhanhdep.com excels at true image enhancement through AI upscaling, there are specific scenarios where you might only need to adjust the DPI metadata without altering the actual pixel count. This is a crucial distinction and avoids unnecessary processing or file size increases.
You should consider changing DPI metadata only if:
- Website Requirements: Some online platforms or submission portals have arbitrary minimum DPI/PPI requirements for image uploads, even if they are primarily for web display (where pixel dimensions are more critical). In these cases, simply updating the metadata satisfies the technical requirement without affecting the visual quality on screen.
- Print Shop Specifications: Occasionally, print shops, magazines, or graphic designers may explicitly request an image with a specific internal DPI setting (e.g., “300 DPI”) regardless of whether your image’s pixel resolution is already sufficient for the intended print size. Rather than trying to educate them on the nuances of pixel density, it’s often easier to comply by just changing the metadata.
- Default Print Dimensions in Software: You might want an image to default to a specific print dimension when loaded into a word processor or desktop publishing program. By setting a specific DPI in the metadata, you dictate this default. For instance, a 1500-pixel wide photo set to 375 DPI metadata will default to 4 inches wide when imported (1500 pixels / 375 DPI = 4 inches).
It’s vital to remember that in these cases, changing the DPI metadata does not improve image quality, sharpness, or clarity. It merely alters an instruction embedded in the file about how densely existing pixels should be packed during printing. If the source image lacks sufficient pixels, the resulting print will still be of low quality, even if the metadata says 300 DPI. For true quality improvement, Tophinhanhdep.com’s AI upscaler remains the superior choice for high-resolution photography and digital art.
Practical Methods for Adjusting DPI Metadata
For situations where you only need to modify the DPI metadata without resampling (changing pixel dimensions), several widely used image editing applications and online tools can get the job done efficiently. These methods are useful for fulfilling specific technical requirements without altering the inherent visual quality of your images.
Adjusting DPI with Professional Software: Photoshop and GIMP
Professional-grade image editing software like Adobe Photoshop and GIMP (GNU Image Manipulation Program) offer precise control over image properties, including DPI metadata. These tools are indispensable for “Digital Photography” and “Graphic Design,” allowing for detailed “Photo Manipulation” and adhering to “Creative Ideas.”
-
How to Change the DPI in Photoshop:
- Open your image in Adobe Photoshop.
- Go to the “Image” menu and select “Image Size.”
- In the Image Size dialog box that appears, locate the “Resolution” field.
- Crucially, ensure the “Resample” box is UNCHECKED. If “Resample” is checked, Photoshop will add or remove pixels, altering your image’s actual resolution and potentially degrading quality if you’re not careful.
- Set the units to “Pixels/Inch” (if not already selected).
- Type your desired DPI value (e.g., 300) into the “Resolution” field. You’ll notice the “Width” and “Height” in inches (or chosen units) change, reflecting the new default print size based on the new DPI.
- Click “OK” to apply the change.
- Go to “File” > “Save” to update the current file, or “File” > “Save As…” to save a new version (recommended).
-
How to Change the DPI in GIMP:
- Open your image in GIMP.
- Go to the “Image” menu and select “Print Size.”
- In the “Set Image Print Resolution” dialog, you’ll see fields for “X Resolution” and “Y Resolution.”
- Ensure the units are set to “pixels/in.”
- Enter your desired DPI value (e.g., 300) into the “X Resolution” field. The “Y Resolution” should automatically update to match if the chain icon is intact, maintaining aspect ratio.
- Click “OK.”
- Go to “File” > “Save” (to overwrite the original), “Save As…” (to save a new file with a different name or format), or “Save a Copy…”
Remember, the key with these programs for metadata-only changes is to uncheck resampling. This ensures you’re only changing the embedded instruction, not the pixel data itself.
Free Online DPI Converters for Quick Adjustments
For quick, hassle-free DPI metadata changes without needing dedicated software, free online DPI converters are an excellent option. These are often used for “Image Tools” and “Converters” purposes, especially when you’re on the go or don’t have access to your primary editing suite.
- Using Online Tools (e.g., convert.town/image-dpi):
- Open your web browser and navigate to a reputable online DPI converter website (like convert.town/image-dpi or other similar services found through Tophinhanhdep.com’s “Image Tools” section).
- Most sites will present an option to choose your desired DPI value (often with common presets like 300 DPI).
- Click the “Choose Image” or “Upload” button to select the image file from your device. These converters typically support popular formats such as JPEG, PNG, BMP, and TIFF.
- Once uploaded, the website will process the image (changing only its metadata) and usually initiate an automatic download of the new file with the updated DPI.
These online converters are incredibly convenient and can even be used on smartphones (iPhone or Android) via their web browsers. Just be mindful that they exclusively override the DPI property and do not improve image quality or add pixels. For true enhancement, Tophinhanhdep.com’s AI upscaler remains the dedicated solution.
Mac’s Built-in Preview Application
macOS users have a convenient, built-in tool for adjusting DPI metadata: the Preview application. This default image viewer can also perform basic editing tasks, including changing DPI without resampling.
- How to Change the DPI in Preview on macOS:
- Open your image file in Preview (this is usually the default action when you double-click an image on a Mac).
- From the menu bar, go to “Tools” and select “Adjust Size.”
- In the “Image Dimensions” dialog box, uncheck the box labeled “Resample image.” This critical step ensures that Preview only modifies the metadata and does not alter the actual pixel dimensions of your image.
- Next to “Resolution,” ensure the units are set to “pixels/inch.”
- Type your target DPI (e.g., 300) into the “Resolution” field.
- You will observe the “Width” and “Height” values change, indicating the new default print dimensions based on the altered DPI.
- Click “OK” to apply the changes.
- Close the image. Preview will prompt you to save the changes if you haven’t already.
This method is quick and effective for Mac users who need to make simple DPI metadata adjustments for documents, email attachments, or fulfilling basic submission requirements, making it a handy “Image Tool” for everyday tasks.
Optimizing DPI for Diverse Printing Needs
Choosing the right DPI for your images is not a one-size-fits-all decision. It’s a strategic choice that depends on several factors related to the image’s final application, whether it’s a small photo print or a massive billboard. Understanding these nuances ensures that your “Wallpapers,” “Backgrounds,” “Aesthetic,” “Nature,” “Abstract,” “Sad/Emotional,” or “Beautiful Photography” translates perfectly from screen to physical medium.
Selecting the Right DPI for Your Project
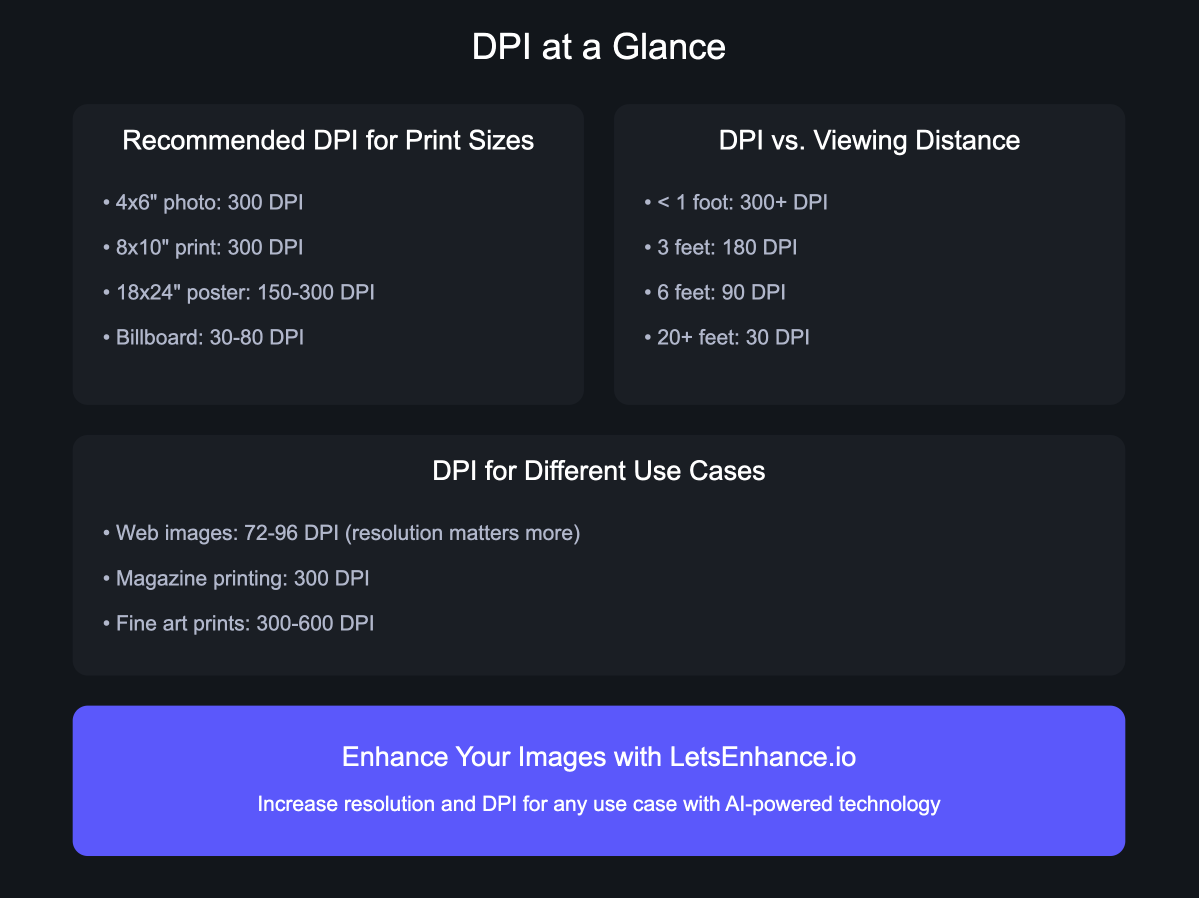
Generally, a higher DPI is preferable for superior print quality. The golden standard for high-quality printing is often cited as 300 DPI or more. This density ensures that individual dots are imperceptible to the naked eye at typical viewing distances, resulting in smooth gradients and sharp details. However, there are practical considerations that can allow for lower DPIs without compromising the perceived quality. To estimate the optimal minimum DPI, consider these three key factors:
-
Viewing Distance: This is perhaps the most significant factor. The closer an image is viewed, the higher the DPI needs to be for it to appear crisp.
- Close-up Viewing (less than 0.6m / 2ft): For items like photo books, flyers, brochures, magazines, or small art prints where viewers will hold the material close, 300-400 DPI is highly recommended. This ensures every fine detail in your “Beautiful Photography” or intricate “Digital Art” is rendered perfectly.
- Medium Viewing Distance (0.6m - 2m / 2ft - 6.5ft): For posters, framed photos, or artwork viewed from a few feet away, 100-200 DPI might be sufficient. The slight reduction in detail density is less noticeable at a greater distance.
- Far Viewing Distance (5m - 200m+ / 16ft - 650ft+): For large-format prints like billboards, banners, or large outdoor signage, very low DPIs are acceptable. A billboard seen from across a street might only require 1-35 DPI. Your eyes blend the dots at such a distance, making individual pixels indistinguishable.
-
Subject Matter: The content of your image also plays a role.
- High Detail: Images with intricate details, sharp edges, or fine textures (e.g., a detailed macro shot in “Nature Photography,” architectural blueprints, or complex “Abstract” designs) will benefit significantly from higher DPIs to preserve those nuances.
- Low Detail/Soft Focus: Images with broad color fields, soft gradients, or intentionally blurred elements might tolerate slightly lower DPIs more gracefully, as there’s less fine detail to lose.
-
Printing Material: The surface you’re printing on affects how much detail it can hold.
- Coated Glossy Paper: High-quality coated papers can hold ink very well, allowing for exceptional detail reproduction. For these, 300 DPI or more is ideal to fully utilize the paper’s capability. This is perfect for vibrant “Aesthetic” prints or “High Resolution Photography.”
- Uncoated Paper: Uncoated papers absorb more ink, which can cause dots to spread slightly, reducing sharpness. There’s often no point in going beyond 200-250 DPI for uncoated stocks, as higher densities won’t yield visibly better results and might just use more ink.
- Textured Materials (e.g., Canvas): Materials with inherent texture, like canvas, naturally obscure fine details. For these, a lower DPI (e.g., 150-200 DPI) can often produce excellent results, as the material’s texture becomes part of the viewing experience.
By carefully considering these factors, you can make informed decisions about the optimal DPI for your specific “Image Inspiration & Collections,” balancing quality with practical constraints.
Beyond DPI: Additional Considerations for Superior Prints
While DPI is a cornerstone of print quality, other factors contribute to an image’s overall excellence. Tophinhanhdep.com emphasizes comprehensive image optimization, ensuring all aspects of your visual content are top-tier.
- Pixel Dimensions Rule the Web: For images displayed exclusively on websites, DPI metadata is largely irrelevant. Web browsers and screens render images based on their pixel dimensions (width x height). A 1920x1080 pixel image will occupy the same screen real estate whether its metadata says 72 DPI or 300 DPI. For web use, focus on optimal pixel dimensions and file size for fast loading, which can be achieved through Tophinhanhdep.com’s “Compressors” and “Optimizers” tools.
- File Size Implications: Increasing the actual DPI of an image by upscaling its resolution (adding more pixels) will inevitably increase its file size. More pixels mean more data. This is a trade-off for higher quality, but Tophinhanhdep.com’s “Image Optimizers” can help manage file sizes without compromising the visual fidelity achieved through its AI upscalers.
- Printer Settings and Capabilities: Your actual printer’s settings also matter. Most inkjet printers offer various DPI settings (e.g., Draft, Normal, Best, MAX DPI). Choosing a higher DPI setting in your printer’s driver generally improves print quality but uses more ink and slows down the printing process. Remember that the DPI settings in your printer driver refer to the printer’s ability to lay down ink dots, which is distinct from the DPI metadata in your image file, though they both contribute to the final print quality.
- Printing Service Requirements: If you plan to use a professional printing service for your “Stock Photos” or “Beautiful Photography,” always inquire about their specific DPI or resolution requirements. Services like Printful, for instance, might require a minimum of 150 DPI for uploaded images. Meeting these specifications proactively, perhaps by using Tophinhanhdep.com’s AI upscaler, can prevent delays and ensure satisfaction.
By considering all these elements—from the initial image resolution to AI-powered enhancement and final print considerations—you can consistently achieve superior results for all your image needs, from stunning “Wallpapers” to professional “Thematic Collections.”
Conclusion
Understanding “How To Make An Image Have More DPI?” is a crucial skill in today’s visual-first world. We’ve journeyed through the distinctions between DPI, PPI, and actual image resolution, highlighting that true quality enhancement for print hinges on increasing pixel density, not merely altering metadata. While traditional methods often falter in adding genuine detail, modern AI upscaling technology, pioneered by platforms like Tophinhanhdep.com, has revolutionized the process, allowing for the creation of genuinely high-resolution, high-DPI images from almost any source.
Tophinhanhdep.com stands as your premier resource, offering state-of-the-art AI Upscalers designed to transform your digital images into crisp, scalable masterpieces suitable for any application. Whether you’re enhancing “Nature Photography” for a gallery print, upscaling “Digital Art” for a large format poster, refining “Aesthetic” images for your website, or bringing “Old Photo” memories back to life, our intuitive tools provide the power and precision you need. Beyond AI upscaling, our platform offers a suite of “Image Tools” including “Converters,” “Compressors,” and “Optimizers” to manage all aspects of your visual content.
From understanding the impact of viewing distance and printing materials on your chosen DPI to leveraging professional software or convenient online tools for metadata adjustments, you now possess a comprehensive toolkit. For truly stunning, print-ready images – from vibrant “Wallpapers” and “Backgrounds” to professional-grade “Stock Photos” and deeply “Sad/Emotional” captures – Tophinhanhdep.com is your trusted partner.
Explore Tophinhanhdep.com’s advanced image tools today and unlock the full potential of your visual content, ensuring every image you create or print achieves unparalleled clarity and impact.