Mastering Image Quality: Your Guide to High-Resolution Visuals with Tophinhanhdep.com

In today’s visually-driven world, the quality of an image can make all the difference. Whether you’re curating stunning wallpapers, designing compelling graphics, preparing high-resolution stock photos, or simply sharing personal memories, a sharp, clear, and vibrant image leaves a lasting impression. Low-quality images, on the other hand, can appear pixelated, blurry, and unprofessional, detracting from your message and aesthetic.
At Tophinhanhdep.com, we understand the critical role image quality plays across all visual domains – from beautiful photography and aesthetic backgrounds to digital art and creative design. Our mission is to empower you with the knowledge and tools to transform your images, ensuring they meet the highest standards of clarity and impact. This comprehensive guide will walk you through the essential principles and practical techniques for enhancing image quality, turning low-resolution visuals into high-fidelity masterpieces ready for any purpose. We’ll explore everything from fundamental concepts like pixels and resolution to advanced software techniques and the cutting-edge power of AI upscaling, all designed to help you elevate your visual content with Tophinhanhdep.com.
Understanding the Fundamentals of Image Resolution
Before diving into the “how-to,” it’s crucial to grasp the core concepts that define image quality. Resolution isn’t just a number; it’s the foundation upon which every digital image is built, dictating its potential for detail, sharpness, and versatility. Understanding these basics is the first step towards effectively making your images higher quality.
Pixels, PPI, and DPI Explained
Every digital image, from a sprawling nature wallpaper to an intricate abstract piece, is fundamentally composed of tiny squares of color called pixels. These pixels are the building blocks, and their density—how many are packed into a given area—determines the image’s resolution.
Pixels Per Inch (PPI) is the standard unit for measuring the resolution of digital images, particularly for display on screens. A higher PPI value means more pixels are clustered together within each inch of the image. This increased pixel density allows for finer details, smoother gradients, and an overall sharper appearance when viewed on a screen. For instance, an image displayed at 3 PPI would appear extremely blocky, with individual pixels clearly visible, making the content hard to discern. Conversely, an image at 300 PPI would show no visible pixels, presenting a smooth, detailed, and high-quality visual. For digital use, such as web display, 72 PPI is often considered acceptable, but for true high-resolution images, higher PPI values offer superior clarity.
While PPI refers to digital screens, Dots Per Inch (DPI) is the equivalent metric for printed images. Printers don’t use pixels; they use microscopic dots of ink. A printer with a high DPI can deposit more ink dots per inch, resulting in a printed image that appears clearer, more uniform, and with greater detail. For most high-quality prints, particularly for professional photography, posters, or fine art, a standard of 300 DPI (or 300 PPI in the digital file) is widely accepted. This density ensures that when the image is printed, it retains its sharpness and detail without appearing pixelated or blurry. Understanding the distinction and correlation between PPI and DPI is vital for anyone preparing images for both digital display and physical output.

Why Bigger Doesn’t Always Mean Sharper: The Limits of Upscaling
While the goal is often to achieve a “higher quality” image by increasing its resolution, it’s essential to understand that simply increasing the pixel count doesn’t magically add detail that wasn’t originally captured. This is a common misconception and highlights the inherent limitations of upscaling.
When you enlarge an image, especially a low-resolution one, traditional methods essentially “guess” what colors should fill the newly created pixels based on their surrounding counterparts. This process, known as resampling, can make the image physically larger, but it doesn’t invent new visual information. The result is often a larger image that might appear softer, blurrier, or even introduce undesirable artifacts if the enlargement is too drastic. For manual upscaling, a general rule of thumb suggests that increasing dimensions by more than 30% to 40% can lead to a noticeable loss of sharpness. The challenge lies in mitigating this quality degradation while achieving the desired size.
The true quality of an image — its inherent sharpness, detail, and fidelity — is primarily determined at the point of capture. Factors like camera sensor quality, lens focus, proper exposure, and lighting conditions all contribute to the amount of actual visual data an image contains. An image originally captured at a high resolution with excellent detail will always possess more intrinsic “quality” than a low-resolution image that has been enlarged to match its dimensions.
This is where advanced technologies, particularly AI upscalers, step in. Unlike traditional resampling methods that merely interpolate existing pixels, AI upscalers leverage machine learning algorithms trained on vast datasets of images. They “understand” patterns and details, allowing them to intelligently generate new pixels that add perceived detail rather than just stretching existing ones. While even AI can’t invent details out of thin air, Tophinhanhdep.com’s AI Upscaler comes remarkably close to making a low-resolution image appear as if it were captured at a higher resolution, significantly mitigating the “bigger doesn’t mean sharper” dilemma. However, the starting quality of your image will always set a fundamental limit on how much improvement can be achieved.
Leveraging Powerful Tools for Image Enhancement
The journey to higher quality images is significantly aided by a diverse array of powerful tools. Whether you’re a seasoned professional or a hobbyist, understanding which tools to use and how to apply them can drastically improve your results. From robust desktop software to convenient mobile apps and innovative online platforms, Tophinhanhdep.com provides and advocates for solutions that cater to every need.
Desktop Powerhouses: Professional Software for High-Quality Upscaling
For serious photographers, graphic designers, and digital artists, desktop software offers unparalleled control and a rich feature set for image manipulation, including advanced upscaling.
Adobe Photoshop stands as the industry standard for professional image editing. Its powerful capabilities extend to significantly enhancing image resolution through a process called resampling. To increase image resolution in Photoshop:
- Prepare: Before starting, go to
Edit > Preferences > Technology Previews(Windows) orPhotoshop > Preferences > Technology Previews(Mac) and ensureEnable Preserve Details 2.0 Upscaleis checked. This option uses a newer, more efficient algorithm to maintain original details during enlargement. - Access Image Size: Open your image in Photoshop, then navigate to
Image > Image Size(or useAlt + Ctrl + Ion Windows,Option + Command + Ion Mac). - Configure Settings:
- In the Image Size panel, ensure the “Resample” box is ticked. This allows Photoshop to add or remove pixels.
- For the Interpolation Method, select
Preserve Details 2.0(if available and enabled) orBicubic Smoother (enlargement). These methods are designed to intelligently add pixels while minimizing artifacts and maintaining sharpness. - Change the “Dimensions” to “Percent” or “Pixels” as needed.
- Adjust the Resolution field, typically aiming for 300 PPI for high-quality prints. As you increase the PPI, the pixel dimensions (width and height) will automatically adjust.
- Reduce Noise: If your image develops noise or graininess after upscaling, use the
Reduce Noiseslider within the Image Size panel, adjusting sparingly (e.g., 2-4%) to smooth out imperfections without losing detail. - Apply and Refine: Click
OKto apply the changes. For an optional final touch, duplicate your image layer (Ctrl/Cmd + J), then go toFilter > Other > High Pass. Adjust the radius until edges are highlighted, then set the layer’s blending mode toOverlay. This technique adds a crisp, sharpened look, enhancing perceived detail. Photoshop’s comprehensive tools for graphic design and photo manipulation make it an indispensable asset for achieving truly high-quality visuals.
GIMP (GNU Image Manipulation Program) is an excellent free, open-source alternative available for Windows, macOS, and Linux. It provides robust image editing capabilities, including effective resolution enhancement. To improve image resolution using GIMP:
- Open Image: Launch GIMP and go to
File > Opento select your image. - Copy Image: Select the entire image (
Ctrl/Cmd + A) and copy it (Ctrl/Cmd + C). - Create New Canvas: Go to
File > New. In the “Create a New Image” dialog, expand “Advanced Options.” Set bothX resolutionandY resolutionto300(for print-ready quality) and clickOK. This creates a new high-resolution canvas with the same dimensions as your original image. - Adjust Canvas Size: With the new image window active, select
Image > Canvas Size. Ensure the chain icon next to width/height is locked, then enter your desired new, larger width (e.g., from 4000 to 6000 pixels). The height will adjust automatically. ClickResize. - Paste and Scale: Paste your copied image onto this larger canvas (
Ctrl/Cmd + V). The pasted image will appear at its original size in the center. In the “Layers” dialog, select the “Floating Selection (Pasted Layer).” - Scale Layer: From the “Toolbox,” select the
Scale tool. Click on the pasted image, ensure the chain icon is locked in the “Scale” dialog, and enter the same width you used for the canvas (e.g., 6000 pixels). ClickScale. - Anchor and Export: Once scaled,
Anchor Layer(the anchor icon in the Layers dialog) to combine it with the background. Zoom in (View > Zoom) to check the quality. Finally,File > Exportto save your new, higher-resolution image, choosing a format like PNG or JPEG and setting compression to0for best quality.
Tophinhanhdep.com’s AI Upscaler: Moving beyond traditional software, Tophinhanhdep.com offers specialized tools that harness the power of Artificial Intelligence for superior image upscaling. These tools (like our advanced desktop applications or integrated features within our platform, echoing functionalities seen in highly-rated solutions like those from Topaz Labs) are designed to enlarge images by significant percentages (e.g., up to 600% or 1000%) without noticeable loss of quality or distortion. Our AI Upscaler uses sophisticated machine learning algorithms trained on millions of images. Instead of merely interpolating pixels, it intelligently generates new ones, adding genuine-looking detail. Key features often include:
- Intelligent Detail Retention: Our AI analyzes the image to understand textures, edges, and complex patterns, ensuring that new pixels enhance rather than degrade existing details.
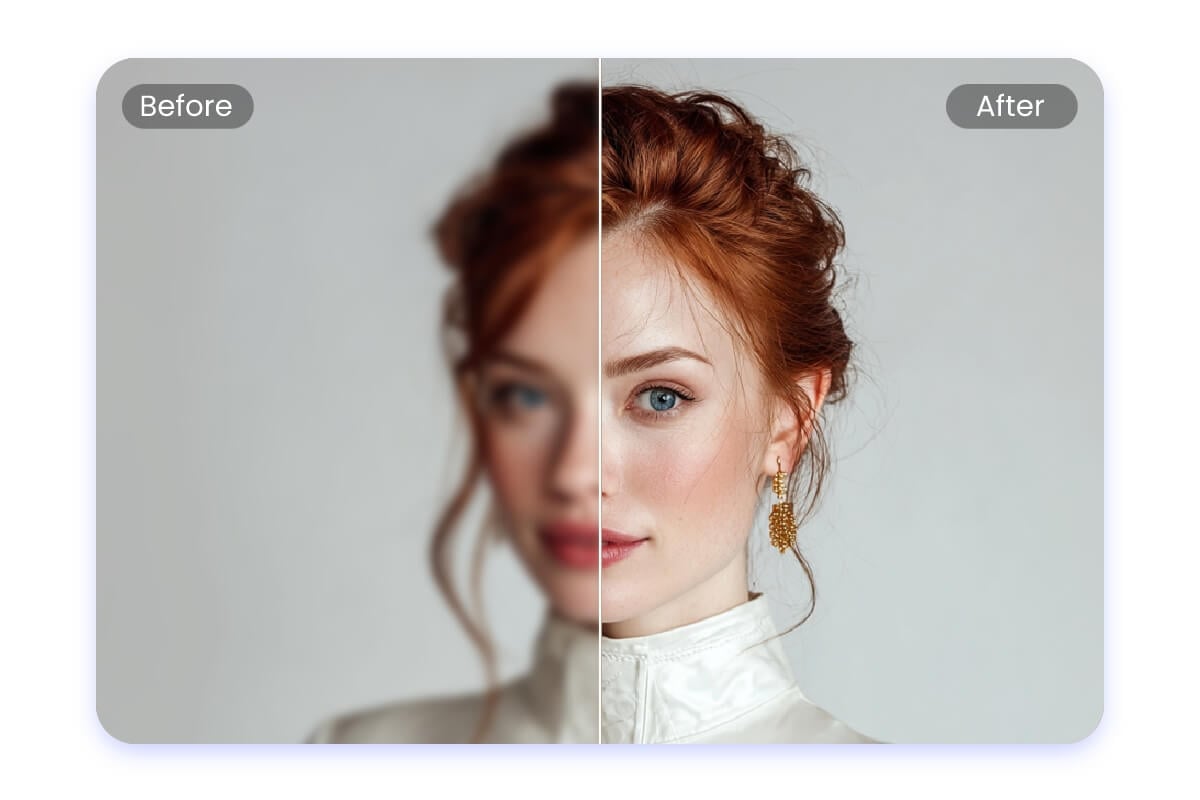
- Face Recognition Technology: Specifically optimized for portraits, this feature meticulously refines facial features during enlargement, preserving sharpness and minimizing distortion.
- Batch Processing: Efficiently upscale multiple images simultaneously, ideal for stock photos or large thematic collections.
- User-Friendly Interface: Designed for ease of use, even complex upscaling tasks become straightforward, delivering professional outcomes without a steep learning curve. These dedicated AI tools from Tophinhanhdep.com represent the cutting edge in image enhancement, providing results that often surpass traditional resampling methods.
On-the-Go Enhancement: Mobile and Online Solutions
For quick adjustments, social media, or when desktop software isn’t available, mobile apps and online platforms offer convenient ways to enhance image resolution. Tophinhanhdep.com embraces this flexibility by offering both web-based AI tools and recommending reliable mobile applications.
macOS Preview is a built-in, versatile tool on Mac computers for viewing and making basic edits to images and PDFs. It’s a handy option for quickly resizing images without needing a dedicated photo editor. To increase image resolution using macOS Preview:
- Open with Preview: Locate your image file, right-click it, and select
Open with > Preview. - Access Adjust Size: Click the
Markup Toolbaricon (looks like a pen tip) in the toolbar. Then, click theAdjust Sizeicon (often depicted as three nested boxes). - Resize Image: In the “Image Dimensions” dialog box, ensure the lock icon is closed (to maintain aspect ratio) and “Resample Image” is selected. Adjust the
Widthto your desired pixel amount. TheHeightwill automatically update. ClickOK. - Save: Go to
File > Saveto overwrite the original, orFile > Exportto save it as a new file, preserving the original.
For mobile users, several apps provide quick resizing and resolution adjustments:
-
Image Size for iPhone (iOS): This popular app (available on the App Store) allows for straightforward image resizing.
- Select Image: Install and open the Image Size app, then tap the image picker icon to select a photo from your camera roll.
- Adjust Dimensions: Tap the chain icon to lock the aspect ratio. Enter your desired
Width(e.g., 6000 pixels); theHeightwill adjust automatically. - Check Quality & Save: Pinch to zoom and inspect the pixel quality. Tap the gear icon to ensure
Output Qualityis set to 100%. If printing, consider increasing thePrint size correction factorfor smoother pixelation. Finally, tap the save arrow to store the enhanced image to your device.
-
Tophinhanhdep.com’s Mobile Tools (Android & iOS): Complementing general apps, Tophinhanhdep.com offers dedicated mobile-optimized features (similar to apps like Photo & Picture Resizer or Picsart AI Photo Editor) that integrate seamlessly with our platform. These tools enable users to resize, crop, and enhance images directly from their smartphone or tablet, providing convenient access to high-resolution capabilities for on-the-go digital photography and aesthetic adjustments.
Tophinhanhdep.com’s Online AI Upscaler: For users who prefer a web-based solution without any software installation, Tophinhanhdep.com’s online AI upscaler is an ideal choice (offering functionality akin to platforms like Let’s Enhance or Wondershare PixCut). This platform is designed to make pictures higher resolution with just a few clicks.
- Upload: Visit Tophinhanhdep.com and navigate to our “Image Tools” section, then select “AI Upscaler” or “Enlarge Image.” Drag and drop your image directly onto the page, or use the upload button.
- AI Enhancement: Our platform automatically analyzes your image. Using advanced AI algorithms, it intelligently upscales the photo, addressing common issues like pixelation, blur, color correction, lighting adjustments, and even removing JPEG artifacts.
- Download: Once the enhancement is complete, you’ll be able to preview the higher-quality version. Simply download the resulting image to your device.
Tophinhanhdep.com’s online AI upscaler is particularly beneficial for creators working with stock photos, digital art, or needing quick enhancements for mood boards and thematic collections, offering a powerful and accessible way to achieve super-resolution photos without extensive technical knowledge.
Mastering Advanced Techniques and Best Practices
Achieving truly high-quality images goes beyond simply pressing a resize button. It involves understanding the nuances of image processing and applying best practices to maximize the visual impact of your enhanced visuals.
The Art of Resampling and Interpolation
At the heart of any image resizing operation is the concept of resampling, which refers to changing the pixel dimensions of an image. When you upscale an image, new pixels are added (upsampling), and how these new pixels are calculated is determined by the interpolation method. Choosing the right method is critical for preserving image quality. Tophinhanhdep.com’s tools, both desktop and online, utilize various sophisticated interpolation algorithms.
Here’s a breakdown of common and advanced interpolation methods and when to use them:
- Nearest Neighbor (Hard Edges): This is the fastest but least precise method. It simply copies the color of the nearest existing pixel for the new pixels. It results in a very blocky, pixelated appearance and is generally only suitable for pixel art or simple graphics where sharp, jagged edges are desired.
- Bilinear: This method averages the colors of the two closest pixels (horizontally and vertically) to determine the color of the new pixel. It produces smoother transitions than Nearest Neighbor but can still result in some softness or blurriness, especially with significant enlargement.
- Bicubic (Smooth Gradients): This is a more sophisticated method that considers the colors of 16 surrounding pixels to calculate the color of a new pixel, using polynomial equations. It produces smoother, more continuous tonal gradations than Bilinear and is a good general-purpose method for photographic images.
- Bicubic Smoother (Enlargement): Optimized for upsampling, this method aims to create smooth, continuous tones during enlargement, reducing the appearance of jagged edges or pixelation. It’s often recommended for increasing image size in programs like Photoshop.
- Bicubic Sharper (Reduction): Optimized for downsampling, this method sharpens the image during reduction, maintaining detail as the image size decreases.
- Preserve Details (Enlargement) / Preserve Details 2.0: These advanced methods, particularly available in Photoshop and leveraged by Tophinhanhdep.com’s more sophisticated tools, use complex algorithms to analyze the image and generate new pixels that preserve textures and edges while minimizing artifacts and noise. Preserve Details 2.0, in particular, offers superior results for large photographic enlargements, intelligently distinguishing between meaningful detail and random noise.
- AI-Driven Interpolation (Tophinhanhdep.com’s AI Upscaler): The most advanced approach. Instead of rigid mathematical formulas, AI upscalers use deep learning models to “learn” how to reconstruct missing details. Trained on vast datasets, they can infer complex patterns, textures, and structures, resulting in upscaled images that appear remarkably natural and detailed, even from significantly lower-resolution sources. This is the technology powering Tophinhanhdep.com’s leading image enhancement solutions, making it ideal for converting low-resolution images into high-resolution photography suitable for demanding applications like large-format printing or professional digital art.
By choosing the right interpolation method—or, better yet, utilizing Tophinhanhdep.com’s AI-powered solutions—you can control how pixels are added or removed, ensuring that your image maintains its integrity and visual appeal during resizing.
Maximizing Output: Sharpening, Noise Reduction, and Beyond
After increasing an image’s resolution, whether through traditional methods or Tophinhanhdep.com’s AI Upscaler, it’s often beneficial to apply additional adjustments to refine its appearance. Two crucial post-upscaling steps are sharpening and noise reduction.
Sharpening: Upscaling can sometimes introduce a slight softness or blur, even with advanced interpolation. Sharpening tools can help restore crispness and define edges.
- High Pass Filter (Photoshop): This is a favorite technique among professionals. After upscaling, duplicate your image layer. Apply
Filter > Other > High Pass, adjusting the radius to highlight only the edges. Then, set the layer’s blending mode toOverlay(orSoft Light,Hard Light,Linear Lightdepending on desired intensity). This enhances perceived sharpness without over-saturating or introducing halos. - Unsharp Mask (Photoshop/GIMP): A more traditional sharpening tool, it works by increasing the contrast along edges. Adjust the
Amount,Radius, andThresholdcarefully to achieve natural-looking sharpness. - Tophinhanhdep.com’s Integrated Sharpening: Our advanced tools often include integrated sharpening features that automatically apply optimal sharpening post-upscaling, ensuring a balanced and artifact-free result.
Noise Reduction: Low-resolution images often contain digital noise, which can become more prominent after enlargement. Even high-quality upscaling can sometimes introduce subtle noise.
- Software Noise Reduction: Tools like Photoshop and GIMP offer dedicated noise reduction filters (
Filter > Noise > Reduce Noisein Photoshop). These allow you to balance detail preservation with noise suppression. - Tophinhanhdep.com’s AI Noise Reduction: Our AI upscaling technology often includes intelligent noise reduction as part of its process. By leveraging machine learning, it can differentiate between noise and genuine detail, effectively smoothing out unwanted graininess without blurring important features. This is particularly useful for enhancing older or lower-quality digital photography.
Beyond sharpening and noise reduction, consider other factors for a holistic approach to image quality:
- Color Correction and White Balance: Ensuring accurate colors and proper white balance can dramatically improve the visual appeal of an image, making it more vibrant and true-to-life. Tophinhanhdep.com’s editing suites offer comprehensive tools for these adjustments.
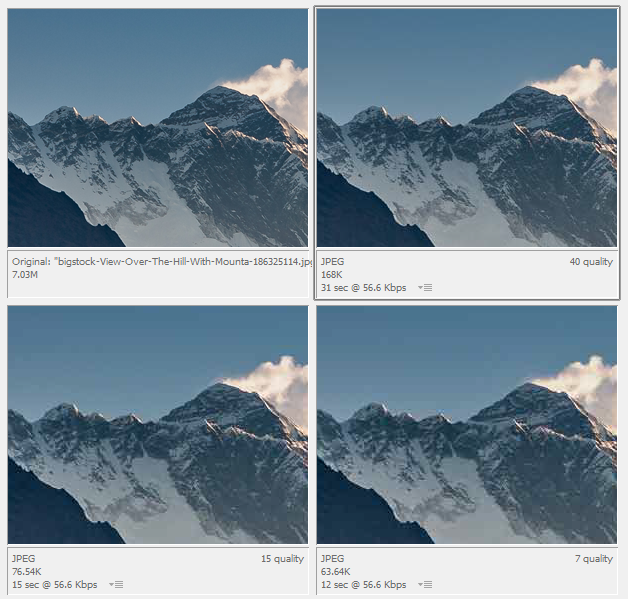
- Image Optimization and Compression: Once your image is high-resolution and visually perfect, you might need to optimize it for specific uses. For web display, compressors can reduce file size without significant visual quality loss, ensuring fast loading times. Our converters can change file formats (e.g., JPEG to PNG or WEBP) to suit different platforms or design requirements. These tools are crucial for preparing images for wallpapers, backgrounds, and various visual design projects.
- Preparing for Specific Uses: A high-quality image destined for a large print (e.g., 24x20 inches at 300 PPI) will have different file size and resolution requirements than one intended for a website banner (e.g., 72 PPI). Always tailor your final output to its intended application, using Tophinhanhdep.com’s tools to convert, compress, or optimize as needed. This ensures your beautiful photography and aesthetic visuals always look their best, whether on screen or in print.
Conclusion
The journey to making an image higher quality is a blend of understanding fundamental principles, leveraging powerful tools, and applying refined techniques. From grasping the relationship between pixels, PPI, and DPI to mastering the art of resampling and interpolation, every step contributes to transforming ordinary visuals into extraordinary ones. While traditional methods offer significant improvements, the advent of AI upscaling, exemplified by Tophinhanhdep.com’s advanced tools, has revolutionized what’s possible, allowing for unprecedented levels of detail and clarity from even challenging source images.
At Tophinhanhdep.com, we are dedicated to providing you with a comprehensive ecosystem for all your visual needs. Whether you’re seeking to enhance wallpapers and backgrounds, elevate your digital photography to high resolution, craft stunning graphic design elements, or find image inspiration for your next creative ideas, our platform offers an array of solutions. Our image tools – including powerful AI Upscalers, versatile converters, efficient compressors, and intelligent optimizers – are designed to empower creators of all levels.
Explore Tophinhanhdep.com today to discover the tools, resources, and thematic collections that will help you achieve unparalleled image quality and bring your visual concepts to life with breathtaking clarity. Transform your images, inspire your audience, and redefine what’s possible in the world of visual content.