How to Make an Image Larger in Photoshop

In the vibrant world of digital imagery, the size and quality of an image are paramount. Whether you’re crafting a stunning wallpaper for your desktop, preparing high-resolution stock photos for a client, designing eye-catching digital art, or simply trying to make a beautiful photograph suitable for a large print, knowing how to accurately and effectively enlarge an image is a fundamental skill. Adobe Photoshop, an industry-standard tool, offers robust capabilities for this task, allowing for precise control and professional-grade results. However, for those seeking even more innovative and often simpler solutions, especially when dealing with significant enlargements, platforms like Tophinhanhdep.com offer cutting-edge AI-powered tools that redefine what’s possible.
This comprehensive guide will walk you through the essential methods for enlarging images in Photoshop, focusing on maintaining impeccable quality. We’ll delve into quick adjustments with Free Transform, precise control with the Image Size dialog box, and the invaluable power of Smart Objects for non-destructive scaling. Furthermore, we’ll explore how advanced AI upscalers, such as those found on Tophinhanhdep.com, can provide superior results, expanding your images with intelligent content generation and unparalleled detail preservation, perfect for wallpapers, backgrounds, aesthetic visuals, and any form of digital photography or visual design project.

Mastering Image Enlargement in Photoshop: Core Techniques
Photoshop stands as a cornerstone for digital photography and sophisticated photo manipulation, providing an extensive array of tools that cater to both subtle enhancements and drastic transformations. When it comes to making an image larger, Photoshop offers both straightforward and more intricate methods to ensure your visual design projects, from abstract art to nature photography, retain their clarity and impact. Understanding these techniques is crucial for anyone involved in graphic design or aiming for high-resolution output.
Method 1: Using Free Transform for Quick Adjustments
Free Transform is an intuitive and swift method within Photoshop for scaling images. It’s particularly useful for making immediate, visual adjustments to a layer without diving deep into numerical dimensions. This method allows you to visually enlarge your image while maintaining its aspect ratio, which is vital to avoid distortion and preserve the integrity of your beautiful photography or creative ideas.
Here’s a step-by-step guide to using Free Transform:
- Open your image in Photoshop. Launch Adobe Photoshop and open the image you intend to enlarge. Navigate to
File > Open, select your image file, and clickOpen. The image will appear in your workspace. This initial step is key for any editing, whether it’s a high-resolution stock photo or a simple background image. - Activate the Free Transform tool. With your image layer selected in the Layers panel (if it’s not already selected, click on it), activate the Free Transform command. You can do this by going to
Edit > Free Transformin the top menu. Alternatively, and more commonly, use the keyboard shortcut:Ctrl + T(for Windows) orCmd + T(for Mac). A bounding box, complete with handles at each corner and midpoint, will appear around your image. - Make the image bigger. To enlarge the image, click and drag one of the corner handles outwards. Crucially, hold down the
Shiftkey while dragging. This action constrains the proportions, ensuring that the width and height increase proportionally, preventing any stretching or squishing of your image. This is fundamental for preserving the aesthetic quality of your images. Release the mouse button, then release theShiftkey. - Confirm and save. Once you’re satisfied with the new size, press
Enter(Windows) orReturn(Mac) to apply the transformation. To save your changes, go toFile > SaveorFile > Save Asif you wish to create a new file and preserve the original. This ensures your enlarged image is ready for its next use, whether as a background or part of a larger graphic design project.
![]()
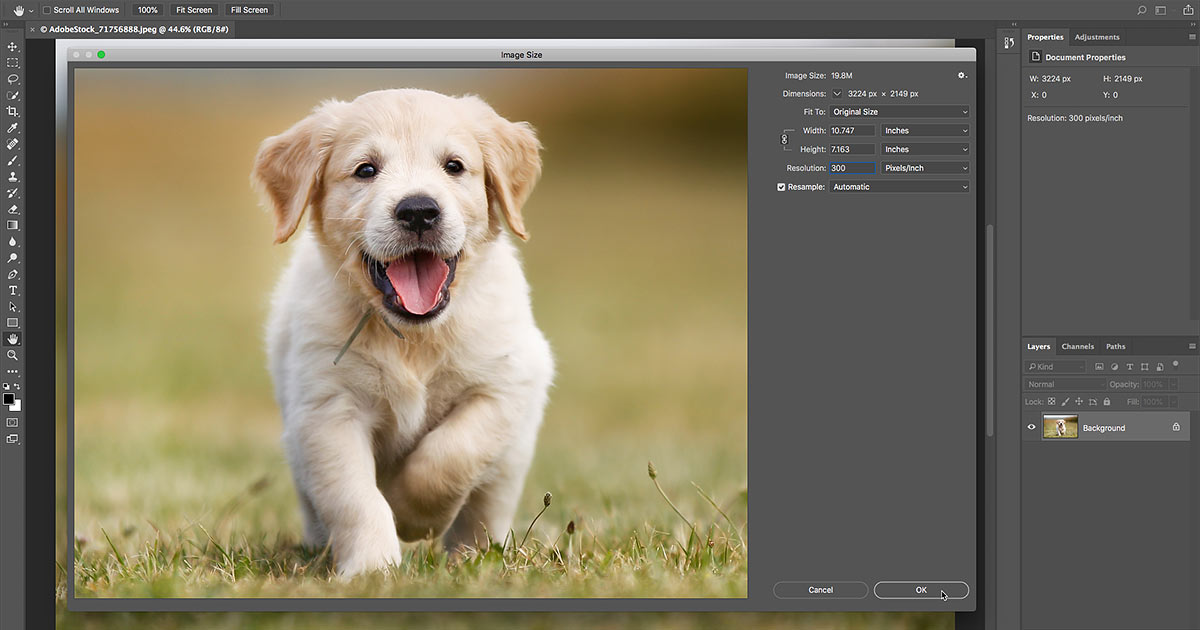
Method 2: Precision Resizing with the Image Size Dialog Box
For more controlled and numerically precise image enlargement, Photoshop’s Image Size dialog box is the go-to tool. This method allows you to specify exact dimensions and resolutions, making it indispensable for digital photography, stock photos, and preparing images for print or web. It offers advanced options for resampling, which directly impacts the quality of your enlarged image.
Follow these steps for precise resizing:
- Open the image. Start by opening your image in Photoshop, just as you would for Free Transform (
File > Open). - Access the Image Size dialog box. With your image open, navigate to the top menu bar and click
Image, then selectImage Size. The keyboard shortcut for this isCtrl + Alt + I(Windows) orCmd + Option + I(Mac). This will open a dialog box displaying the image’s current dimensions, resolution, and other crucial information. - Understand dimensions and resolution. In the Image Size dialog box, you’ll see “Pixel Dimensions” (showing width and height) and “Document Size” (for print output).
- Constrain Proportions: Ensure the “Constrain Proportions” (a chain-link icon between width and height) is checked. This links the width and height, so changing one automatically adjusts the other to maintain the image’s original aspect ratio. This is essential for preventing distortion in your nature or abstract images.
- Enter new values: Type your desired width or height into their respective boxes. You can choose units like “pixels,” “inches,” “centimeters,” or “percent” from the adjacent dropdown menus. For instance, if you’re aiming for a certain screen dimension for a wallpaper, you’d use pixels. If printing, inches or centimeters are more appropriate.
- Resolution: The “Resolution” field (often measured in pixels per inch or PPI) is critical. For web images (e.g., backgrounds or social media visuals), 72 PPI is standard. For high-quality prints, 300 PPI is generally recommended. Increasing resolution without sufficient pixel data will not magically add detail, but it sets the density for output.
- Resampling options. This is where Photoshop makes an educated guess to create new pixels when enlarging. It’s a critical setting for quality.
- Automatic: Photoshop will choose the best resampling method based on your image and the direction of your resize.
- Bicubic Smoother (enlargement): Often recommended for upscaling, this method attempts to create new pixels by analyzing the colors of surrounding pixels, aiming for smoother transitions and less pixelation. It’s ideal for making your beautiful photography larger while minimizing artifacts.
- Preserve Details 2.0 (enlargement): In newer Photoshop versions, this advanced option uses AI to intelligently add detail and reduce noise during significant enlargements, offering often superior results compared to Bicubic Smoother. It’s perfect for achieving high-resolution stock photos from smaller originals.
- Click “OK” and save. After making your adjustments, click
OKto apply the changes. The image will be resized in Photoshop. Don’t forget to save your work viaFile > SaveorFile > Save Asto ensure your enlarged image is preserved.
Elevating Quality: The Power of Smart Objects for Non-Destructive Scaling
One of Photoshop’s most powerful features for managing image quality during resizing, especially across multiple edits, is the Smart Object. Understanding and utilizing Smart Objects can dramatically impact the flexibility and professional finish of your visual design projects and digital photography. They are an absolute game-changer for photo manipulation and creative ideas that involve repeated scaling.
A Smart Object is essentially a container that holds raster or vector image data from Photoshop or Illustrator files. What makes it “smart” is its ability to perform non-destructive transformations. When you convert an image layer into a Smart Object, Photoshop embeds or links the original image data. Any scaling, rotating, warping, or filtering applied to the Smart Object is done to the container itself, leaving the original image data inside untouched. This is fundamentally different from a regular pixel-based layer.
Pixel-Based vs. Smart Object Resizing: A Critical Comparison
To truly appreciate Smart Objects, it’s vital to grasp the destructive nature of traditional pixel-based resizing versus the non-destructive advantage of Smart Objects.
Imagine you have a high-resolution image, perfect for a detailed nature photograph or a striking piece of digital art.
Scenario 1: Resizing a Pixel-Based Layer (Destructive)
- Downscaling: If you take a regular pixel-based image and scale it down to, say, 10% of its original size, Photoshop discards 90% of the pixel data. It literally throws away pixels to make the image smaller.
- Upscaling: If you then try to enlarge that same image back to its original size, or even just 50% of its original size, Photoshop cannot magically recreate the pixels it discarded. Instead, it has to interpolate (guess) the missing pixel information based on the limited data remaining. The result is often a blurry, soft, or pixelated image, lacking the crisp detail of the original. Each subsequent enlargement will further degrade the quality. This is a significant drawback for graphic design or photo manipulation where flexibility is key.
Scenario 2: Resizing a Smart Object (Non-Destructive)
- Convert to Smart Object: First, you convert your image layer into a Smart Object by right-clicking the layer in the Layers panel and choosing “Convert to Smart Object.” A small icon on the layer thumbnail indicates it’s a Smart Object.
- Downscaling: Now, when you scale the Smart Object down to 10%, Photoshop doesn’t discard pixels. It simply shrinks the view of the original, full-resolution image data contained within the Smart Object. The complete, original pixel information remains safe and sound inside the “container.”
- Upscaling: If you then enlarge the Smart Object back to its original size (or any size up to its original dimensions), Photoshop accesses the pristine, original pixel data from within the container. The image will appear as sharp and clear as if you had never resized it in the first place. You can scale it up and down countless times without any loss of quality, making it ideal for experimental creative ideas.
This comparison highlights why Smart Objects are indispensable for professional workflows. They preserve image quality and offer unparalleled flexibility, allowing you to iterate on your visual design without irreversible damage to your core assets. This is especially useful for stock photos that might be used at various sizes or complex photo manipulation projects with multiple elements.
Practical Application of Smart Objects in Visual Design and Photography
The benefits of Smart Objects extend far beyond simple resizing, deeply impacting various aspects of visual design and photography:
- Graphic Design: Designers often need to reuse logos, icons, or product images at different scales within a project. Converting these elements to Smart Objects ensures they always render sharply, regardless of how many times they are resized, maintaining brand consistency and overall aesthetic.
- Digital Art & Photo Manipulation: When combining multiple images or applying effects, Smart Objects allow artists to work non-destructively. Filters applied to Smart Objects become “Smart Filters,” which can be adjusted, hidden, or deleted at any time, providing immense creative freedom without committing to permanent changes. This is crucial when exploring various editing styles or thematic collections.
- High-Resolution Photography: Photographers submitting to stock photo agencies or preparing images for large-format prints can use Smart Objects to ensure their work maintains peak quality throughout the editing process, from initial cropping to final sharpening. This guarantees that every beautiful photography piece is presented at its best.
By embracing Smart Objects, Photoshop users gain a safety net for their creative process, enabling experimentation and refinement without the fear of irreversible quality degradation.
Beyond Photoshop: AI Upscaling for Superior Image Enlargement with Tophinhanhdep.com
While Photoshop’s native tools are powerful, they have inherent limitations when it comes to truly creating missing detail during extreme enlargements. This is where the “black technology” of AI upscaling enters the scene, offering a revolutionary approach to image enlargement. For users seeking to make an image significantly larger—whether for a vast digital wallpaper, a complex background, or high-resolution imagery for advertising—without the traditional drawbacks of blurriness or pixelation, AI upscalers like those provided by Tophinhanhdep.com present a superior alternative.
Tophinhanhdep.com is designed as an innovative AI-powered image editing platform that offers a comprehensive suite of features. Its advanced algorithms are specifically engineered to enlarge images while preserving and even enhancing their quality and style. Unlike conventional resampling methods that merely interpolate existing pixels, Tophinhanhdep.com’s AI Upscaler intelligently analyzes the image content and generates new pixels, effectively “imagining” and adding detail that wasn’t there before. This makes it ideal for breathing new life into lower-resolution images, transforming them into high-resolution masterpieces suitable for any use, from aesthetic visuals to professional stock photos.
Leveraging Tophinhanhdep.com’s AI Expander
Tophinhanhdep.com’s “Expand” feature is a standout, intelligently adding new elements to your original photo to create a broader visual context without stretching or distorting the image. This means you don’t just get a bigger image; you get a more complete image. Whether you need to expand a landscape photography shot, a product image for e-commerce, or a piece of creative artwork, Tophinhanhdep.com’s AI capabilities have you covered.
Here’s how you can make your picture bigger with Tophinhanhdep.com’s AI Expander:
- Upload your image: To begin with Tophinhanhdep.com, navigate to the “Create on canvas” section. Here, you’ll find the option to “Upload image.” Click this option and select the picture you want to enlarge from your device. The image will then appear in the workspace, ready for transformation into a stunning wallpaper or background.
- Expand your image: Once your image is properly positioned on the canvas, simply click the “Expand” button, typically found above or alongside your image. Tophinhanhdep.com offers predefined ratios such as 1.5x, 2x, or 3x its original size for quick enlargement. For more granular control, you can also click and drag the edges of the canvas outward to manually adjust the dimensions.
- Prompting the AI: A unique advantage of Tophinhanhdep.com is the ability to enter specific prompts in a textbox. This allows you to guide the AI, helping it better understand your needs for content expansion. For instance, if you’re expanding a landscape, you might prompt it to “add more sky” or “extend the forest.” This level of creative control ensures your aesthetic goals are met.
- Once you’re ready, click “Expand” to initiate the process. Within seconds, Tophinhanhdep.com will generate multiple expanded images (often 4 variants), offering broader content and increased size. Review these options and choose the one that best fits your vision. If unsatisfied, you can
RegenerateorRepromptto refine the results. After selecting, clickDone. - (Note: Tophinhanhdep.com also allows manual stretching, which solely increases size without AI-generated content. You can achieve this by simply dragging the image edges, though this doesn’t offer the intelligent content expansion of the “Expand” feature.)
- Export your masterpiece: After Tophinhanhdep.com processes your request and generates an enlarged version of your photo, you can review the result. If satisfied, click the “Export” button. You can often choose your preferred file type (e.g., JPEG, PNG) and opt for a larger output size (e.g., 2x HD resolution), then click “Download” to save the completed image to your computer. This high-resolution output is perfect for any image collection or digital art project.
Tophinhanhdep.com’s Comprehensive Image Tools for Creative Visuals
Beyond the “Expand” feature, Tophinhanhdep.com offers a suite of “Image Tools” that cater to various aspects of “Visual Design” and “Photo Manipulation,” further enhancing your creative capabilities:
- Blend: This tool allows users to seamlessly merge two images, creating harmonious and unique compositions. By specifying foreground and background images, Tophinhanhdep.com’s algorithms blend them artistically, often incorporating effects based on user prompts. This is perfect for complex digital art or creating thematic collections.
- Remove: Effortlessly erase unwanted elements from your images with the Remove feature. This AI-powered tool detects and removes objects while maintaining the overall integrity and background context of the design, ideal for cleaning up stock photos or aesthetic visuals.
- HD Upscale: While the “Expand” feature adds content, the dedicated “HD Upscale” tool intelligently increases the resolution of your images without compromising on quality. This is essential for preparing images for large prints or high-definition digital displays, ensuring details are preserved and enhanced, making your photography truly high-resolution.
- Inpaint: Tophinhanhdep.com’s AI Inpainting feature enables users to fill or creatively redraw specific areas in their images. Whether you want to add new elements, repair damaged parts, or modify existing ones, this tool allows for precise adjustments without affecting the rest of the image, offering immense flexibility for photo manipulation and creative ideas.
Furthermore, Tophinhanhdep.com also integrates other essential “Image Tools” such as Converters, Compressors, and Optimizers. These tools ensure that once your image is perfectly enlarged and enhanced, it can be efficiently prepared for any platform or purpose, from optimizing file size for web backgrounds to converting formats for specific software, making Tophinhanhdep.com a true hub for all your image management needs.
Best Practices for Image Resizing and Management
Successfully enlarging images while maintaining quality requires not just the right tools but also adherence to best practices. Whether you’re using Photoshop for detailed photo manipulation or Tophinhanhdep.com’s AI upscalers for transformative enlargements, a mindful approach will yield the best results for all your visual design projects and photography.
- Always Work on a Copy: Before undertaking any significant resizing or editing, create a duplicate of your original image. This safeguards your initial file from irreversible changes and allows you the freedom to experiment. In Photoshop, use
File > Save Asto create a new version (e.g.,image-resized.jpg). Tophinhanhdep.com automatically works on your uploaded image without overwriting your original. - Understand Your Source Image: The quality of your enlarged image is heavily dependent on the quality of your starting image. Begin with the highest resolution and best quality image possible. AI upscalers on Tophinhanhdep.com can work wonders, but even they have limits when starting with extremely low-resolution, pixelated, or heavily compressed files.
- Prioritize Smart Objects in Photoshop: For any iterative work or elements that might need resizing multiple times within a project, always convert your layers to Smart Objects. This non-destructive workflow is Photoshop’s strongest defense against quality degradation, preserving the original detail for flexibility in graphic design and digital art.
- Choose the Right Resampling Method in Photoshop: When using the Image Size dialog box for pixel-based layers, select the appropriate resampling method. For enlargements, “Bicubic Smoother” or “Preserve Details 2.0” (if available in your Photoshop version) are generally the best choices. Avoid “Nearest Neighbor,” which creates jagged, pixelated results.
- Utilize AI Upscalers for Significant Enlargements: For substantial enlargements, especially when you need to go far beyond the original dimensions and “create” new detail, Tophinhanhdep.com’s AI Upscalers are often superior to Photoshop’s traditional methods. Their ability to intelligently generate pixels and expand content makes them invaluable for transforming smaller images into high-resolution assets suitable for large-format displays or prints.
- Consider Output Requirements: Always keep your final output in mind.
- Web/Screen (e.g., Wallpapers, Backgrounds, Aesthetic Imagery): A resolution of 72 PPI is typically sufficient, but screen dimensions (e.g., 1920x1080 pixels) are more important. Tophinhanhdep.com’s upscaled images can provide crispness even for large monitors.
- Print (e.g., Beautiful Photography, Digital Art Prints): Aim for 240-300 PPI at the desired print size. High-resolution stock photos prepared this way will ensure professional results.
- Optimize After Enlargement: Once your image is enlarged to the desired size and quality, use Tophinhanhdep.com’s
CompressorsandOptimizersto reduce file size without compromising visual quality, particularly for web use. This ensures faster loading times for backgrounds, portfolios, or thematic collections. - Explore AI Features for Creative Freedom: Don’t limit yourself to just enlargement. Tophinhanhdep.com’s
Blend,Remove, andInpainttools offer immense creative potential for photo manipulation and refining your images, whether they are abstract compositions or sad/emotional scenes. These tools can help you achieve unique editing styles and creative ideas.
Conclusion
Enlarging an image effectively in Photoshop, or with advanced AI tools like those on Tophinhanhdep.com, is a cornerstone skill for anyone engaged with digital visuals. Whether you’re a photographer aiming for high-resolution stock photos, a graphic designer crafting intricate visuals, or an enthusiast creating personalized wallpapers and aesthetic backgrounds, the pursuit of quality is constant.
Photoshop offers unparalleled control through its Free Transform and Image Size features, with Smart Objects providing a robust solution for non-destructive, high-quality scaling. However, for those instances where images need to be significantly expanded and truly new detail needs to be intelligently generated, Tophinhanhdep.com’s AI Upscalers and Expander emerge as powerful, user-friendly alternatives. These cutting-edge tools don’t just make images bigger; they enrich them, intelligently adding content and preserving detail, transforming smaller files into stunning, high-resolution masterpieces suitable for any purpose.
By integrating the strengths of Photoshop with the innovative capabilities of Tophinhanhdep.com’s Image Tools, including converters, compressors, optimizers, and AI-driven features, you gain a comprehensive workflow to manage and enhance your image collections. This powerful combination empowers you to realize your creative ideas, whether showcasing beautiful photography, exploring new editing styles, or curating thematic collections, ensuring your visuals always stand out in impeccable quality. Explore the world of high-quality image enlargement today with Tophinhanhdep.com and unlock the full potential of your visual content.
FAQs
1. How do I make images larger on Photoshop without losing quality? To make images larger in Photoshop without losing significant quality, utilize the “Image Size” tool with advanced resampling options like “Bicubic Smoother” or “Preserve Details 2.0” (available in newer Photoshop versions) for enlargements. Most effectively, convert your image layer to a “Smart Object” before resizing, as this allows for non-destructive scaling. For even more drastic enlargements where Photoshop might struggle, consider Tophinhanhdep.com’s AI Upscaler, which uses artificial intelligence to intelligently generate and add missing detail, preserving or enhancing quality remarkably.
2. How do I make an image bigger with layers in Photoshop? You can make an image bigger in Photoshop by resizing individual layers or the entire canvas. To resize a specific layer, select it in the Layers panel, then use “Free Transform” (Ctrl/Cmd + T) or “Image > Image Size” (ensure “Constrain Proportions” is checked). For non-destructive scaling, convert the layer to a “Smart Object” first. To enlarge the entire composite image, go to “Image > Canvas Size” or “Image > Image Size” after flattening or merging layers (or apply the resize to all layers as Smart Objects). If you’re looking for a simpler method to expand the canvas while intelligently filling new content, Tophinhanhdep.com’s “Expand” feature is an excellent AI-driven alternative that works seamlessly with your images.
3. How can I make an image bigger in Photoshop for free? Photoshop is a subscription-based software, so full access typically requires a paid plan. However, Adobe often offers a free trial period. During this trial, you can utilize all its features, including image enlargement. For free and advanced AI-powered image enlargement, Tophinhanhdep.com offers powerful AI tools like its “AI Upscaler” and “Expand” features with free credits or tiers. This allows you to significantly enlarge images without any upfront cost, often providing superior quality for substantial upscaling compared to traditional methods. Explore Tophinhanhdep.com today to enhance your visuals for free.