How to Make High-Resolution Images

In today’s visually-driven world, the quality of an image can make all the difference. From breathtaking wallpapers and captivating backgrounds to professional stock photos and intricate digital art, high-resolution images are the cornerstone of impactful visual content. Whether you’re a seasoned photographer aiming for pristine prints, a graphic designer crafting detailed layouts, or simply someone who appreciates crystal-clear visuals, understanding how to achieve and maintain high image resolution is an invaluable skill.
At Tophinhanhdep.com, we are dedicated to empowering creators and enthusiasts with the knowledge and tools needed to elevate their visual projects. Our platform, rich with resources on everything from aesthetic nature photography to advanced image manipulation, emphasizes the importance of resolution in achieving stunning results. This comprehensive guide will delve into the intricacies of image resolution, explore various methods for enhancing it, and showcase how Tophinhanhdep.com’s advanced image tools can transform your low-resolution images into high-definition masterpieces.

Understanding Image Resolution: Pixels, PPI, and Print Quality
Before we dive into the “how-to,” it’s essential to grasp the fundamental concepts that govern image resolution. A clear understanding of these terms will not only help you navigate the technical aspects of image enhancement but also enable you to make informed decisions for your specific visual needs, from captivating backgrounds for your devices to high-quality prints for display.
The Fundamentals of Digital Image Structure
At its core, every digital image is composed of tiny squares of color known as pixels. These pixels are the building blocks that, when combined, create the intricate details, smooth gradients, and vibrant hues you see on your screen. The more pixels an image contains within a given area, the more detail it can display, and thus, the higher its resolution.
The resolution of a digital image is commonly measured in Pixels Per Inch (PPI). This metric indicates the density of pixels packed into every inch of an image. A higher PPI value means more pixels per inch, resulting in a sharper, more detailed image. Conversely, a lower PPI means fewer pixels per inch, leading to a pixelated or “blocky” appearance, especially when the image is enlarged. For instance, an image with 300 PPI will appear significantly smoother and more detailed than an image of the same physical size but with only 72 PPI. The difference is stark, with the lower PPI image revealing noticeable individual pixels.
For images intended for print, another related term comes into play: Dots Per Inch (DPI). While PPI refers to the pixels on a screen, DPI refers to the dots of ink a printer lays down on paper. Similar to PPI, a higher DPI results in a clearer, more uniform printed image. Although technically distinct, PPI and DPI are often used interchangeably to convey the overall sharpness and detail required for a quality output. As a general rule of thumb, 300 pixels per inch (or DPI) is the widely accepted standard for high-quality printed images, ensuring clarity and sharpness that meets professional expectations for beautiful photography and vivid visual design.
Why Resolution Matters: From Screens to Prints
The importance of image resolution extends across various applications, directly impacting the aesthetic appeal and practical utility of your visual content.
- For Digital Display (Wallpapers, Backgrounds, Web Aesthetics): When viewing images on screens, whether it’s a desktop wallpaper, a mobile background, or a photo displayed on a website, resolution plays a crucial role in the visual experience. High-resolution images appear crisp and clear, filling modern high-definition displays without pixelation. They contribute to a polished and professional aesthetic, making everything from abstract art to stunning nature photography look its best. Low-resolution images, on the other hand, can appear blurry or jagged, diminishing their impact and professionalism.
- For Printing (High-Resolution Photography, Graphic Design, Digital Art): The impact of resolution becomes even more critical when preparing images for print. A low-resolution image that might look acceptable on a small screen will almost certainly appear pixelated and fuzzy when enlarged and printed. This is particularly true for large-format prints, posters, or merchandise, where individual pixels become visible, destroying the image’s integrity. For professional photography, graphic design, and digital art, maintaining a 300 PPI standard is paramount to ensure that prints are sharp, detailed, and truly reflect the original artistic intent. This applies to everything from stock photos used in brochures to custom-designed digital art canvases.
- For Editing and Manipulation (Photo Manipulation, Creative Ideas): When engaging in photo manipulation or intricate digital art, working with high-resolution images provides a far greater degree of flexibility and quality control. Higher resolution means more raw pixel data, allowing for more aggressive cropping, zooming, and detailed editing without introducing noticeable artifacts or quality degradation. This pixel density is essential for maintaining clarity and sharpness when applying advanced editing styles or implementing creative ideas. Our Image Tools, including converters and optimizers, often prepare images for such detailed work.
- For Visual Inspiration & Collections (Mood Boards, Thematic Collections, Trending Styles): The power of visual inspiration hinges on quality. High-resolution images are essential for creating compelling mood boards, curating thematic collections, and staying abreast of trending styles. When every detail matters in conveying an emotion or idea – be it sad/emotional imagery or a piece of beautiful photography – the clarity of a high-resolution image ensures the message is delivered without compromise.
In essence, understanding and optimizing image resolution is not just a technicality; it’s a pathway to unlocking the full potential of your visual content, ensuring that your images always look their best, no matter where they are viewed or how they are used.
Best Practices for Upscaling Images Effectively
While the idea of transforming a low-resolution image into a high-resolution one is appealing, it’s crucial to approach this process with realistic expectations and a set of best practices. Simply “making an image bigger” doesn’t automatically equate to higher quality or more detail. The process primarily involves adding pixels, not magically recovering lost information. Tophinhanhdep.com advocates for intelligent upscaling, leveraging advanced algorithms and careful editing to achieve the best possible results while understanding the inherent limitations.
Key Considerations Before Resizing
Before you embark on increasing an image’s resolution, keep the following principles in mind to mitigate potential quality loss and ensure a satisfactory outcome:
- Bigger Doesn’t Always Mean Sharper: When you increase the dimensions of an image, you are essentially instructing the software to create new pixels based on the existing ones. This process, known as resampling or upsampling, adds pixels to make the image larger, but it doesn’t add new, original detail that wasn’t captured in the first place. Therefore, a significantly enlarged image may appear larger but could also look softer, less sharp, or even blurry compared to the original, especially if the initial resolution was very low.
- Avoid Excessive Enlargement: The extent to which you can increase an image’s size before noticeable degradation occurs varies depending on the original image’s quality and content. As a general guideline, increasing dimensions by more than 30-40% in a single step can often lead to a visible loss of sharpness. For more substantial increases, it’s sometimes better to perform multiple smaller upscaling steps rather than one massive jump, though modern AI upscalers are changing this paradigm.
- The Starting Quality is Paramount: It’s important to remember that upscaling is an enhancement, not a miracle. An extremely low-resolution, out-of-focus, or poorly exposed image will always have inherent limitations. While Tophinhanhdep.com’s tools can significantly improve such images, they cannot invent data that was never there. The quality determined by the initial capture (focus, exposure, lighting, camera sensor capabilities) will always be the foundational limit of your final output. Therefore, strive to begin with the highest quality original image possible.
Leveraging Sharpening and Noise Reduction
To counteract the common side effects of upscaling, such as softness and noise, judicious application of sharpening and noise reduction techniques is often necessary. Tophinhanhdep.com’s integrated image tools are designed with these considerations in mind, offering features that help maintain clarity and detail.
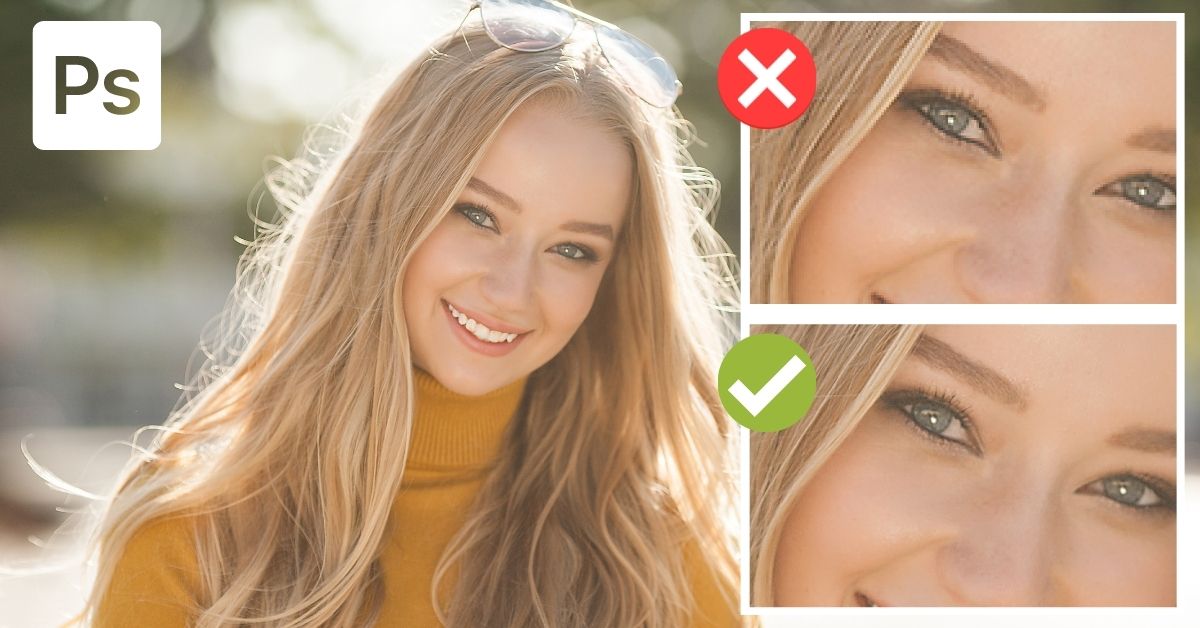
- Strategic Sharpening: Many image editing applications, including those offered or recommended by Tophinhanhdep.com, include dedicated sharpening tools. These tools enhance the contrast along the edges of objects in your image, giving the impression of greater detail and crispness. However, sharpening must be used sparingly. Over-sharpening can lead to an unnatural, “halo” effect around objects or exaggerate existing image noise. The goal is to restore some of the sharpness lost during the upscaling process without introducing new artifacts. Our platform advises a balanced approach, often suggesting a “high pass filter” technique in advanced desktop editors to apply sharpening without overdoing it.
- Intelligent Noise Reduction: Upscaling can sometimes make existing image noise (graininess) more apparent or even introduce new noise. Noise reduction tools work by smoothing out these random pixel variations, resulting in a cleaner image. Similar to sharpening, excessive noise reduction can lead to a loss of fine detail, making the image appear overly smooth or “plastic.” The key is to find a balance where noise is minimized while preserving important textures and details. Tophinhanhdep.com’s AI upscalers often incorporate intelligent noise reduction as part of their enhancement process, automatically balancing these factors for optimal results.
- The Role of Interpolation Methods: When traditional upscaling is performed, the software uses an interpolation method to determine the color and value of the newly created pixels. Different methods yield different results:
- Nearest Neighbor: Simple, fast, but often produces jagged edges and pixelation. Best for pixel art.
- Bilinear: Averages the colors of surrounding pixels, producing smoother but often blurrier results.
- Bicubic: A more complex method that considers more surrounding pixels, often producing smoother gradients and better detail than Bilinear. “Bicubic Smoother” is designed for enlargement, while “Bicubic Sharper” is for reduction.
- Preserve Details / Preserve Details 2.0 (in advanced software): These are more advanced algorithms designed specifically for enlargement, attempting to maintain original details and reduce noise more intelligently. Tophinhanhdep.com’s AI-driven tools often leverage principles similar to these advanced methods, but with machine learning for superior results.
By understanding these considerations and employing a thoughtful approach to upscaling, combined with the right tools, you can achieve remarkable improvements in image resolution, enhancing your beautiful photography and visual design projects.
Tophinhanhdep.com’s Approach to High-Resolution Image Enhancement
At Tophinhanhdep.com, we understand the critical demand for high-resolution images across all visual domains. That’s why we’ve developed and integrated cutting-edge tools, particularly our powerful AI Upscalers, to make the process of enhancing image resolution accessible, efficient, and highly effective. Our platform simplifies complex technical processes, allowing users to achieve professional-grade results with ease, whether for generating stunning wallpapers, detailed stock photos, or intricate graphic designs.
Harnessing the Power of AI Upscaling
The advent of Artificial Intelligence has revolutionized image enhancement, and Tophinhanhdep.com is at the forefront of this innovation. Our AI Upscalers utilize sophisticated deep machine learning technology and advanced neural network structures, such as the Super-Resolution Convolutional Neural Network (SRCNN). Unlike traditional upscaling methods that merely “guess” new pixel values based on adjacent pixels, our AI-driven tools intelligently analyze and reconstruct image details.
Here’s how Tophinhanhdep.com’s AI Upscalers deliver superior results:
- Intelligent Detail Reconstruction: Instead of simply interpolating, our AI models are trained on millions of diverse images. This extensive training allows them to understand patterns, textures, and structures within images. When you upload a low-resolution image, the AI doesn’t just enlarge it; it intelligently reconstructs missing details, predicts how new pixels should look, and fills in gaps with remarkable accuracy. This results in significantly sharper, clearer, and more natural-looking high-resolution images, even from relatively low-quality originals.
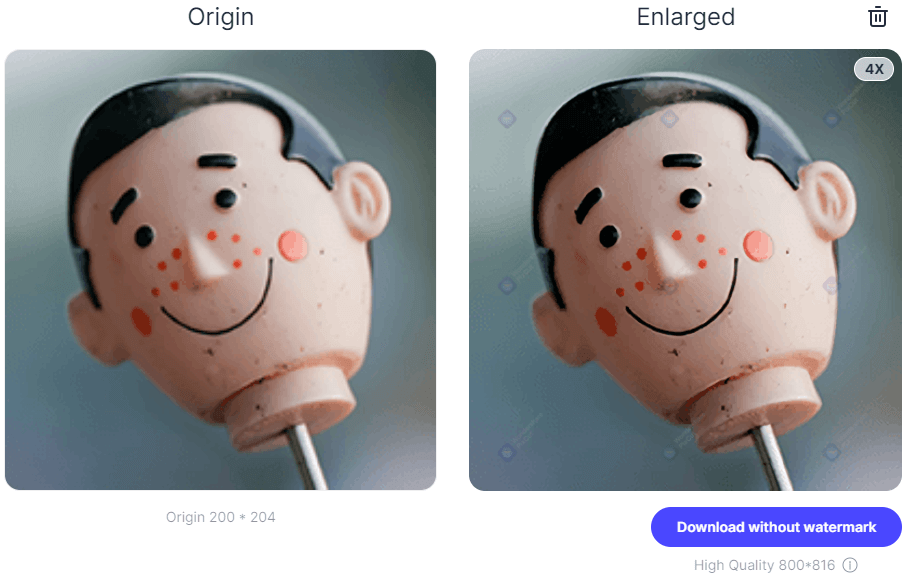
- Preservation of Quality without Pixelation: One of the most significant advantages of Tophinhanhdep.com’s AI Upscalers is their ability to enlarge photos by a substantial margin (e.g., up to 1000% or more) without introducing pixelation or blur. This is critical for applications like printing large-format aesthetic images or creating high-resolution close-ups from your photography.
- Automatic Enhancement Features: Beyond just increasing resolution, our AI upscaling technology often includes automatic enhancements such as fixing pixelation, correcting colors and lighting, removing JPEG artifacts, and applying intelligent noise reduction. These integrated features ensure a holistic improvement in overall image quality, making your backgrounds, nature scenes, or abstract art truly pop.
- User-Friendly Online Experience: Tophinhanhdep.com’s AI Upscalers are designed for ease of use, operating directly within your web browser. This means no software downloads, no complex installations, and no steep learning curve. The process is typically as simple as uploading your image and letting the AI do the heavy lifting, ideal for quick optimizations for social media, visual design projects, or thematic collections.
Step-by-Step Guide: Using Tophinhanhdep.com’s Integrated Tools
Achieving higher resolution with Tophinhanhdep.com is a straightforward process, designed to be intuitive for everyone, from beginners to experienced professionals. Whether you are working on a desktop or a mobile device, our platform ensures a seamless experience.
Using Tophinhanhdep.com’s Online AI Upscaler (Desktop/Mobile):
Our online AI Upscaler is the recommended method for most users due to its power and simplicity.
- Navigate to the Tool: Open your web browser and go to Tophinhanhdep.com. Locate the “Image Tools” section and click on “AI Upscalers” or a similarly labeled “Enlarge Image” feature.
- Upload Your Image: You will typically find an “Upload” button or a drag-and-drop zone. Select the picture you wish to enhance from your computer or mobile device. Ensure you grant the necessary permissions if prompted (e.g., access to your photo library on mobile).
- Choose Your Upscaling Factor/Settings: Tophinhanhdep.com’s AI Upscaler may offer options to choose how much you want to enlarge the image (e.g., 2x, 4x, 8x, or a custom percentage). Some tools might automatically detect the best upscaling factor. Our AI is designed to automatically enlarge images without losing quality, so often, minimal input is required from you.
- Initiate the Enhancement: Once your image is uploaded and settings are confirmed, click the “Enhance,” “Upscale,” or “Process” button. The AI will then get to work, which may take a few moments depending on the image size and chosen upscaling factor.
- Review and Download: After the process is complete, you’ll be presented with a preview of your newly enhanced, high-resolution image. Take a moment to zoom in and examine the quality. If you’re satisfied with the result, click the “Download” or “Save” button to save the high-resolution image to your device. You may also have options to choose the output format (e.g., JPEG, PNG, TIFF) and compression level. For the best quality, always choose the lowest compression setting (highest quality).
General Steps for Desktop Image Editing Software (Conceptual Guide for Tophinhanhdep.com-recommended advanced tools):
While Tophinhanhdep.com offers powerful online solutions, many users prefer the granular control of advanced desktop software for professional photography or complex visual design tasks. Here’s a generalized approach reflecting functionalities found in top-tier editing suites that Tophinhanhdep.com frequently refers to:
- Open Your Image: Launch your preferred desktop image editing software (e.g., an advanced image editor recommended by Tophinhanhdep.com for professional use) and open the image you want to modify.
- Access Image Size/Resample Options: Navigate to the “Image” menu and select “Image Size” (or a similar option like “Scale Image” or “Canvas Size”). This panel provides controls over an image’s dimensions and resolution.
- Configure Resampling Settings:
- Enable Resample: Crucially, ensure the “Resample” option is checked. This tells the software to add new pixels as you change the dimensions.
- Choose Interpolation Method: Select an appropriate interpolation method. For enlargement, options like “Preserve Details 2.0” (if available), “Preserve Details (enlargement),” or “Bicubic Smoother” are generally recommended as they perform more intelligent pixel calculations.
- Adjust Resolution/Dimensions: Set your desired resolution (e.g., 300 PPI for print) or increase the width/height dimensions. Ensure the aspect ratio is locked (often indicated by a chain icon) to prevent distortion. For example, if your original image is 1000 pixels wide at 72 PPI, you might change the resolution to 300 PPI.
- Apply Noise Reduction and Sharpening (Post-Resampling): After applying the initial resolution increase, examine your image. Most advanced software includes options to “Reduce Noise” directly within the Image Size dialog or as separate filters. Apply these judiciously to refine the image. You might also consider applying a “High Pass” filter in “Overlay” blending mode, a common technique for sharpening details without over-processing.
- Save/Export Your High-Resolution Image: Once satisfied, save your work. For best quality, export the image to a format like TIFF or high-quality JPEG (with minimal compression). When prompted for compression levels, opt for “zero compression” or the “highest quality” setting to retain maximum detail.
By combining Tophinhanhdep.com’s advanced AI Upscalers for effortless enhancement and strategic use of desktop editing software for fine-tuned control, you can consistently achieve the high-resolution quality your visual content deserves. This synergy allows for unparalleled flexibility, catering to all aspects of digital photography, visual design, and image collection needs.
Advanced Techniques with Desktop and Mobile Applications
Beyond Tophinhanhdep.com’s integrated online AI upscalers, a diverse ecosystem of desktop software and mobile applications offers robust capabilities for increasing image resolution. These tools provide varying degrees of control and complexity, catering to different user needs—from professional photographers and graphic designers to casual users looking to enhance their mobile snapshots. Tophinhanhdep.com, while promoting its own powerful solutions, also recognizes and helps users navigate the broader landscape of image enhancement tools, offering guidance on leveraging their specific strengths.
Utilizing Comprehensive Image Editing Suites for Precision
For users who require maximum control, precision, and a broad suite of editing features alongside resolution enhancement, comprehensive desktop image editing software is indispensable. These programs, which Tophinhanhdep.com often references for advanced photo manipulation and digital photography techniques, offer deep functionality far beyond simple resizing.
Conceptual Workflow for Desktop Image Editors (e.g., Tophinhanhdep.com’s recommended professional suites):
- Initial Image Preparation:
- Open the Image: Begin by opening your image in the chosen software. Ensure it’s in a suitable format; RAW files should be processed first using the software’s RAW conversion capabilities if applicable.
- Duplicate Layer (Optional but Recommended): For non-destructive editing, always duplicate your image layer (e.g.,
Ctrl+JorCmd+J) before making significant changes. This allows you to revert to the original or compare results.
- Accessing Resolution and Resampling Controls:
- Image Size Dialog: Navigate to
Image > Image Size(or equivalent). This central dialog is where you’ll control pixel dimensions and resolution. - Understanding Parameters:
- Dimensions: Shows the current width and height in pixels.
- Resolution: Displays the PPI. For print, aim for 300 PPI.
- Resample: This crucial checkbox activates the interpolation process, allowing new pixels to be created. Without it, you’re only changing the print size of the existing pixels, not their count.
- Interpolation Method: Choose the best algorithm for enlargement. Options like “Preserve Details 2.0” or “Bicubic Smoother” are typically the most effective for adding pixels while minimizing quality loss.
- Image Size Dialog: Navigate to
- Strategic Upscaling:
- Incremental Increases: For very significant resolution jumps, consider increasing the image size in smaller increments (e.g., 10-20% at a time), saving, and then repeating. This can sometimes yield better results than a single, massive upscale, especially with traditional methods. However, with Tophinhanhdep.com’s AI Upscalers, a single large jump is often perfectly acceptable.
- Monitoring Quality: Constantly zoom in to check the effect of the upscaling. Look for pixelation, blurriness, or artifact introduction.
- Post-Upscaling Refinement:
- Noise Reduction: Use built-in noise reduction filters (
Filter > Noise > Reduce Noise, or similar) to smooth out any graininess that may have been amplified or introduced during upscaling. Be careful not to overdo it, as this can erase fine details. - Sharpening (High Pass Filter Method): A highly effective technique is to apply a High Pass filter.
- Duplicate your newly upscaled layer.
- Go to
Filter > Other > High Pass. - Adjust the radius until only the edges and details are visible in gray, then click OK.
- Change the blending mode of this High Pass layer to “Overlay” (or “Soft Light,” “Hard Light” for different intensities). This method enhances edges without over-sharpening the entire image.
- Clarity/Texture Adjustments: Utilize sliders for Clarity or Texture (if available) to selectively enhance mid-tone contrast and perceived detail without aggressive sharpening.
- Noise Reduction: Use built-in noise reduction filters (
- Final Export:
- Save As: When saving, choose a format that preserves quality, such as TIFF for archival purposes or high-quality JPEG (with minimal compression) for general use.
- Compression Settings: Always select the highest quality/lowest compression setting to ensure the maximum detail from your enhanced image is retained.
This meticulous workflow, often employed for stock photos, high-resolution photography, and detailed visual design projects, ensures that every pixel counts.
On-the-Go Resolution Enhancement with Mobile Tools
For those who manage their visual content primarily on mobile devices, dedicated mobile applications offer convenient ways to increase image resolution. Tophinhanhdep.com acknowledges the prevalence of mobile photography and the need for quick, effective tools that integrate seamlessly into a mobile workflow for everything from social media aesthetic images to quick edits for mood boards.
Conceptual Workflow for Mobile Image Resizing Apps (e.g., Tophinhanhdep.com’s recommended mobile apps):
- Install and Grant Permissions: Download and install a reputable image resizing app (e.g., an app like “Image Size” for iOS or a “Photo & Picture Resizer” for Android, as suggested by Tophinhanhdep.com for mobile users). Grant the app access to your device’s photo library.
- Select Your Image: Open the app and choose the image you wish to resize from your gallery.
- Adjust Dimensions/Resolution:
- Lock Aspect Ratio: Crucially, ensure the “lock” icon (often a chain) linking width and height is engaged. This maintains the image’s original proportions as you resize.
- Enter New Values: Input your desired new width or height in pixels. The other dimension will adjust automatically. Some apps may also allow direct manipulation of resolution (PPI/DPI).
- AI Enhancement (if available): Many modern mobile apps, similar to Tophinhanhdep.com’s online AI Upscaler, now integrate AI features. Look for options like “Enhance” or “AI Upscale” for improved quality over basic resizing.
- Configure Output Quality: If available, ensure the “Output Quality” or “Compression Level” slider is set to 100% (or the highest quality) before saving.
- Save the Image: The app will process the image and typically save the resized version to a new folder within your device’s photo library. You can then review the pixel quality by pinching to zoom.
- Print Size Correction (Optional): Some advanced mobile apps offer “Print size correction factor” to smooth out pixelation for print purposes. Adjust this if your primary goal is physical output.
While mobile apps offer convenience, they generally provide less fine-grained control than desktop software. However, for quick enhancements of images for social media, personal use, or immediate sharing, they are incredibly efficient. Tophinhanhdep.com’s mobile-friendly interface ensures that you can always access powerful AI-driven enhancement, bridging the gap between desktop precision and mobile convenience.
Integrating High-Resolution Images into Your Visual Projects
The ultimate goal of creating high-resolution images is to unlock their full potential across a wide spectrum of visual applications. At Tophinhanhdep.com, we emphasize not just the creation but also the strategic deployment of high-quality visuals. From crafting immersive digital experiences to producing tangible works of art, high-resolution images are the backbone of impactful visual communication.
Enhancing Wallpapers, Backgrounds, and Aesthetic Collections
High-resolution images are foundational to creating truly captivating digital environments and curated visual collections.
- Stunning Wallpapers and Backgrounds: Modern screens, from smartphones to large ultrawide monitors, boast incredibly high pixel densities. Low-resolution images stretched across these displays appear pixelated, blurry, and unprofessional. By utilizing Tophinhanhdep.com’s AI Upscalers or meticulously enhancing images with our recommended tools, you can transform ordinary photos into breathtaking wallpapers and backgrounds. Imagine a serene nature landscape, an abstract art piece, or a beautifully composed photograph filling your screen with crystal-clear detail, setting a perfect aesthetic tone for your device. High-resolution ensures every subtle shade and sharp edge contributes to an immersive visual experience.
- Curating Aesthetic and Thematic Collections: Whether you’re building a mood board for a creative project, compiling thematic collections of sad/emotional imagery, or curating beautiful photography, the consistency of high resolution is key. A collection where images vary wildly in quality detracts from its overall impact. Tophinhanhdep.com helps you standardize and elevate your collections, ensuring every image contributes to a cohesive and inspiring visual narrative. High-resolution images allow for deeper engagement with the details, essential for conveying complex emotions or appreciating artistic nuances.
- Optimal for Stock Photos: For platforms offering stock photos, resolution is a non-negotiable requirement. Clients demand images that can be used across various media, from small web thumbnails to large print advertisements. Tophinhanhdep.com’s expertise in high-resolution digital photography ensures that your images meet the stringent quality standards required for commercial licensing, maximizing their utility and value.
The Impact on Graphic Design, Digital Art, and Photography
For professional creative fields, high resolution isn’t merely a preference; it’s a necessity that directly impacts the integrity and versatility of the work.
- Graphic Design Excellence: In graphic design, images are often integrated into complex layouts, scaled, cropped, and combined with text and other graphic elements. Working with high-resolution images from the outset, or ensuring upscaled images meet demanding specifications, is crucial for achieving crisp, professional results, especially for print collateral like brochures, posters, and packaging. Low-resolution images quickly become design liabilities, limiting creative freedom and compromising the final output. Tophinhanhdep.com’s image tools ensure that designers have access to the highest quality assets for their projects.
- Precision in Digital Art and Photo Manipulation: Digital artists and photo manipulators thrive on detail. High-resolution base images provide a rich canvas, allowing for intricate brushwork, seamless blending, and detailed texture application without the constraints of pixel limitation. When performing photo manipulation, scaling elements, or compositing different images, starting with or converting to high resolution ensures that all components maintain visual fidelity, resulting in believable and polished digital art. Our platform guides artists in leveraging these capabilities for their creative ideas.
- Professional Photography Outputs: For photographers, high resolution is synonymous with professionalism and versatility. It means capturing moments with enough detail to allow for significant cropping without sacrificing quality, printing large-format exhibition pieces, or providing clients with flexible assets for various uses. The ability to produce high-resolution files from your digital photography ensures that your work stands up to scrutiny in any medium, truly showcasing the beauty and detail you intended to capture. Tophinhanhdep.com’s resources on editing styles and high-resolution techniques are tailored to help photographers maximize their output.
In conclusion, the journey to making high-resolution images is a vital one for anyone serious about visual content. From understanding the underlying principles of pixels and PPI to leveraging advanced AI upscalers and mastering traditional editing techniques, every step contributes to the creation of stunning, versatile, and impactful visuals. At Tophinhanhdep.com, we are committed to providing you with the tools, knowledge, and inspiration to ensure your images always meet the highest standards, elevating your wallpapers, backgrounds, aesthetic collections, and professional creative endeavors to new heights. Explore our platform to discover how our comprehensive image tools and expert guidance can empower your visual journey.