How to Make an Image Sharper in Photoshop

In the expansive realm of digital photography and visual design, clarity is king. Whether you’re crafting stunning wallpapers, refining aesthetic backgrounds, capturing the intricate details of nature, or creating impactful abstract art, the sharpness of your image plays a pivotal role in its overall impact. A perfectly sharp image not only enhances visual appeal but also conveys a sense of professionalism and attention to detail. However, not every photo emerges from the camera perfectly crisp. Blurriness can creep in due to various factors – slight camera shake, focusing errors, or simply the inherent softness of a lens at certain apertures. This is where the powerful capabilities of Adobe Photoshop come into play, offering a suite of sophisticated tools to transform a soft or blurry picture into a tack-sharp masterpiece.
At Tophinhanhdep.com, we understand the pursuit of visual perfection. Our platform is dedicated to providing resources for high-resolution images, fostering creative ideas, and empowering users with essential image tools. Sharpening isn’t just about making something less blurry; it’s about adding contrast along the edges of objects, making them stand out, giving volume, and enhancing the overall drama of your subject. It’s a subtle art, an illusion that tricks the eye into perceiving greater detail. This comprehensive guide will delve deep into Photoshop’s arsenal of sharpening techniques, ensuring your images, from beautiful photography to stock photos, always look their absolute best. We’ll explore various filters and tools, explaining their nuances and how to apply them effectively to achieve stunning, high-quality results without introducing unwanted artifacts.
Understanding Image Sharpening in Photoshop

Image sharpening, at its core, is an optical illusion. It doesn’t actually add new detail to an image; instead, it manipulates existing pixel information to create the perception of greater sharpness. Photoshop achieves this by increasing the contrast along “edges” within your image. An edge is defined as any area where there’s a significant, sudden change in brightness between adjacent pixels. By making the lighter side of an edge even lighter and the darker side darker, our brains interpret this enhanced contrast as increased clarity and detail. This fundamental principle underlies all sharpening methods in Photoshop, from basic tools to advanced filters. Understanding this allows you to apply sharpening intelligently, avoiding over-processing that can lead to unnatural-looking halos or excessive noise.
The Illusion of Sharpness: What It Really Means
The concept of sharpening as an illusion is crucial. Imagine a fine line in your photograph where a light area meets a dark area. A sharpening algorithm identifies this transition. Instead of just making the line itself clearer, it subtly brightens the pixels immediately adjacent to the light side of the line and darkens the pixels immediately adjacent to the dark side. This creates a more pronounced visual separation, enhancing the definition of the edge. The degree to which this contrast is boosted directly influences how sharp the image appears. This technique is universally applicable, whether you’re working on aesthetic backgrounds, refining digital art, or enhancing high-resolution stock photos. It’s a key step in photo manipulation that breathes life into your visual designs.
Why Sharpening is Crucial for Visual Perfection
In the current digital landscape, where images are consumed across diverse screens and printed in various formats, visual perfection is paramount. Sharpening is not merely a cosmetic tweak; it’s a critical step in post-processing that can significantly elevate the quality of your photography. For nature photography, it can bring out the delicate texture of a leaf or the glint in an animal’s eye. For portraits, it can define facial features and hair. For product photography, it ensures every detail is crisp and appealing. Without proper sharpening, even a well-composed and exposed image can appear dull or soft, failing to capture the viewer’s full attention. It transforms a good photo into a great one, aligning with the standards of beautiful photography and professional visual design. For those curating thematic collections or developing unique editing styles, consistent and appropriate sharpening is a hallmark of quality.
Essential Photoshop Tools for Image Sharpening
Photoshop offers a robust array of tools and filters specifically designed for sharpening. Each method has its strengths and is suited for different scenarios. Understanding when and how to use them effectively is key to achieving optimal results without introducing unwanted artifacts.
Mastering the Unsharp Mask Filter
The Unsharp Mask (USM) filter is perhaps the most widely recognized and frequently used sharpening tool in Photoshop. Its name might sound counter-intuitive, but it’s derived from traditional photographic darkroom techniques. It works by detecting edges, blurring a copy of the image, subtracting the blurred copy from the original, and then adding contrast to the remaining edge details. This method provides precise control over three key parameters:
- Amount: This slider determines the intensity of the sharpening effect. A higher ‘Amount’ value results in more pronounced contrast along the edges. It controls how much darker the dark pixels get and how much lighter the light pixels become. Over-reliance on ‘Amount’ can quickly lead to an artificial, over-processed look, so it’s best used judiciously.
- Radius: The ‘Radius’ defines the width of the sharpening effect around the edges. It dictates how many pixels extending outward from the edge will be affected. A smaller radius targets only the immediate edge, while a larger radius spreads the sharpening effect further. For fine details, a small radius (1-3 pixels) is usually preferred. For images with larger elements, a slightly larger radius might be appropriate. Too high a radius can lead to noticeable halos around objects.
- Threshold: This intelligent slider helps prevent sharpening in areas where it’s not desired, such as smooth skin tones or a clear sky, which might otherwise become grainy. ‘Threshold’ tells Photoshop to ignore pixels that have a contrast difference below a specified level. By increasing the ‘Threshold’ value, you instruct the filter to only sharpen edges where the difference in brightness between pixels is significant enough, preserving smooth areas and minimizing noise.
To use USM effectively, open your image, convert the layer to a Smart Object (for non-destructive editing), go to Filter > Sharpen > Unsharp Mask, and experiment with these sliders while zoomed in to 100% on a detailed area of your image. This method is excellent for general output sharpening, preparing images for web display or print, ensuring your high-resolution wallpapers and backgrounds are crisp.
Precision Sharpening with Smart Sharpen
The Smart Sharpen filter is an advanced version of Unsharp Mask, offering more refined controls and intelligence. It’s particularly recommended for targeted sharpening because it minimizes noise in low-contrast areas more effectively than USM. Smart Sharpen includes basic and advanced settings, allowing you to fine-tune different aspects of the sharpening process, including distinct controls for shadows and highlights.
Here’s how Smart Sharpen distinguishes itself:
- Targeted Sharpening: Unlike USM, Smart Sharpen is designed to analyze the image content more intelligently, allowing for more selective sharpening. It can apply different levels of sharpening to different parts of the image, reducing artifacts in smooth areas while enhancing detail in textures.
- Reduce Noise Slider: A crucial feature is the ‘Reduce Noise’ slider. This allows you to mitigate the introduction of noise that often accompanies sharpening, especially in images captured in low light or with high ISO settings. By lowering this slider, you can observe the full sharpening effect and then adjust it to strike a balance between sharpness and noise.
- Shadow and Highlight Controls: In the advanced settings, Smart Sharpen provides specific controls for ‘Fade Amount’, ‘Tonal Width’, and ‘Radius’ within the ‘Shadows’ and ‘Highlights’ sections. This enables you to prevent unwanted darkening in shadows or brightening in highlights, common issues with traditional sharpening, leading to a more natural and balanced final image.
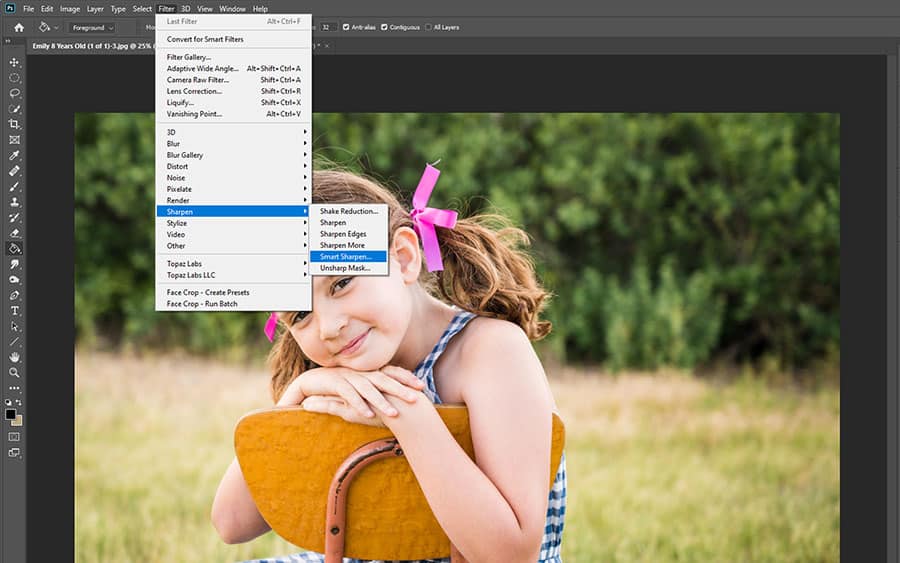
To apply Smart Sharpen, duplicate your image layer and convert it to a Smart Object. Then, navigate to Filter > Sharpen > Smart Sharpen. Start with the ‘Default’ preset, lower ‘Reduce Noise’ to see the full effect, and then adjust ‘Amount’ and ‘Radius’. Pay close attention to halos, reducing the ‘Radius’ just enough to eliminate them. The ability to save settings with Smart Sharpen also makes it a powerful tool for maintaining consistent editing styles across various images within your collections.
The Power of the High Pass Filter for Edge Detection
The High Pass filter is a unique and incredibly effective method for sharpening that stands out due to its simplicity and precision. Many professionals prefer it because it excels at isolating edges and applying sharpening without affecting overall image contrast or colors, minimizing the risk of color shifts or noise in smooth areas.
Here’s how this method works:
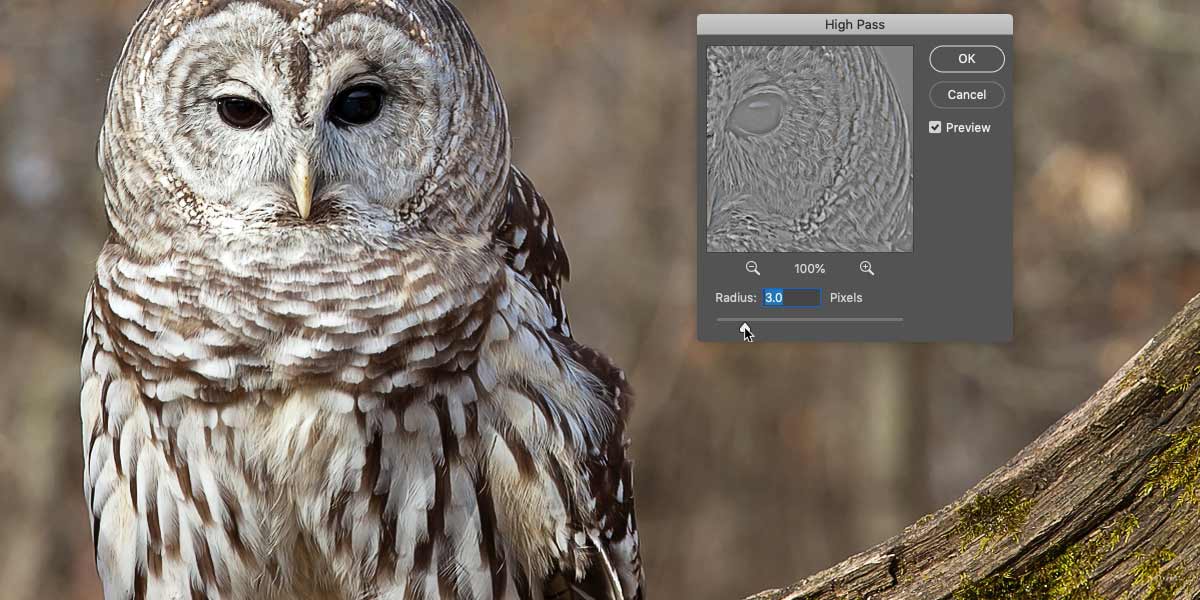
- Edge Detection: High Pass works by filling the image with a flat, neutral gray. It then identifies areas of abrupt tonal change (edges) and highlights them, making the lighter side of the edge lighter and the darker side darker, while non-edge areas remain gray.
- Radius Setting: The only real adjustable parameter in the High Pass dialog box is ‘Radius’. This value controls the width of the highlighted edges. The goal is to set the ‘Radius’ just high enough so that you can clearly see the edges you want to sharpen, but not so high that you start to see broad details or colors bleeding into the gray. Typically, values between 2 and 5 pixels work best for most images, but it’s crucial to zoom in and observe the effect closely.
- Blending Modes: After applying the High Pass filter, the magic happens when you change the layer’s blending mode. Since the High Pass layer contains mostly neutral gray, and contrast-boosting blend modes (like Overlay, Soft Light, Hard Light, or Linear Light) hide neutral gray, the gray areas disappear. Only the highlighted edges remain, and their contrast is dramatically increased, resulting in a sharpened image.
- Overlay: Produces a strong sharpening effect.
- Soft Light: Offers a more subtle and gentle sharpening.
- Hard Light & Linear Light: Provide even stronger, more aggressive sharpening, useful for images that require a significant boost.
For a non-destructive workflow, always convert your image layer to a Smart Object before applying the High Pass filter. After applying the filter and setting the blend mode, you can further fine-tune the sharpening by adjusting the opacity of the High Pass layer. This powerful technique ensures that your aesthetic images and beautiful photography stand out with exceptional clarity.
Advanced Techniques and Specialized Sharpening
Beyond the core sharpening filters, Photoshop provides specialized tools and techniques for handling specific types of blur or for applying sharpening with greater control to particular areas of an image. These methods are invaluable for addressing common photographic challenges and for achieving truly refined visual designs.
Combating Camera Shake with the Shake Reduction Filter
One of the most frustrating forms of blur is that caused by camera motion. Whether it’s a slight tremor during a long exposure or an accidental nudge, motion blur can significantly degrade image quality. Photoshop’s Shake Reduction filter, found under Filter > Sharpen > Shake Reduction, is specifically designed to intelligently analyze and correct blurring caused by various types of camera motion, including linear, arc-shaped, rotational, and zigzag movements.
How it works:
- Automatic Analysis: When you apply the filter, Photoshop automatically analyzes the image to detect the nature and extent of the blur. It identifies the “shake region” and attempts to extrapolate the appropriate corrections across the entire image.
- Interactive Correction: The Shake Reduction dialog box displays the corrected image, allowing you to make further adjustments. You can refine the blur trace, increase or decrease ‘Blur Stroke Length’, and adjust ‘Smoothing’ to get the best result.
- Preview and Save: A ‘Preview’ option lets you toggle between the original and corrected versions, helping you judge the effectiveness of the applied filter. Once satisfied, save your work.
This tool is a lifesaver for digital photography where even high-resolution captures can sometimes suffer from unavoidable camera shake, helping restore clarity to what might otherwise be unusable shots. It’s an essential part of an image tools repertoire for photographers and designers alike, especially when dealing with dynamic shots or candid moments.
Selective Sharpening with the Sharpen Tool
While filters apply sharpening across entire layers or selections, the dedicated Sharpen tool allows for highly localized and precise sharpening. This brush-based tool functions by increasing contrast along the edges in the areas you paint over, mimicking the underlying mechanism of sharpening. The more you drag the tool over a specific area, the more pronounced the sharpening effect becomes.
Key aspects of using the Sharpen tool:
- Brush Control: Like other brush tools, you can select different brush tips, adjust size, hardness, and flow to precisely control where and how much sharpening is applied.
- Blending Mode & Strength: You can set the blending mode for the tool (e.g., Normal, Darken, Lighten) and adjust its ‘Strength’ to control the intensity of the sharpening.
- Sample All Layers: This option determines whether the tool sharpens based on data from all visible layers or only the active layer. Deselecting it provides more control, especially in multi-layered visual designs.
- Protect Detail: Enabling ‘Protect Detail’ helps enhance sharpness while minimizing pixelated artifacts, ensuring a smoother, more natural look. Deselecting it can yield a more dramatic effect, though with a higher risk of artifacts.
The Sharpen tool is ideal for bringing out specific details in parts of an image, like the eyes in a portrait, the texture of a rock in a landscape, or fine elements in digital art, without over-sharpening other areas that should remain smooth. It’s a fundamental tool for photo manipulation, allowing for artistic control over focus and detail.
Optimizing Your Workflow: Beyond Basic Sharpening
Effective image sharpening isn’t just about knowing which buttons to press; it’s about integrating these techniques into a broader workflow that prioritizes non-destructive editing, considers the final output, and leverages modern advancements like AI. For anyone involved in visual design, from graphic design to curating image collections, an optimized sharpening workflow ensures consistently high-quality results.
Non-Destructive Editing for Flexibility
The golden rule in Photoshop, especially for critical adjustments like sharpening, is non-destructive editing. This approach ensures that your original image data remains untouched, allowing for unlimited adjustments, modifications, or reversals without degrading the image quality.
Key practices for non-destructive sharpening:
- Smart Objects: Always convert your image layers into Smart Objects before applying filters like Unsharp Mask, Smart Sharpen, or High Pass. When applied to a Smart Object, these become Smart Filters, which can be easily edited, toggled on/off, or even removed at any time. This offers unparalleled flexibility to fine-tune your sharpening or adapt it for different output needs.
- Duplicate Layers: For tools that are destructive (like the Sharpen tool if used directly on the background layer), create a duplicate layer (
Ctrl+JorCmd+J) before applying the effect. This way, you can always revert to the original unsharpened layer or adjust the opacity of the sharpened layer to blend the effect. - Layer Masks: Combine sharpening with layer masks to apply the effect only to specific areas of your image. For example, after applying a High Pass filter, you can add a black layer mask and then paint with a white brush on the areas you want to sharpen. This is excellent for selective sharpening, ensuring smooth areas like skies or skin remain untouched.
Embracing non-destructive editing is fundamental for professional digital photography and visual design, offering the freedom to experiment and perfect your images without commitment.
Integrating Sharpening into Your Digital Photography Process
Sharpening should typically be one of the last steps in your photo editing workflow. Applying it too early can amplify noise, color aberrations, or other imperfections that you would otherwise correct. A general workflow might look like this:
- Basic Adjustments: Crop, straighten, adjust exposure, contrast, white balance, and color.
- Retouching/Cleaning: Remove dust spots, blemishes, or unwanted objects.
- Local Adjustments: Apply dodge and burn, or make selective color/tone adjustments.
- Noise Reduction: If necessary, apply noise reduction before sharpening. Sharpening can exacerbate noise, so addressing it beforehand is crucial.
- Sharpening: Apply your chosen sharpening technique.
- Final Output Adjustments: Resize, convert color profiles, and apply any final output-specific sharpening (e.g., slight additional sharpening for print).
This structured approach ensures that each step complements the others, leading to optimal results for all your image types, from nature backgrounds to abstract art, contributing to high-resolution quality.
Exploring AI-Powered Alternatives for Enhanced Clarity
While Photoshop remains the industry standard, the landscape of image tools is rapidly evolving, with AI-driven solutions offering new ways to enhance clarity and sharpness. Platforms like Tophinhanhdep.com increasingly integrate AI upscalers and optimizers that can complement or even offer alternatives to traditional Photoshop sharpening, especially for complex blur cases or when speed is a priority.
- AI Upscalers: For images that are inherently low-resolution or significantly blurry, AI upscalers can intelligently add detail and resolution, often making them more amenable to conventional sharpening afterwards. This can be a game-changer for older photos or images intended for larger prints or high-resolution displays.
- AI Sharpening Tools: Some AI tools offer “one-click” solutions for sharpening, leveraging machine learning to identify and enhance edges while intelligently suppressing noise. These can be particularly beneficial for beginners or for those seeking a quick workflow for large batches of stock photos.
- Motion Blur Correction: Advanced AI tools can often perform more sophisticated motion blur correction than traditional filters, analyzing patterns and reconstructing details with remarkable accuracy, making even seemingly unsalvageable photos usable.
For photographers and designers seeking creative ideas and efficient workflows, exploring these cutting-edge image tools on platforms like Tophinhanhdep.com can unlock new possibilities, especially when combining the meticulous control of Photoshop with the intelligent automation of AI. Whether you’re aiming for trending styles or creating unique digital art, the integration of these tools can help you achieve unprecedented levels of clarity and visual impact.
Conclusion
Sharpening an image in Photoshop is a fundamental skill for anyone passionate about digital photography and visual design. It’s a nuanced process that, when executed correctly, can dramatically enhance the impact and perceived quality of your images, transforming soft captures into stunning, high-resolution masterpieces. We’ve explored a range of powerful tools, from the versatile Unsharp Mask and the intelligent Smart Sharpen to the precise High Pass filter and the specialized Shake Reduction filter, not to mention the direct control offered by the Sharpen tool.
Remember that the key to successful sharpening lies in moderation, understanding the underlying principles, and adopting a non-destructive workflow using Smart Objects and layer masks. By carefully balancing the ‘Amount’, ‘Radius’, and ‘Threshold’ settings, or by selecting the perfect ‘Radius’ and blending mode for the High Pass filter, you can achieve remarkable clarity without introducing unwanted artifacts or noise.
Furthermore, as the world of image tools continues to advance, incorporating AI-powered solutions available on platforms like Tophinhanhdep.com can provide complementary or alternative methods, especially for challenging scenarios or when striving for efficiency. Whether you are enhancing beautiful photography for an aesthetic collection, preparing high-resolution stock photos, or refining intricate digital art for visual design projects, mastering these sharpening techniques will undoubtedly elevate your work. Good luck in your journey to creating images that are not just seen, but truly felt.