How to Make an Image Smaller in Photoshop: A Tophinhanhdep.com Guide

In the vibrant world of digital imagery, where every pixel counts, the ability to effectively manage and manipulate image sizes is an indispensable skill. For creators, photographers, and designers contributing to or leveraging platforms like Tophinhanhdep.com—a hub for captivating Images ranging from Wallpapers and Backgrounds to Aesthetic, Nature, Abstract, Sad/Emotional, and Beautiful Photography—mastering the art of image resizing in Adobe Photoshop is not just an advantage, it’s a necessity. Whether you’re preparing a stunning High Resolution landscape for a desktop wallpaper, optimizing a stock photo for web display, or crafting intricate digital art for a visual design project, understanding how to make an image smaller without compromising its visual integrity is paramount.
Incorrect resizing can lead to pixelated, blurry, or stretched visuals, diminishing the impact of even the most breathtaking photography. Conversely, a perfectly resized image enhances user experience by ensuring faster load times on websites, fitting seamlessly into various layouts, and maintaining crisp detail across different mediums. This comprehensive guide will walk you through the essential Photoshop techniques for resizing, from basic dimension adjustments to advanced layer transformations, and critically, how to preserve your image’s quality using Smart Objects—a feature every serious Tophinhanhdep.com contributor should understand. We’ll also explore how these techniques integrate with the broader goals of visual design, image optimization, and creative workflows, ensuring your contributions to platforms like Tophinhanhdep.com always shine.
![]()
Essential Methods for Resizing Images in Adobe Photoshop
Photoshop offers a variety of tools to adjust the size of your images, catering to different needs from quick adjustments for web uploads to precise manipulations for print. For Tophinhanhdep.com users dealing with an array of beautiful photography and visual design elements, these fundamental methods are your starting point.
How to Resize an Image in Photoshop
Resizing an image fundamentally means changing its pixel dimensions, which in turn affects its file size and physical output size. For sharing on Tophinhanhdep.com as captivating backgrounds or aesthetic images, efficient resizing is crucial for balancing visual quality with performance. Smaller file sizes mean faster loading pages and a smoother browsing experience for users admiring your work. When you approach resizing, it’s not just about shrinking; it’s about smart reduction. Simply stretching or compressing an image often leads to a degraded, pixelated, or blurry result. Instead, Tophinhanhdep.com recommends utilizing Photoshop’s dedicated image-editing features, which provide the control needed to maintain image quality.
Before diving into the resizing process, always consider making a backup of your original image. This simple step ensures that your high-resolution digital photography remains untouched, allowing you to return to it if needed without any destructive edits. For an extensive collection like Tophinhanhdep.com’s thematic collections, preserving original files is a best practice.
Using the Crop Tool
One of the most straightforward ways to effectively “make an image smaller” is by using Photoshop’s Crop tool. This method is particularly useful when you want to remove unwanted peripheral areas of an image, thereby reducing its overall dimensions and, consequently, its file size. For a stunning nature photo or an abstract composition on Tophinhanhdep.com, judicious cropping can also enhance the visual impact by focusing on the most compelling elements.
To use the Crop Tool:
- Open your image in Photoshop.
- Select the Crop tool from the Tools panel (it often looks like two intersecting right angles).
- Click and drag across the image to define the area you want to keep. Alternatively, you can use the crop handles (the small squares on the corners and sides of the selection box) to adjust the cropping area.
- Once satisfied with your selection, press Enter (Windows) or Return (Mac) on your keyboard, click the checkmark in the Options Bar at the top, or click outside the image area to apply the crop.
- After cropping, click File > Save As to save your image with a new file name, preserving your original.

This method is excellent for refining the composition of your images, whether they are destined for beautiful photography collections or as aesthetic elements in visual design.
Using the Resizing Tool
For precise control over an image’s dimensions, Photoshop’s “Image Size” dialog box is the primary tool. This allows you to specify exact pixel dimensions or adjust by percentage, making it indispensable for preparing images for various uses on Tophinhanhdep.com, from web backgrounds to print-ready art.
To resize using the Image Size dialog box:
- Open your image in Photoshop.
- Navigate to Image > Image Size from the menu bar at the top of the screen. This will open the Image Size dialog box, displaying your image’s current dimensions and resolution.
- Adjust the sizing options:
- Fit To: This dropdown offers preset dimensions for common uses, such as web, print, or mobile device screens. It can be a quick way to achieve a standard size.
- Width and Height: You can directly input new values for the width and height. By default, these values are linked. It is highly recommended to keep the “Constrain Proportions” (link icon) enabled. This ensures that as you change one dimension (e.g., width), the other (height) automatically adjusts to maintain the original aspect ratio. This prevents your nature wallpapers or aesthetic backgrounds from appearing stretched or squashed, preserving the integrity of your digital photography.
- Resolution: This refers to the number of pixels per inch (PPI) or per centimeter. While changing resolution affects print size, for screen display, pixel dimensions are more critical. Lowering the resolution for web images can significantly reduce file size, which ties into Tophinhanhdep.com’s need for optimized image tools.
- You can also choose to resize by Percent instead of pixels from the dropdown menus next to the Width and Height fields. This allows you to scale the image proportionally by a percentage of its current size (e.g., 50% to make it half the size, 200% to double it).
- If your image contains layers with applied styles (like drop shadows or strokes), click the gear icon in the top-right of the Image Size window and ensure “Scale Styles” is checked. This will scale the layer effects along with the image, maintaining visual consistency for your graphic design elements or photo manipulation projects.
- Click OK to apply the changes.
- Finally, go to File > Save As to save your resized image under a new name, protecting your original high-resolution file. This practice is crucial for Tophinhanhdep.com users who frequently reuse and adapt images.
Resizing an Object Using Free Transform
Beyond resizing the entire canvas, Photoshop allows for precise control over individual layers or objects within an image using the Free Transform function. This is incredibly useful for creative ideas, photo manipulation, and digital art projects featured on Tophinhanhdep.com, where you might need to scale a single element to fit a larger composition or adjust its size relative to other elements.
To use Free Transform:
- Select the layer containing the object you wish to resize in the Layers panel.
- Go to Edit > Free Transform in the menu bar, or use the convenient keyboard shortcut: Ctrl+T (Windows) or Command+T (Mac). A bounding box with corner and side handles will appear around your selected object.
- To scale proportionally: Click and drag any of the corner handles while holding down the Shift key. This maintains the aspect ratio, preventing distortion. You can also ensure the Maintain Aspect Ratio link icon is activated in the Options Bar at the top of the screen.
- To scale non-proportionally: If the link icon is deselected, you can drag side handles to change width or height independently, though this is generally not recommended for organic objects as it can cause stretching.
- Manual Percentage Input: In the Options Bar, you can also enter exact Width (W) and Height (H) percentages to precisely scale your object. Again, ensure the aspect ratio link is active for proportional scaling.
- Once you have achieved the desired size, press Enter (Windows) or Return (Mac) to apply the transformation.
This method offers quick and flexible resizing for individual components of your visual designs, allowing for dynamic photo manipulation and arrangement of elements in aesthetic and thematic collections on Tophinhanhdep.com.
Advanced Transformations: Shaping Your Visual Content
While simple scaling is essential, Photoshop’s Transform features extend far beyond mere size adjustments. They enable sophisticated manipulation of objects, allowing Tophinhanhdep.com users to craft truly unique visual designs, digital art, and photo manipulations. These sub-options offer creative control to alter perspective, skew angles, distort shapes, and even warp images to fit intricate creative ideas.
Resizing an Object Using Transform Sub-options
The Edit > Transform menu (which can also be accessed by right-clicking on a Free Transform bounding box) offers a suite of powerful sub-options that move beyond basic scaling:
- Rotate: This allows you to turn an object around a fixed reference point. Move your pointer outside the bounding box, and it will turn into a curved, two-sided arrow. Drag to rotate. Holding Shift while rotating constrains the rotation to 15-degree increments, perfect for precise angular adjustments in graphic design.
- Skew: Use this to slant an object vertically or horizontally. Drag a side handle while holding Ctrl (Windows) or Command (Mac) to distort the object along its axes, creating dynamic angles for abstract images or creative layouts.
- Distort: This option gives you full control over stretching an object in all directions. By dragging the corner handles, you can manipulate the object’s shape freely, making it invaluable for fitting elements into unusual compositions or correcting perspective issues in digital photography. Holding Ctrl (Windows) or Command (Mac) while dragging a corner handle in Free Transform mode temporarily activates Distort mode.
- Perspective: Apply a one-point perspective effect to an object, making it appear to recede or advance in space. Drag a corner handle, and the opposite corner will move in tandem, allowing you to quickly create depth for backgrounds or elements in a visual design. For quick access, hold Shift+Ctrl+Alt (Windows) or Shift+Command+Option (Mac) and drag a corner handle in Free Transform mode.
- Warp: This is perhaps the most advanced of the transformation tools, allowing for detailed, non-linear manipulation of an object’s shape using a mesh grid. When activated, a mesh appears over the image, and you can drag control points, lines, or areas within the mesh to bend, twist, and mold the object. This is a powerful tool for complex photo manipulation, digital art, and creating unique aesthetic effects for Tophinhanhdep.com’s diverse image collections.
These advanced transformation capabilities provide artists and designers on Tophinhanhdep.com with the flexibility to realize their most ambitious creative ideas, turning simple images into compelling visual narratives or intricate digital masterpieces.
Preserving Image Quality: The Power of Smart Objects
For Tophinhanhdep.com, which prides itself on High Resolution, Beautiful Photography, and captivating Visual Design, maintaining image quality during resizing is paramount. Standard resizing methods can often lead to irreversible damage to your pixels. This is where Photoshop’s Smart Objects become an invaluable asset, offering a non-destructive workflow that protects your original image data.
Resize Images Without Losing Quality with Photoshop Smart Objects
When you regularly work with images for Tophinhanhdep.com, whether it’s for wallpapers, backgrounds, or detailed photo manipulation, you’ll frequently need to scale elements up and down. Traditional pixel-based resizing, often referred to as destructive editing, permanently discards pixel information when an image is scaled down. This means if you later decide to scale that image back up, Photoshop has to guess at the missing data, resulting in a blurry, blocky, or pixelated mess.
Smart Objects fundamentally change this process. A Smart Object acts as a container for your image, preserving all of its original pixel data, regardless of how much you scale it within your Photoshop document. Any transformations you apply—be it scaling, rotating, skewing, or warping—are applied to the Smart Object container itself, not the embedded image data. This non-destructive approach is vital for maintaining the pristine quality of your digital photography and ensuring that every aesthetic detail remains sharp and crisp, even after multiple resizing operations. For Tophinhanhdep.com’s focus on high-quality visual content, understanding and utilizing Smart Objects is a cornerstone of professional image editing.
To convert a layer to a Smart Object:
- Select the desired layer in the Layers panel.
- Right-click (Windows) or Control-click (Mac) on the layer.
- Choose “Convert to Smart Object” from the context menu. A small icon will appear in the layer thumbnail, indicating it’s now a Smart Object.
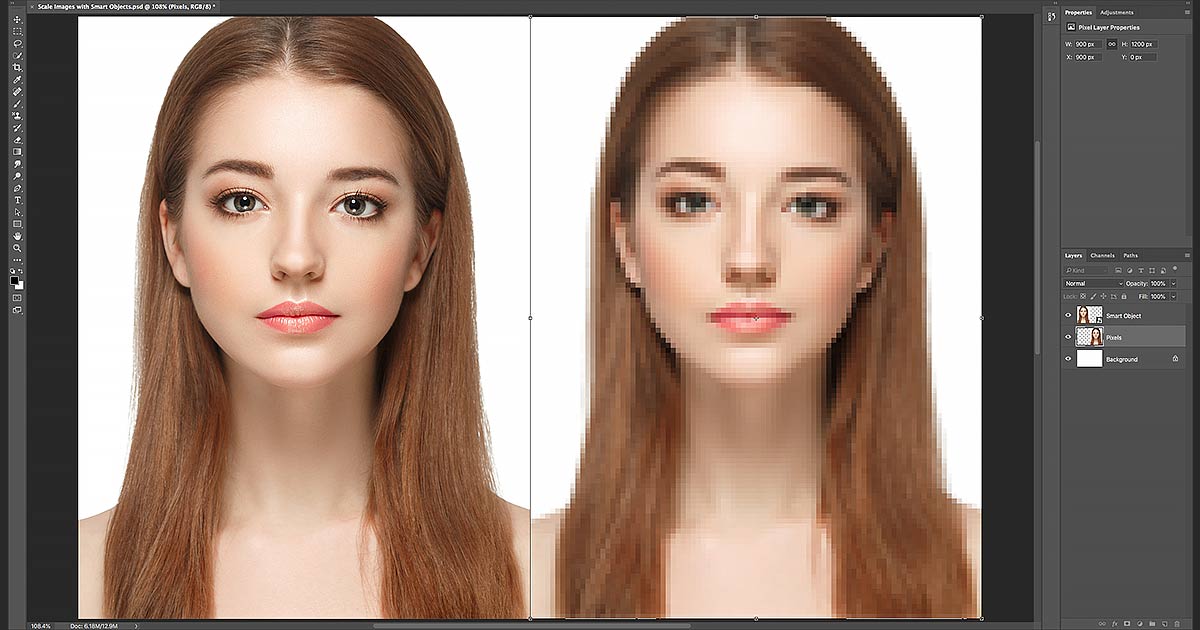
Resizing images vs smart objects in Photoshop
Let’s conduct a conceptual side-by-side comparison to illustrate the critical difference between resizing a standard pixel-based image and a Smart Object. This will highlight why Smart Objects are indispensable for Tophinhanhdep.com users prioritizing image quality and flexible editing.
Imagine you have a stunning high-resolution photograph destined for Tophinhanhdep.com, maybe a vibrant nature scene or an intricate piece of abstract art.
Downscaling the image
First, consider a pixel-based layer. If you take this image and scale it down significantly—say, to 10% of its original size—Photoshop will throw away 90% of its pixels. This is a destructive edit. The image will look fine at this small size, but the actual data has been irrevocably reduced. The moment those pixels are discarded, the detail they represented is gone forever.
Now, imagine the same operation with a Smart Object. When you scale a Smart Object down to 10%, Photoshop doesn’t discard any pixels from the original embedded image. Instead, it scales the container that holds the image. The image within the container remains at its full, original resolution, hidden from view but perfectly preserved. Both versions appear identical when downscaled, but their underlying data integrity is vastly different.
Upscaling the smart object
Here’s where the true power of Smart Objects becomes evident. Let’s take both the downscaled pixel-based image and the downscaled Smart Object and try to scale them back up to, for example, 50% of their original size (which would be 500% of their current downscaled size).
-
Upscaling the Pixel-Based Image: When you attempt to enlarge the pixel-based image, Photoshop has to stretch the remaining 10% of pixels. It cannot magically recreate the detail that was discarded during downscaling. The result is typically a soft, blurry, and blocky image, clearly lacking the crispness and detail of the original. This degradation makes the image unsuitable for high-quality display on Tophinhanhdep.com or for any serious visual design work.
-
Upscaling the Smart Object: In stark contrast, when you scale the Smart Object back up, Photoshop accesses the original, full-resolution image data that was safely stored within its container. The image is rendered from this pristine source, meaning it will appear just as crisp and sharp as it did at its original size, only now at 50%. The Smart Object has survived the downscaling and upscaling without a single scratch to its image quality.
This ability to non-destructively resize is why Smart Objects are indispensable for Tophinhanhdep.com users. You can experiment with different sizes for mood boards, test various layouts for digital art, or adapt beautiful photography for multiple thematic collections without ever worrying about diminishing the source quality. This flexibility not only streamlines your workflow but also ensures that your high-resolution images remain versatile assets for any future editing styles or creative ideas.
A crucial point to remember: while Smart Objects protect quality during scaling down and back up to their original size, they do not magically create new detail. If you attempt to upscale a Smart Object beyond its original dimensions, you will still encounter pixelation and blur, just like with a regular pixel layer. The advantage of a Smart Object lies in preserving the original quality, not in generating new information where none existed. Therefore, always start with the highest resolution image possible for your Tophinhanhdep.com projects.
Practical Applications and Best Practices for Tophinhanhdep.com Users
The mastery of image resizing in Photoshop directly impacts the quality and efficiency of content created for platforms like Tophinhanhdep.com. From optimizing stunning wallpapers to preparing assets for intricate graphic design, these skills are foundational.
Optimizing Images for Tophinhanhdep.com: Web, Print, and Creative Assets
For Tophinhanhdep.com, a platform showcasing diverse images and photography, precise resizing is not just a technicality; it’s a strategic move to enhance user experience and content versatility.
- Web-Optimized Wallpapers and Backgrounds: High-resolution wallpapers and aesthetic backgrounds look fantastic, but large file sizes can slow down page loading, leading to user frustration. By carefully resizing images to appropriate web dimensions (e.g., 1920x1080 pixels for full HD desktop wallpapers, or specific dimensions for mobile backgrounds) and then saving them efficiently, you ensure quick loading times. This resizing process is a critical first step before utilizing other Tophinhanhdep.com Image Tools like Compressors and Optimizers to further reduce file size without perceptible quality loss.
- Social Media & Trending Styles: Each social media platform has recommended image dimensions and aspect ratios. Resizing your beautiful photography or digital art to these specifications ensures your images are displayed correctly, without awkward cropping or quality degradation. This attention to detail is crucial for creating impactful visual content that aligns with trending styles and captures audience attention.
- Print-Ready Photography and Digital Art: For physical prints, resolution becomes paramount. While a web image might be 72 PPI, a high-quality print often requires 300 PPI. Resizing for print involves adjusting both pixel dimensions and resolution. Ensuring your high-resolution images are scaled correctly for print means your digital art and beautiful photography maintain their crispness and detail when brought to life off-screen.
- Stock Photos & Thematic Collections: When curating stock photos or assembling thematic collections, images often come in varying sizes. Resizing them consistently creates a cohesive look and feel. Smart Objects are particularly useful here, allowing you to scale individual elements within a collage or collection repeatedly without harming the original quality, providing immense flexibility for photo ideas and mood boards.
Saving your resized images correctly is the final step. Use File > Save As to create a new file, selecting an appropriate format (JPEG for photos, PNG for images with transparency) and quality settings to balance file size with visual fidelity.
Enhancing Creative Workflows with Efficient Resizing
Efficient resizing techniques are not merely about making an image smaller; they are about empowering your creative workflow for graphic design, digital art, and photo manipulation projects on Tophinhanhdep.com.
- Graphic Design & Photo Manipulation: In complex projects involving multiple layers and elements, objects often need to be resized to fit. Whether it’s integrating a small aesthetic icon into a large banner or adjusting a background element for perspective, understanding Free Transform and its sub-options allows for fluid integration. The non-destructive nature of Smart Objects means you can experiment with different sizes and arrangements of elements in your digital art without committing to a final pixel count until the very end.
- Iterative Design & Editing Styles: When exploring different editing styles or visual design iterations for a single image, Smart Objects offer unparalleled freedom. You can apply various effects, scale the image, and then change your mind and re-scale it without quality loss. This iterative process is invaluable for finding the perfect look for your photography or digital art.
- Keyboard Shortcuts for Speed: As highlighted earlier, learning Photoshop’s keyboard shortcuts for resizing and transformations (e.g., Ctrl/Cmd+T for Free Transform, holding Shift for proportional scaling) significantly speeds up your workflow. For busy creators managing diverse image collections and visual design projects for Tophinhanhdep.com, every second saved counts. Incorporating these shortcuts into your routine makes complex manipulations feel intuitive and efficient.
By integrating these resizing strategies, Tophinhanhdep.com contributors can manage their images and visual content with greater precision, speed, and creative freedom, ensuring that every piece of digital photography and graphic design meets the highest standards of quality.
Conclusion
Mastering how to make an image smaller in Photoshop is more than a technical skill; it’s a fundamental aspect of digital image management and creative excellence, especially for platforms like Tophinhanhdep.com. From the straightforward adjustments offered by the Image Size dialog box and Free Transform to the indispensable quality preservation capabilities of Smart Objects, Photoshop provides a comprehensive toolkit for every visual need.
By understanding the differences between destructive and non-destructive editing, and by strategically employing tools like the Crop Tool and Transform Sub-options, Tophinhanhdep.com users can confidently prepare their images for any purpose—be it for breathtaking wallpapers, engaging social media aesthetics, precise graphic design, or high-fidelity print outputs. These techniques not only optimize your images for performance but also safeguard their intrinsic quality, ensuring your high-resolution photography and digital art always look their best. Embrace these methods to elevate your contributions to Tophinhanhdep.com, transforming your photo ideas into impactful visual designs that resonate with viewers and maintain their crispness across every screen and medium.