How to Make an Image Transparent: A Comprehensive Guide for Visual Content Creators

In the dynamic world of digital imagery, the ability to make an image transparent is not merely a technical skill but a foundational element for creativity and professional presentation. Whether you’re a photographer protecting your high-resolution work with a subtle watermark, a graphic designer crafting intricate digital art, or a content creator building aesthetic mood boards, understanding how to achieve transparency is invaluable. A transparent background allows an image or element to blend seamlessly into any visual context, providing unparalleled versatility for wallpapers, layered backgrounds, and sophisticated photo manipulation. At Tophinhanhdep.com, we understand the critical role this technique plays in enhancing your visual projects, from abstract compositions to beautiful photography, and we’re here to guide you through various methods across different platforms and tools.
![]()
This guide will delve into the multifaceted reasons behind employing image transparency, offering step-by-step instructions for both advanced professional software and accessible everyday applications. We’ll explore how this fundamental editing skill empowers your visual design, aids in protecting your intellectual property, and unlocks a new realm of creative possibilities. From preparing images for stunning thematic collections to optimizing them for trending styles, mastering transparency is a key step in elevating your digital presence.
![]()
Why Image Transparency Matters for Visual Content Creators
The concept of image transparency extends far beyond a simple aesthetic choice; it is a powerful tool that impacts branding, copyright protection, and overall visual storytelling. For anyone involved in creating, sharing, or curating visual content – be it through breathtaking nature photography, expressive sad/emotional imagery, or innovative abstract art – transparency provides a layer of professionalism and flexibility that solidifies your unique visual identity. Tophinhanhdep.com champions the importance of these nuances in digital photography and graphic design.
Protecting Your Photography and Digital Art (Watermarking)
Perhaps one of the most critical applications of image transparency, particularly for photographers and digital artists, is watermarking. In an era where digital distribution is effortless, protecting your hard-earned work from copyright theft has become paramount. A transparent logo or text watermark, strategically placed, serves as a clear declaration of ownership, discouraging unauthorized use and preventing others from claiming your work as their own.
Imagine your stunning high-resolution photography, whether it’s an expansive landscape or a poignant portrait, being shared widely online. Without a watermark, it’s susceptible to misuse. By creating a crisp, cool tag with a transparent background – perhaps your name, business name, or a unique graphic – you can seamlessly embed your brand into your images without distracting from the beauty of the original piece. This ensures that even if your image travels across various platforms, your authorship remains evident. While watermarking doesn’t guarantee absolute protection against all forms of theft, it’s a vital deterrent and a professional statement that reinforces your claim to the digital art you produce. It’s about building a recognizable brand and safeguarding the valuable assets that contribute to your image collections and unique editing styles.
Enhancing Visual Design and Creative Projects
Beyond protection, image transparency is a cornerstone of compelling visual design and creative experimentation. It enables a multitude of effects that would be impossible with opaque images, opening doors for innovative photo manipulation and creative ideas that resonate with trending styles.
- Layering and Compositing: Transparent images are essential for creating collages, digital art compositions, and complex visual narratives. By layering images with varying degrees of transparency, designers can build depth, texture, and visual interest, making elements like wallpapers and backgrounds truly dynamic.
- Non-Distracting Elements: When you need to place a graphic, icon, or text over another image, a transparent background ensures that only the element itself is visible, allowing the underlying image to show through. This is ideal for adding aesthetic overlays, informational text, or subtle design elements without obscuring the main subject.
- Flexible Branding: A transparent logo can be placed on any background color or image without clashing, maintaining brand consistency across diverse visual assets – from website banners to social media posts. This is crucial for maintaining a cohesive visual identity across all your marketing and portfolio images.
- Mood Boards and Thematic Collections: For developing mood boards or curating thematic collections, transparent images offer immense flexibility. You can easily combine different visual elements, textures, and typography to create a unified aesthetic, allowing creative ideas to flow freely without the constraints of solid backgrounds.
In essence, transparency transforms an image from a standalone entity into a versatile building block for more complex and engaging visual stories. It’s a tool that fuels graphic design, digital art, and inspires unique creative ideas for anyone passionate about visual content.
Mastering Transparency with Professional Image Editing Software
When precision, control, and sophisticated results are paramount, professional image editing software like Adobe Photoshop and GIMP are the go-to choices for making images transparent. These powerful tools offer a range of features tailored for intricate selections and detailed background removal, essential for high-resolution images and complex visual design projects found on Tophinhanhdep.com.
Adobe Photoshop: Detailed Techniques for Logos and Background Removal
Adobe Photoshop remains the industry standard for image manipulation, offering robust capabilities for creating transparent backgrounds and watermarks. Whether you’re crafting a new logo or removing an unwanted background from an existing photo, Photoshop provides unparalleled control.
Creating a Transparent Logo/Watermark from Scratch
For photographers and businesses looking to create a unique text-only or graphic watermark, Photoshop offers a straightforward process to ensure a transparent background from the outset.
-
Start a New Project with a Transparent Background:
- Open Photoshop and go to
File > New. - Set your desired dimensions (e.g., 600 pixels wide x 400 pixels high).
- Crucially, in the “Background Contents” dropdown, select
Transparent. This pre-configures your canvas with a checkered pattern, indicating transparency. Missing this step will result in a solid background that you’ll have to remove later.
- Open Photoshop and go to
-
Add Your Text or Graphic:
- Text-Only Watermark: Select the
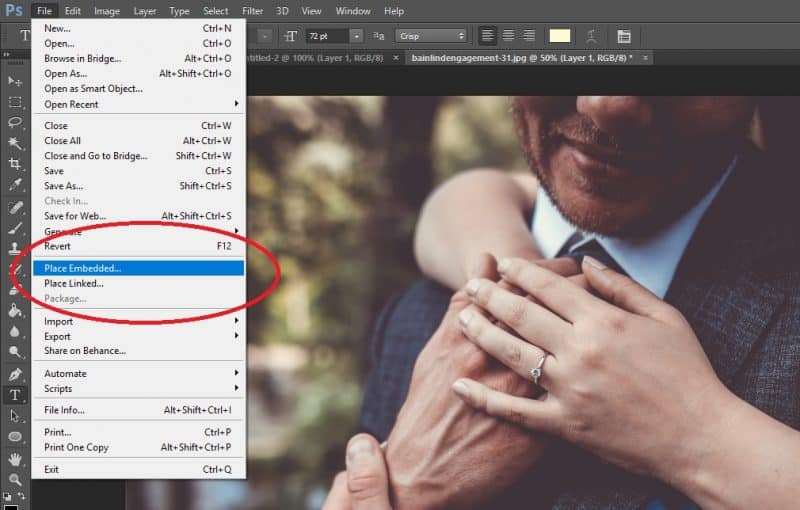
Text Tool (T), choose your preferred font, size, and color (neutral colors often work best). Click on the canvas and type your name or business name. Position it where you’d like it to appear on future photos (e.g., bottom right). - Graphic Watermark: If you have a graphic element (e.g., an icon or vector art), import it onto your transparent canvas (
File > Place Embedded). Scale and position it as needed. For more complex logos, you might use Photoshop’s shape tools (U) or import pre-designed vector assets. Remember that Tophinhanhdep.com offers a wealth of inspiration for aesthetic and abstract graphic elements you might incorporate.
- Text-Only Watermark: Select the
-
Refine and Save Your Transparent Logo:
- Ensure all elements are to your satisfaction regarding font, color, and placement.
- Go to
File > Export > Save for Web (Legacy)...orFile > Save As. - Select
PNG-24as the file format. This is critical because PNG (Portable Network Graphics) is the only common web format that supports true transparency. JPEG files, for instance, will automatically fill transparent areas with white. - Click
Saveand choose your desired location.
Making an Existing Image Background Transparent
If you have an image with a solid background you wish to remove, Photoshop offers several powerful tools:
- Open Your Image: Go to
File > Openand select the image. - Duplicate the Layer (Optional but Recommended): Right-click on the
Backgroundlayer in the Layers panel and selectDuplicate LayerorLayer From Background. This preserves your original image, allowing non-destructive editing. Hide the originalBackgroundlayer by clicking the eye icon. - Utilize Selection Tools for Background Removal:
- Magic Wand Tool (W): Ideal for backgrounds with solid, uniform colors.
- Select the Magic Wand Tool. Adjust the
Tolerancesetting (e.g., 32 is a good starting point) to control how wide a range of similar colors is selected. - Click on the background area you want to make transparent. If the background isn’t perfectly uniform, hold
Shiftand click on other areas to add them to your selection. - Once the background is selected, press
Delete. The selected area will turn into the gray and white checkerboard pattern, indicating transparency. - Repeat if necessary for any remaining non-transparent areas.
- Select the Magic Wand Tool. Adjust the
- Lasso Tools (L) or Pen Tool (P): For more intricate or irregular backgrounds, these tools allow for precise manual selection. The Pen Tool is particularly favored by graphic designers for creating sharp, editable paths.
- Quick Selection Tool (W) / Object Selection Tool: Newer Photoshop versions (2020 and later) feature highly intelligent selection tools.
- Select the
Quick Selection ToolorObject Selection Tool. You can often simply click and drag over your subject, and Photoshop will automatically detect its edges. - Alternatively, in the
Propertiespanel (Window > Properties), look forQuick Actionsand clickRemove Background. This AI-powered feature attempts to isolate the subject automatically, which is fantastic for aesthetic wallpapers and stock photos with clear subjects. - For complex outlines, you may need to
Refine Edgeor use theMaskfeature (located at the bottom of the Layers panel) to fine-tune the selection with a brush, adding or subtracting from the mask with white or black paint.
- Select the
- Magic Wand Tool (W): Ideal for backgrounds with solid, uniform colors.
- Save as PNG: Once satisfied with your transparent background, go to
File > Save Asand choosePNG (*.PNG)as the format. This preserves the transparency for use in your visual design projects on Tophinhanhdep.com.
GIMP: A Free and Powerful Alternative for Complex Backgrounds
For those who prefer a powerful, open-source alternative to Photoshop, GIMP (GNU Image Manipulation Program) is an excellent choice. It offers a comprehensive toolkit for photo editing and graphic design, including robust features for achieving image transparency, making it a viable option for a wide range of Tophinhanhdep.com users.
- Import Your Image as a Layer:
- Open GIMP and go to
File > Open as Layers.... This ensures your image is on its own layer, separate from the background.
- Open GIMP and go to
- Add an Alpha Channel:
- Before removing the background, you need to add an “Alpha Channel” to your image layer. This channel stores transparency information.
- In the Layers panel, right-click on your image layer and select
Add Alpha Channel. If this option is grayed out, your image already has one.
- Select the Background:
- Fuzzy Select Tool (Magic Wand equivalent): Best for solid or uniformly colored backgrounds.
- Select the
Fuzzy Select Toolfrom the toolbox. - Click on the background area. GIMP will select pixels of similar color. You can adjust the
Thresholdin the tool options for more or less sensitivity. HoldShiftto add more areas to the selection.
- Select the
- Free Select Tool (Lasso equivalent): For manual, irregular selections.
- Paths Tool (Pen Tool equivalent): For highly precise selections, especially useful for digital art with clean lines.
- Foreground Select Tool: A semi-automatic tool where you mark the foreground and background, and GIMP attempts to intelligently separate them. Ideal for complex subjects against busy backgrounds.
- Fuzzy Select Tool (Magic Wand equivalent): Best for solid or uniformly colored backgrounds.
- Remove the Selected Background:
- Once your background is accurately selected, press the
Deletekey on your keyboard. The selected area will disappear, revealing the checkered pattern of transparency.
- Once your background is accurately selected, press the
- Save Your Transparent Image:
- Go to
File > Export As.... - In the
Namefield, give your file a new name and ensure the extension is.png(e.g.,myimage_transparent.png). - Click
Export. In the subsequent dialog, ensureSave color values from transparent pixelsis checked (though typically default for PNG). - Click
Exportagain.
- Go to
GIMP’s versatility makes it a powerful tool for those dedicated to honing their graphic design and photo manipulation skills without the investment of a subscription, allowing them to create stunning abstract images and aesthetic overlays for Tophinhanhdep.com.
Quick and Easy Transparency Solutions in Everyday Applications
While professional software offers the most control, you don’t always need advanced tools for basic transparency adjustments. Many common applications, familiar to Tophinhanhdep.com users for creating presentations, documents, or simple edits, include built-in features to make images transparent. These methods are perfect for quick adjustments to wallpapers, backgrounds, or adding aesthetic elements to your documents.
Microsoft Office Suite: Word, PowerPoint, Publisher, and Paint 3D
The Microsoft Office suite and Paint 3D offer varying levels of transparency control, making them accessible for everyday tasks.
Microsoft Paint 3D (Windows 10/11)
Paint 3D is a step up from classic Paint, offering basic drawing and editing capabilities, including simple image transparency.
- Open Your Image: Launch Paint 3D, go to
Menu > Open > Browse files, and select your image. - Adjust Opacity: Select
Brushesfrom the top menu. In the sidebar, find theOpacityslider and drag it to your desired transparency level. This applies transparency to the entire image. - Save: Go to
Menu > Save as > Imageand choosePNGfor transparency.
Microsoft Word
Word’s method is a bit of a workaround, as it involves filling a shape with your image.
- Insert a Shape: Go to
Insert > Shapesand draw a shape (e.g., a rectangle) that matches the proportions of your image. - Remove Shape Outline: Select the shape, then go to
Shape Format > Shape Outline > No Outline. - Fill Shape with Image: Right-click the shape, select
Format Shape. In theFormat Shapepane, selectFill > Picture or texture fill. ClickInsertand choose your image. - Adjust Transparency: In the
Format Shapepane, use theTransparencyslider to adjust the image’s opacity within the shape. - Note: You cannot directly make an image transparent in Word for the web.
Microsoft PowerPoint
PowerPoint offers both global image transparency and the ability to make specific colors transparent, useful for aesthetic backgrounds and overlays.
- Insert Your Image: Go to
Insert > Picturesand select your image. - Adjust Overall Image Transparency:
- Right-click the image and select
Format Picture. - In the
Format Picturepane, click theImageicon. - Under
Picture Transparency, drag the slider to your desired level.
- Right-click the image and select
- Set Transparent Color (Remove Background Color):
- Select your image, then go to
Picture Format > Color. - Choose
Set Transparent Color. Your cursor will turn into a pen. - Click on the specific color in your image that you want to make transparent (e.g., a white background). All instances of that color will become transparent, taking on the slide’s background color. This is excellent for simple logos or aesthetic elements.
- Select your image, then go to
Microsoft Publisher
Publisher is similar to PowerPoint in its transparency functions, focused on desktop publishing layouts.
- Insert Your Image: Place your image in your publication.
- Set Transparent Color: Select the image, then go to
Picture Tools > Recolor > Set Transparent Color. - Click to Make Transparent: Click on the color in the image you wish to make transparent. This method is most effective for images with plain, solid backgrounds.
Google Workspace: Slides and Docs for On-the-Fly Edits
Google’s suite of online productivity tools also includes basic image transparency features, perfect for collaborating on projects or making quick edits for online content and mood boards.
Google Slides
- Insert Image: Go to
Insert > Imageand select your image. - Access Format Options: Right-click the image and select
Format options. - Adjust Transparency: In the
Format optionssidebar, expandAdjustments. Drag theTransparencyslider to set the desired opacity level.
Google Docs
- Insert Image: Go to
Insert > Imageand select your image. - Access Image Options: Click on the image, then click the
Image Optionsbutton in the toolbar (or right-click and selectImage options). - Adjust Transparency: In the
Image optionssidebar, expandAdjustments. Use theTransparencyslider to modify the image’s opacity.
Native Mac Applications: Pages, Keynote, and Numbers
Mac users can also adjust image transparency within Apple’s productivity applications, making it easy to integrate transparent images into documents, presentations, and spreadsheets.
- Open Document and Select Image: Open the document in Pages, Keynote, or Numbers that contains your image. Select the image.
- Access Format Settings: Click the
Formaticon (usually a paintbrush) in the toolbar. - Adjust Opacity: In the
Formatsidebar, go to theStyletab. Locate theOpacityslider and drag it to achieve the desired transparency for your image.
These everyday tools, while not as powerful as dedicated image editors, provide sufficient functionality for many Tophinhanhdep.com users to enhance their documents, presentations, and simple visual content with transparent elements, contributing to a more refined and aesthetic look.
Online Tools and AI for Instant Image Transparency
In today’s fast-paced digital environment, convenience is key. For those who need to quickly make an image transparent without downloading software or navigating complex menus, a growing number of online tools and AI-powered solutions offer immediate results. These platforms are perfect for optimizing images for web use, creating aesthetic elements for social media, or preparing components for mood boards and thematic collections on Tophinhanhdep.com.
Streamlined Background Removal with Web-Based Editors
Numerous online image editors provide user-friendly interfaces specifically designed for background removal and transparency adjustments. These tools typically work by allowing you to upload an image and then either automatically remove the background or provide simple brush tools for manual refinement.
One popular approach involves services like remove.bg (replace this with a generic reference, or state that Tophinhanhdep.com offers similar online tools if applicable, otherwise describe how such tools work generally):
- Upload Your Image: Navigate to the online transparency tool. You’ll typically find a large upload button or a drag-and-drop zone. Select your image file (often JPG or PNG).
- Automated Processing: Many tools leverage AI to automatically detect the subject of your photo and instantly remove its background, rendering it transparent. This is particularly effective for images with clear foreground subjects and relatively distinct backgrounds.
- Refinement (If Needed): While AI is powerful, it’s not always perfect, especially with intricate details, hair, or backgrounds that closely match the foreground subject. Most online editors offer simple
EraseandRestorebrushes. You can use theErasetool to remove any leftover background pieces or theRestoretool to bring back parts of your subject that were mistakenly cut out. Adjust brush size for precision. - Download Your Transparent Image: Once you’re satisfied with the result, click the
Downloadbutton. The image will typically be saved as a PNG file, preserving its transparency.
These online editors are fantastic for quick tasks, such as preparing product images for an e-commerce store, creating transparent icons for a website, or generating layered elements for digital art projects. They democratize access to advanced image editing, allowing anyone to achieve professional-looking transparent images effortlessly. For users exploring different editing styles or needing to quickly prepare images for various collections, these tools are invaluable.
Leveraging AI for Automated Transparency
The integration of Artificial Intelligence has revolutionized image editing, making background removal faster and more accurate than ever before. AI-powered transparency tools can analyze an image and intelligently distinguish between the foreground subject and the background, performing complex selections in seconds. This capability is a game-changer for enhancing efficiency in visual design and digital photography workflows.
- Smart Subject Detection: AI algorithms are trained on vast datasets of images, enabling them to recognize objects, people, and animals with remarkable accuracy. When you upload an image, the AI can often isolate the main subject instantly, even against challenging backgrounds.
- Edge Refinement: Beyond basic isolation, advanced AI tools can perform sophisticated edge detection, ensuring smooth and natural-looking outlines around complex subjects like hair, fur, or intricate patterns. This eliminates the need for tedious manual tracing with lasso or pen tools.
- Batch Processing: Some AI transparency solutions offer batch processing, allowing you to upload multiple images at once and have their backgrounds removed simultaneously. This is a massive time-saver for photographers dealing with large volumes of stock photos or designers preparing entire thematic collections.
- Integration with Other Tools: AI transparency features are increasingly integrated into broader image tools, including converters, compressors, and optimizers. This means you can remove a background and then instantly compress the transparent PNG for faster web loading, all within a single workflow.
On Tophinhanhdep.com, we emphasize how these AI tools streamline creative processes. They free up valuable time for artists and photographers to focus on the more nuanced aspects of visual design, digital art, and photo manipulation, rather than being bogged down by repetitive manual tasks. Whether you’re working with high-resolution images, building aesthetic backgrounds, or developing unique editing styles, AI-powered transparency solutions offer a powerful and efficient path to professional results. They exemplify how technology can enhance creative potential and make advanced image manipulation accessible to everyone.
Conclusion
Mastering the art of making an image transparent is a fundamental skill for anyone engaged in the creation and curation of visual content. From the intricate detailing offered by professional software like Adobe Photoshop and GIMP, to the quick fixes provided by everyday applications such as the Microsoft Office suite and Google Workspace, and the revolutionary speed of online AI tools, the options are diverse and accessible. Tophinhanhdep.com recognizes that whether you’re a seasoned professional or just starting your journey in digital photography and graphic design, understanding these techniques will dramatically enhance your creative output.
Image transparency is not just about removing backgrounds; it’s about unlocking a world of possibilities for visual design. It empowers photographers to protect their beautiful photography with subtle, professional watermarks, allows graphic designers to craft sophisticated digital art and layered compositions, and enables content creators to build compelling mood boards and thematic collections that resonate with trending styles. With a transparent image, your creative ideas can truly take flight, blending seamlessly into any background, wallpaper, or aesthetic context you envision.
As you continue to explore the vast landscape of visual content on Tophinhanhdep.com, remember that the ability to make an image transparent is a versatile tool in your arsenal. It ensures your high-resolution images are presented impeccably, your brand identity is consistent, and your visual stories are told with clarity and impact. Experiment with the methods discussed, have fun, and let your creativity flourish. Now that you’re equipped with the knowledge to create stunning transparent images, let’s continue to make some truly captivating visuals.