Mastering Transparency: A Comprehensive Guide to Making Images and Shapes Transparent in Google Slides with Tophinhanhdep.com

In today’s visually-driven world, presentations are no longer just about conveying information; they’re about captivating your audience, telling a compelling story, and leaving a lasting impression. Google Slides has emerged as a powerhouse tool for creating dynamic and engaging presentations, offering a wealth of features for visual enhancement. Among these, the ability to manipulate image and shape transparency stands out as a fundamental skill for any aspiring designer or presenter.
Transparency, often referred to as opacity, allows you to control the visibility of an element, making it more or less see-through. This seemingly simple adjustment unlocks a universe of creative possibilities, transforming ordinary slides into visually stunning narratives. Whether you’re aiming for a subtle background overlay, a polished graphic element, or a seamlessly integrated collage, mastering transparency is key.
At Tophinhanhdep.com, we understand the profound impact of high-quality visuals. Our platform is dedicated to empowering users with an extensive library of premium images, cutting-edge photography tools, and invaluable visual design resources. From breathtaking wallpapers and aesthetic backgrounds to high-resolution stock photos and advanced AI upscalers, Tophinhanhdep.com provides everything you need to bring your creative visions to life. This guide will walk you through the essential techniques for making images and shapes transparent in Google Slides, while also highlighting how Tophinhanhdep.com’s resources can elevate your design process.
The Art of Visual Storytelling: Why Image Transparency Matters in Google Slides
Visuals are the cornerstone of effective communication. Studies consistently show that a significant portion of the population are visual learners, processing information more efficiently and retaining it longer when presented graphically. In the realm of presentations, images are not mere decorations; they are powerful tools for engagement, comprehension, and emotional connection. However, the indiscriminate use of images can sometimes hinder rather than help, leading to cluttered slides, illegible text, and a distracted audience. This is where transparency becomes an indispensable design principle.

Elevating Your Presentation Aesthetics
The strategic application of image transparency can dramatically enhance the aesthetic appeal of your Google Slides presentations. Imagine a delicate nature scene, an abstract swirl, or a beautiful piece of photography – found within Tophinhanhdep.com’s curated collections – used as a subtle backdrop. By adjusting its transparency, you can transform a dominant image into a supportive atmospheric element, setting the mood without overwhelming your primary content.
This technique is particularly effective for creating an “aesthetic” presentation, leveraging “wallpapers” and “backgrounds” from Tophinhanhdep.com that evoke specific feelings or themes. A transparent overlay allows your text and foreground elements to pop, while the underlying image adds depth, texture, and visual interest. It’s about achieving balance and sophistication, turning your slides into a cohesive work of “digital art.” Our extensive “image inspiration & collections” on Tophinhanhdep.com offer countless “photo ideas” and “thematic collections” that, when combined with transparency, can create stunning “mood boards” and “trending styles” for your presentations.
![]()
Enhancing Text Legibility and Visual Hierarchy
One of the most practical applications of transparency is improving text legibility. Often, a vibrant, high-resolution image, while beautiful, can make overlaid text difficult to read due to conflicting colors and intricate details. By making the background image transparent, you create a softer, more subdued backdrop that allows your essential information to stand out clearly. This is a crucial aspect of “graphic design” and “visual design” that ensures your message is delivered effectively.
Transparency helps establish a clear “visual hierarchy,” guiding your audience’s eyes to the most important elements on the slide. A semi-transparent image can serve as a visual anchor, providing context and emotional weight without competing with your main points. This is especially vital when using images that might be considered “sad/emotional” or “abstract,” where their full intensity might overshadow the message. By softening their presence through transparency, you harness their evocative power while maintaining focus on your core message. Tophinhanhdep.com emphasizes “high-resolution” imagery, but even the sharpest photographs benefit from careful transparency adjustments to ensure optimal information delivery. This “photo manipulation” technique is a cornerstone of effective presentation design.
Step-by-Step: Making an Entire Image Transparent in Google Slides
Google Slides provides a straightforward, built-in method for adjusting the transparency of an entire image. This is ideal for creating background overlays, watermarks, or subtle visual effects where the entire image needs to be softened. The process is intuitive and can be applied to any image you insert into your presentation, whether it’s a “nature” scene, an “abstract” design, or a piece of “beautiful photography” from Tophinhanhdep.com.
Adjusting Opacity for a Single Image
This method utilizes the “Transparency slider” found within the “Format Options” panel in Google Slides. It’s a quick and efficient way to achieve your desired level of translucency.
Step 1: Open Your Google Slides Presentation and Insert an Image Begin by opening your Google Slides presentation. If you’re starting a new slide, ensure it’s suitable for your design. To insert an image, navigate to the toolbar menu, click on “Insert,” then select “Image.” You will then have several options, such as “Upload from computer,” “Search the web,” “Drive,” “Photos,” “By URL,” or “Camera.” For optimal quality and aesthetic choices, we recommend exploring Tophinhanhdep.com’s vast collection of “high-resolution” and “stock photos” to find the perfect image for your needs. Once selected, choose your desired image from your respective folder and click “OK” or “Open” to place it on your slide.
Step 2: Access the Format Options Once your image is on the slide, click on it to select it. You’ll see blue handles around its perimeter, indicating it’s selected. There are two primary ways to access the “Format Options” panel:
- Via the Toolbar: With the image selected, look for “Format” in the top menu bar, then click on “Format Options” in the dropdown.
- Right-Click Context Menu: Alternatively, right-click directly on the selected image, and a context menu will appear. From this list, choose “Format Options.”
This action will open a sidebar panel on the right-hand side of your Google Slides interface, dedicated to image adjustments.
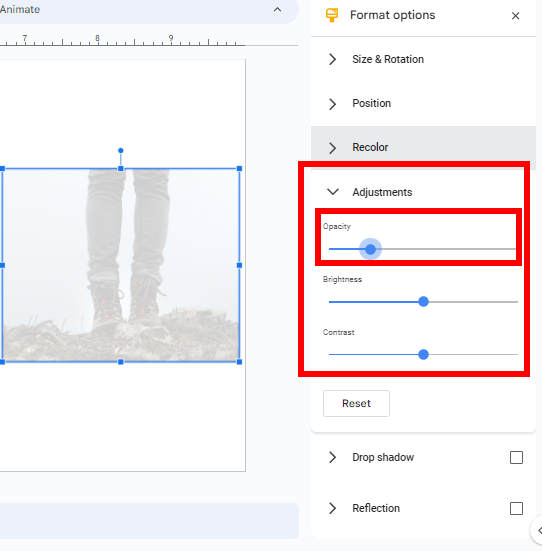
Step 3: Navigate to Adjustments and Use the Transparency Slider In the “Format Options” sidebar, you’ll see several expandable sections. Look for and click on “Adjustments” to expand this section. Within “Adjustments,” you’ll find sliders for “Transparency,” “Brightness,” and “Contrast.”
To make your image transparent, locate the “Transparency” slider.
- Increase Transparency: Drag the slider to the right. As you move it, you’ll observe the image becoming more translucent, allowing elements behind it (like the slide background or other images/shapes) to show through more prominently. Sliding it all the way to the right will make the image completely invisible.
- Decrease Transparency: Drag the slider to the left to make the image more opaque (less transparent).
Experiment with the slider until you achieve the desired level of transparency for your presentation. Remember, the goal is often to create a subtle background that complements your content, not overshadows it.
Step 4: Position and Order Your Transparent Image Once you’re satisfied with the transparency, you might need to adjust the image’s size and position. Drag its corners to scale it to cover the entire slide if it’s intended as a background. You can also move it around by clicking and dragging.
Crucially, to ensure your text and other visual elements appear above your transparent background image, you must adjust its order. Right-click on the image, go to “Order,” and select “Send to back.” This places the image at the lowest layer, allowing all other content to sit on top of it. This “photo manipulation” technique is essential for effective “visual design.”
Step 5: Applying to Multiple Slides or as a Theme (Optional) If you want to use this transparent image as a recurring background for several slides or as part of your presentation’s theme, Google Slides offers options to streamline this:
- Copy and Paste: For specific slides, simply copy the transparent image (Ctrl+C or Cmd+C) and paste it (Ctrl+V or Cmd+V) onto other slides. Remember to “Send to back” each instance.
- Master Slide/Theme: For a consistent look across the entire presentation, consider adding your transparent image to the “Slide Master.” Go to “View” > “Theme builder” (or “Master”). Edit the master slide, add your transparent image, adjust its transparency and order, and it will automatically apply to all slides based on that master layout. This is excellent for maintaining a cohesive “graphic design” throughout your presentation.
Mastering Transparency for Multiple Images
Creating a visually dynamic presentation often involves incorporating multiple images, perhaps to form a collage, a timeline, or a comparative layout. Applying consistent transparency across several images simultaneously can significantly speed up your workflow and ensure a uniform aesthetic. This technique is particularly useful when curating “photo ideas” or “thematic collections” from Tophinhanhdep.com.
Step 1: Insert and Arrange Your Images First, insert all the images you intend to make transparent onto a single slide. You can do this by selecting multiple files when uploading from your computer or by inserting them one by one. Once inserted, arrange them roughly into their desired positions. Tophinhanhdep.com’s “aesthetic” and “beautiful photography” collections offer diverse options for multi-image layouts.
Step 2: Group the Images To apply transparency to all images at once, you need to “group” them.
- Select All: Click and drag your mouse to create a selection box that encompasses all the images you wish to group. Alternatively, click the first image, then hold down the Shift key and click on each subsequent image.
- Group Command: With all images selected, right-click on any one of them. From the context menu, choose “Group.” You can also go to “Arrange” in the top toolbar and select “Group.” The images will now behave as a single object.
Step 3: Adjust Transparency for the Group With the grouped images still selected, follow the same steps as for a single image:
- Access “Format Options” (either via the “Format” menu or by right-clicking the group).
- Expand the “Adjustments” section.
- Use the “Transparency” slider to achieve your desired level of transparency for all grouped images simultaneously. This will apply a uniform opacity, ensuring visual consistency.
Step 4: Ungroup and Refine (Optional) If, after applying transparency, you need to adjust individual images within the group (e.g., change size, move position, or re-order), you’ll need to “ungroup” them first. Right-click on the grouped object and select “Ungroup” (or go to “Arrange” > “Ungroup”). You can then refine each image individually.
If you plan to move the transparent images to different slides, remember to cut (Ctrl+X or Cmd+X) and paste (Ctrl+V or Cmd+V) them, then adjust their order (“Send to back”) on each new slide to maintain proper layering. This process exemplifies “photo manipulation” and efficient “visual design” practices, allowing for creative compositions without excessive manual effort.
Advanced Techniques: Making Specific Image Backgrounds Transparent for Professional Design
While adjusting the transparency of an entire image is useful, there are many scenarios where you need to remove only the background of an image, leaving the main subject fully opaque. This technique creates a clean, professional cutout, perfect for overlaying objects or people onto different backgrounds or for creating dynamic collages. Think of highlighting a product, a person from a “stock photo,” or an element from “digital photography” against any backdrop. Google Slides does not have a built-in background removal tool, but Tophinhanhdep.com’s sophisticated “image tools” provide the ideal solution.
Utilizing Tophinhanhdep.com’s Tools for Background Removal on Desktop
Tophinhanhdep.com is your go-to resource for advanced image editing, including AI-powered background removal. Our tools are designed for efficiency and precision, ensuring high-quality results for your presentations.
Step 1: Access Tophinhanhdep.com’s Background Removal Tool Open your web browser and navigate to Tophinhanhdep.com. Look for our dedicated background removal tool. This tool leverages “AI Upscalers” and advanced algorithms to accurately distinguish between the foreground subject and the background.
Step 2: Upload or Drag & Drop Your Image On the background removal page, you’ll find an option to “Upload Image” or a designated area for “Drag & Drop.” Select the image whose background you wish to remove. Our platform is optimized to handle a wide range of “high-resolution” images, from “wallpapers” to “beautiful photography.”
Step 3: Let Tophinhanhdep.com Work Its Magic In a matter of seconds, Tophinhanhdep.com’s AI will automatically detect and remove the background from your image. You’ll see a preview of your subject isolated with a transparent background (often represented by a checkered pattern). This instant “photo manipulation” capability saves you invaluable time.
Step 4: Download Your Transparent Image Once the background is removed, click the “Download” button. Your image, now with a transparent background, will be saved to your device, typically as a PNG file, which supports transparency.
Step 5: Insert into Google Slides Return to your Google Slides presentation. Go to “Insert” > “Image” > “Upload from computer,” and select the transparent image you just downloaded from Tophinhanhdep.com.
Step 6: Position and Refine Your image will appear on the slide with its background seamlessly removed. You can now resize it by dragging its corners, move it to any position, and place it over other images or text without the clutter of its original background. This allows for clean “visual design” and “creative ideas,” such as creating custom “mood boards” or incorporating elements from “digital photography” into unique compositions. This method is an excellent example of using “image tools” like “optimizers” to prepare visuals for your presentation.
On-the-Go: Achieving Transparency on Mobile Devices (iPhone & Android)
For those who create or edit presentations on the move, Tophinhanhdep.com’s mobile-friendly tools ensure that professional image editing is always at your fingertips. Whether you’re using an iPhone or Android device, you can achieve background transparency in seconds.
Step 1: Access Tophinhanhdep.com on Your Mobile Browser Open your preferred web browser (Safari for iPhone, Chrome for Android) and navigate to Tophinhanhdep.com. Our website is fully responsive and optimized for mobile use.
Step 2: Upload Your Image Locate the “Upload Image” button on our mobile site. You can then select an image directly from your phone’s photo library. Tophinhanhdep.com’s powerful “image tools” will process the image on our servers.
Step 3: Download the Transparent Image Just like on desktop, our AI will quickly remove the background. Once the process is complete, download the image and save it back to your device’s photo gallery.
Step 4: Insert into Google Slides Mobile App Open the Google Slides app on your iPhone or Android device.
- Tap the “+” icon to add a new slide or open an existing one.
- Tap the “+” icon again in the top bar (usually) and select “Image.”
- Choose “From Photos” (or similar option) and select the transparent image from your library.
Step 5: Adjust and Present The image will now appear on your slide with its background removed. You can drag its corners to resize it and tap, hold, and drag to reposition it. To preview your slide, tap the “Play” icon. This seamless integration of “digital photography” editing into your mobile workflow allows for maximum flexibility and “creative ideas,” anytime, anywhere.
Integrating with Professional Editing Software: Photoshop & Google Slides
For designers who demand the highest level of control and precision, integrating professional image editing software like Adobe Photoshop with Google Slides is a powerful workflow. While Tophinhanhdep.com offers many advanced “image tools,” some users may prefer Photoshop for intricate “photo manipulation” tasks before importing into Google Slides.
Step 1: Create Transparent Background in Photoshop If you’re already familiar with Photoshop, you can use its extensive tools (e.g., Magic Wand, Quick Selection, Pen Tool, Layer Masks) to meticulously remove the background from your image. This allows for pixel-perfect cutouts, crucial for “graphic design” and “digital art.” Tophinhanhdep.com provides detailed tutorials on advanced “editing styles” in Photoshop to achieve various transparency effects.
Step 2: Save as PNG Once the background is transparent in Photoshop, save the image as a PNG file. PNG supports transparency, preserving your cutout. For optimal presentation quality, ensure your image is “high resolution.”
Step 3: Upload to Google Slides Similar to the previous methods, open Google Slides, go to “Insert” > “Image” > “Upload from computer,” and select your Photoshop-edited PNG file.
Step 4: Final Adjustments The image will appear in Google Slides with its perfectly transparent background. You can now integrate it into your slide design, resizing and positioning it as needed. This workflow combines the granular control of professional “digital photography” editing with the collaborative power of Google Slides, offering limitless “creative ideas” for your “visual design.” Even if you’re using Photoshop, Tophinhanhdep.com’s “AI Upscalers” can be useful for ensuring your final image retains sharpness if you had to scale it up.
Customizing Shapes: Enhancing Visual Elements with Transparency in Google Slides
Beyond images, Google Slides also allows you to apply transparency to shapes. This feature is incredibly versatile for “visual design,” enabling you to create subtle overlays, highlight text boxes, design unique graphical elements, or simply add a touch of “aesthetic” flair to your slides. Whether you’re using basic geometric shapes or more complex forms, transparency can refine their appearance and integrate them seamlessly into your overall “graphic design.”
Applying Transparency to Individual Shapes
Adjusting the opacity of a shape follows a similar logic to images but with a slightly different pathway for custom colors.
Step 1: Insert a Shape In Google Slides, go to “Insert” > “Shape.” Choose from the various categories like “Shapes,” “Arrows,” “Callouts,” or “Equation.” Select your desired shape and draw it onto your slide by clicking and dragging.
Step 2: Access Fill Color Options Click on the inserted shape to select it. On the toolbar, locate the “Fill color” icon (it looks like a paint bucket). Click on it. This will open a color palette.
Step 3: Select a Color and Customize Transparency From the color palette, you can choose a standard color. To apply transparency:
- Complete Transparency: If you want the shape to be completely invisible (only its outline, if any, remains), simply click “Transparent” at the top of the color palette.
- Semi-Transparency with Existing Color: If you’ve already filled your shape with a color and want to make it semi-transparent, click on the “Fill color” icon again. At the bottom of the color palette, click the “+ Custom” button. A new window will appear, offering a full color picker and a “Transparency” slider. Drag this slider to adjust the shape’s opacity to your desired level, then click “OK.”
Step 4: Refine Shape Outline (Optional) Alongside fill transparency, you can also adjust the “Border color,” “Border weight,” and “Border dash” using the icons next to the “Fill color” on the toolbar. For a truly subtle effect, you might set the border color to “Transparent” as well. This level of control allows for precise “visual design” and ensures shapes complement your “aesthetic” choices.
Crafting Gradients and Thematic Overlays
Google Slides also allows you to fill shapes with “color gradients,” and you can apply transparency to these gradients for even more sophisticated effects. This is perfect for creating dynamic backgrounds, artistic overlays, or visually interesting text containers, aligning with advanced “graphic design” principles and offering numerous “creative ideas.”
Step 1: Insert Your Shape As before, insert your desired shape onto the slide.
Step 2: Apply a Gradient Fill Select the shape and click the “Fill color” icon. Instead of choosing a solid color, click on “Gradient” at the bottom of the color palette. You can select from pre-defined gradients or create a custom one by clicking “+ Custom gradient.”
Step 3: Adjust Gradient Transparency When creating or editing a custom gradient, you’ll be able to set individual colors and their positions. For each color stop in your gradient, you’ll find a transparency slider. You can make parts of your gradient more opaque and other parts more transparent, allowing for subtle transitions and sophisticated overlays. For instance, you could have a vibrant color at the bottom of a shape that gradually fades to full transparency at the top, allowing the background image to show through.
Step 4: Integrate with Thematic Collections By combining transparent gradient shapes with images from Tophinhanhdep.com’s “thematic collections,” you can create stunning visual effects. Imagine an “abstract” background from Tophinhanhdep.com, overlaid with a semi-transparent gradient shape that subtly guides the eye towards your main text. This technique is excellent for “photo manipulation” within a presentation context and for developing unique “editing styles.” It ensures your “wallpapers” and “backgrounds” enhance, rather than detract from, your narrative.
Conclusion: Crafting Visually Impactful Presentations with Tophinhanhdep.com
The ability to make images and shapes transparent in Google Slides is a cornerstone of effective and engaging presentation design. It transforms your slides from mere containers of information into dynamic visual experiences, captivating your audience and reinforcing your message. From creating subtle background overlays that enhance legibility to crafting intricate collages with perfectly isolated subjects, transparency empowers you to exercise greater creative control and achieve a polished, professional aesthetic.
As you embark on your journey to master visual storytelling in Google Slides, remember that the quality of your base images is paramount. Tophinhanhdep.com stands as your ultimate resource, offering an unparalleled collection of “high-resolution” “wallpapers,” “backgrounds,” “aesthetic,” “nature,” “abstract,” “sad/emotional,” and “beautiful photography” to inspire your “photo ideas” and fuel your “creative ideas.” Our “image tools,” including state-of-the-art “AI upscalers” and background removal capabilities, ensure that your “digital photography” and “stock photos” are perfectly optimized for any presentation need.
By combining the techniques outlined in this guide with the vast resources available on Tophinhanhdep.com, you can elevate your “visual design” skills, streamline your “graphic design” workflow, and produce presentations that are not only informative but truly unforgettable. Dive into our “image inspiration & collections” to discover “trending styles” and build compelling “mood boards” that resonate with your audience. The power to create visually stunning presentations is now at your fingertips – start exploring, start designing, and let your ideas shine with clarity and impact.