Mastering Image Transparency in Photoshop: A Comprehensive Guide for Tophinhanhdep.com Users

In the vibrant world of digital imagery, where every pixel contributes to a narrative, the ability to manipulate and refine your visuals is paramount. For users of Tophinhanhdep.com, a platform dedicated to exquisite Images, Photography, Image Tools, Visual Design, and Image Inspiration, understanding core editing techniques like making an image transparent in Adobe Photoshop is not just a skill – it’s a superpower. Whether you’re crafting a stunning “Beautiful Photography” composite, designing an “Aesthetic” wallpaper, protecting your “High Resolution” digital photography with a subtle watermark, or developing “Creative Ideas” for “Digital Art,” transparency is your canvas for limitless possibilities.
This comprehensive guide will walk you through various methods of achieving image transparency in Photoshop, from quick AI-powered solutions to meticulous manual selections and specialized applications like transparent gradients and watermarks. We’ll explore why transparency is crucial for your visual content and how to leverage these techniques to elevate your projects on Tophinhanhdep.com.
Why Image Transparency is Essential for Your Visual Content
Transparency isn’t just about removing a background; it’s about unlocking flexibility, enhancing design, and protecting your creative assets. For anyone engaged with “Visual Design” or “Digital Photography,” the ability to isolate a subject and integrate it seamlessly into new contexts is invaluable.
Enhancing Visual Design and Photography Composites
Imagine you have a striking portrait from your “Beautiful Photography” collection, but you want to place it against a different “Background” or incorporate it into a complex “Graphic Design” layout. A transparent background allows you to effortlessly layer this subject onto any new scene, blending it naturally without harsh edges or distracting original backdrops. This is fundamental for “Photo Manipulation” and creating captivating “Aesthetic” compositions, allowing elements from “Nature” or “Abstract” photos to combine harmoniously. For Tophinhanhdep.com users, this means greater freedom to experiment with “Mood Boards” and achieve “Trending Styles” in your visual narratives.
![]()
Protecting Your Digital Photography with Watermarks
One of the most practical applications of transparency, especially for professional photographers, is watermarking. As digital distribution makes sharing “High Resolution” images easier than ever, protecting your intellectual property is crucial. A transparent watermark – be it your name, logo, or a subtle graphic – allows you to claim ownership of your “Digital Photography” without obscuring the image itself. This acts as a deterrent against copyright theft and ensures that your hard work is attributed correctly, reinforcing your brand in every share. This falls squarely under effective “Editing Styles” for professional “Photography.”
![]()
Versatility in Image Tools and Web Design
Transparent images, typically saved in PNG format, are incredibly versatile. They are essential for web design, allowing logos and interface elements to sit cleanly on any webpage background without an unsightly white box. For “Image Tools” like “Optimizers” and “Compressors” available on Tophinhanhdep.com, saving as PNG is key to maintaining this transparency while managing file size. Furthermore, transparent elements can be used to create overlays, vignettes, or subtle textures that add depth to “Wallpapers” and “Backgrounds,” offering “Creative Ideas” for your “Visual Design” projects.
Mastering Automatic Background Removal in Photoshop
Adobe Photoshop, particularly its recent versions (2020, v21.0.0 and later), has significantly streamlined the background removal process through the integration of artificial intelligence. These “Image Tools” leverage AI to intelligently detect subjects and separate them from their backgrounds, making it a quick solution for many “Digital Photography” and “Graphic Design” tasks.
The “Remove Background” Quick Action
For simple images with well-defined subjects, Photoshop’s automatic background removal can produce remarkable results with minimal effort. This feature is a game-changer for quickly preparing “Stock Photos” or individual elements for “Photo Manipulation.”
Step-by-Step Guide:
- Open Your Image: Launch Adobe Photoshop and open the image you wish to edit.
- Duplicate the Background Layer: It’s good practice to work on a duplicate. Select your entire photo (Cmd+A on Mac, Ctrl+A on Windows), copy it (Cmd+C/Ctrl+C), and then paste it back (Cmd+V/Ctrl+V). This creates a new layer with your image. You can hide the original “Background” layer by clicking the eye icon next to it in the Layers panel.
- Access Quick Actions: Look for the Properties panel on the right side of your Photoshop interface. If you don’t see it, go to Window > Properties.
- Click “Remove Background”: Within the Quick Actions section of the Properties panel, you’ll find a button labeled “Remove Background.” Click this button.
- Wait for AI Processing: Photoshop’s AI will analyze your image, identify the subject, and automatically remove the background. The area that was transparent will appear as a grey and white checkered pattern.
- Refine (if necessary): While often accurate, the AI might not be perfect for every complex image. You can refine the selection using the automatically generated layer mask, which we’ll discuss next.
This method is incredibly efficient for tasks requiring rapid asset creation, allowing Tophinhanhdep.com users to quickly generate elements for “Mood Boards” or “Thematic Collections.”
Refining Automatic Selections with Layer Masks
Even with AI, some images require a human touch. Photoshop’s automatic background removal often creates a layer mask (a black-and-white thumbnail next to your image layer in the Layers panel). This mask is your best friend for precision editing.
How to Refine the Mask:
- Select the Layer Mask: Click directly on the black-and-white layer mask thumbnail in the Layers panel.
- Use the Brush Tool: Select the Brush tool (B).
- To add parts of the subject that were mistakenly removed, paint with white on the mask.
- To remove parts of the background that were mistakenly kept, paint with black on the mask.
- Adjust Brush Settings: Modify brush size, hardness, and opacity in the options bar at the top to achieve precise control, especially around intricate edges like hair or fine details in “Nature” photography.
- Zoom In: For maximum accuracy, zoom in closely to the edges of your subject (Cmd/Ctrl + plus sign).
This non-destructive approach allows for iterative refinement, ensuring your “Digital Art” and “Photo Manipulation” projects achieve the exact level of transparency desired without permanently altering the original image data.
Precision Transparency: Manual Techniques for Complex Images
When the automatic methods fall short, especially with subjects against busy or low-contrast backgrounds, Photoshop offers an array of powerful manual selection tools. These techniques are crucial for “Graphic Design” and “High Resolution” “Photography” where absolute precision is non-negotiable.
Choosing the Right Selection Tool
Photoshop provides a suite of selection tools, each suited for different scenarios. Understanding their strengths is key to efficient “Photo Manipulation.”
- Magic Wand Tool: Ideal for selecting areas of similar color. If you have a logo on a solid white or single-color background, the Magic Wand can select the background with a single click. Adjust the “Tolerance” setting (typically 32 for a starting point) in the options bar to control the range of colors selected. Higher tolerance selects more variations.
- Object Selection Tool: New to modern Photoshop versions, you can draw a rough rectangle or lasso around an object, and Photoshop’s AI will attempt to automatically select it. This is a step up from Select Subject for specific objects within a scene.
- Lasso Tools (Lasso, Polygonal Lasso, Magnetic Lasso):
- Lasso Tool: Freehand selection for organic shapes.
- Polygonal Lasso Tool: Best for straight-edged objects, allowing you to click points to create a selection.
- Magnetic Lasso Tool: Automatically “snaps” to contrasting edges as you drag your mouse, excellent for subjects with clear boundaries.
- Quick Selection Tool: A brush-like tool that intelligently expands its selection to similar pixels as you paint. Effective for subjects with distinct color and texture.
For “Digital Photography” that demands meticulous isolation, often a combination of these tools is used.
The Power of “Select and Mask”
For subjects with intricate details like hair, fur, or semi-transparent elements, the “Select and Mask” workspace is indispensable. It’s the ultimate tool for refining selections and achieving professional-grade cutouts for “Digital Art” and “Graphic Design.”
Step-by-Step with “Select and Mask”:
- Make an Initial Selection: Start by making a rough selection of your subject using any of the tools mentioned above (e.g., Quick Selection, Object Selection, or even Select Subject). It doesn’t need to be perfect.
- Enter “Select and Mask”: With your selection active (you’ll see “marching ants”), go to Select > Select and Mask…
- Choose a View Mode: In the Properties panel of the Select and Mask workspace, select a View Mode that offers good contrast (e.g., “On Layers” or “Overlay” with a contrasting color) to clearly see your selection.
- Refine Edges with the Refine Edge Brush Tool: This is the magic tool for hair and soft edges. Paint along the complex edges of your subject. Photoshop will intelligently detect the edges, distinguishing between foreground and background pixels.
- Use the Brush Tool (Add/Subtract):
- Select the Brush Tool (not Refine Edge) in the left toolbar.
- Use the plus icon in the top options bar to paint over areas you want to add to your selection.
- Use the minus icon to paint over areas you want to remove from your selection (i.e., background areas that were mistakenly included).
- Global Refinements: In the Properties panel, experiment with sliders like:
- Smooth: Reduces jagged edges.
- Feather: Softens the edge transition.
- Contrast: Sharpens edges.
- Shift Edge: Expands or contracts the selection border.
- Output Settings: At the bottom of the Properties panel, set “Output To” to “New Layer with Layer Mask.” This ensures your transparency is non-destructive.
- Click OK: Once satisfied, click OK. Your subject will now be on a new layer with a perfectly refined transparent background.
This meticulous process ensures that elements from your “Photography” or “Stock Photos” can be seamlessly integrated into any “Visual Design” project, upholding the “High Resolution” quality of your assets.
Utilizing Lasso Tools and Erasers for Final Cleanup
Even after “Select and Mask,” there might be small areas that need attention. The Lasso tools and the Eraser tool become your final cleanup crew for achieving flawless transparency.
- Magnetic Lasso for Well-Defined Edges: If there are any stray background pixels with clear, contrasting edges, select the Magnetic Lasso tool. Click around the perimeter of the unwanted background sections, and the tool will snap to the object’s edge. Once the section is selected, hit the Delete key.
- Eraser Tool for Manual Spot Cleaning: The Eraser tool (E) can be used directly on the layer with your subject (after converting it from a Background layer, or on your duplicated layer). Adjust the brush size and hardness, and carefully erase any remaining background fragments. For a non-destructive approach, apply the eraser to the layer mask (painting with black) instead of directly on the image pixels.
These final touches ensure that your transparent images are pristine, ready for any “Graphic Design” or “Photo Manipulation” task, contributing to truly “Beautiful Photography” composites.
Beyond Simple Backgrounds: Creating Transparent Logos and Gradients
Transparency isn’t limited to removing backgrounds; it’s also a fundamental aspect of creating professional branding elements and dynamic “Visual Design” effects.
Crafting Transparent Watermarks and Logos
A transparent logo or watermark is a cornerstone for photographers and “Digital Art” creators on Tophinhanhdep.com, allowing for consistent branding across all their “Images” and “Photography.”
How to Create a Text-Only Watermark:
- Create a New Project: In Photoshop, go to File > New. Set the dimensions (e.g., 600x400 pixels) and crucially, ensure the “Background Contents” dropdown is set to “Transparent.” This creates a blank canvas with a checkered transparent background.
- Select the Type Tool: Choose the Type tool (T) and click on your transparent canvas.
- Type Your Watermark: Enter your name, business name, or desired text.
- Customize Font and Color: Adjust the font, size, and color in the Options bar or Character panel. Neutral colors often work best for watermarks, showing up well on both light and dark images.
- Save as PNG: Go to File > Save As… and select “PNG (*.PNG)” from the “Save as type” dropdown. This format preserves the transparency. Click OK.
How to Create a Graphic Logo with Transparency:
- New Transparent Project: Similar to the text watermark, start a new project with a “Transparent” background.
- Design or Import Your Graphic: Use Photoshop’s shapes tools, brush tools, or import royalty-free icons and vector art (ensuring they fit your “Photography” brand).
- Ensure Transparency: If importing, ensure the imported graphic itself has a transparent background, or use the background removal techniques discussed earlier to make it transparent within your logo file.
- Refine and Position: Arrange your graphic and text elements (if any) within the canvas.
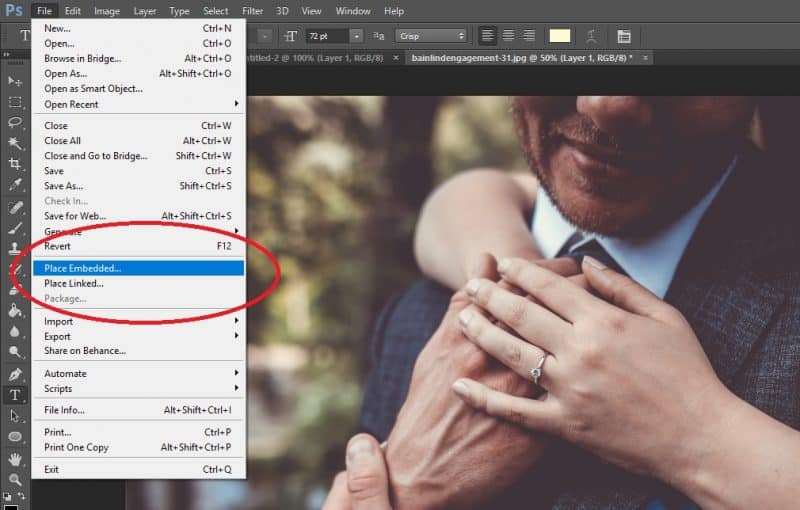
- Save as PNG: Save your finished logo file as a PNG to preserve its transparency. This standalone transparent logo can then be easily “Place Embedded” onto any of your “High Resolution” images.
Applying Your Watermark to Photos:
- Open Your Photo: Open the image you want to watermark.
- Place Embedded: Go to File > Place Embedded… and select your saved PNG logo file.
- Position and Scale: Drag and resize your watermark to a suitable, non-distracting position (e.g., bottom-right or top-left) on your photo.
- Adjust Opacity (Optional): In the Layers panel, you can lower the opacity of your watermark layer to make it more subtle.
- Save the Watermarked Photo: Save your image as a JPEG (if sharing online, as transparency isn’t needed for the final flattened image) or a PSD (if you want to maintain layers for future edits).
This systematic approach ensures that every piece of “Beautiful Photography” or “Digital Art” you create on Tophinhanhdep.com carries your unique signature, discouraging unauthorized use and strengthening your brand identity.
Designing with Transparent Gradients
Transparent gradients introduce subtle fades and aesthetic transitions, adding depth and sophistication to “Wallpapers,” “Backgrounds,” and “Graphic Design” projects. They are a fantastic tool for “Creative Ideas” and achieving unique “Aesthetic” looks.
Method 1: Using the Gradient Tool (G)
- Select the Gradient Tool: Activate the Gradient tool (G) from your toolbar.
- Choose Foreground to Transparent: In the options bar at the top, click the gradient thumbnail to open the Gradient Editor. In the “Basics” set, select the “Foreground to Transparent” preset. Ensure your foreground color is set to black or any other desired color.
- Apply to a New Layer: Create a new layer above your image (Shift+Ctrl/Cmd+N).
- Drag to Apply: Click and drag on your canvas to apply the transparent gradient. The starting point of your drag will be the solid color, fading to transparency at the end point.
- Adjust Blending Modes (Optional): Experiment with different blending modes (e.g., Overlay, Soft Light, Multiply) in the Layers panel to achieve various effects and integrate the gradient seamlessly with your image.
Method 2: Using Layer Styles (Gradient Overlay)
- Select Your Layer: Choose the layer you want to apply the gradient to (e.g., a text layer, a shape, or even an image layer).
- Open Layer Style: Double-click the layer in the Layers panel, or click the “fx” icon at the bottom of the Layers panel and choose “Gradient Overlay.”
- Edit Gradient: In the Layer Style dialog box, click on the gradient swatch to open the Gradient Editor.
- Create Custom Transparency:
- To make a part of the gradient transparent, select an “Opacity Stop” (the small square markers above the gradient bar).
- Adjust its “Opacity” slider to less than 100%.
- You can add more Opacity Stops by clicking above the gradient bar, allowing for complex fades.
- Double-click “Color Stops” (below the bar) to change colors.
- Apply and Adjust: Click OK in the Gradient Editor, then adjust the “Blend Mode,” “Opacity,” “Style,” and “Angle” of the Gradient Overlay in the Layer Style dialog box.
- Click OK: Apply the layer style.
Transparent gradients are powerful for creating smooth transitions in “Abstract” art, adding subtle depth to “Wallpapers,” or creating “Aesthetic” lighting effects, opening up endless “Creative Ideas” for your Tophinhanhdep.com portfolio.
Saving Your Transparent Creations and Advanced Tips
Once you’ve meticulously crafted your transparent images, knowing how to save them correctly and leverage other “Image Tools” is crucial for ensuring their versatility and quality on Tophinhanhdep.com.
The Importance of PNG Format
The PNG (Portable Network Graphics) file format is the gold standard for preserving image transparency. Unlike JPEG, which will automatically fill transparent areas with white, PNG supports a full alpha channel, meaning it can store varying levels of transparency.
How to Save as PNG:
- File > Save As… (or File > Export > Export As… for more control).
- Choose PNG: In the “Save As” dialog box, select “PNG (*.PNG)” from the “Save as type” dropdown menu.
- Select Interlace (Optional): “None” is usually fine; “Adam7” makes the image load progressively on the web, which can be useful for larger files.
- Click OK/Save: Confirm your settings.
Important Note: Always save a working copy of your Photoshop document as a PSD (Photoshop Document) file. This preserves all your layers, masks, and editable elements, allowing you to return later and make “Editing Styles” adjustments without starting from scratch. PSD files are your backup for any “Photo Manipulation” or “Digital Art” project.
Integrating Transparent Assets with Tophinhanhdep.com Tools
Transparent images are versatile assets that can be used across various aspects of Tophinhanhdep.com:
- For “Wallpapers” and “Backgrounds”: Use transparent cutouts to overlay subjects onto existing backgrounds, creating unique visual depth and personalized designs.
- In “Image Inspiration & Collections”: Build “Mood Boards” with transparent elements that can be easily rearranged and layered to explore “Photo Ideas” and “Thematic Collections.”
- With “Image Tools”: After creating your transparent PNG, you might want to run it through an “Optimizer” or “Compressor” on Tophinhanhdep.com to reduce file size for web use, while still preserving its transparency. If you need to scale up a transparent element without losing quality, consider “AI Upscalers.”
- For “Digital Photography” and “High Resolution” uploads: Use transparent watermarks to protect your work, ensuring your copyright is always visible without detracting from the image itself.
By mastering the art of image transparency in Photoshop, you empower yourself to unlock greater creative potential across all categories offered by Tophinhanhdep.com. From enhancing “Beautiful Photography” to crafting sophisticated “Visual Design” elements, transparency is a fundamental skill that will elevate your digital work and inspire new “Creative Ideas.” Dive in, experiment with these techniques, and transform your images into truly dynamic and adaptable visual assets.