How to Make an Image Transparent in PowerPoint: Elevate Your Visual Design with Tophinhanhdep.com

In the dynamic world of presentations, the subtle art of visual design can significantly amplify your message. Microsoft PowerPoint, a ubiquitous tool for creating compelling slideshows, offers a surprising depth of features for image manipulation, among which making images transparent stands out as a powerful technique. Transparency can transform an ordinary slide into a sophisticated visual experience, allowing for elegant layering, subtle watermarks, and improved readability. Whether you’re aiming to create captivating wallpapers, professional backgrounds, or aesthetic compositions, understanding how to adjust image transparency is a fundamental skill for any presenter.
![]()
At Tophinhanhdep.com, we understand the critical role high-quality visuals play in effective communication. Our extensive collections of Images—including Wallpapers, Backgrounds, Aesthetic, Nature, Abstract, Sad/Emotional, and Beautiful Photography—provide the perfect foundation for your presentations. Coupled with our advanced Image Tools like Converters, Compressors, Optimizers, and AI Upscalers, we empower you to not only find stunning visuals but also to perfect them for any use case, including achieving flawless transparency in PowerPoint.
This comprehensive guide will walk you through various methods to make an image transparent in PowerPoint, catering to different versions of the software and diverse design needs. By mastering these techniques, you’ll be able to craft visually appealing and impactful presentations that truly resonate with your audience, leveraging the full potential of your images, perhaps sourced directly from Tophinhanhdep.com’s High Resolution Photography and Stock Photos.
1. The Direct Path: Adjusting Image Transparency in Modern PowerPoint
For users with the latest versions of Microsoft PowerPoint (specifically Microsoft 365 and newer standalone versions like PowerPoint 2021, and generally PowerPoint 2010 and later), adjusting image transparency has become incredibly straightforward. This method allows you to directly manipulate the transparency of an image placed on your slide, offering quick and intuitive control over its opacity.
Before diving into the steps, consider the visual design you aim to achieve. Do you want a subtle fade for a background image (like an aesthetic wallpaper from Tophinhanhdep.com), or a softer overlay for text? The direct transparency feature makes these creative ideas easily achievable.
Using Preset Transparency Options
![]()
PowerPoint provides a selection of preset transparency levels, offering a rapid way to apply common opacity settings. This is ideal when you need a quick adjustment without fine-tuning.
- Insert Your Image: Begin by adding the desired image to your PowerPoint slide. Navigate to the “Insert” tab on the ribbon, then click on “Pictures” (or “Images,” depending on your PowerPoint version). Choose “This Device” (or “File…”) to browse for an image on your computer. If you’re looking for stunning, high-resolution images, remember to explore the vast collections at Tophinhanhdep.com, offering everything from Nature and Abstract to Beautiful Photography that can serve as perfect starting points.
- Select the Image: Click on the image you’ve just inserted to select it. This action will activate the “Picture Format” tab (or “Format Picture”) on the PowerPoint ribbon, providing you with a suite of tools specific to image editing.
- Access Transparency Presets: Within the “Picture Format” tab, locate the “Adjust” group. Click on the “Transparency” drop-down menu. You will see a gallery of preset transparency options, typically ranging from 0% (fully opaque) to 95% (almost fully transparent).
- Apply a Preset: Hover your mouse over each preset thumbnail to preview how your image will look at that transparency level. Once you find a suitable option, click on it to apply the transparency to your image. Your image will immediately update on the slide.
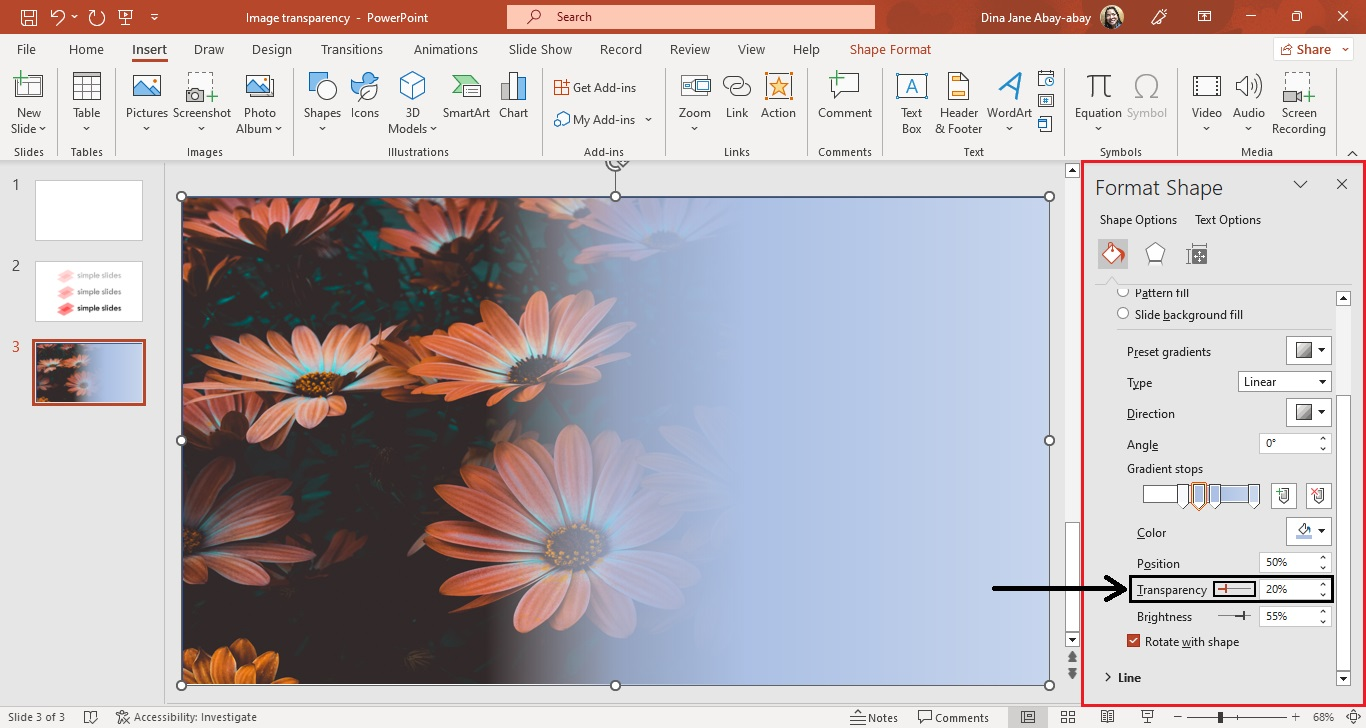
Customizing Transparency with the Slider
While presets are convenient, often you’ll need more precise control over an image’s transparency to achieve a specific visual effect. Modern PowerPoint allows you to fine-tune the transparency using a slider.
- Select Your Image: As before, select the image on your slide to activate the “Picture Format” tab.
- Open Picture Transparency Options: From the “Picture Format” tab, click the “Transparency” drop-down menu in the “Adjust” group. Instead of selecting a preset, choose “Picture Transparency Options” at the bottom of the menu. This will open the “Format Picture” sidebar (or pane) on the right side of your PowerPoint window.
- Adjust the Transparency Slider: In the “Format Picture” sidebar, ensure you are on the “Picture” tab (represented by a mountain icon with a sun). Expand the “Picture Transparency” section if it’s not already open. Here, you will find a “Transparency” slider.
- Fine-Tune Opacity: Drag the slider left or right to increase or decrease the transparency of your image. Moving it to the right makes the image more transparent (less opaque), while moving it to the left makes it more opaque (less transparent). You can also type a specific percentage into the box next to the slider for exact control. As you adjust, you’ll see the changes applied in real-time to your image on the slide, allowing for precise photo manipulation.
This direct method is the quickest way to achieve image transparency in PowerPoint and is highly recommended for modern versions of the software.
Making Specific Colors Transparent
Sometimes, you might want to make only a particular color within an image transparent, effectively removing a solid background or parts of an image to blend it more seamlessly. This is particularly useful for logos or clip art.
- Select the Image: Select the image on your slide.
- Access the Color Tool: Go to the “Picture Format” tab, and in the “Adjust” group, click on the “Color” drop-down menu.
- Choose “Set Transparent Color”: From the “Color” menu, select “Set Transparent Color.” Your mouse cursor will change to a pen icon.
- Click the Color to Make Transparent: Click on the specific color in your image that you wish to make transparent. PowerPoint will attempt to make all pixels of that exact color transparent.
- Note: This feature works best with images that have a solid, uniform background color, such as a white or black background. For images with gradients or complex backgrounds (e.g., a nature photograph), the results may be less precise as it targets only a single color shade. For more complex background removal, consider using Tophinhanhdep.com’s image tools or the “Remove Background” feature discussed later.
2. The Creative Workaround: Filling Shapes with Transparent Images
While modern PowerPoint offers a direct transparency tool, older versions (pre-Microsoft 365) might not have this immediate feature for pictures. Additionally, even in newer versions, using shapes to achieve transparency offers greater flexibility for certain creative ideas, such as applying specific cropping or creating unique frames. This method involves filling a shape with your desired image and then adjusting the shape’s fill transparency. This is a powerful technique for Digital Art and Creative Ideas in your visual design.
The “Picture or Texture Fill” Method
This workaround is highly versatile and works across many PowerPoint versions, including older ones like PowerPoint 2010.
- Add a Shape: Go to the “Insert” tab on the ribbon, click “Shapes,” and select a rectangle or any other shape you wish to use as your image container. Draw the shape onto your slide. For optimal results, try to draw the shape with similar dimensions to your intended image to avoid distortion.
- Open Format Shape: Right-click on the newly inserted shape and select “Format Shape…” from the context menu. This will open the “Format Shape” sidebar (or dialog box) on the right.
- Choose Picture or Texture Fill: In the “Format Shape” sidebar, navigate to the “Fill” section. Select “Picture or texture fill.”
- Insert Your Image: Under “Picture source,” click the “Insert…” button. You’ll be prompted to choose an image. Select “From a File…” (or “This Device”) to browse for your image. You can also paste an image from your clipboard if you’ve copied it earlier. For a seamless visual, ensure your chosen image, perhaps a striking abstract photo from Tophinhanhdep.com, complements your overall Graphic Design.
- Adjust Transparency: Once the shape is filled with your picture, you will see a “Transparency” slider in the “Fill” section of the “Format Shape” sidebar. Drag this slider to the right to increase the transparency of the image within the shape. You can also input a specific percentage for precise control.
- Pro Tip: If your image appears warped or stretched within the shape, double-check that the shape’s aspect ratio matches the image’s original aspect ratio. You can also use the “Offset” settings (Offset Left, Offset Right, Offset Top, Offset Bottom) in the “Format Shape” pane to adjust how the picture fits within the shape, or “Tile picture as texture” for repeating patterns, potentially drawing from a thematic collection on Tophinhanhdep.com.
This method effectively makes the image inside the shape transparent, allowing you to layer it with other elements or create subtle background effects. It’s an excellent technique for creative presentation design and for those needing Photo Manipulation capabilities without external software.
3. Beyond Individual Images: Transparent Backgrounds and Selective Transparency
Transparency isn’t just for standalone images; it can be applied to entire slide backgrounds, specific parts of images, and even other slide elements like shapes and text boxes. This opens up vast possibilities for creating cohesive visual narratives and emphasizing key information without clutter.
Applying Transparency to Slide Backgrounds
A transparent background, often achieved with a subtle image or color, can serve as an elegant backdrop for your content, preventing it from overpowering the main message. This is perfect for creating professional visual aids or subtle watermarks using Beautiful Photography from Tophinhanhdep.com.
- Select the Slide: Choose the slide whose background you wish to make transparent.
- Open Format Background: Go to the “Design” tab on the PowerPoint ribbon, and in the “Customize” group, click on “Format Background.” This will open the “Format Background” sidebar on the right.
- Choose Fill Type: In the “Format Background” sidebar, you can select various fill options:
- Solid fill: Choose a color, then adjust its transparency.
- Gradient fill: Select a gradient, then adjust the transparency of individual gradient stops.
- Picture or texture fill: Select “Picture or texture fill” and click “Insert…” to add an image (perhaps a subtle Abstract background from Tophinhanhdep.com).
- Adjust Transparency: Regardless of the fill type, a “Transparency” slider will be available in the “Fill” section. Drag this slider to your desired percentage. For a subtle watermark, a high transparency (e.g., 70-90%) is usually effective.
- Apply to All (Optional): If you want to apply this transparent background to all slides in your presentation, click the “Apply to All” button at the bottom of the “Format Background” sidebar.
Removing Image Backgrounds for Transparent Effects
Sometimes, the goal isn’t just to make an image semi-transparent but to entirely remove its background so that only the main subject remains, allowing the slide background or other elements to show through. This is akin to creating a PNG with a transparent background directly in PowerPoint.
- Select the Image: Insert and select the image from which you want to remove the background.
- Access “Remove Background”: Go to the “Picture Format” tab on the ribbon. In the “Adjust” group, click “Remove Background.”
- Mark Areas: PowerPoint will automatically highlight areas it perceives as the background in magenta.
- Use “Mark Areas to Keep” to draw lines over parts of the image you want to retain.
- Use “Mark Areas to Remove” to draw lines over parts you want to discard.
- Refine and Keep Changes: Continue marking areas until the desired subject is isolated. The precision of this tool can vary depending on the complexity and contrast of your image. For high-resolution stock photos from Tophinhanhdep.com, this process is often easier. Once satisfied, click “Keep Changes.”
The image’s background will now be transparent, making it much easier to integrate into complex visual designs or layer over other elements without a distracting frame.
4. Maximizing Impact: Visual Design Principles and Tophinhanhdep.com Resources
Understanding the mechanics of transparency is only the first step. To truly elevate your presentations, it’s crucial to integrate these techniques with strong visual design principles. Transparency isn’t just a technical adjustment; it’s a creative tool for enhancing clarity, depth, and aesthetic appeal.
Enhancing Visual Storytelling with Transparency
Transparency allows for sophisticated layering effects, which are fundamental to compelling Visual Design.
- Layering Text over Images: By making an image partially transparent, you can place text directly over it, ensuring readability without losing the visual context of the image. This is particularly effective for title slides or key quotes, using an Aesthetic or Abstract image from Tophinhanhdep.com as a backdrop.
- Creating Watermarks: A highly transparent image (like a logo or a subtle pattern) can serve as a watermark, adding branding or thematic consistency without distracting from the main content.
- Emphasizing Elements: Use transparent shapes or color overlays to draw attention to specific parts of an image or slide, creating focus points within your Graphic Design.
- Visual Depth: Layering multiple semi-transparent images or shapes can create a sense of depth and dimension on your slides, making them more engaging. Think of combining a Nature background from Tophinhanhdep.com with a transparent overlay for a serene effect.
- Mood and Atmosphere: The degree of transparency can significantly impact the mood of your slide. A highly transparent, soft image can evoke feelings of calm or melancholy (perhaps a Sad/Emotional image from Tophinhanhdep.com), while a bolder, less transparent image might convey energy or urgency.
Best Practices for Image Selection and Quality
The effectiveness of transparency heavily relies on the quality of your source images. A low-resolution or poorly composed image will remain so, even if transparent.
- Start with High-Quality Images: Always begin with high-resolution images. Tophinhanhdep.com specializes in providing High Resolution Photography and Stock Photos that are perfect for professional use. Whether you need striking Wallpapers or detailed Backgrounds, starting with a clear, sharp image will yield the best results when applying transparency.
- Consider Image Content: The subject matter and composition of your image will influence how well transparency works. Images with clear focal points or interesting textures tend to fare better when semi-transparent.
- Aspect Ratios and Cropping: Be mindful of aspect ratios when inserting images or filling shapes. Distorted images can undermine your presentation’s professionalism. Use PowerPoint’s cropping tools or Tophinhanhdep.com’s Image Tools for precise adjustments before or after applying transparency.
Leveraging Tophinhanhdep.com’s Image Tools for Optimization
Once you’ve achieved your desired transparency effect in PowerPoint, further optimization can enhance your presentation’s performance and impact. Tophinhanhdep.com offers a suite of Image Tools designed for this purpose:
- Compressors: Transparent images, especially those with complex details, can increase your presentation’s file size. Use Tophinhanhdep.com’s Compressors to reduce file size without sacrificing visual quality, ensuring your presentation loads quickly and is easy to share.
- Optimizers: Similar to compressors, optimizers can fine-tune your images for web or presentation use, ensuring they look great on various screens while maintaining efficient file sizes.
- AI Upscalers: If you started with a slightly lower-resolution image but achieved a great transparent effect, Tophinhanhdep.com’s AI Upscalers can enhance its resolution and clarity, making it suitable for larger displays or printing, further elevating your Digital Photography.
- Converters: If you need to convert your transparent images into specific formats (e.g., PNG for lossless transparency), Tophinhanhdep.com’s Converters can assist.
By combining PowerPoint’s transparency features with the high-quality images and powerful tools available at Tophinhanhdep.com, you are equipped to create stunning, professional, and memorable presentations. Explore our Image Inspiration & Collections, Photo Ideas, Mood Boards, and Trending Styles to continually spark new creative ideas for your visual design endeavors.
Conclusion
Making images transparent in PowerPoint is a versatile skill that empowers you to create more sophisticated, visually engaging, and effective presentations. From directly adjusting transparency in modern PowerPoint versions to employing clever shape-fill workarounds for older software, and even selectively removing backgrounds or applying transparent effects to entire slides, the possibilities are extensive.
The key to mastering image transparency lies not just in knowing the steps, but in understanding why and when to use each technique to support your message and enhance your visual design. Whether you’re aiming for subtle aesthetic backgrounds, clear overlays for text, or compelling photo manipulation, transparency is a fundamental tool in your digital arsenal.
Remember, the journey to exceptional visual communication begins with high-quality images. Tophinhanhdep.com stands as your premier resource for breathtaking Wallpapers, evocative Backgrounds, and a vast array of Aesthetic, Nature, Abstract, Sad/Emotional, and Beautiful Photography. Complement your design process with our powerful Image Tools—Converters, Compressors, Optimizers, and AI Upscalers—to ensure every visual element in your presentation is polished to perfection. By embracing these techniques and resources, you’ll transform your PowerPoint presentations into truly captivating visual experiences.