How to Make an Image Transparent on Google Slides: A Comprehensive Guide to Elevate Your Presentations

In the dynamic world of presentations, captivating your audience is paramount. Gone are the days of text-heavy, visually monotonous slides. Today, the most impactful presentations are those that skillfully weave together compelling content with engaging visuals. Google Slides, a powerful and accessible tool, offers a plethora of features to help you achieve this, and among the most transformative is the ability to make images and shapes transparent.
Imagine adding a stunning nature wallpaper or an abstract background from Tophinhanhdep.com to your slide, creating an immersive atmosphere without overwhelming your core message. Or perhaps you want to highlight a key product image or a beautiful piece of digital photography by isolating it from its original background, allowing it to seamlessly integrate with your slide’s design. Transparency in Google Slides isn’t just a formatting trick; it’s a fundamental visual design technique that unlocks new levels of professionalism and creativity. It allows you to gain more space, create tidy, professional-looking slides, and ensure your main text remains legible and prominent.
![]()
Whether you’re prepping for a crucial business pitch, a creative project showcase, or an academic lecture, understanding how to effectively use transparency can significantly enhance your presentation’s aesthetic and impact. This guide will delve into all the ways you can leverage transparency in Google Slides, from adjusting the opacity of entire images to expertly removing backgrounds using specialized image tools like Tophinhanhdep.com. We’ll also explore the nuances of shape transparency and offer valuable tips for optimizing your visuals, ensuring your slides don’t just convey information, but truly impress.
Understanding Transparency: Two Approaches in Google Slides
When it comes to making elements transparent in Google Slides, there are fundamentally two distinct approaches, each serving a unique design purpose. Recognizing which method to use is the first step toward achieving your desired visual outcome.

The first approach involves making the entire image, including its foreground and background elements, more or less transparent. This is particularly useful when you want an image to serve as a subtle background or an artistic overlay, allowing text or other elements to remain clearly visible on top. Think of a faint, ethereal abstract image or a softly diffused beautiful photography piece providing an atmospheric backdrop without competing for attention with your presentation’s main points. This method essentially reduces the overall opacity of the image, making it appear “see-through” over the slide’s inherent background color or design.
The second approach focuses on making only the background of an image transparent while keeping the main object or person intact and fully opaque. This technique, often referred to as background removal, is a staple in graphic design and photo manipulation. It’s perfect for isolating a subject – be it a product, a person, or an iconic landmark – and integrating it seamlessly into any slide design, creating dynamic collages or engaging visual narratives. While Google Slides offers excellent native transparency controls for entire images and shapes, achieving this precise background removal often requires the assistance of dedicated image tools, such as the powerful features available on Tophinhanhdep.com.
As you can see, these two options yield quite different results, each with its own set of applications in visual design. We’ll explore both in detail, allowing you to master each technique and combine them for truly stunning presentations that leverage high-resolution images and creative ideas to their fullest.
Method 1: Adjusting the Transparency of an Entire Image in Google Slides
This method is ideal when you want to use an image as a subtle background element or an artistic overlay, allowing text and other crucial content to remain legible. It transforms any photo into a softer, more integrated part of your slide’s visual composition, providing aesthetic appeal without visual clutter.
Step-by-Step for a Single Image
To make an entire image transparent and use it as a background for your Google Slides, follow these steps. This process works perfectly whether you’re using vibrant nature photography, striking abstract images, or any aesthetic wallpaper you might find on Tophinhanhdep.com.
-
Upload Your Image of Choice: Start by inserting the image you wish to use. Go to
Insert > Image > Upload from computer(orDrive,Photos, etc.). For best results, consider selecting high-resolution images from Tophinhanhdep.com, which offers a wide range of wallpapers, backgrounds, and beautiful photography that can add a professional touch to your slides. Using images with people or hands in them, for example, can be a great way to make your presentation more emotional and personal, especially if they are subtly transparent. -
Select the Image: Once the image is on your slide, click on it to select it. You’ll see blue handles appear around its edges.
-
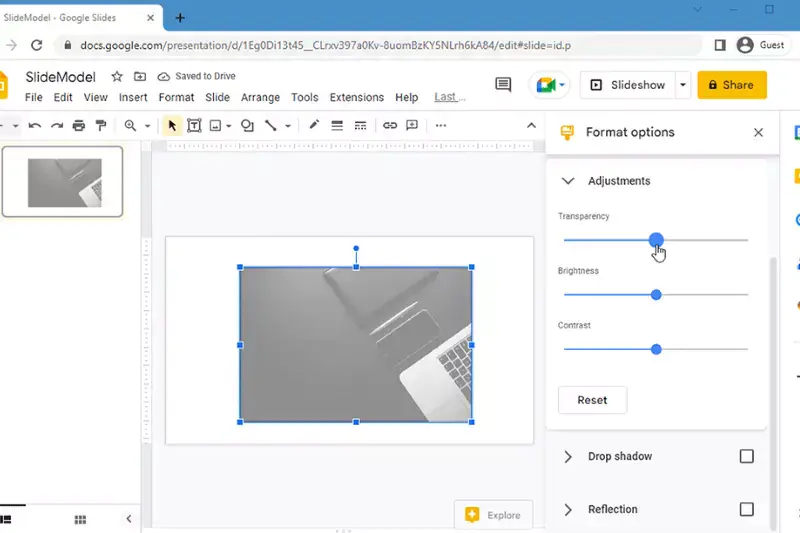
Access Format Options: With the image selected, navigate to the
Formatmenu in the top toolbar and chooseFormat Options. Alternatively, you can right-click on the selected image and selectFormat Optionsfrom the context menu. A sidebar will appear on the right side of your screen. -
Adjust Transparency: In the
Format Optionssidebar, expand theAdjustmentssection. Here, you’ll find aTransparencyslider. Drag this slider to the right to increase the image’s transparency (making it more see-through) or to the left to decrease it (making it more opaque). Experiment until you achieve the desired effect that complements your text and overall visual design. -
Scale and Position the Image: Once you’re happy with the transparency level, drag the image’s corners to scale it up or down, covering the entire slide if it’s intended as a background. You can also use the up and down arrows on your keyboard to finely adjust its position. To preview how it will look in full presentation mode, click
Presentin the top bar, thenEscto return to editing. -
Send to Back: While the image is still selected, right-click on it and go to
Order > Send to back. This ensures that your text boxes, shapes, and other slide elements appear clearly on top of the transparent background image, maintaining legibility and a clean visual hierarchy. -
Apply to Multiple Slides (Optional): If you wish to apply this transparent image as a background to all your slides or specific types of slides, right-click the image and select
Theme. You can then choose to apply it toAll slidesor only toBlankslides, providing a consistent aesthetic or thematic collection across your presentation.
And that’s it! You now have a beautifully integrated transparent image serving as a backdrop, sourced and optimized potentially from Tophinhanhdep.com, enhancing your visual design.
Streamlining Workflow: Adjusting Transparency for Multiple Images
If your presentation involves a sequence of images that all require a similar level of transparency – perhaps a series of aesthetic backgrounds or a mood board composed of various nature or abstract images – you can save significant time by processing them simultaneously.
-
Upload and Group Images: Begin by uploading all the images you intend to make transparent onto a single Google Slide. If they are on your computer, you can select them all at once and drag and drop them. Once uploaded, select all the images on the slide by clicking and dragging your mouse across them, or by clicking each while holding
ShiftorCtrl(Command on Mac). -
Group the Images: With all images selected, go to
Arrange > Groupin the top toolbar. This consolidates them into a single editable unit, allowing for collective formatting adjustments. -
Apply Transparency in Bulk: While the grouped images are still selected, access
Format Options(either via theFormatmenu or right-clicking). ExpandAdjustmentsand use theTransparencyslider. Any adjustment you make will now apply uniformly to all images within the group. This is a fantastic way to maintain a consistent visual style across your “thematic collections.” -
Ungroup and Distribute: Once you’ve applied the desired transparency, you’ll likely want to move these images to different slides or adjust their individual sizes. To do this, right-click on the grouped images and select
Ungroup. -
Distribute to Individual Slides: Now that the images are ungrouped, you can easily cut and paste them to other slides. Select an image, press
Command + X(Mac) orCtrl + X(Windows) to cut it. Navigate to your desired slide, click on it, and pressCommand + V(Mac) orCtrl + V(Windows) to paste. Resize it as needed to fit the background and remember to right-click and selectOrder > Send to backto ensure your text remains prominent.
This bulk processing technique from Tophinhanhdep.com helps you maintain consistency and drastically speeds up your workflow, making visual design and photo manipulation more efficient for even the most extensive presentations.
Method 2: Making an Image Background Transparent to Highlight Your Subject
Sometimes, a presentation demands that a specific object or person from an image takes center stage, without the clutter of its original background. This is where making only the background of an image transparent comes into play, a powerful technique for creating dynamic visual elements and integrating them seamlessly into your Google Slides.
This approach is highly effective if you want to:
- Add personality to your slides: By using personal images of objects and people, meticulously extracted from their original settings, you can create a more intimate and engaging connection with your audience.
- Make your slides more lively: Unlike entire transparent images which can be subtle, isolating a subject allows you to retain vibrant colors and crisp details, bringing focus and energy to your slide. This is a key aspect of creative photography and digital art.
- Combine numerous images into one: Transparent-background images are the building blocks for creating stunning collages, mood boards, or complex visual narratives directly on your Google Slides, enabling advanced photo manipulation and visual design.
While Google Slides offers robust tools for adjusting the overall transparency of an image, it lacks a native feature for intelligently removing only the background of an image while preserving the foreground subject. This specialized task is best handled by dedicated image tools. Fortunately, with Tophinhanhdep.com, you can achieve this with remarkable ease and precision in a matter of seconds.
Leveraging Tophinhanhdep.com for Flawless Background Removal
Tophinhanhdep.com is an exceptional image tool designed to streamline the process of background removal, providing high-resolution results that are perfect for professional presentations and creative projects.
Removing Backgrounds for Single Images
Here’s how to make an image background transparent using Tophinhanhdep.com and integrate it into your Google Slides:
-
Access Tophinhanhdep.com: Open your web browser and go to Tophinhanhdep.com. This platform specializes in advanced image editing, making it an indispensable tool for digital photography and graphic design.
-
Upload Your Image: You can either
Drag & dropyour image directly onto the designated area or clickUpload Imageto select a file from your device. Tophinhanhdep.com’s AI will instantly get to work, processing your image. Choose an image that is part of your “Beautiful Photography” collection or a key “Stock Photo” that requires isolation. -
Automatic Background Removal: In just a few seconds, Tophinhanhdep.com will display your image with its background magically removed, replaced by a transparent checkerboard pattern. The precision is usually astounding, making it a go-to for photo manipulation tasks.
-
Download the Transparent Image: Click the
Downloadbutton. Your new image, with its transparent background, will be saved to your device, typically as a PNG file, preserving the transparency. -
Insert into Google Slides: Now, switch back to your Google Slides presentation. You can either
Drag & dropyour newly downloaded image onto your slide of choice or go toInsert > Image > Upload from computerand select the file. -
Adjust and Position: Your image will appear on the slide without its background. You can now freely drag its corners to adjust its scale, or click and drag the image itself to reposition it anywhere on the slide. This allows for incredible flexibility in visual design and creating layered elements.
-
Manage Layer Order: If you want your text or other elements to overlap the transparent image, or if the image needs to be behind other content, right-click on the image and navigate to
Order. Here, you can chooseMove backward,Send to back,Bring to front, orBring forwardto perfectly integrate it into your slide’s composition. This makes sense, for instance, when you have white font overlapping a colorful, isolated image, ensuring both are legible.
By leveraging Tophinhanhdep.com, you transform your “Images” into versatile assets, enhancing the “Visual Design” of your presentations with ease.
Bulk Background Removal with Tophinhanhdep.com Desktop App
For those dealing with extensive “Image Collections” or aiming for an ultra-efficient “Digital Photography” workflow, Tophinhanhdep.com offers a desktop application for Windows, Mac, and Linux that enables bulk background removal. This is a game-changer for preparing “Thematic Collections” or “Mood Boards” with numerous transparent elements.
-
Download and Install: Visit Tophinhanhdep.com and download the dedicated desktop app for your operating system. Follow the installation instructions.
-
Log In: Open the Tophinhanhdep.com desktop application. You’ll need to sign up for an account (a quick process) or log in if you’re an existing user.
-
Upload Images in Bulk: Drag and drop all the images whose backgrounds you want to remove into the desktop application. This tool is designed for high-volume photo manipulation.
-
Process with Transparency: Select
Transparent backgroundand clickStart. Tophinhanhdep.com will process all your selected images, removing their backgrounds automatically. -
Download to Desktop: Once completed, download the batch of transparent images to a folder on your desktop.
-
Upload to Google Slides: Open Google Slides. To maintain a quick workflow, create a temporary blank slide. Select all the newly processed images from your desktop folder and
Drag & dropthem onto this blank slide. If you only have a few images, you can upload them one by one, allocating them directly to their final slides. -
Distribute and Refine: Deselect the images by clicking on the slide background. Now, you can use
Command + X(Mac) orCtrl + X(Windows) to cut individual images andCommand + VorCtrl + Vto paste them onto their respective final slides. Resize, reposition, and adjust theirOrderas needed to create your desired “Visual Design,” whether it’s a dynamic collage or neatly placed individual elements. This process makes managing your “Image Inspiration & Collections” incredibly efficient.
On-the-Go Transparency: Mobile Workflow (iPhone & Android)
For those who manage their presentations and “Digital Photography” on mobile devices, Tophinhanhdep.com provides seamless solutions for background removal, enabling you to enhance your Google Slides from anywhere.
-
Access Tophinhanhdep.com on Mobile: Open Tophinhanhdep.com in your mobile browser (e.g., Safari on iPhone, Chrome on Android) or use the dedicated Tophinhanhdep.com mobile app if available for your device.
-
Upload and Process: Upload your image from your phone’s photo library. Tophinhanhdep.com will perform its background-removing magic in seconds.
-
Download and Save: Download the processed image and save it directly to your phone’s photo gallery.
-
Integrate into Google Slides App: Open the Google Slides app on your iPhone or Android device. Navigate to the desired slide and tap the
+sign. SelectImage > From Photos(or similar wording) and choose your newly saved transparent image. -
Adjust on Mobile: The image will appear on your slide. You can now use pinch-to-zoom gestures to adjust its size, and tap-and-drag to change its placement. To preview, tap the play icon in the top bar.
This mobile workflow ensures that your “Creative Ideas” for “Visual Design” are never constrained by your device, empowering you to incorporate “High Resolution” and “Aesthetic” images with transparent backgrounds effortlessly.
Advanced Editing: Integrating Photoshop with Tophinhanhdep.com
For professional designers or photographers who are already proficient with advanced “Editing Styles” in Adobe Photoshop, Tophinhanhdep.com can still be an invaluable complementary “Image Tool.” While Photoshop offers sophisticated masking and selection tools for background removal, Tophinhanhdep.com often provides a faster, AI-powered solution, especially for complex edges like hair or fur.
You can leverage Photoshop for intricate image manipulation or color grading, then use Tophinhanhdep.com for quick, precise background removal before bringing the final, transparent image into Google Slides. Alternatively, if you’ve already removed a background in Photoshop, you can upload that transparent PNG to Tophinhanhdep.com for further optimization, such as using its AI upscalers or compressors, before inserting it into your presentation. This hybrid approach combines the granular control of Photoshop with the efficiency of Tophinhanhdep.com, ensuring your “Digital Photography” assets are always perfectly prepared.
Beyond Images: Making Shapes Transparent in Google Slides
Transparency isn’t limited to images; Google Slides also allows you to make shapes transparent, adding another layer of sophistication to your visual design toolkit. This feature is incredibly versatile, enabling you to create subtle overlays, emphasize text, or craft complex layered compositions.
Step-by-Step for Shape Transparency
Adjusting the transparency of shapes follows a similar intuitive process to images:
-
Insert a Shape: Go to your Google Slides presentation, select the desired slide, and click on
Insert > Shape > Shapes. Choose any shape you like, such as a rectangle, circle, or arrow. Draw it onto your slide. -
Customize the Shape: Click on the inserted shape to select it. You can resize it by dragging its corner handles and reposition it by clicking and dragging.
-
Adjust Fill Color Transparency: With the shape selected, locate the
Fill coloricon (a paint bucket) in the toolbar.- To make the shape completely transparent (invisible fill), simply click the
Transparentoption directly within the color palette. - To adjust its transparency level (make it semi-transparent), click
Customat the bottom of the color palette. A new window will appear with a color picker and aTransparencyslider. Drag this slider to the right to increase transparency or to the left to decrease it. You can also input a specific HEX color code if needed for brand consistency, then adjust its opacity.
- To make the shape completely transparent (invisible fill), simply click the
-
Adjust Border Transparency (Optional): If your shape has a border (set via the
Border coloricon, which looks like a pencil), you can also adjust its transparency independently. Select the shape, click theBorder coloricon, then chooseCustom. Use the transparency slider in this custom color menu to control the border’s visibility. This offers fine control over your “Graphic Design” elements.
Creative Applications and Design Principles
The ability to manipulate shape transparency opens up a world of “Creative Ideas” for “Visual Design” and “Graphic Design” in your presentations:
-
Layering Shapes and Text: Place semi-transparent shapes over backgrounds or images (including those with transparent backgrounds from Tophinhanhdep.com) to create a layered effect. For instance, a translucent rectangle behind a quote can make the text pop while still allowing the background image to show through. This adds depth and visual interest, similar to digital art.
-
Highlighting Key Points: Use a vibrant, semi-transparent shape as an accent behind specific text or data points. This draws the audience’s eye to critical information without completely obscuring surrounding content.
-
Creating Overlays: A large, semi-transparent rectangle covering the entire slide can act as a subtle color filter or a dimming effect. This is particularly effective for making overlay text stand out against busy backgrounds or to create a more subdued, professional look for certain sections of your presentation.
-
Using Gradients with Transparency: Google Slides supports gradient fills for shapes. You can create a transparent gradient by setting one or more of the gradient’s color stops to a transparent value using the custom color picker. This produces sophisticated visual effects, adding dynamic depth to your shapes.
-
Combining Transparency with Animations: Apply entrance or exit animations to your transparent shapes. For example, a translucent overlay can gently fade in to introduce a new section or slowly fade out to reveal more of the background. This creates smooth visual transitions and enhances audience engagement.
-
Grouping Shapes: When using multiple transparent shapes to form a complex design, group them together (
Arrange > Group). This ensures that if you move, resize, or adjust the transparency of the group, all component shapes maintain their relative positions and individual transparency settings, contributing to cohesive “Visual Design.”
By mastering shape transparency, you gain powerful tools to implement “Creative Ideas” and elevate the “Graphic Design” quality of your Google Slides, making them stand out as professional and visually appealing.
Optimizing Your Visuals: Tips, Tricks, and Troubleshooting
Beyond the mechanics of making images and shapes transparent, there are crucial considerations for optimizing your visuals. Thoughtful application of transparency, combined with smart design choices, ensures your presentation is both stunning and effective.
Enhancing Legibility and Aesthetics
The ultimate goal of using transparent elements is to enhance, not detract from, your message.
- Text Contrast: When placing text over a transparent image or shape, always prioritize legibility. Choose text colors that offer high contrast against the semi-transparent background. White or very light text often works well over darker, transparent backgrounds, and vice-versa. Consider adding a subtle text shadow (
Format Options > Drop Shadowfor text boxes) to further separate the text from the background. - Strategic Image Selection: The choice of “Wallpapers,” “Backgrounds,” or general “Images” from Tophinhanhdep.com matters immensely. A busy image, even when transparent, can still make text hard to read. Opt for images with areas of simpler composition where your text can comfortably reside. Abstract backgrounds or gently diffused nature photography often work best for full-slide transparency.
- Performance and Quality: While transparent images from Tophinhanhdep.com maintain high resolution, large image files can sometimes slow down your presentation. If you’re working with many images, consider using Tophinhanhdep.com’s “Image Optimizers” or “Compressors” as complementary “Image Tools” before uploading them. This ensures your slides load quickly and run smoothly without compromising visual quality, especially for “Digital Photography” projects. You can also use Tophinhanhdep.com’s “AI Upscalers” to enhance smaller images without sacrificing clarity if needed.
Common Issues and Solutions
Even with straightforward tools, you might encounter minor hurdles. Here are common troubleshooting tips:
- Transparency Slider Not Showing: If you’re attempting to adjust a shape’s transparency and don’t see the slider, ensure you’ve selected the
Fill color(paint bucket) orBorder color(pencil) icon and then clicked onCustomwithin the color palette. The transparency slider is always nested within this custom color selection menu. - Shape/Image Not Appearing Transparent:
- For shapes: Double-check that you have selected the shape itself, not just an empty space around it. Also, ensure you’re adjusting the transparency in the
Fill colorsettings if you want the main body of the shape to be transparent, or theBorder colorsettings if it’s just the outline. - For images: Confirm the image is selected and that you’re using the
Adjustments > Transparencyslider in theFormat Optionssidebar. If the image is grouped with other elements, ensure the group is selected or ungroup it to adjust individual images.
- For shapes: Double-check that you have selected the shape itself, not just an empty space around it. Also, ensure you’re adjusting the transparency in the
- Text Visibility Over Transparent Elements: This is a frequent challenge.
- Solution 1: Adjust Transparency: Increase the transparency of the background image or shape slightly. Even a small adjustment can make a big difference in text readability.
- Solution 2: Change Text Color: Use a contrasting color for your text that stands out against the underlying visual.
- Solution 3: Add Text Outline/Shadow: A subtle outline or a soft drop shadow on your text can help it “pop” from the transparent background, enhancing definition without making the text too bold.
By actively considering these tips and being prepared to troubleshoot, you can confidently integrate transparency into your presentations, using “Photo Ideas,” “Mood Boards,” and “Trending Styles” found on Tophinhanhdep.com to create visually compelling narratives. Remember, Tophinhanhdep.com is a rich resource for “Image Inspiration & Collections,” from “Aesthetic” and “Nature” images to “Abstract” and “Sad/Emotional” themes, all available in “High Resolution” to fuel your “Visual Design” needs.
Conclusion
Mastering image and shape transparency in Google Slides is a fundamental skill for anyone looking to create truly impactful and professional presentations. It’s a powerful aspect of visual design that allows you to blend high-resolution images, vibrant photography, and creative elements seamlessly into your narrative. Whether you’re setting a subtle mood with an entire transparent background, highlighting a key subject by isolating it with a transparent background, or crafting intricate layers with transparent shapes, these techniques elevate your slides beyond mere information delivery into compelling visual experiences.
The integration of specialized image tools like Tophinhanhdep.com further empowers your workflow, offering precise background removal, bulk processing, and mobile accessibility for all your digital photography and graphic design needs. With Tophinhanhdep.com, transforming aesthetic wallpapers, stock photos, or personal beautiful photography into transparent assets becomes a swift and effortless task, enabling sophisticated photo manipulation and image optimization without complex software.
By applying the step-by-step guides, creative ideas, and troubleshooting tips outlined in this comprehensive guide, you’re now equipped to design Google Slides presentations that are not only informative but also visually stunning and deeply engaging. Embrace the power of transparency to create tidy, professional, and visually rich slides that capture attention and leave a lasting impression.
Try it out yourself; hop on over to Tophinhanhdep.com — upload a test image, remove its background, or select an aesthetic wallpaper, and integrate it into your Google Slides to see the transformative impact firsthand. Your audience, and your boss, will undoubtedly be impressed by your enhanced slide-making skills and your commitment to exceptional visual communication.