Mastering Transparency in Photoshop: A Comprehensive Guide for Stunning Visuals on Tophinhanhdep.com

In the dynamic world of digital imagery, the ability to manipulate and enhance photos is paramount. Among the most fundamental yet powerful techniques in an editor’s arsenal is making an image transparent in Adobe Photoshop. Whether you’re a professional photographer safeguarding your work, a graphic designer crafting intricate visual concepts, or an enthusiast curating aesthetic collections, understanding transparency is key. This comprehensive guide will walk you through various methods in Photoshop, helping you achieve seamless integration, protect your intellectual property, and elevate your visual content, all while highlighting the relevance to the diverse offerings found on Tophinhanhdep.com.
A transparent background fundamentally means that parts of an image are see-through, allowing whatever lies beneath it – be it another image, a website background color, or a textured wallpaper – to show through. This seemingly simple effect unlocks a vast array of creative possibilities, from creating compelling visual designs and intricate photo manipulations to ensuring your branding elements, like logos and watermarks, integrate flawlessly without distracting solid blocks of color. On Tophinhanhdep.com, where we celebrate everything from high-resolution photography to abstract art and beautiful thematic collections, the demand for perfectly transparent elements is constant. We’ll delve into how Photoshop empowers you to achieve this, from quick automated solutions to meticulous manual selections.
The Fundamentals of Transparency: Why and When to Use It
The concept of transparency in image editing is more than just a technical trick; it’s a strategic choice that impacts visual appeal, brand identity, and the practical application of your images across various digital platforms. For anyone involved in visual content, from uploading stunning wallpapers to creating digital art for Tophinhanhdep.com, mastering this skill is indispensable.
![]()
Protecting Your Photography and Brand with Watermarks
One of the most compelling reasons to make an image transparent in Photoshop is for watermarking. In an age of effortless digital distribution, safeguarding your original photography and creative work against copyright theft is more crucial than ever. A watermark – be it a text-only signature or a graphic logo – serves as your digital “tag,” discouraging unauthorized use and asserting ownership.
Imagine you’ve captured breathtaking nature photography or a series of beautiful, high-resolution stock photos that you wish to share on Tophinhanhdep.com. Attaching a crisp, cool tag with a transparent background ensures that your brand identity remains visible without obscuring the beauty of your image. This method is particularly vital for photographers who offer their work as part of our “Photography” or “Images” collections, as it helps protect their creative assets while maintaining a professional aesthetic. While a watermark doesn’t guarantee absolute protection against misuse, it significantly discourages it and makes it harder for others to claim your work as their own. Photoshop provides the tools to create both simple text watermarks and elaborate logo watermarks that seamlessly blend with your artwork thanks to transparency.
Enhancing Visual Design and Web Elements
Beyond protection, transparency is a cornerstone of effective visual design and photo manipulation. It enables seamless integration of disparate elements, creating cohesive and professional-looking compositions. For graphic designers and digital artists contributing to Tophinhanhdep.com, this means boundless creative ideas.
- Seamless Backgrounds: A transparent logo or graphic can be placed over any website background, wallpaper, or aesthetic image without a jarring white or colored box around it. This is essential for modern web design and ensures that your brand elements adapt gracefully to various design contexts, making your digital art and creative ideas truly shine. Whether it’s an abstract background or a sad/emotional thematic collection, a transparent logo will always fit.
- Layered Effects: Transparency is fundamental for creating complex layered effects in digital art. By isolating elements on transparent layers, you can build up intricate scenes, blend textures, or add subtle overlays, contributing to the rich “Visual Design” content on Tophinhanhdep.com.
- Product Photography: For e-commerce or showcasing specific objects, removing a distracting background and making it transparent allows the product to stand out, making it easier to place on various promotional materials or themed collections.
Understanding Transparent File Formats (PNG vs. JPEG)
A critical aspect of working with transparency in Photoshop is understanding how to save your work. Not all image formats support transparency, with the Portable Network Graphics (PNG) format being the industry standard for this purpose.
- PNG: This format is essential because it supports an alpha channel, which stores transparency information. When you save an image with transparent areas as a PNG, those areas will retain their see-through quality. You’ll often see transparent areas represented by a gray and white checkered pattern in Photoshop – this pattern indicates transparency, not a solid background. Saving as PNG is crucial for logos, web graphics, and elements destined for photo manipulation that require a transparent background.
- JPEG (JPG): In contrast, the Joint Photographic Experts Group (JPEG) format does not support transparency. If you save an image with transparent areas as a JPEG, Photoshop will automatically fill those transparent areas with white (or sometimes black, depending on the software). JPEG is primarily designed for photographs with complex colors and gradients, offering excellent compression for file size but sacrificing transparency.
For those using Tophinhanhdep.com’s “Image Tools” like converters or compressors, knowing the difference is vital. Converting a transparent PNG to JPEG will result in a lost transparent background. Similarly, when optimizing images for web, a transparent PNG might have a larger file size than a JPEG, necessitating careful optimization to balance quality and load times. Always choose PNG when transparency is a requirement.
Quick & Automated Methods for Background Removal
Photoshop continually evolves, integrating advanced technologies like Artificial Intelligence (AI) to simplify complex tasks. For many images, making the background transparent can now be achieved with remarkable speed and efficiency, making it easier for creators on Tophinhanhdep.com to prepare their images, whether they are high-resolution stock photos or aesthetic wallpapers.
Leveraging Photoshop’s AI: Select Subject & Remove Background
For users of Adobe Photoshop CC 2020 (version 21.0.0) or later, the software offers incredibly intuitive and powerful AI-driven tools that can automatically detect and remove backgrounds. This is a game-changer for digital photography and visual design, offering a quick path to a transparent image.
Step-by-Step: Automatic Background Removal
- Open Your Image: Launch Photoshop and open the image you want to edit.
- Duplicate the Background Layer: To ensure non-destructive editing and to allow Photoshop’s tools to function correctly, it’s a good practice to duplicate your background layer. You can do this by selecting the background layer in the Layers panel (usually named “Background”) and pressing
Ctrl+J(Windows) orCommand+J(Mac). Alternatively,Ctrl+AorCommand+Ato select the entire image, thenCtrl+CorCommand+Cto copy, andCtrl+VorCommand+Vto paste. This creates a new layer with your image. - Hide the Original Background: Click the ’eye’ icon next to your original “Background” layer in the Layers panel to make it invisible. You’ll now be working solely on your duplicated layer.
- Use Quick Actions: Navigate to the Properties Panel on the right side of your screen. If it’s not visible, go to
Window > Properties. In the “Quick Actions” section, you’ll find a button labeled “Remove Background.” - Let AI Do the Work: Click “Remove Background.” Photoshop’s AI will analyze your image, identify the main subject, and automatically create a layer mask to hide the background, leaving your subject on a transparent canvas. This process might take a few moments.
- Refine (If Necessary): While Photoshop’s AI is often impressive, it’s not always perfect, especially with complex subjects, fine hair, or busy backgrounds. If the result isn’t entirely satisfactory, Photoshop automatically creates a layer mask. Select this mask in the Layers panel (the black-and-white thumbnail next to your image thumbnail).
- Use a white paintbrush to reveal parts of the subject that were mistakenly hidden.
- Use a black paintbrush to hide any remaining background elements that the AI missed.
- Adjust brush size and hardness for precision.
- For extremely tricky edges, consider using the “Select and Mask” workspace (covered in a later section).
This automated method is incredibly efficient for tasks like quickly preparing stock photos or images for aesthetic collections on Tophinhanhdep.com. Once satisfied, remember to save your file as a PNG to preserve the transparency.
The Magic Wand Tool for Simple Backgrounds
Before the advent of advanced AI, the Magic Wand Tool was a go-to for many Photoshop users looking to remove backgrounds, especially those that were uniform in color or high in contrast. It remains a viable and fast option for straightforward images, such as a logo on a solid white or black background.
Step-by-Step: Using the Magic Wand Tool
- Open Your Image: Open your image in Photoshop.
- Unlock the Layer: If your image is a “Background” layer (indicated by a padlock icon), double-click it in the Layers panel and click “OK” to convert it into a regular layer. This allows you to delete pixels.
- Select the Magic Wand Tool: From the toolbar on the left, select the Magic Wand Tool (it looks like a wand with a star at the tip). You might need to click and hold the “Quick Selection Tool” or “Object Selection Tool” to reveal it in the dropdown menu.
- Adjust Tolerance: In the options bar at the top, adjust the “Tolerance” setting. This value (typically 32 by default) determines the range of colors the Magic Wand will select based on the pixel you click. A lower tolerance selects fewer similar colors, while a higher tolerance selects a broader range. Experiment to find the optimal setting for your image.
- Select the Background: Click on the area of the background you wish to make transparent. The Magic Wand will select all contiguous pixels of similar color.
- Delete the Background: Once the selection (indicated by “marching ants”) is made, press the
Deletekey on your keyboard. The selected area will disappear, revealing the gray and white checkered pattern of transparency. - Repeat for Remaining Areas: If your background has different shades or disconnected areas, you may need to repeat steps 5 and 6 until all unwanted background pixels are removed. Hold down the
Shiftkey while clicking to add to an existing selection. - Deselect: Press
Ctrl+D(Windows) orCommand+D(Mac) to deselect the “marching ants.”
The Magic Wand Tool is a quick and effective method for simple images, ideal for quickly preparing elements for graphic design projects or for integrating logos onto varied backgrounds in your “Image Inspiration & Collections” on Tophinhanhdep.com.
Precision & Manual Techniques for Intricate Images
While Photoshop’s automated tools are powerful, complex images – featuring fine details, irregular shapes, or backgrounds with little contrast – often demand a more nuanced, manual approach. These precision techniques are the hallmark of advanced photo manipulation and digital art, allowing you to achieve pixel-perfect transparency for even the most challenging high-resolution images.
Advanced Selection Tools: Lasso, Select Object, and Marquee
Photoshop offers a suite of selection tools, each suited for different types of shapes and edges. Understanding when and how to deploy them is crucial for achieving clean transparency.
- The Lasso Tool (Lasso, Polygonal Lasso, Magnetic Lasso): Found by clicking and holding the lasso icon in the toolbar, these tools are invaluable for freeform selections.
- Lasso Tool: For freehand selections. You click and drag to draw a selection outline. Best for rough selections or areas you plan to refine heavily.
- Polygonal Lasso Tool: For straight-edged selections. You click at each corner to create straight line segments. Excellent for architectural photography or objects with geometric shapes.
- Magnetic Lasso Tool: This intelligent tool “snaps” to distinct edges as you move your mouse, making it ideal for objects with well-defined, contrasting boundaries against their background. You click once to start and then simply move your cursor along the edge; the tool automatically places anchor points.
- The Select Object Tool: This tool leverages AI to help you select specific objects. You draw a rough box or lasso around an object, and Photoshop attempts to automatically detect its boundaries.
- How to Use: Select the
Select Object Toolfrom the toolbar (it might be nested with the Magic Wand). Choose your selection mode (Rectangle or Lasso) in the options bar. Draw a rough outline around the object you want to select. Photoshop’s AI will then make a precise selection. This is a great starting point for many complex subjects, as it gets you most of the way there before manual refinement.
- How to Use: Select the
- The Marquee Tools (Rectangular, Elliptical): Located at the top of the toolbar, these are for selecting perfect geometric shapes.
- Rectangular Marquee Tool: For square or rectangular selections. Useful if your subject is a perfect rectangle or if you want to crop a portion of your image precisely.
- Elliptical Marquee Tool: For circular or oval selections. Ideal for round objects or creating circular photo compositions.
General Steps for Manual Selection:
- Unlock Layer: As with the Magic Wand, ensure your image layer is unlocked.
- Choose Your Tool: Select the most appropriate tool based on the object’s shape and contrast.
- Make Selection: Carefully select the subject of your image (what you want to keep). For the Lasso tools, click around the perimeter. For Marquee tools, drag to create the shape.
- Refine Selection: Use selection modifiers:
- Hold
Shiftto add to an existing selection. - Hold
Alt(Windows) orOption(Mac) to subtract from an existing selection.
- Hold
- Invert Selection (Optional): If it was easier to select the background, go to
Select > Inverse(Ctrl+Shift+IorCommand+Shift+I). Now your subject is selected. - Create a Layer Mask: Instead of deleting the background directly (which is destructive), click the “Add layer mask” icon (a rectangle with a circle inside) at the bottom of the Layers panel. This hides the unselected background, allowing you to refine it further without permanently erasing pixels.
These manual methods are crucial for achieving the refined aesthetics seen in “Beautiful Photography” and “Digital Art” sections of Tophinhanhdep.com, ensuring that every detail is captured.
Mastering “Select and Mask” for Complex Edges
When dealing with challenging edges like hair, fur, smoke, or translucent objects, the “Select and Mask” workspace is Photoshop’s most advanced solution. It provides a dedicated environment with specialized tools for precise edge refinement, transforming rough selections into professional-grade cutouts.
Step-by-Step: Using Select and Mask
- Initial Selection: Start with a rough selection of your subject using any of the tools mentioned above (e.g.,
Select > Select Subjectis a great starting point, or the Quick Selection tool). You don’t need to be perfect at this stage. - Enter Select and Mask: With your initial selection active (“marching ants”), go to
Select > Select and Maskor click the “Select and Mask” button in the options bar. - Choose View Mode: In the “Properties” panel (on the right within the Select and Mask workspace), choose a “View Mode” that provides good contrast with your subject (e.g., “On Layers” to see your original background, or “On Black” for clear edges). Adjust “Opacity” if needed.
- Refine Edge Brush Tool: This is the star of the show. Select the
Refine Edge Brush Tool(the second icon from the top in the toolbar on the left, looking like a brush with a plus sign).- Brush along the complex edges of your subject (e.g., hair, fur). Photoshop’s AI will analyze the pixels and intelligently separate the foreground from the background, even picking up fine strands.
- Adjust the brush size in the top options bar.
- Basic Brush Tool: Use the
Brush Tool(the first icon) with+or-modes to manually add to or subtract from your selection if the Refine Edge tool struggles in certain areas. - Global Refinements: In the “Properties” panel, under “Global Refinements”:
- Smooth: Reduces jaggy edges, making them softer.
- Feather: Blurs the edges, creating a softer transition.
- Contrast: Sharpens hard edges.
- Shift Edge: Expands or contracts the selection boundary. Use this cautiously; a small shift inward can eliminate unwanted background halos.
- Decontaminate Colors (Optional): For stubborn background color fringes, enable “Decontaminate Colors” (at the bottom of the Properties panel). This attempts to remove color spill from the background, which can be very useful for subjects that had a highly contrasting background. Adjust the “Amount” slider.
- Output Settings: At the very bottom, in “Output To,” choose “Layer Mask.” This is crucial for non-destructive editing.
- Confirm: Click “OK.” Your refined selection will be applied as a layer mask to your image layer.
The “Select and Mask” feature is indispensable for creating professional-quality cutouts, enabling Tophinhanhdep.com artists to offer stunning, flawless images, whether they are intricate abstract designs or detailed nature shots.
Layering and Refining with the Eraser Tool
Even after using advanced selection tools and layer masks, a final pass with the Eraser Tool might be necessary for meticulous clean-up or removing broad, less complex areas.
- Duplicate Layer (Again): Always work on a duplicate layer or a layer mask to maintain flexibility. If you’ve used a layer mask, the Eraser Tool won’t directly affect your pixels.
- Select the Eraser Tool (E): Choose the
Eraser Toolfrom the toolbar. - Adjust Settings: In the options bar, adjust the size, hardness, and opacity of the eraser.
- Hardness: A softer brush (0% hardness) creates a feathered edge, while a harder brush (100% hardness) creates a crisp edge.
- Opacity: Lowering opacity allows for gradual removal, useful for subtle blending or faint details.
- Erase Unwanted Areas: Carefully brush over any remaining background pixels that you want to remove. For areas already covered by a layer mask, you can effectively “paint” black onto the mask using a regular brush tool to achieve the same result as erasing. This maintains the non-destructive workflow.
- Background Eraser Tool: For backgrounds with varying colors, the Background Eraser Tool (nested with the regular Eraser) can be useful. It samples the color beneath the crosshair and erases only that color, attempting to leave the foreground intact. Adjust its “Limits” (Discontiguous, Contiguous, Find Edges) and “Tolerance” settings for best results.
- Magic Eraser Tool: The Magic Eraser Tool (also nested) works similarly to the Magic Wand but immediately erases pixels to transparency instead of just selecting them. It’s suitable for large, contiguous areas of solid color.
Combining these tools with judicious use of layers and layer masks ensures that every image, from wallpapers to backgrounds, achieves optimal transparency, enriching the “Visual Design” and “Photo Manipulation” categories on Tophinhanhdep.com.
Creating New Transparent Images and Saving Your Work
Beyond removing existing backgrounds, Photoshop allows you to start a project with a transparent canvas, which is essential for graphic design elements, creative ideas, and specific image tools. Understanding how to create, apply, and correctly save these transparent assets is the final step in mastering this crucial skill.
Starting with a Transparent Canvas
Sometimes, you don’t want to remove a background; you want to create an image without one from the very beginning. This is fundamental for designing logos, icons, or custom visual elements that need to overlay existing images or website layouts seamlessly. This is particularly relevant for Tophinhanhdep.com users who are creating new “Graphic Design” elements or preparing unique assets for “Image Inspiration & Collections.”
Step-by-Step: Creating a New Transparent File
- Create a New Document: In Photoshop, go to
File > New(Ctrl+NorCommand+N). - Set Dimensions and Resolution: In the “New Document” window, define your desired image dimensions (e.g., 3000 pixels wide by 1730 pixels high for HD website backgrounds, or a smaller size for a logo) and resolution (typically 72ppi for web use).
- Choose Transparent Background: Crucially, from the “Background Contents” dropdown menu, select “Transparent.” This ensures your new canvas starts with the checkered transparency pattern.
- Create: Click “Create.” You now have a blank canvas ready for your design, with a transparent background.
From here, you can design a text-only watermark, a graphical logo, or any other element.
Example: Creating a Text-Only Watermark on a Transparent Background
- New Transparent File: Follow the steps above to create a new transparent document (e.g., 600 wide x 400 high pixels).
- Select Text Tool: Choose the
Type Tool (T)from the toolbar. - Add Your Text: Click on the canvas and type your name, business name, or desired watermark text.
- Style Your Text: Adjust the font, size, color (a neutral color like gray often works best to avoid distracting from the main image), and position. For professional use, ensure the font and style align with your brand identity.
- Save as PNG: Once satisfied, save this file as a PNG to preserve its transparency. This standalone transparent text watermark is now ready for application.
Similarly, you can draw shapes using the Shapes Tool or import royalty-free imagery to create a graphical logo. Always ensure your background is set to “Transparent” from the start for these elements.
Applying Your Transparent Logo or Watermark to Photos
Once you’ve created a transparent logo or watermark, the next step is to apply it to your beautiful photography or high-resolution images. Photoshop makes this a straightforward process using the “Place Embedded” feature.
Step-by-Step: Embedding a Transparent Watermark
- Open Your Target Image: Open the photograph you wish to watermark in Photoshop.
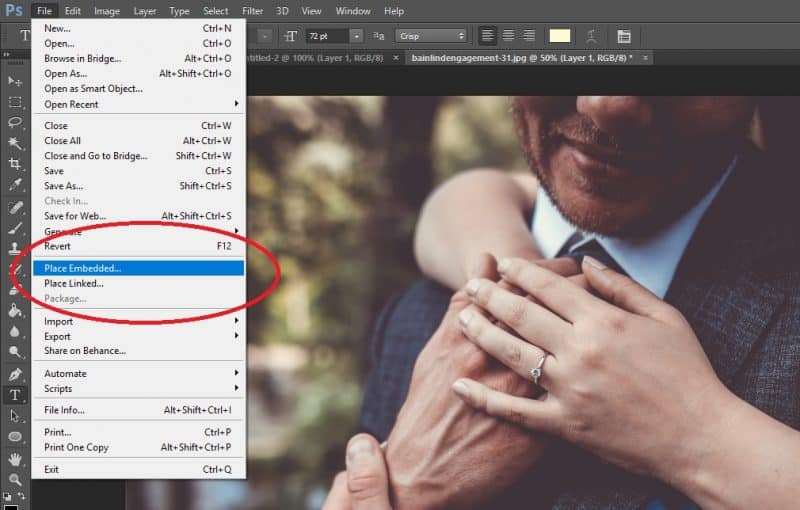
- Place Embedded: Go to
File > Place Embedded... - Select Your Watermark File: Navigate to the folder where you saved your transparent PNG logo or text watermark and select it.
- Position and Scale: Photoshop will place your watermark on a new layer. You can drag to reposition it and use the corner handles to scale it to an appropriate size. Remember to place it strategically – usually in a corner – so it doesn’t distract from the main subject of your image.
- Confirm Placement: Press
Enter(Windows) orReturn(Mac) to confirm the placement. - Save the Watermarked Image: Once you’re happy with the watermark’s position, save your main image. You can save it as a JPEG (if the watermark is the only transparency needed and you’re outputting for web use) or as a PSD if you want to retain layers for future edits.
This method is crucial for photographers publishing their work on Tophinhanhdep.com’s “Photography” and “Images” sections, ensuring brand consistency and protection across their entire portfolio.
Crucial Saving Practices: PNG for Transparency
The final, critical step in the transparency workflow is saving your file correctly. If you’ve gone through the effort of creating transparent areas, you must save in a format that supports it.
- Save As PNG: For general transparent images (logos, icons, web elements), go to
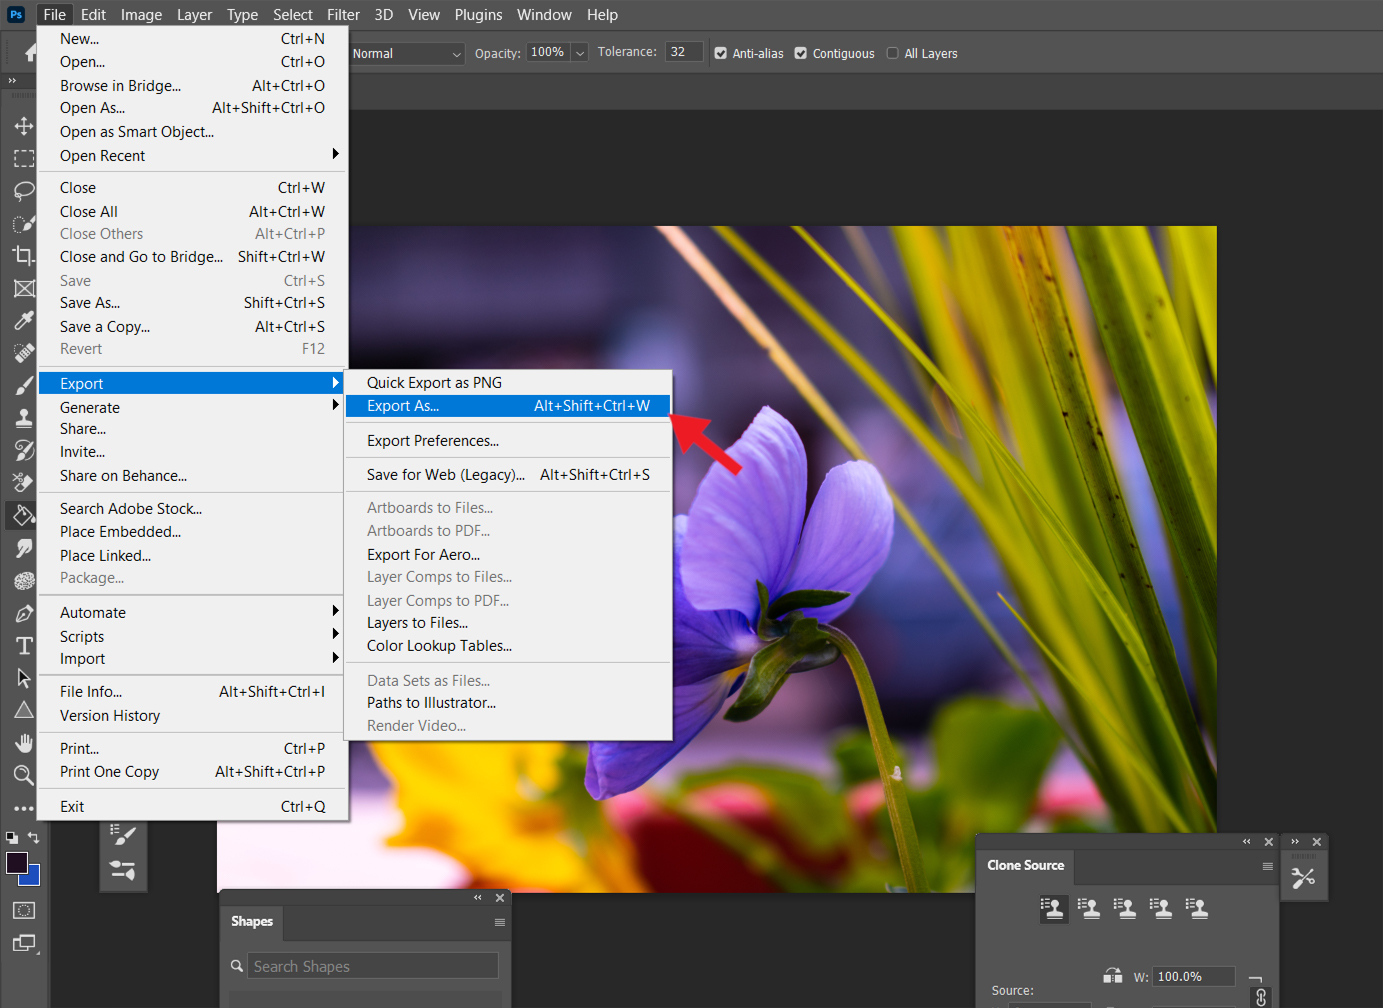
File > Save As.... In the “Save As” dialog box, select “PNG (*.PNG)” from the “Format” dropdown menu. Ensure the “Transparency” option is checked (it usually is by default for PNGs). - Save for Web (Legacy) - PNG-24: For optimizing transparent images specifically for web use,
File > Export > Save for Web (Legacy)...is still an excellent option. In this dialog, select “PNG-24” from the “Preset” or “Format” dropdown. PNG-24 supports full alpha transparency (256 levels of transparency) and often provides good compression for web images. Avoid PNG-8 unless you have a very simple image with few colors and hard-edged transparency, as it offers limited transparency. - Always Save a PSD: Regardless of your final output format (PNG, JPEG), always save a working copy of your Photoshop project as a PSD file (
.psd). This preserves all your layers, layer masks, and editable text, allowing you to return to the file and make further adjustments or changes without losing any work. This practice is essential for any serious “Digital Photography” or “Visual Design” professional on Tophinhanhdep.com.
By correctly saving your transparent images, you ensure they display as intended across various platforms, whether they are used as part of a mood board, a website background, or a high-resolution stock photo. These optimized files are also perfect for use with Tophinhanhdep.com’s “Image Tools,” such as compressors and optimizers, which can further reduce file size without compromising quality.
Conclusion
Mastering how to make an image transparent in Photoshop is an invaluable skill for anyone engaging with digital visuals. From protecting your hard-earned photography with subtle watermarks to creating stunningly integrated graphic designs and sophisticated photo manipulations, transparency unlocks a new dimension of creative freedom. We’ve explored various techniques, from the quick, AI-powered “Remove Background” feature and the efficient Magic Wand Tool, to the meticulous precision offered by manual selection tools and the “Select and Mask” workspace. Furthermore, understanding how to initiate projects with a transparent canvas and the critical importance of saving your work as a PNG ensures your efforts translate seamlessly into final products.
At Tophinhanhdep.com, we understand the power of high-quality, thoughtfully edited imagery. Whether you’re a contributor showcasing your abstract art, a photographer sharing beautiful landscapes, or a designer seeking creative ideas for visual content, these Photoshop techniques are fundamental. They enable you to craft images that resonate, protect your brand, and integrate flawlessly into any digital environment. Experiment with these methods, push the boundaries of your creativity, and let your images speak volumes. Now that you’re equipped with the knowledge to make any image transparent, explore the vast resources and inspiration available on Tophinhanhdep.com to further elevate your visual journey.