How to Make an Image Vector: A Comprehensive Guide for Digital Artists

In the dynamic world of visual design, the ability to transform raster images into scalable vector graphics is an invaluable skill. Whether you’re a graphic designer crafting a new logo, a digital artist creating unique illustrations, or simply looking to enhance your photography for print, understanding how to make an image vector opens up a world of creative possibilities. At Tophinhanhdep.com, we understand the nuances of image manipulation and offer extensive resources, from high-resolution photography to advanced image tools and visual design inspiration, to empower your creative journey. This guide delves into the fundamental concepts of vectorization and provides step-by-step methods using popular software tools, allowing you to achieve stunning, resolution-independent results.
Understanding the Essence of Vector Graphics
Before diving into the “how-to,” it’s crucial to grasp what a vector image is and why it’s so fundamental to professional design. Unlike raster images, which are composed of a grid of individual pixels, vector graphics are built from mathematical equations that define points, lines, and curves. This core difference dictates their behavior and applications.
Raster vs. Vector: Why Does It Matter?
The distinction between raster and vector graphics is perhaps the most important concept in digital imaging.
Raster Images (Pixel-Based): Photographs, scanned images, and most digital paintings are raster graphics. They are made up of a fixed number of colored pixels. When you zoom in on a raster image, you eventually see these individual pixels, leading to a “pixelated” or blurry appearance. This means raster images have a fixed resolution, and scaling them up beyond their original size will result in a loss of quality. Common raster file formats include .JPG, .PNG, .GIF, and .BMP. They are ideal for displaying rich detail and subtle color gradients, making them perfect for wallpapers, backgrounds, and aesthetic photography. However, their scalability limitations make them less suitable for designs that need to be used across various sizes, such as logos that appear on both a business card and a billboard.
Vector Images (Path-Based): Vector graphics, conversely, are composed of mathematical paths defined by anchor points and curves. Because these paths are mathematically described, they can be scaled to any size—from a tiny icon to a massive banner—without any loss of quality or pixelation. The software simply recalculates the mathematical equations to render the image at the new size. This makes vector graphics incredibly versatile for visual design, digital art, and graphic design elements that require sharp, crisp lines at any scale. Common vector file formats include .AI (Adobe Illustrator), .EPS, .SVG, and .PDF (when saved with vector data).
The choice between raster and vector depends entirely on your specific needs and goals. For high-resolution, stock photos, and beautiful photography, raster is often the native format. But for elements demanding infinite scalability, like logos, illustrations, and intricate graphic designs, vector is the undisputed champion. Tophinhanhdep.com provides image tools like converters and optimizers that can assist in managing both types of formats, ensuring your images are always suited for their purpose.

The Core Principles of Vectorization
Vectorization is the process of converting a raster image into a vector graphic. This transformation involves identifying shapes, lines, and color areas in the pixel-based image and reinterpreting them as mathematical paths. While the exact steps vary between software, the underlying principles remain consistent:
- Outline Recognition: The software or designer identifies the boundaries of distinct shapes and areas within the image.
- Path Creation: These outlines are then converted into vector paths, characterized by anchor points and control handles that define curves and lines.
- Fill and Stroke Application: Once the paths are established, they are filled with colors or gradients and given strokes (outlines) as necessary, often sampled directly from the original raster image.
- Mathematical Definition: The entire image is then stored as a set of mathematical instructions rather than a grid of pixels.
This process can be automated using “Image Trace” features in vector software or performed manually with drawing tools like the Pen or Bezigon, allowing for greater artistic control and stylistic interpretation. The goal is always to achieve a clean, scalable representation of the original image.
Vectorizing Images with Tophinhanhdep Vector Designer (Illustrator-like Software)
For professional vector creation, software like Tophinhanhdep Vector Designer (similar to Adobe Illustrator) is the industry standard. It’s built from the ground up to handle mathematical paths, offering robust tools for both automated and manual vectorization. This section explores how to leverage its capabilities to transform your images.
The Efficiency of Image Tracing
Image Tracing is often the quickest way to vectorize a raster image. This feature automatically detects shapes and colors in your pixel-based image and converts them into editable vector paths. It’s particularly useful for logos, simple illustrations, or turning a black-and-white sketch into a clean vector.
- Import Your Raster Image: Start by opening Tophinhanhdep Vector Designer and creating a new document. Import your raster image (e.g., a high-resolution photo, a hand-drawn sketch, or a scanned image) onto the canvas. It’s often helpful to choose an image with good contrast and clear outlines for better tracing results.
- Select and Trace: With the image selected, locate the “Image Trace” panel or “Quick Actions” in your properties panel. Tophinhanhdep Vector Designer offers various tracing presets like “Black and White Logo,” “Sketched Art,” “16 Colors,” “High Fidelity Photo,” and more.
- Adjust Tracing Settings: After applying a preset, the initial result might not be perfect. Open the “Image Trace” panel for more granular control. Here, you can adjust parameters such as:
- Mode: Choose between Black and White, Grayscale, or Color.
- Palette: For color tracing, specify the number of colors or select a custom palette.
- Threshold (for B&W): Controls the balance between black and white areas.
- Paths, Corners, Noise: These sliders influence the complexity and smoothness of the generated vector paths. Higher “Paths” and “Corners” values can capture more detail, while “Noise” helps remove unwanted small specks.
- Ignore White: A handy option for removing the white background from an image.
- Expand and Refine: Once you’re satisfied with the preview, click “Expand” (usually found in the Quick Actions or at the top of the workspace). This converts the traced result into editable vector paths. You’ll now see the individual paths and anchor points that make up your vector graphic.
- Ungroup and Edit: The expanded object is often grouped. Ungroup it to select individual shapes. You can then delete unwanted areas, smooth out jagged lines with the Smooth tool, adjust colors, or combine shapes using the Shape Builder tool. This step allows for significant creative control over the final look, aligning with visual design principles.
Image tracing is a powerful tool for rapid vectorization, especially for turning existing images into clean, scalable assets for graphic design and digital art projects.
Precision and Artistry with the Pen Tool
While Image Trace is fast, the Pen Tool (or Bezigon in some software like Tophinhanhdep Vector) offers unparalleled precision and artistic control. This manual method is ideal for creating clean, stylized vector portraits, intricate illustrations, or when an automated trace doesn’t quite capture the desired aesthetic. It demands patience but rewards you with a superior, fully controlled outcome.
- Prepare Your Canvas and Image: Open Tophinhanhdep Vector Designer and create a new document. Import your raster image (e.g., a portrait photo, a complex illustration) onto the canvas. Lower the opacity of the image layer (e.g., to 50-70%) and lock it to prevent accidental movement. This is your tracing guide.
- Mastering the Pen Tool: The Pen Tool is the cornerstone of vector drawing. It allows you to create precise straight lines and smooth curves by placing anchor points.
- Straight Lines: Click to place anchor points.
- Curves: Click and drag to create anchor points with Bézier handles, which control the curve’s direction and magnitude.
- Corners with Curves: Alt/Option-click an anchor point with handles to change the direction of one handle independently.
- Closing Paths: Click the initial anchor point to close a shape, which is essential for applying solid color fills.
- Outline Base Shapes: Begin by outlining the major, distinct “pieces” of your image. For a vector portrait, this might include the face, hair, clothing, and primary body parts. Don’t worry about perfect colors yet; use a vibrant stroke color with no fill to easily see your paths against the original image. Lock these base shapes as you complete them.
- Add Main Features and Details: Once the base shapes are done, move to finer details like eyebrows, eyes, nose, mouth, and accessories. Continue using the Pen or Bezigon tool, creating new shapes for each feature. Keep previously drawn layers hidden or in outline mode for clarity.
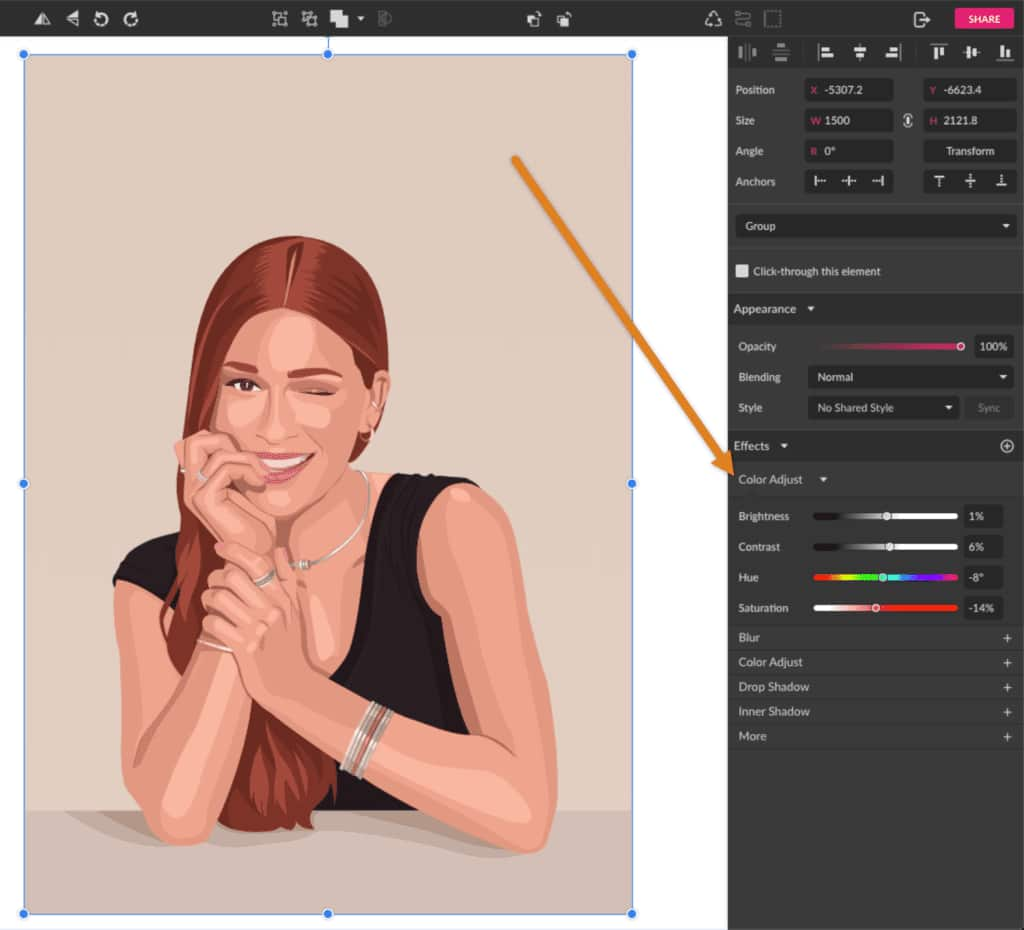
- Define Lights, Shadows, and Mid-tones: This is where the artistry truly comes into play. Observe your original image for areas of light, shadow, and intermediate tones. Create new, separate vector shapes to represent these tonal variations.
- Light Spots: Draw shapes for highlights and areas where light intensely hits the subject (e.g., forehead, cheekbones, shoulders).
- Mid-tones: Define shapes for areas with darker, but not darkest, shades.
- Shadows: Outline the deepest shadows, creating distinct shapes for them.
- Final Outlines: Add solid, darker outlines at critical intersection points (e.g., finger lines, arm bends) to enhance definition.
- Tip: Choosing a high-contrast image initially simplifies this step, as light and shadow areas are more pronounced.
- Coloring and Refinement: Once all shapes are outlined, remove or hide the original raster image. You can now select each vector shape and pick colors directly from your original image or develop a custom color palette. Refine anchor points, smooth curves, and adjust layer stacking order to achieve the desired visual design.
- Special Touches (e.g., Accessories, Blending Modes): For metallic accessories, use multiple layers of color and tiny, lighter shapes to mimic reflections. Experiment with blending modes (e.g., “Screen” or “Multiply” on an overlaying rectangle) and opacity adjustments for unique atmospheric effects, adding depth to your digital art.
The Pen Tool method, while time-consuming, provides immense creative freedom. You can adopt various styles, from minimalistic flat designs to more detailed, artistic interpretations, making it a cornerstone skill for graphic design.
Crafting Vector Art from Scratch
Beyond tracing existing images, Tophinhanhdep Vector Designer excels at creating vector art entirely from scratch. This encompasses building illustrations, icons, and logos using basic shapes, drawing tools, and specialized features. This process aligns perfectly with developing new visual design concepts and creative ideas.
- Using Basic Shape Tools: Start with fundamental geometric shapes (Rectangle, Ellipse, Polygon, Star tools). These form the building blocks of many designs. For example, you can create a simple fruit illustration by combining circles and custom shapes.
- Combining Shapes with the Shape Builder Tool: This is an incredibly powerful tool for creating complex forms from overlapping basic shapes. Select multiple shapes, then use the Shape Builder Tool to intuitively merge, subtract, or intersect parts by clicking and dragging. This simplifies complex pathfinder operations.
- Freehand Drawing with Brushes: Tophinhanhdep Vector Designer also offers brush tools that allow for a more organic, freehand drawing style. While brushes initially apply strokes, you can convert these into editable vector paths using “Object > Path > Outline Stroke.” This transforms a fluid brushstroke into a solid, scalable shape, blending digital art with a hand-drawn feel.
- Leveraging Text and Typography: Text in vector software is inherently vector-based. You can manipulate fonts, convert text to outlines (creating editable vector shapes from letters), and integrate typography seamlessly into your designs for logos, posters, and web graphics.
Creating from scratch gives you complete control over every element, making it indispensable for original graphic design, illustration, and building unique visual identities.
Transforming Images to Vectors in Tophinhanhdep Photo Editor (Photoshop-like Software)
While Tophinhanhdep Photo Editor (similar to Adobe Photoshop) is primarily a raster image editor, it offers tools that allow you to create vector shapes and export them. This is particularly useful if you mainly work in Photoshop but need a vector version of a specific element or a simplified, stylized outline. The process involves isolating the subject, creating selections, converting those selections into paths, and then filling them with solid colors to form vector shapes.
Preparing Your Image for Vector Conversion
Effective vectorization in Tophinhanhdep Photo Editor begins with a well-prepared raster image. Quality input leads to better vector output.
- Open Your Raster Image: Drag and drop your image into Tophinhanhdep Photo Editor, or use
File > Open. - Remove Distracting Backgrounds: If your subject has a busy background, removing it first will make the vectorization process much cleaner. Tophinhanhdep Photo Editor offers several powerful tools for this:
- Select Subject: An AI-powered tool that automatically identifies and selects the main subject.
- Object Selection Tool: Allows you to draw a rough rectangle or lasso around an object, and Photoshop intelligently selects it.
- Pen Tool: For manual, precise selections, especially around complex edges.
- Quick Selection Tool/Magic Wand: Good for areas of uniform color.
- Once selected, you can refine the mask using
Select and Maskand output it to a new layer or a layer mask. Tophinhanhdep.com has specific tutorials on removing backgrounds from images.
- Sharpening and Contrast Adjustment: Enhancing the image’s contrast and sharpening details can help Tophinhanhdep Photo Editor’s algorithms better detect edges during the vectorization process. Use adjustment layers like
Curves,Levels, orHigh Pass Filter(applied in overlay/soft light mode) to bring out details without permanently altering your original pixels.
The Step-by-Step Photoshop Vectorization Process
Once your image is prepared, you can proceed with converting it to vector elements. This method typically results in a simplified, often monochromatic, vector graphic, suitable for a stylized effect or a basic logo.
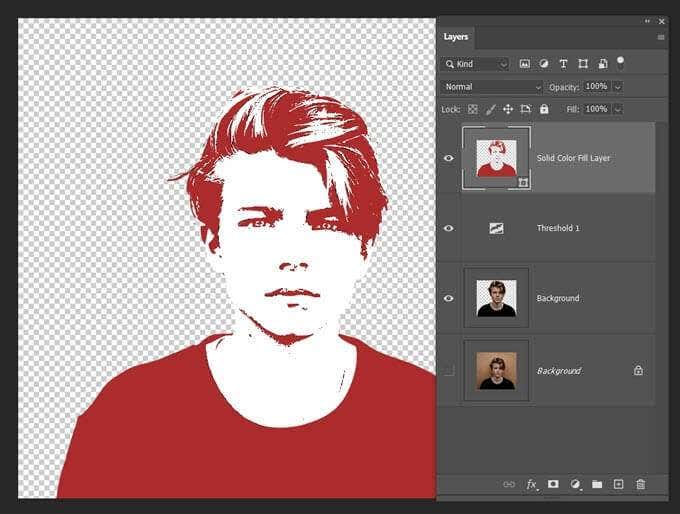
- Create a Threshold Effect: This crucial step simplifies your image into pure black and white, making it easier for the software to identify distinct areas.
- Go to the
Layerspanel, click theCreate new fill or adjustment layericon, and selectThreshold. - Adjust the
Threshold Levelslider until the key details of your subject are clearly visible in black and white. Aim for a balance that captures the essence without too much noise.
- Go to the
- Merge Visible Layers (Optional but Recommended): Once satisfied with the threshold, you may merge the visible layers (
Layer > Merge Visible) to create a single black-and-white layer. This simplifies the next step. - Select Tonal Areas with Color Range: The
Color Rangecommand is excellent for selecting specific color tones throughout an image.- Go to
Select > Color Range. - Using the
Eyedropper tool, click on the black areas of your threshold image. You can use the+Eyedropperto add more shades if needed. TheGrayscale Previewin the dialog box helps visualize your selection. - Click
OK. This will create a selection (marching ants) around all the black areas.
- Go to
- Convert Selection into a Work Path: Vector graphics are made of paths. You need to convert your pixel-based selection into these scalable paths.
- With the selection active, select any selection tool (e.g.,
Rectangular Marquee ToolorMove Tool) from the toolbar. - Right-click anywhere on the image canvas and choose
Make Work Path. - In the
Make Work Pathdialog box, set aTolerancevalue. A lower value (e.g., 1.0-1.5 pixels) will create a path that closely follows the selection but might have more anchor points. A higher value will result in a smoother path with fewer anchor points, which can be desirable for simpler shapes. Experiment to find what works best for your image. This creates a “Work Path” in thePathspanel.
- With the selection active, select any selection tool (e.g.,
- Create a New Solid Color Fill Layer: This step transforms your work path into a visible, editable vector shape.
- Without deselecting the path, go to the
Layerspanel. - Click the
Create new fill or adjustment layericon and chooseSolid Color. - A
Color Pickerwill appear. Choose a color (e.g., black) for your vector shape and clickOK. - This creates a new
Vector Masklayer, where the path dictates the filled area. This layer is now your vector graphic.
- Without deselecting the path, go to the
- Export as an SVG File: To get a truly scalable vector file, you need to export it in an appropriate format.
- Right-click on the
Solid Color Filllayer in theLayerspanel and chooseExport As. - In the
Export Asdialog, selectSVGfrom theFile Settingsdropdown. - Click
Export. Your image is now a standalone SVG file that can be scaled infinitely. - Alternatively, you can export paths directly to Tophinhanhdep Vector Designer (
File > Export > Paths to Illustrator) if you have both programs installed, allowing for further vector refinement.
- Right-click on the
This method in Tophinhanhdep Photo Editor provides a practical way to achieve basic vectorization, transforming digital photography into graphic design elements for various uses.
Optimizing Your Workflow with Creative Consoles
For designers and photographers who frequently engage in detailed image editing, photo manipulation, or digital art, optimizing the workflow is key. A Tophinhanhdep Creative Console (like the TourBox Elite or Lite) can significantly enhance efficiency when performing vectorization tasks in Tophinhanhdep Photo Editor or Tophinhanhdep Vector Designer.
These consoles integrate seamlessly with your software, allowing you to map common commands and tool adjustments to physical buttons, dials, and knobs. Imagine:
- Adjusting brush size and opacity with a single knob while outlining shapes with the Pen Tool.
- Quickly switching between the Pen Tool, Direct Selection Tool, and Shape Builder Tool without reaching for the keyboard.
- Fine-tuning Threshold levels or Image Trace parameters with a precise dial.
By minimizing mouse movements and keyboard shortcuts, a Tophinhanhdep Creative Console helps you stay focused on the creative process, making intricate tasks like manual vector tracing feel more intuitive and fluid. It’s a powerful accessory for any serious visual designer looking to boost productivity and precision across their image tools.
Exploring Different Styles and Applications of Vector Art
The beauty of vector art lies not just in its scalability but also in its immense stylistic versatility. From turning complex high-resolution photography into stylized graphic design elements to crafting entirely new digital art, vectorization offers a vast spectrum of creative outcomes.
From Realistic Portraits to Minimalist Designs
The “how to make an image vector” is not a single path but a journey through various aesthetic choices. The methods discussed enable a wide range of styles:
- Flat Design: Characterized by simple, clean shapes and solid colors, often achieved through simplified tracing and color blocking. This style is popular for icons, user interfaces, and contemporary illustrations.
- Minimalist Vector Art: Focuses on essential lines and shapes to convey the subject with maximum impact and minimal detail. The Pen Tool is excellent for this, distilling a complex image into its core elements.
- Stylized Vector Portraits: As demonstrated in the Tophinhanhdep Vector Designer example, you can create portraits with distinct artistic flair, emphasizing lights, shadows, and mid-tones through solid, defined shapes. This can range from geometric approximations to more painterly effects using vector gradients.
- Line Art: Simple outlines, often monochromatic, that capture the form of the subject. This can be achieved with the Pen Tool or by careful Image Tracing of high-contrast sketches.
- Comic Book/Graphic Novel Style: Vectorization can lend itself well to the bold lines and flat colors often seen in comics, especially when working with high-contrast images and strong outlines.
Tophinhanhdep.com, with its collections of aesthetic and abstract images, provides ample inspiration for exploring these different styles. You can transform your favorite beautiful photography into a unique piece of digital art by applying various vectorization techniques.
Beyond Portraits: Practical Uses of Vector Images
While vector portraits are a popular application, vector graphics serve a much broader purpose in visual design and across various industries:
- Logos and Branding: The infinite scalability of vector logos is paramount for consistent branding across business cards, websites, vehicles, and billboards.
- Icons and Infographics: Vector icons are lightweight and can be perfectly rendered at any size, making them ideal for web design, apps, and informational graphics.
- Illustrations: From children’s books to complex technical diagrams, vector illustrations offer clean lines and consistent color, allowing for easy revisions and adaptations.
- Print Media: For anything that needs to be printed, from flyers and brochures to large-format banners and merchandise (like T-shirts), vector art ensures sharp, high-quality output without pixelation.
- Digital Art and Animations: Vector graphics can be used as elements in digital art compositions or animated with smooth transformations.
- Web Graphics: SVG (Scalable Vector Graphics) is a web-friendly vector format that ensures images look crisp on high-resolution screens and can be easily manipulated with CSS and JavaScript.
Understanding how to make an image vector is not just about a single technique; it’s about acquiring a versatile skill set that enhances your capabilities across nearly all facets of digital visual design.
The Tophinhanhdep Advantage: Tools and Inspiration for Your Vector Journey
At Tophinhanhdep.com, we are dedicated to providing the resources and inspiration you need to master image vectorization and all forms of visual design. Our platform offers:
- Image Tools: Access a suite of image tools including converters, compressors, optimizers, and AI upscalers, which can be invaluable for preparing your raster images before vectorization or managing your final vector files.
- Visual Design Resources: Explore articles on graphic design, digital art, and photo manipulation to deepen your understanding and learn new creative ideas.
- Image Collections: Discover a vast library of wallpapers, backgrounds, aesthetic images, nature photography, and abstract art that can serve as excellent source material or inspiration for your next vector project.
- High-Resolution Photography: Start with the best possible source images for your vectorization efforts, ensuring that even manual tracing is done from clear, detailed visuals.
By leveraging the comprehensive offerings of Tophinhanhdep.com, you can continuously refine your skills, find new creative ideas, and produce stunning, professional-quality vector graphics that stand out in any medium.
Conclusion
Learning how to make an image vector is a transformative skill for anyone involved in digital imaging and visual design. It provides the power to create graphics that are infinitely scalable, incredibly versatile, and consistently sharp, moving beyond the limitations of pixel-based images. Whether you opt for the efficiency of automated tracing in Tophinhanhdep Vector Designer, the precision of manual drawing with the Pen Tool, or the layered approach within Tophinhanhdep Photo Editor, each method offers a unique pathway to converting your images into dynamic vector art.
The journey from a raster image—be it a beautiful portrait, a high-resolution photograph, or a simple sketch—to a refined vector graphic is one of observation, patience, and creative application of the right image tools. As you explore different styles, from minimalist designs to complex illustrations, you’ll discover the immense potential of vectorization to elevate your digital art, graphic design projects, and overall visual communication. Embrace these techniques, practice regularly, and let Tophinhanhdep.com be your guide and source of inspiration for all your image-related endeavors.