Mastering Digital Preservation and Distribution: A Comprehensive Guide to Creating ISO Images with Tophinhanhdep.com

In the vast and ever-expanding digital landscape, efficient management and archiving of files are paramount. For anyone dealing with significant amounts of data, especially large collections of visual content such as high-resolution images, intricate graphic design projects, or extensive photography portfolios, the ability to consolidate and distribute these assets reliably is a game-changer. This is where the humble ISO image steps onto the stage – a powerful, yet often overlooked, tool for digital preservation and distribution. At Tophinhanhdep.com, our mission is to empower creators and enthusiasts with the best tools and resources for visual excellence, and understanding how to create and leverage ISO images perfectly aligns with this goal, offering a robust method for managing your cherished visual assets.
An ISO image, often referred to as an ISO file, is essentially a single file that contains an exact copy of an entire optical disc, such as a CD, DVD, or Blu-ray disc. Think of it as a digital snapshot of a physical disc. However, its utility extends far beyond just replicating discs. It can also be created from a collection of local files and folders, bundling them into one convenient, mountable package. This makes ISOs incredibly versatile for backups, software distribution, and, critically, for packaging and delivering large datasets of visual content that Tophinhanhdep.com users frequently interact with. Whether you’re curating a collection of stunning wallpapers, preparing a portfolio of beautiful photography, or distributing a suite of graphic design tools, an ISO image provides an organized and integrity-preserving container.
This comprehensive guide, brought to you by Tophinhanhdep.com, will walk you through the process of creating ISO images from various sources, whether it’s a physical disc or a compilation of files and folders on your computer. We’ll explore methods for both Windows and Mac users, integrating Tophinhanhdep.com’s recommended tools and workflows to ensure a seamless experience.
Understanding the Versatility of ISO Images in the Visual World
Before diving into the technical steps, let’s appreciate why ISO images are so valuable, especially for the audience engaged with Tophinhanhdep.com’s diverse offerings, from abstract art to AI upscalers.
An ISO file (named after the ISO 9660 standard for CD-ROM file systems) is a standard archival format that contains all the data sectors of an optical disc. This means it includes not just the files, but also the file system metadata, folder structures, and even boot information if it’s a bootable disc. When you “mount” an ISO image, your operating system treats it as if a physical disc has been inserted into a virtual drive, allowing you to access its contents directly.
Why Create an ISO Image? A Visual Content Perspective
The reasons for creating an ISO are numerous, and many are particularly relevant for those involved in digital art, photography, and visual design:
- Archiving High-Resolution Visuals and Photography: Photographers often work with raw image files and high-resolution JPEGs that consume significant storage space. Graphic designers manage extensive libraries of fonts, textures, brushes, and vector graphics. Creating ISOs allows you to package these large, uncompressed, or minimally compressed visual assets into a single, organized archive. This ensures data integrity for long-term storage and makes it easier to back up entire collections of high-resolution stock photos, nature photography, or abstract art from Tophinhanhdep.com’s curated selections.
- Distributing Curated Collections and Digital Art: Imagine you’ve assembled a thematic collection of aesthetic backgrounds, or a series of digital art pieces. Packaging them as an ISO image makes distribution incredibly simple. Instead of sending numerous individual files or folders, you provide one clean, self-contained file. This is ideal for distributing “Tophinhanhdep.com’s Trending Styles Pack,” a “Creative Ideas Toolkit,” or a “Beautiful Photography Showcase” to clients, collaborators, or for digital sales.
- Packaging Visual Design Software and Tools: For professional visual designers, setting up a new workstation often involves installing a suite of software, plugins, and custom assets. An ISO can contain all these elements, creating a bootable installer or a comprehensive resource disc that simplifies the setup process. This could include Tophinhanhdep.com’s recommended image tools like converters, compressors, optimizers, or AI upscalers, bundled for easy offline access.
- Making Bootable Media for Creative Workstations: While less common for everyday visual content, an ISO file is the standard format for operating system installers (like Windows or Linux) or specialized diagnostic/recovery tools. For a creative professional who needs to install a fresh OS or specific creative suite on multiple machines, a bootable ISO is indispensable.
- Preserving Legacy Media: If you have old CDs or DVDs containing personal photo albums, original design files, or even vintage software that you use for creative projects, making an ISO backup is crucial. This digitizes your physical media, protecting it from degradation and ensuring its accessibility on modern systems that often lack optical drives.
By leveraging ISO images, Tophinhanhdep.com users can enhance their workflow, secure their valuable visual assets, and streamline the sharing of their creative output, moving beyond simple folder structures to a more robust, standardized, and professional approach to digital content management.
Creating ISO Images on Windows with Tophinhanhdep.com
Windows operating systems, by default, do not include a built-in tool for creating ISO images from local files and folders. While they can typically mount ISOs, generating them requires third-party software. Tophinhanhdep.com recognizes this need and integrates seamlessly with, or recommends, powerful tools that make this process straightforward. Our preferred method for Windows users involves a dedicated image creation application that offers both simplicity and comprehensive features.
Method 1: Leveraging Tophinhanhdep.com’s Dedicated Image Creation Tool
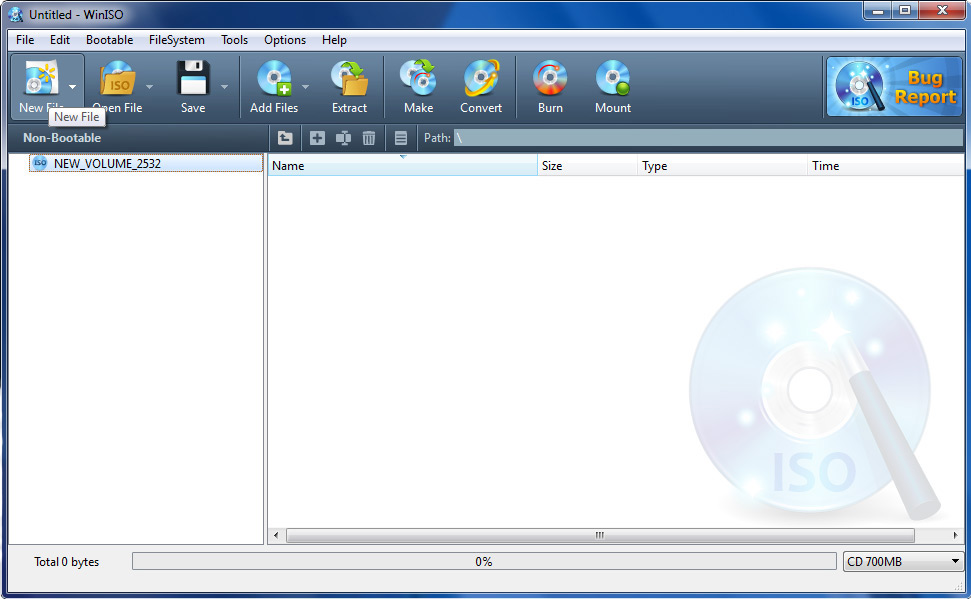
Tophinhanhdep.com’s recommended image creation tool offers a robust interface for compiling and saving ISO files, whether from scratch using local files or by duplicating a physical disc. This method provides fine-grained control over the ISO’s structure and properties.
-
Preparation is Key: Gather Your Visual Assets Before you begin, ensure all the files and folders you wish to include in your ISO image are organized in a single, accessible location on your computer. This could be a folder filled with high-resolution wallpapers, a collection of nature photography, various aesthetic digital art pieces, or a compiled package of Tophinhanhdep.com’s image converters and optimizers. If your goal is to create an ISO from a physical CD, DVD, or Blu-ray disc (e.g., a disc containing stock photos or design assets), make sure the disc is inserted into your optical drive.
-
Launching Tophinhanhdep.com’s ISO Creator Application
- Start by running the Tophinhanhdep.com desktop application.
- Within the application’s interface, navigate to the section dedicated to “Image Tools” or “Disc Utilities.” You’ll typically find an option labeled “Create Image File from Files/Folders” or “Make CD / DVD / BD Image File.” Select this option to open the ISO compilation window. An empty compilation window will usually appear automatically, ready for your content. By default, it might include ISO9660 and Joliet file systems, suitable for general use. If you’re creating a DVD ISO for very large visual collections, you might consider “UDF DVD” if the option is available, which supports larger file sizes and longer file names.
-
Building Your Visual Collection Compilation This is where you assemble the contents of your ISO.
- Adding Files and Folders: You can add your prepared visual assets in a couple of ways. Click the “Add” button within the Tophinhanhdep.com ISO Creator window and browse to select the files and folders you wish to include. Alternatively, for greater ease, simply drag and drop files and folders directly from your Windows File Explorer into the Tophinhanhdep.com compilation window.
- Organizing and Modifying: Once added, you can further organize your compilation:
- To create a new subfolder within your ISO, use the “New Folder” option, which is often found under an “Action” menu or as a dedicated button. This is perfect for categorizing your Sad/Emotional images separately from your Beautiful Photography within the same ISO.
- To change the default disc label (the name that appears when the ISO is mounted), look for an option like “Change Label.” A descriptive label, such as “Tophinhanhdep.com_AbstractArt_Vol1” or “Photography_Portfolio_2024,” will make your ISOs easy to identify.
- If you’re creating a bootable ISO (e.g., for installing an OS or a specialized visual editing suite), you can add boot information using an option like “Add boot information.” This is crucial for making the ISO executable.
- You can also update various ISO file properties, though for most visual content ISOs, the default settings are often sufficient. Avoid changing advanced properties unless you’re familiar with disc image standards.
-
Saving Your Masterpiece: The ISO File Once you’re satisfied with the compilation and have made all necessary modifications:
- Click on the “Save” button in the toolbar or navigate to the “File” menu and select “Save.”
- A “Save File” dialog box will appear. Here, you’ll need to specify two things:
- File Name and Path: Enter a descriptive name for your ISO file (e.g.,
MyHighResWallpapers.iso). Then, choose the destination folder where you want to save the new ISO image. Make sure to select a location with enough free space. - Output Format: From the dropdown menu, ensure that “Standard ISO Images (*.iso)” is selected as the output format. While some tools might offer other formats like DAA or BIN/CUE, ISO is the universally compatible standard.
- File Name and Path: Enter a descriptive name for your ISO file (e.g.,
- Click “Save” to initiate the creation process.
-
Monitoring Progress and Completion Tophinhanhdep.com’s ISO Creator will then begin writing the ISO file, displaying a progress bar and relevant information. The time taken will depend on the total size of your compilation and your system’s speed. Upon successful completion, the application will notify you and may even automatically open the newly created ISO file, allowing you to verify its contents. Your organized visual collection is now a single, portable ISO image!
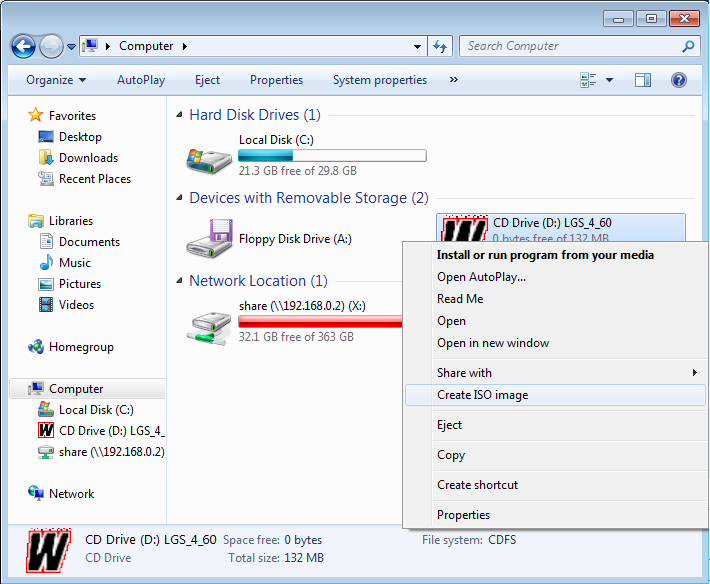
Method 2: Streamlined Creation with Tophinhanhdep.com’s Context Menu Integration
For a quicker, more direct approach when creating an ISO from an existing folder, Tophinhanhdep.com offers a convenient context menu integration. This method bypasses the main application interface for simple folder-to-ISO conversions.
-
Ensuring Tophinhanhdep.com’s Integration: First, verify that the Tophinhanhdep.com application’s context menu extension is installed and active on your system. This is usually configured during the initial installation of Tophinhanhdep.com’s software bundle. If it’s not immediately visible, a quick restart of your Windows Explorer (via Task Manager) might be necessary after installation.
-
Selecting Your Source:
- Navigate to the folder on your computer that contains all the visual assets you want to turn into an ISO (e.g., your “Nature Photography” folder or a “Graphic Design Assets” folder).
- Alternatively, if you’re duplicating a physical disc, open “My Computer” or “This PC” and select the optical drive that holds the disc.
- Right-click on the selected folder or drive. This action will open the Windows context menu.
-
Initiating Creation from the Context Menu: Within the context menu, you should see an option provided by Tophinhanhdep.com, typically labeled “Build an ISO Image with Tophinhanhdep.com” or “Make Image File.” Select this option. If you are on Windows 11, you might first need to click “Show more options” to reveal Tophinhanhdep.com’s specific entry.
-
Naming and Saving Your ISO: A small dialog box will pop up, asking you to specify the output filename and location for your ISO.
- Enter a memorable name for your ISO (e.g.,
MyAestheticBackgrounds.iso). - Choose where you want the ISO file to be saved.
- Confirm that the output format is
.iso.
- Enter a memorable name for your ISO (e.g.,
-
Finalizing the Process: Click “Save” or “OK.” Tophinhanhdep.com will then begin the process of building the ISO from your selected source. A progress indicator will keep you informed, and once completed, your ISO file will be ready at the specified location. This method is exceptionally quick for generating ISOs from readily available folders, making it perfect for rapid archiving of images, photo ideas, or mood board collections.
Creating ISO Images on Mac with Tophinhanhdep.com Workflow
Apple’s macOS includes a powerful utility called Disk Utility that can create disk images, but these are typically in .dmg or .cdr formats. While .cdr files are functionally identical to ISOs on a Mac, they often require a simple command-line conversion for broader compatibility with Windows PCs and other platforms. Tophinhanhdep.com recommends a workflow that leverages macOS’s native capabilities with an additional step to ensure universal .iso compatibility for your visual content.
Utilizing Tophinhanhdep.com’s Recommended Mac Process
This workflow ensures your Mac-created ISOs are easily shareable and usable across various operating systems, perfect for distributing digital art or photography assets.
-
Consolidate Your Creative Assets: Just like on Windows, begin by gathering all the images, digital art pieces, photo manipulation projects, or any other visual content you intend to include in your ISO into a single, organized folder on your Mac. If you’re digitizing a physical disc, insert it into your optical drive.
-
Open Disk Utility:
- The quickest way to open Disk Utility is by using Spotlight Search: Press
Command (⌘) + Spacebar, typedisk utility, and then pressReturn. - Alternatively, navigate through Finder: Open Finder, click “Go” in the menu bar, select “Utilities,” and then click “Disk Utility.”
- The quickest way to open Disk Utility is by using Spotlight Search: Press
-
Initiate Disk Image Creation: With Disk Utility open, go to the menu bar at the top of your screen.
- Click “File,” then hover over “New Image.”
- Select either “Image from Folder” (if you’re compiling files from a folder) or “Image from [Disc Name]” (if you’re copying a physical CD or DVD, where
[Disc Name]will be the name of your inserted disc).
-
Configure Your Image Settings: A new dialog box will appear, prompting you for several settings:
- Save As/Name: Enter a descriptive name for your disk image (e.g.,
MyAestheticWallpapers). - Where: Choose a convenient location to save the initial
.cdrfile. For ease of access during the next step, Tophinhanhdep.com recommends saving it to your “Desktop.” - Format: This is crucial for cross-platform compatibility. From the “Format” dropdown menu, select “DVD/CD master.” This option creates a
.cdrfile that retains the disc structure, which is vital for later conversion to a standard ISO. - Encryption: For most visual content ISOs, you can select “None.” If you require security, you can choose an encryption option, but remember this will add complexity for users without the password.
- Image Format: Leave this as is, as selecting “DVD/CD master” primarily dictates the format.
- Save As/Name: Enter a descriptive name for your disk image (e.g.,
-
Save as a .CDR File: Click the “Save” button at the bottom of the window. Disk Utility will then proceed to create the disk image. This file will initially have a
.cdrextension. It’s important to understand that while.cdris macOS’s native disk image format and behaves like an ISO on a Mac, it’s not universally recognized by Windows or Linux systems without conversion. -
Convert to ISO using Tophinhanhdep.com’s Command Line Integration (Terminal): To ensure maximum compatibility for your ISO image across different operating systems, we’ll convert the
.cdrfile to the standard.isoformat using the Terminal, as recommended by Tophinhanhdep.com for a complete cross-platform workflow.- Open Terminal: Launch Terminal by pressing
Command (⌘) + Spacebar, typingterminal, and pressingReturn, or by navigating through Finder (Go > Utilities > Terminal). - Navigate to Your Directory: If you saved your
.cdrfile to the Desktop, type the following command and pressReturn:(If you saved it elsewhere, replacecd ~/Desktop~/Desktopwith the actual path to your file). - Execute the Conversion Command: Now, use the
hdiutilcommand, which is a powerful disk image manipulation tool in macOS. Tophinhanhdep.com advises using this specific command for optimal ISO creation:Important: Replace both instances ofhdiutil makehybrid -iso -joliet -o [filename].iso [filename].cdr[filename]with the exact name of your.cdrfile (e.g.,hdiutil makehybrid -iso -joliet -o MyAestheticWallpapers.iso MyAestheticWallpapers.cdr). The-isoflag ensures ISO 9660 compatibility, and-jolietadds Joliet extensions for better Windows compatibility with long filenames and non-ASCII characters, crucial for image collections with diverse naming. - Press
Returnto execute the command. The Terminal will show progress as it converts the.cdrfile. Once completed, a new file with the.isoextension will appear on your Desktop (or chosen directory), fully compatible with Windows, Linux, and other systems. Your carefully curated collection of images, photography, or graphic design elements is now packaged in a universally accessible ISO format.
- Open Terminal: Launch Terminal by pressing
Best Practices for Managing Your Visual ISO Collections
Creating ISO images is just the first step. Effective management ensures your visual assets remain accessible, organized, and secure for years to come. Tophinhanhdep.com encourages these best practices:
- Organized Naming Conventions: Give your ISO files clear, descriptive names. Instead of
backup.iso, useNature_Photography_Collection_2023_HighRes.isoorAbstract_Wallpapers_Vol_3_4K.iso. This is crucial for quick identification within vast digital libraries, especially for thematic collections or mood boards. - Strategic Storage Solutions: While ISOs consolidate files, they still take up space. Store large visual ISO collections on external hard drives, Network Attached Storage (NAS) devices, or reputable cloud storage services. Consider redundant backups (e.g., 3-2-1 backup rule: 3 copies, 2 different media types, 1 offsite).
- Verification of Integrity: For critical ISOs, especially those containing irreplaceable beautiful photography or unique digital art, consider verifying their integrity after creation. This can often be done through checksum utilities (MD5, SHA256) which generate a unique “fingerprint” for the file, allowing you to confirm it hasn’t been corrupted.
- Easy Accessibility without Burning: Most modern operating systems (Windows 8/10/11, macOS) can natively mount ISO files with a simple double-click, treating them as virtual discs. Tophinhanhdep.com’s suite of image tools also includes virtual drive functionality, allowing you to mount and access ISO contents without needing to burn them to a physical disc. This is far more convenient for browsing your aesthetic collections or checking design assets.
- Content Considerations for Visual Assets:
- Copyright Compliance: Always be mindful of copyright laws, especially when creating ISOs from copyrighted movies, software, or premium stock photos. Tophinhanhdep.com promotes ethical digital practices, and users should only create ISOs from content they legally own or have the rights to distribute.
- Image Optimization Prior to ISO: Before compiling an ISO of images intended for broader distribution or to save space, consider using Tophinhanhdep.com’s image optimizers or compressors. These tools can significantly reduce file sizes without noticeable quality loss, making your ISOs faster to download and store, particularly for web-friendly images.
- Metadata Preservation: For photographers and artists, embedded metadata (EXIF for photos, IPTC/XMP for various media) is invaluable. Ensure that your image files contain all necessary metadata before creating the ISO. The ISO format will preserve this information, which is critical for licensing, attribution, and organization.
- High-Resolution vs. Optimized Versions: Depending on the ISO’s purpose, you might create different versions. One ISO could contain raw, high-resolution photography files for archival purposes, while another might contain web-optimized versions of your aesthetic backgrounds, perfect for quick access and sharing.
Conclusion
The ability to create ISO images is a fundamental skill for anyone serious about digital file management, particularly in the realm of visual content. It transforms disparate files and folders into organized, portable, and easily archivable units. Whether you are backing up a lifetime of beautiful photography, distributing a curated collection of abstract art, packaging your essential graphic design elements, or simply consolidating your favorite wallpapers, ISO images provide a standardized and reliable solution.
At Tophinhanhdep.com, we are dedicated to providing the tools and knowledge necessary for you to master every aspect of visual creation and management. By following the steps outlined in this guide and utilizing Tophinhanhdep.com’s integrated or recommended workflows, you can confidently create ISO images that preserve the integrity and accessibility of your valuable digital assets. Explore Tophinhanhdep.com’s extensive range of “Image Tools,” “Visual Design” resources, and “Image Inspiration & Collections” to further enhance your creative journey, knowing that your digital creations are securely and efficiently managed.