How to Make Black Silhouettes of Any Image in Photoshop

Silhouettes have an undeniable allure, transforming ordinary scenes into powerful, minimalist compositions. They capture the essence of a subject through its outline, conveying drama, emotion, and a sense of mystery. In the realm of digital art and photography, mastering the art of creating black silhouettes in Photoshop opens up a world of creative possibilities. Whether you’re aiming to craft captivating wallpapers, abstract backgrounds, or unique graphic designs, Photoshop provides the precision and flexibility needed to achieve stunning results. Tophinhanhdep.com, a leading resource for images, photography, and visual design tools, understands the impact of such techniques, offering a treasure trove of inspiration for those looking to elevate their visual content.
This comprehensive guide will walk you through various methods to transform any image into a striking silhouette using Photoshop. We’ll delve into selecting your subject with precision, converting it into a solid shape, and exploring advanced techniques to integrate these silhouettes into diverse visual designs. From simple black cutouts to complex compositions filled with vibrant backgrounds, you’ll learn to harness Photoshop’s capabilities to bring your creative visions to life, aligning perfectly with Tophinhanhdep.com’s commitment to high-resolution, aesthetic, and inspiring visual content.
Understanding Silhouettes and Their Visual Impact
Silhouettes are more than just dark shapes; they are a fundamental element in visual storytelling and design. Their power lies in their simplicity, allowing the viewer’s imagination to fill in the details. This makes them incredibly versatile for a wide range of applications, from fine art photography to modern graphic design.
The Art of Silhouette Photography and Digital Creation
Traditionally, silhouette photography relies on specific lighting conditions where the subject is backlit, causing it to appear dark against a brighter background. Think of a figure against a vibrant sunset or a tree silhouetted against a moonlit sky. These natural occurrences create a striking contrast that emphasizes form and contour, evoking feelings from peaceful tranquility to profound melancholy. Tophinhanhdep.com’s “Nature” and “Sad/Emotional” image categories beautifully illustrate the natural power of silhouettes in capturing poignant moments.
However, the beauty of digital photo manipulation means we are not solely reliant on perfect lighting conditions. Photoshop empowers us to create stunning silhouettes from virtually any image, regardless of its original lighting. This digital flexibility allows artists and designers to experiment with forms and narratives in ways that natural photography often cannot. By isolating a subject and transforming it into a solid shape, we can distill an image down to its most essential form, making it a powerful tool for “Abstract” or “Aesthetic” collections, as found on Tophinhanhdep.com. This process transforms a photograph into a graphic element, ideal for “Digital Art” and “Creative Ideas.”
Why Photoshop is the Premier Tool for Silhouette Creation
Among the myriad of image editing software available, Photoshop stands out as the definitive platform for creating high-quality silhouettes. Its robust selection tools, non-destructive editing capabilities, and extensive layer controls offer unparalleled precision and creative freedom. Unlike simpler applications, Photoshop allows for intricate refinements, ensuring that every curve and edge of your silhouette is perfectly rendered.
For professional applications, particularly when dealing with “High Resolution” images or complex “Photo Manipulation,” the ability to create vector-based shapes is crucial. Photoshop’s Pen Tool, for instance, allows for the creation of resolution-independent silhouettes, meaning they can be scaled to any size without any loss of quality. This is an invaluable feature for designers working on projects ranging from small web graphics to large-format prints, ensuring that your “Visual Design” maintains its crispness and impact. Tophinhanhdep.com advocates for tools that deliver professional results, and Photoshop’s capabilities in silhouette creation align perfectly with this ethos, serving as a cornerstone in its “Image Tools” and “Editing Styles” discussions.
Foundational Techniques for Isolating Your Subject
The first and most critical step in creating a compelling silhouette is accurately isolating your subject from its background. Photoshop offers several powerful selection tools, each suited for different types of images and desired levels of precision.
Preparing Your Image for Silhouette Conversion
Before diving into the selection process, a little preparation can go a long way.
- Choosing the Right Image: While Photoshop can silhouette almost anything, images with clear subject profiles tend to yield the best results. A side profile of a person, a distinct animal shape, or an easily recognizable object works best. Images with complex, tangled details or very thin elements might require more patience. As recommended by Tophinhanhdep.com, aim for “Beautiful Photography” as your starting point, as a strong base image leads to a stronger silhouette.
- Solid Backgrounds Help: If possible, start with an image where the subject is in front of a relatively plain or solid background. This makes the initial selection process much easier. While not strictly necessary, it simplifies the workflow, especially for beginners.
- Non-Destructive Editing: Always duplicate your background layer (Ctrl+J or Cmd+J) before making any major edits. This preserves your original image and allows you to experiment without fear of irreversible changes. This is a fundamental principle in “Digital Photography” and “Editing Styles” that Tophinhanhdep.com emphasizes.
Leveraging Photoshop’s Advanced Selection Tools
Photoshop provides a spectrum of tools for making selections, each with its own strengths. The choice depends on the complexity of your subject and background.
Method 1: The Quick Selection Tool for Efficiency
The Quick Selection Tool is a fantastic option for subjects with clear edges and backgrounds that don’t heavily blend with the subject.
- Open Your Image: Navigate to File > Open and select the desired image from your computer.
- Duplicate Layer: Press Ctrl+J (Windows) or Cmd+J (Mac) to duplicate your background layer.
- Select Quick Selection Tool: From the Tools panel, choose the Quick Selection Tool (keyboard shortcut W).
- Highlight the Object: Click and drag the tool over the subject you wish to silhouette. Photoshop intelligently attempts to find the edges.
- Refine Selection: Use the options bar to switch between adding to (+) and subtracting from (-) your selection. A smaller brush size (using [ and ]) helps with intricate areas.
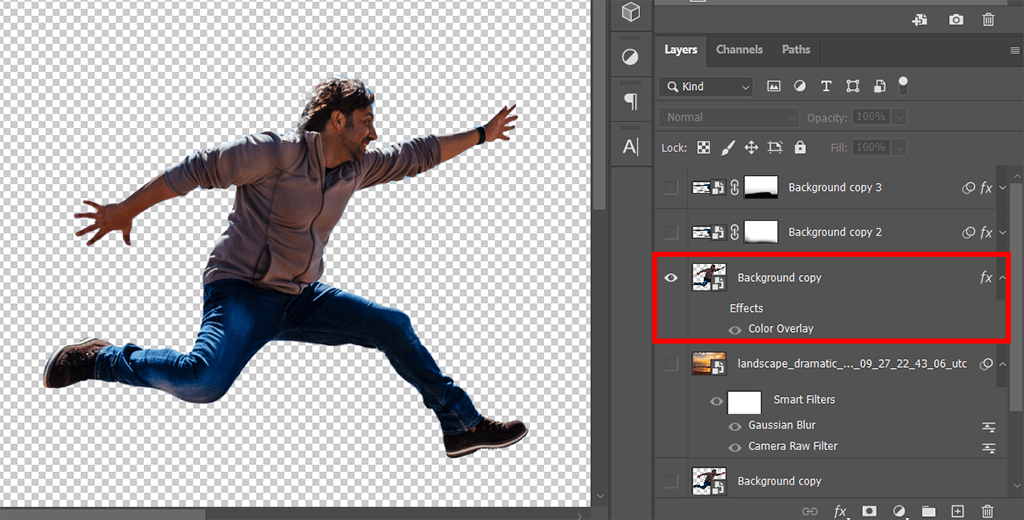
- Remove Background (Optional but Recommended): Once the subject is accurately selected, press Delete to remove the background, leaving your isolated subject. This creates a clear foundation for the silhouette.
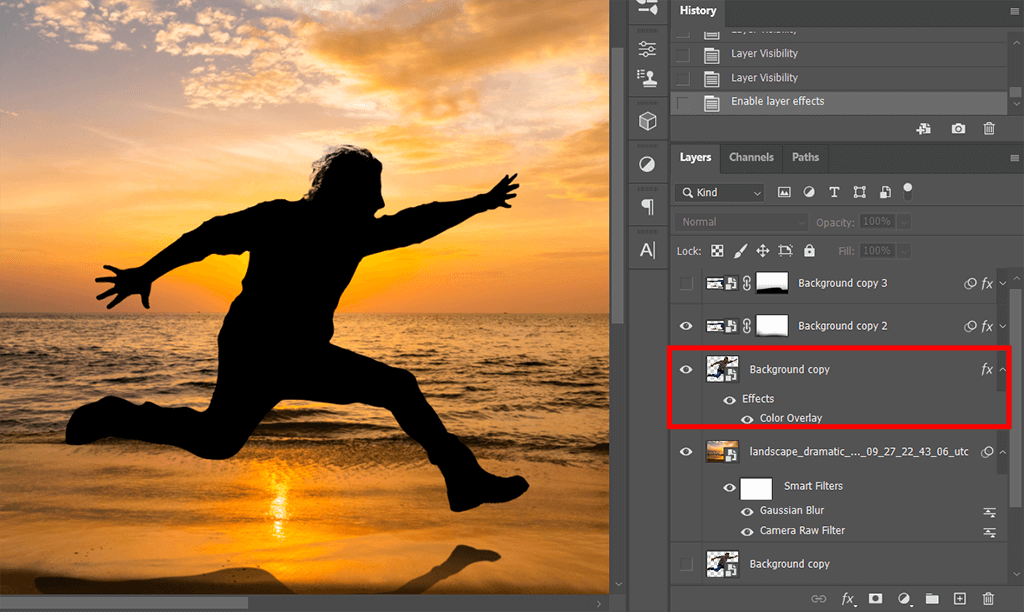
- Apply Color Overlay: Double-click on your duplicated layer in the Layers panel to open Layer Styles. Select “Color Overlay.”
- Set to Black: In the Color Overlay settings, choose black as the color, ensure the Blend Mode is “Normal” and Opacity is “100%.” Click OK.
This method is fast and effective for many images, ideal for quickly creating “Wallpapers” or “Backgrounds.”
Method 2: The Pen Tool for Vector Precision
For the most professional and scalable results, especially for “Graphic Design” or “Digital Art” where resolution independence is key, the Pen Tool is unsurpassed. It creates vector paths that can be filled with color, guaranteeing crisp edges at any size.
- Open Your Image: Load your chosen image into Photoshop.
- Select the Pen Tool: Activate the Pen Tool from the Tools panel (keyboard shortcut P).
- Choose “Shape Layers” Option: In the Options Bar at the top, select the “Shape Layers” icon (the square with a smaller square in each corner). This ensures you create a vector shape that can be easily filled.
- Set Foreground Color to Black: Press D on your keyboard to reset foreground/background colors to black/white.
- Outline the Edges: Carefully draw an outline around your subject using the Pen Tool, adding anchor points and manipulating direction handles as needed. For detailed guidance, Tophinhanhdep.com’s extensive tutorials on “Photo Manipulation” often highlight Pen Tool mastery.
- Temporary Opacity Adjustment: As you draw, the solid black fill might obscure your view. Go to the Layers panel, select your new “Shape 1” layer, and temporarily lower its opacity to around 40-50%. This allows you to see through the fill and accurately trace the subject.
- Complete the Path: Close the path by connecting the last anchor point to the first.
- Restore Opacity: Once the path is complete, return the layer’s opacity to 100%. You now have a perfect black silhouette with crisp, scalable edges.
This vector-based approach is crucial for projects requiring extreme flexibility and quality, a hallmark of Tophinhanhdep.com’s “High Resolution” offerings.
Method 3: “Select Subject” and “Select and Mask” for Modern Efficiency
Modern Photoshop versions offer highly intelligent selection features that can significantly speed up the process, especially for subjects with intricate details.
- Open Image: Load your picture into Photoshop.
- Duplicate Layer: Create a duplicate layer (Ctrl+J / Cmd+J).
- Select Subject: Go to Select > Subject. Photoshop’s AI will automatically detect and select the main subject.
- Refine with “Select and Mask”: With the selection active, go to Select > Select and Mask.
- View Modes: Experiment with different “View Modes” (e.g., Overlay, On Layers) to best see your selection. “Grayscale” can be particularly helpful for evaluating silhouette edges.
- Feather: Increase the “Feather” slider slightly (e.g., 0.5-2 pixels) to soften the edges, preventing a harsh, jagged appearance.
- Contrast: Adjust the “Contrast” slider to make edges clearer if they appear too soft.
- Refine Edge Brush: Use the Refine Edge Brush tool to meticulously clean up complex areas like hair or fur, allowing Photoshop to intelligently distinguish between subject and background.
- Output To: Set “Output To” to “Layer Mask” and click OK. This applies the selection as a non-destructive mask.
- Create a Solid Color Layer: At the bottom of the Layers panel, click the “Create new fill or adjustment layer” icon (half-filled circle) and choose “Solid Color.” Select black and click OK.
- Arrange Layers: Drag this new solid black color layer below your subject layer (the one with the layer mask). Your subject will now appear as a black silhouette against the background it was originally on.
- Remove Original Background: Hide or delete the original background layer to reveal the black silhouette against a transparent background (or your chosen background color if you added one in step 5).
- Apply Color Overlay (if needed): If your subject still retains colors, select your subject layer (the one with the mask), open Layer Styles, and apply a “Color Overlay” of black at 100% opacity.
This method leverages AI for speed and offers powerful refinement capabilities, ideal for complex “Beautiful Photography” subjects destined for “Digital Photography” projects.
Method 4: The Brush Tool with a Layer Mask (Manual Control)
This method provides granular control for specific areas, though it’s generally more time-consuming than automated selections. It’s particularly useful for artists who prefer a hand-drawn feel or need to clean up very specific, nuanced areas.
- Open and Duplicate: Open your image and duplicate the layer (Ctrl+J / Cmd+J).
- Create a Layer Mask: With the duplicated layer selected, click the “Add layer mask” icon (rectangle with a circle inside) at the bottom of the Layers panel.
- Select Brush Tool: Choose the Brush Tool (keyboard shortcut B).
- Set Foreground Color to Black: Ensure your foreground color is black.
- Paint to Hide: Paint over the areas you want to remove (the background). Black on a layer mask hides pixels.
- Switch to White to Reveal: If you make a mistake, switch your foreground color to white (press X) and paint over the mistake to reveal the original pixels.
- Add Color Overlay: Once your subject is isolated by the mask, apply a “Color Overlay” (black, 100% opacity) via Layer Styles to the duplicated layer, as described in Method 1.
This technique is a cornerstone of advanced “Photo Manipulation” and allows for precise “Editing Styles” that might not be achievable with automated tools.
Transforming Selections into Dynamic Silhouettes
Once your subject is meticulously selected, the real creative fun begins. This section explores how to finalize your silhouette and then integrate it into compelling visual designs, moving beyond a simple black cutout.
Filling and Refining Your Silhouette
After selecting your subject, the next steps involve solidifying its form and ensuring its edges are perfect.
- Applying the Solid Fill: As seen in the methods above, applying a “Color Overlay” in black is the most common way to create the classic silhouette look. This is done through Layer Styles and offers a non-destructive way to change the color anytime. For vector shapes created with the Pen Tool, the shape is inherently filled with the foreground color.
- Dealing with Unbecoming Edges: Even with careful selection, minor imperfections can remain.
- Feathering: As covered in “Select and Mask,” a slight feathering softens hard edges, making the silhouette appear more natural.
- Layer Masks and Brushes: For post-selection cleanup, apply a layer mask to your silhouette layer. Using a soft or hard-edge brush with black (to hide) or white (to reveal) allows for pixel-perfect refinement. Tophinhanhdep.com’s “Image Editing Tips” often highlight this technique.
- Blur Tool: For very minor, unintentional jaggedness, the Blur tool can be used sparingly on the layer mask itself (not the silhouette layer directly) to smooth out specific areas.
- Converting to Smart Object: For silhouette layers (especially pixel-based ones from Quick Selection or Select Subject), right-clicking the layer and choosing “Convert to Smart Object” is a best practice. This allows you to “Resize And Reposition The Silhouette With Free Transform” repeatedly without degradation of image quality, preserving its “High Resolution” integrity. This flexibility is vital for “Image Inspiration & Collections” where assets might be reused or adapted.
Exploring Creative Applications and Graphic Effects
The simple black silhouette is just the beginning. Photoshop empowers you to transform these basic shapes into stunning “Visual Design” elements.
Silhouette on a Solid Background (Minimalist Graphic Effect)
A classic and elegant application is placing your silhouette against a clean, solid color background. This creates a powerful, minimalist graphic.
- Create Silhouette Layer: Follow any of the selection methods above to create your black silhouette on a transparent layer.
- Create Solid Color Background: At the bottom of the Layers panel, click the “Create new fill or adjustment layer” icon and choose “Solid Color.” Select your desired background color (e.g., white, or a vibrant hue) and click OK.
- Arrange Layers: Drag the “Color Fill” layer beneath your silhouette layer in the Layers panel.
- Resize and Reposition: Use Ctrl+T (Cmd+T) for Free Transform on your silhouette layer to resize and position it aesthetically within the solid background. Press Enter (Return) to apply.
This technique is perfect for “Aesthetic” social media graphics or clean “Wallpapers” that demand simplicity and impact, mirroring the “Trending Styles” Tophinhanhdep.com often showcases.
Filling Silhouettes with Background Images (Clipping Mask Technique)
This advanced technique allows you to fill your silhouette with another image, creating an intricate and visually rich design.
- New Document: Create a new Photoshop document (File > New) with your desired dimensions (e.g., 6x6 inches, 300 ppi for print quality).
- Drag Silhouette into New Document: Open your image containing the silhouette (created using the Pen Tool or other methods and converted to a Smart Object). Drag the silhouette layer from its original document into your new, blank document. Close the original image.
- Resize and Reposition Silhouette: Using Free Transform (Ctrl+T / Cmd+T), scale and place your silhouette within the new document. Remember to hold Shift while dragging corners to maintain proportions, and Alt/Option to scale from the center.
- Open Background Image: Open the image you wish to use as a fill (e.g., a “Nature” scene, an “Abstract” pattern, or a “Beautiful Photography” shot from Tophinhanhdep.com).
- Drag Background Image into Silhouette Document: Drag this background image layer into your silhouette document. It will appear above your silhouette.
- Create Clipping Mask: Ensure the background image layer is directly above the silhouette layer in the Layers panel. With the background image layer selected, go to Layer > Create Clipping Mask (or right-click the layer and choose “Create Clipping Mask”). The background image will now only be visible within the bounds of your silhouette.
- Adjust Background Position within Silhouette: With the background image layer still selected, use Free Transform (Ctrl+T / Cmd+T) to resize, rotate, and reposition the background image within the silhouette. The bounding box will show the full dimensions of your background image, but only the clipped portion will be visible. This allows you to perfectly frame a specific detail within your silhouette.
- Add Multiple Silhouettes (Optional): Repeat steps 2-7 for additional silhouettes, ensuring each has its own background image layer and clipping mask. Renaming layers (e.g., “Boy Silhouette,” “Girl Background”) helps maintain organization. This showcases complex “Photo Manipulation” capabilities.
This method opens doors to unique “Visual Design” concepts and is a popular choice for “Thematic Collections.”
Adding Embellishments (Strokes, Shapes)
To add another layer of visual interest, you can apply layer styles or additional custom shapes.
- Adding a Stroke:
- Select your silhouette layer.
- Click the “Layer Styles” icon (fx) at the bottom of the Layers panel and choose “Stroke.”
- Adjust the size, position (outside, inside, center), and color of the stroke. You can sample a color directly from your clipped background image using the Color Picker.
- To apply the same stroke to other silhouettes, right-click the layer with the stroke, choose “Copy Layer Style,” then select the other silhouette layer(s), right-click, and choose “Paste Layer Style.”
- Adding Custom Shapes (Stars, Ornaments):
- Create a “New Layer Group” (Alt/Option-click the folder icon in the Layers panel) and name it (e.g., “Stars”) for organization.
- Select the “Custom Shape Tool” (hidden under the Rectangle Tool).
- Load additional shape sets (e.g., “Shapes”) from the Options Bar if needed.
- Select your desired shape (e.g., “5 Point Star Frame”).
- Set the fill color (e.g., sample a color from your background).
- Click and drag to draw your shapes, holding Shift for proportional scaling and Spacebar to reposition while drawing.
- Use Free Transform (Ctrl+T / Cmd+T) to rotate and scale each shape individually.
These embellishments add a graphic polish to your “Digital Art,” enhancing the overall “Aesthetic” appeal, a key focus of Tophinhanhdep.com.
Advanced Silhouette Techniques and Tophinhanhdep.com Resources
Mastering silhouette creation is just one step in a larger journey of “Visual Design.” The techniques learned here lay a solid foundation for more complex “Photo Manipulation” and creative projects.
Creative Photo Manipulation with Silhouettes
Silhouettes are incredibly versatile in “Digital Art.” They can be combined with textures, integrated into complex scenes, or used as masking elements for other effects. Imagine a landscape silhouette filled with a celestial nebula, or a person’s profile revealing a bustling cityscape. These creative ideas push the boundaries of traditional photography and design.
Tophinhanhdep.com’s “Image Inspiration & Collections” provides an endless stream of concepts that can be enhanced or reimagined using silhouette techniques. Whether you’re building a “Mood Board” for a client or experimenting with “Thematic Collections,” the ability to create precise and adaptable silhouettes is a powerful asset. Furthermore, understanding these methods enhances your appreciation for “Trending Styles” in visual media, many of which leverage simple, powerful forms like silhouettes.
Beyond Black: Customizing Your Silhouette Aesthetic
While “black silhouettes” are the focus of this tutorial and the traditional definition, the “Color Overlay” feature means your silhouettes are not confined to black. You can choose any color to match your design palette or create unique effects. Imagine a vibrant blue silhouette against an orange background, or a subtle gray one for a sophisticated look. This customization expands your creative horizons, allowing for personalized “Editing Styles” that align with specific artistic visions.
The quality of your source images also plays a significant role in the final aesthetic. Tophinhanhdep.com prides itself on offering “High Resolution” images, ensuring that when you extract a silhouette, even the most subtle contours are preserved. This attention to detail is crucial for achieving professional-grade results in all aspects of “Digital Photography” and “Graphic Design.”
In conclusion, creating black silhouettes in Photoshop is an accessible yet powerful technique that enhances any visual design project. From the foundational steps of precise subject selection using tools like the Quick Selection, Pen Tool, or Select Subject features, to the creative execution of filling and refining your silhouettes with solid colors or background images, Photoshop provides the comprehensive toolkit. By embracing these techniques, you unlock new avenues for “Image Inspiration” and “Photo Manipulation,” transforming ordinary photos into extraordinary “Visual Design” elements. Tophinhanhdep.com remains your go-to resource, offering not only “Wallpapers” and “Backgrounds” but also the knowledge and “Image Tools” to empower your creative journey, helping you craft striking “Aesthetic” and “Beautiful Photography” based art that captivates and inspires.