Mastering Monochromatic: How to Transform Color Images to Black and White in Photoshop with Tophinhanhdep.com

Black and white photography possesses a captivating, timeless allure that continues to mesmerize audiences even in our vibrantly colored digital age. Stripping away the hues allows viewers to engage with an image on a deeper level, compelling them to focus on the interplay of light and shadow, the intricate dance of textures, and the raw emotion conveyed by the subject. This monochromatic transformation can elevate an ordinary snapshot into a dramatic masterpiece, offering a fresh perspective and a profound sense of artistic expression.
Perhaps you’re aiming to evoke a nostalgic, vintage feel, or infuse your contemporary photos with a touch of classic drama. Whatever your creative vision, Adobe Photoshop stands as the unparalleled tool for converting your colorful compositions into stunning grayscale works of art. At Tophinhanhdep.com, we understand the power of visual storytelling and are dedicated to providing you with the knowledge and tools to bring your artistic ideas to life. As your ultimate resource for high-quality images, comprehensive photography guides, and innovative image tools, Tophinhanhdep.com is here to guide you through every step of this creative journey.
This extensive guide will delve into multiple powerful methods for converting color images to black and white in Photoshop, ranging from quick and simple adjustments to advanced techniques that offer granular control over your final output. We’ll explore how each method influences the aesthetic outcome, ensuring you can choose the perfect approach for your unique images and creative goals.

The Art of Black and White Conversion: Why Monochromatic Matters
Converting an image to black and white is far more than just removing color; it’s a deliberate artistic choice that redefines how an audience perceives your photograph. It’s an exercise in visual design, challenging you to see the world in terms of contrast, tone, and form.
Beyond Color: Focusing on Form and Emotion
When color is present, it naturally attracts the eye, sometimes diverting attention from the core elements of a scene. Vibrant reds, calming blues, or lush greens can be beautiful, but they can also mask underlying strengths or weaknesses in composition, texture, and light. By converting an image to black and white, you strip away these distractions, forcing yourself and your audience to concentrate on:
- Texture and Detail: Without color, the intricate patterns, rough surfaces, smooth contours, and minute details within your image become incredibly prominent. The wrinkles on a face, the bark of a tree, or the weave of a fabric gain a heightened sense of presence.
- Light and Shadow: The play of light and shadow, which is fundamental to photography, becomes exceptionally powerful in monochrome. Strong contrasts between bright highlights and deep shadows create drama, depth, and a sculptural quality that can be breathtaking.
- Composition and Form: The lines, shapes, and spatial relationships within your photograph are emphasized. Good composition becomes even more critical, as the eye is drawn to the arrangement of elements rather than their individual colors.
- Mood and Emotion: Black and white has a unique ability to convey strong emotions. It can evoke feelings of nostalgia, melancholy, intensity, or serene timelessness, often adding a layer of gravitas or poetic depth to an image.
- Timelessness: Many iconic photographs are in black and white, giving the medium a classic, enduring quality. Converting your photos to monochrome can instantly transport them to another era or imbue them with a lasting artistic significance.
Understanding these artistic principles, championed by the “Visual Design” and “Image Inspiration” sections of Tophinhanhdep.com, is crucial for making informed decisions during the conversion process. It helps you choose the right method and refine your black and white image to achieve your desired emotional and aesthetic impact.
Essential Preparations for Optimal Results
Before diving into the conversion process, a little preparation can go a long way in ensuring your black and white image truly shines. Just as with any digital photography or photo manipulation, the foundation of your image matters.
- Start with a Strong Image: While black and white can rescue some photos, it cannot fix a fundamentally poor composition or blurry focus. Look for images with strong contrasts, interesting textures, compelling light, and a clear subject. Our “Photography” section on Tophinhanhdep.com offers numerous guides on capturing such high-resolution, impactful images.
- Ensure RGB Color Mode: Most black and white conversion filters in Photoshop work optimally with images in RGB Color mode. Many old or scanned black and white photos might be in Grayscale mode. To check and convert, go to
Image > Mode. IfGrayscaleis checked, clickRGB Color. This ensures Photoshop has all the necessary color channel data to work with during conversion. - Boost Contrast for Faded Images: Old or faded photos often lack sufficient contrast, which is vital for impactful black and white imagery. A quick fix is to duplicate your background layer (
Ctrl+JorCmd+J), then go toImage > Auto Contrast. If the effect is too strong, you can immediately go toEdit > Fade Auto Contrastand lower the opacity. Alternatively, use anAdjustment Layer > LevelsorCurvesto non-destructively adjust contrast. Tophinhanhdep.com provides detailed tutorials on these editing styles. - Consider Color Tints: If your image has a sepia or other color tint that you wish to remove before a pure black and white conversion, you can go to
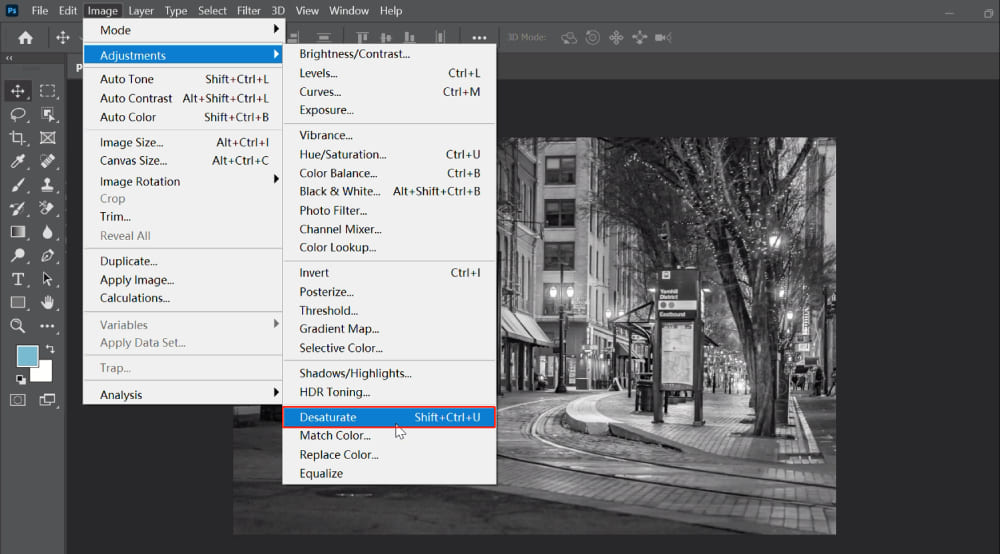
Image > Adjustments > Desaturateon a duplicated layer to achieve a clean black and white base.
![]()
Fundamental Techniques for Black and White Conversion in Photoshop
Photoshop offers a spectrum of tools for black and white conversion, each with its own advantages and level of control. We’ll start with the most straightforward methods before progressing to more nuanced approaches.
Quick and Easy: Desaturate and Grayscale Mode
For quick results or when you don’t require fine-tuned control over individual color contributions, these methods are ideal.
-
Desaturate Adjustment:
- How to: Open your image. Go to
Image > Adjustments > Desaturate. Alternatively, use the keyboard shortcutShift + Ctrl + U(Windows) orShift + Cmd + U(Mac). - Result: This command instantly removes all color information, leaving you with a black and white image. It’s fast and effective for a basic conversion.
- Consideration: Desaturate is a destructive edit if applied directly to the image layer, meaning you can’t easily go back and adjust how specific colors contribute to the grayscale tones. For better flexibility, duplicate your layer first or use an adjustment layer.
- How to: Open your image. Go to
-
Grayscale Mode:
- How to: Open your image. Go to
Image > Mode > Grayscale. Photoshop will prompt you, asking if you want to discard color information. ClickDiscard. - Result: Similar to Desaturate, this converts the entire image to black and white by removing all color data.
- Consideration: This is a permanent, destructive change to the image file itself, converting its color profile to Grayscale. It’s often used when you’re certain you won’t need the color information again and want a smaller file size, but it offers no control over the conversion process.
- How to: Open your image. Go to
While simple, these methods provide a good starting point for understanding how Photoshop handles monochromatic transformations. For more sophisticated control, adjustment layers are your best friend.
The Power of Adjustment Layers: Black & White and Hue/Saturation
Adjustment layers are the preferred method for professional photo editing because they are non-destructive, allowing you to modify your image without permanently altering the original pixel data. This means you can always go back and tweak your settings, or even remove the adjustment entirely, without losing your original color image.
-
Black & White Adjustment Layer:
- How to:
- Open your image in Photoshop.
- Go to
Window > Adjustmentsto open the Adjustments panel. - Click on the
Black & Whiteicon (it looks like a half black, half white square). This creates a new Black & White adjustment layer above your image layer in the Layers panel.
- Control: The magic of this method lies in the
Propertiespanel (which usually opens automatically when you create the adjustment layer). Here, you’ll find six color sliders: Red, Yellow, Green, Cyan, Blue, and Magenta.- Dragging a slider to the left will darken the grayscale tones that correspond to that original color in your image.
- Dragging a slider to the right will lighten those tones.
- Presets: The
Propertiespanel also offers various presets (e.g.,Higher Contrast,Infrared,Maximum Black,Maximum White) that provide excellent starting points for different looks. - Tinting: Want to add a classic sepia or selenium tone? Tick the
Tintbox in the Properties panel and click the colored square next to it to access the color picker. This allows you to introduce a subtle color overlay to your black and white image, creating a specific mood or vintage effect. - Benefits: This is widely considered the best all-around method for black and white conversion due to its non-destructive nature, precise control over tonal mapping, and built-in tinting options. It lets you fine-tune how each original color translates into shades of gray, allowing you to emphasize specific elements.
- How to:
-
Hue/Saturation Adjustment Layer:
- How to:
- Open your image in Photoshop.
- Go to
Window > Adjustmentsand click theHue/Saturationicon (it looks like a rainbow spectrum). - In the
Propertiespanel, simply drag theSaturationslider all the way to-100.
- Result: This achieves a black and white conversion similar to the
Desaturatecommand but with the crucial advantage of being non-destructive. - Control (Indirect): While it doesn’t offer direct sliders for individual colors like the Black & White adjustment, you can use the
Masterdropdown menu within the Hue/Saturation panel to target specific color ranges (e.g.,Reds,Blues) and adjust theirLightnessafter saturation has been set to -100. This provides some indirect control over how different colors appear as grayscale tones. - Benefits: Non-destructive and relatively quick. It’s a good alternative if you’re already familiar with the Hue/Saturation panel.
- How to:
Both adjustment layer methods offer incredible flexibility, allowing you to experiment freely and achieve the perfect monochromatic interpretation of your color images.
Advanced Conversions and Creative Control
For photographers and visual designers seeking even greater command over their black and white conversions, Photoshop provides sophisticated tools that delve into the individual color channels and tonal mapping.
Leveraging Channels and Channel Mixer for Distinct Tones
Understanding color channels is key to unlocking advanced black and white conversions. A color image is composed of Red, Green, and Blue channels (in RGB mode), each containing the grayscale information for that specific color.
-
Channels Panel Technique (Copying a Single Channel):
- How to:
- Open your image. Go to
Window > Channelsto open the Channels panel. - Click on the
Greenchannel (or Red or Blue, depending on the effect you want). You’ll see the image in grayscale, based purely on the luminance values of that channel. - Press
Ctrl+A(Cmd+A on Mac) to select all, thenCtrl+C(Cmd+C on Mac) to copy the channel information. - Return to the
Layerspanel. Create aNew Layer(Ctrl+Shift+NorCmd+Shift+N). - Press
Ctrl+V(Cmd+V on Mac) to paste the copied grayscale channel onto this new layer.
- Open your image. Go to
- Result: This method creates a black and white image based solely on the luminosity of a chosen color channel. For instance, the Green channel often provides a balanced tonal range, while the Red channel might darken skies, and the Blue channel could brighten them.
- Benefits: It’s a quick way to achieve a specific grayscale look, emphasizing different details based on the chosen channel’s luminance.
- How to:
-
Channel Mixer Adjustment Layer:
- How to:
- Open your image. Go to
Window > Adjustmentsand click theChannel Mixericon. - In the
Propertiespanel, check theMonochromebox at the bottom.
- Open your image. Go to
- Control: This is where the Channel Mixer shines. You’ll see sliders for Red, Green, and Blue
Source Channels.- By adjusting these sliders, you control how much of each original color channel contributes to the final black and white image’s luminosity. The total percentage of R+G+B should ideally sum to 100% to maintain a balanced exposure, but you can go above or below for artistic effects.
- For example, increasing the Red slider and decreasing the Green and Blue sliders will make red objects lighter and blue/green objects darker in your black and white image.
- Constant Slider: The
Constantslider allows you to globally brighten or darken the entire image, essentially adding or subtracting gray from the output channel. - Benefits: Offers the most granular control over how colors translate to grayscale, allowing for highly customized and nuanced black and white conversions. It’s excellent for creating specific tonal separations, like dramatic sky effects or emphasizing certain textures.
- How to:
Gradient Map for Unique Monochromatic Looks
The Gradient Map adjustment layer is another creative tool for black and white conversions, especially when you want to introduce a specific tonal style or split tone effect.
- How to:
- Open your image. Go to
Window > Adjustmentsand click theGradient Mapicon. - Initially, this might apply a strange color gradient. In the
Propertiespanel, click on the gradient bar itself to open theGradient Editor. - Select a basic
Black, Whitegradient (often found in theBasicsfolder). ClickOK. - By default, this maps the darkest tones of your image to black and the lightest tones to white, effectively creating a black and white image.
- Customization: You can modify the gradient to introduce unique effects:
- Split Toning: Add color stops to the gradient to map different luminosity values to specific colors. For instance, you could map shadows to a deep blue and highlights to a warm yellow, creating a classic split-tone effect often seen in film photography.
- Unique B&W Tones: Create a gradient with multiple shades of gray, or even subtle tints (e.g., dark brown to light beige) to give your black and white image a distinctive look.
- Benefits: Provides powerful creative control over the tonal response of your black and white image, allowing for stylistic and nuanced monochromatic effects that go beyond simple grayscale.
- Open your image. Go to
Selective Color: Blending Worlds with the Brush Tool
Sometimes, the most dramatic black and white image is one that retains a single splash of color, drawing the viewer’s eye to a specific element. This popular technique, often called “selective color,” combines the power of monochromatic conversion with focused color emphasis. Tophinhanhdep.com, with its focus on creative ideas and photo manipulation, celebrates this approach.
- How to:
- Step 1: Convert to Black and White: Begin by converting your entire image to black and white using your preferred non-destructive method (e.g., a
Black & White Adjustment Layer). This is crucial. - Step 2: Add a Layer Mask: The Black & White adjustment layer automatically comes with a white layer mask. If you used another method (like
Hue/Saturationor duplicated a layer and desaturated it), ensure you add a layer mask to that black and white layer by clicking theAdd Layer Maskicon at the bottom of theLayerspanel. - Step 3: Invert the Mask (Optional, but often easier): With the layer mask selected, press
Ctrl+I(Cmd+I on Mac) to invert it to black. This will temporarily hide the black and white effect, revealing your original color image underneath. - Step 4: Use the Brush Tool to Reveal Color:
- Select the
Brush Tool(B). - Set your foreground color to white (press
Dto reset to default black/white, thenXto switch). - Adjust your brush
SizeandHardness(right-click on the canvas) for precision. For edges, a smaller, harder brush is good; for larger areas, a softer brush works well. - Carefully paint over the areas where you want the original color to show through. Since you’re painting on the black layer mask with white, you are revealing the color layer beneath the black and white effect.
- Select the
- Step 5: Correcting Mistakes: If you accidentally paint over an area that should remain black and white, simply switch your foreground color to black (press
X) and paint over the mistake on the layer mask. This will re-hide the color, bringing back the black and white effect. - Benefits: This technique creates a striking visual contrast, directing attention precisely where you want it and adding a powerful, narrative element to your image. It’s a favorite for product photography, highlighting key features, or emphasizing emotional focal points.
- Step 1: Convert to Black and White: Begin by converting your entire image to black and white using your preferred non-destructive method (e.g., a
Enhancing Your Black and White Creations with Tophinhanhdep.com
Once you’ve achieved your desired black and white conversion, the journey doesn’t have to end. Further refinements can elevate your monochromatic masterpiece, and Tophinhanhdep.com is here to support you with an array of resources and tools.
Refining Your Monochromatic Masterpiece
Post-conversion tweaks are essential for giving your black and white images that polished, professional look. These steps fall under the broader umbrella of “Photography (Editing Styles)” and “Visual Design (Photo Manipulation)” categories on Tophinhanhdep.com.
- Dodging and Burning: This classic darkroom technique is perfectly replicated in Photoshop.
Dodging(lightening) andBurning(darkening) specific areas allows you to sculpt light, enhance three-dimensionality, and guide the viewer’s eye. Use a neutral gray layer set to Overlay blend mode, and paint with soft white or black brushes. - Sharpening: Black and white images often benefit from a touch of sharpening to emphasize textures and details that might have been less prominent in color. Use
Filter > Sharpen > Smart SharpenorUnsharp Maskjudiciously to avoid artifacts. - Vignettes: A subtle vignette (a gradual darkening around the edges of the frame) can help draw focus to the center of your image, adding a classic, intimate feel.
- Noise Reduction: If your original image had digital noise, it can become more apparent in black and white. Apply noise reduction carefully (
Filter > Noise > Reduce Noise) to maintain detail while smoothing unwanted grain. - Adding Subtle Tints: Beyond the
Tintoption in the Black & White adjustment layer, you can create more complex toning using aSolid Coloradjustment layer set toColorblend mode with low opacity, or throughCurvesadjustments targeting specific tonal ranges for split-toning effects.
Remember, the goal is to enhance the image, not overwhelm it. Small adjustments often yield the most impactful results.
Discover More: Tophinhanhdep.com as Your Visual Hub
As you master the art of black and white conversion and photo manipulation, Tophinhanhdep.com remains your steadfast partner in the visual realm. We are more than just a tutorial site; we are a comprehensive platform designed to fuel your creativity and elevate your digital artistry.
- Images (Wallpapers, Backgrounds, Aesthetic, Nature, Abstract, Sad/Emotional, Beautiful Photography): Explore our vast collections of high-resolution images to find inspiration for your next project, or simply discover stunning visuals for your personal use.
- Photography (High Resolution, Stock Photos, Digital Photography, Editing Styles): Dive deeper into the world of photography with our expert guides on capturing breathtaking images, understanding digital photography principles, and mastering various editing styles.
- Image Tools (Converters, Compressors, Optimizers, AI Upscalers, Image-to-Text): Enhance your workflow and optimize your images with our suite of powerful image tools. Whether you need to compress a file for web use, convert formats, or even upscale a low-resolution image using cutting-edge AI technology, Tophinhanhdep.com has you covered.
- Visual Design (Graphic Design, Digital Art, Photo Manipulation, Creative Ideas): Broaden your creative horizons with resources on graphic design, digital art, and advanced photo manipulation techniques. Find creative ideas and inspiration to push the boundaries of your visual projects.
- Image Inspiration & Collections (Photo Ideas, Mood Boards, Thematic Collections, Trending Styles): Never run out of creative fuel. Our curated collections, mood boards, and insights into trending styles will keep your imagination buzzing with fresh photo ideas.
The versatility of Photoshop, when combined with the rich resources available on Tophinhanhdep.com, empowers you to unleash your full creative potential. Transforming color images into black and white is not merely a technical process; it’s an artistic discipline that demands a keen eye and a thoughtful approach. By embracing the various methods outlined in this guide, you gain the ability to imbue your photographs with drama, depth, and a timeless elegance that transcends the everyday.
We encourage you to experiment with these techniques, explore the nuanced power of monochromatic expression, and continually refine your vision. Visit Tophinhanhdep.com today for more insights, inspiration, and tools to make every one of your visual creations truly unforgettable.