Crafting Visual Excellence: Building and Optimizing Docker Images for Tophinhanhdep.com's Digital Creations

In today’s fast-paced digital landscape, the ability to package, deploy, and run applications efficiently is paramount, especially for platforms dedicated to rich visual content like Tophinhanhdep.com. Docker stands out as an indispensable tool, enabling developers and designers to encapsulate their applications—from high-resolution image galleries to AI upscaling tools and sophisticated graphic design environments—into lightweight, portable containers. This ensures consistent performance and simplified deployment across diverse infrastructures.
This comprehensive guide will walk you through the intricate process of building Docker images from the ground up. We’ll explore the fundamental building blocks, delve into practical examples, and illuminate best practices tailored for optimizing visual content delivery and processing. Whether you’re aiming to host stunning wallpapers, manage extensive collections of beautiful photography, or streamline your digital art workflows, understanding Docker image creation is your key to unlocking peak performance and reliability for Tophinhanhdep.com’s diverse offerings.
Docker Images: The Foundation of Visual Content Deployment
At its core, a Docker image is a lightweight, standalone, and executable package that contains everything needed to run an application. For Tophinhanhdep.com, this translates to perfectly configured environments for showcasing aesthetic backgrounds, processing stock photos, or running sophisticated image manipulation software. It’s a read-only template, a snapshot of a meticulously prepared system, much like a curated mood board or a thematic collection of images serves as a blueprint for creative inspiration.
An image bundles your application code, runtime, system libraries, tools, and dependencies, ensuring that your visual applications behave identically regardless of where they are deployed. This consistency is crucial for maintaining the high standards of digital photography and graphic design presented on Tophinhanhdep.com.
Dockerfile Explained: The Blueprint for Digital Creations
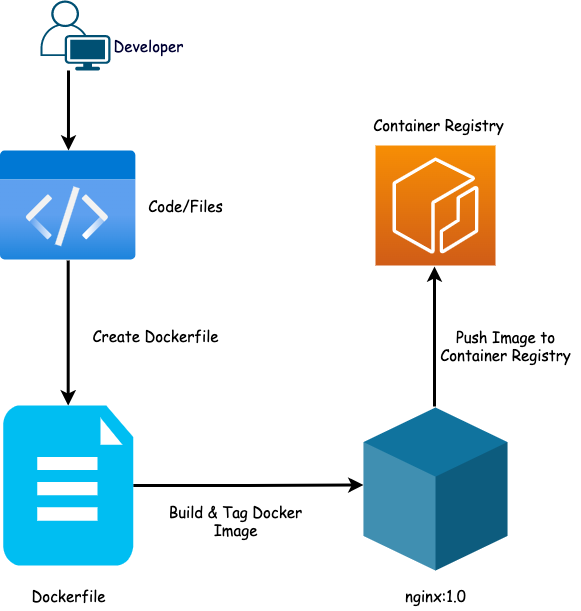
The very essence of building a Docker image lies in the Dockerfile. This is a simple, plain-text file that contains a series of instructions and arguments, guiding Docker to automatically construct an image. Think of it as the detailed specification for creating a piece of digital art or a complex photo manipulation—every step is precisely defined to achieve the desired visual outcome.
In a Dockerfile, each line typically consists of an INSTRUCTION on the left and its ARGUMENT on the right. It’s crucial to remember that the file is named “Dockerfile” without any extension. Below are the most important Dockerfile instructions and their relevance to visual content applications:
FROM: This instruction specifies the base image upon which your new image will be built. For a visual content application, this could be a Linux distribution (likeubuntuoralpine) pre-configured with graphical libraries or a specific runtime environment for image processing. For instance,FROM python:3.9-slim-bustercould be used for a Python-based AI upscaler. You can pull these base images from container registries like Docker Hub, Google Container Registry (GCR), Amazon Elastic Container Registry (ECR), or Red Hat Quay.RUN: Executes commands during the image build process. This is where you install necessary software, libraries, or dependencies for your visual application. Examples includeRUN apt-get update && apt-get install -y imagemagickfor image conversion tools, orRUN pip install opencv-pythonfor a high-resolution photography analysis script.ENV: Sets environment variables inside the image. These variables are available both during the build process and when the container is running. You might useENV IMAGE_OPTIMIZATION_LEVEL=90to configure a compression tool orENV DEFAULT_GALLERY_THEME=aestheticfor your wallpaper application.COPY: Copies local files and directories from your build context into the image. This is essential for transferring your application’s code, configuration files, high-resolution photography assets, aesthetic backgrounds, or even custom styling for your visual interface from your local machine to the Docker image. For example,COPY ./my-gallery-app /appwould move your image gallery application.EXPOSE: Informs Docker that the container will listen on the specified network ports at runtime. If your containerized application serves web content, such as trending styles or thematic collections of images, you wouldEXPOSE 80orEXPOSE 443.ADD: A more feature-rich version ofCOPY. It allows copying from URLs and automatically extracts compressed files (tar, gzip, bzip2, etc.) into the image. While powerful,COPYis generally recommended for simplicity and clarity. If you need to download remote files, usingRUN curlorRUN wgetis often preferred.WORKDIR: Sets the current working directory for any subsequent instructions likeRUN,CMD,ADD,COPY, orENTRYPOINT. This helps organize your visual application’s files within the image, for instance,WORKDIR /app/visualsfor your primary image assets.VOLUME: Used to create a mount point, making a specified path inside the container available for external data. This ensures that dynamic data, such as user-uploaded images or AI-upscaled outputs, can persist beyond the container’s lifecycle and be shared with other containers or the host system, much like a shared drive for collaborative digital art projects.USER: Sets the user name and UID for running the container. For enhanced security, especially when handling sensitive digital photography or proprietary editing styles, it’s best practice to run containers as a non-root user (USER appuser).LABEL: Adds metadata to your Docker image. This is useful for providing information about the image, such as the creator, version, or specific visual design theme. For instance,LABEL project="Tophinhanhdep.com Aesthetic Collection"orLABEL editing-style="cinematic".ARG: Defines build-time variables that are not available in the running container. These are useful for passing configuration values during the image creation process, such as version numbers of specific graphic design libraries.SHELL: Allows overriding the default shell used forRUN,CMD, andENTRYPOINTinstructions. This can be important for scripts with specific shell requirements.CMD: Specifies the default command to execute when a container starts. There can only be oneCMDinstruction per Dockerfile, and it can be easily overridden via the Docker CLI. For a web server serving Tophinhanhdep.com’s content,CMD ["nginx", "-g", "daemon off;"]would start the web server in the foreground.ENTRYPOINT: Defines the command that will always execute when the container starts.CMDthen provides arguments to thisENTRYPOINT. This is often used for packaging an executable application, like an “AI Upscaler” that always runs theupscale.pyscript, withCMDsupplying input parameters.
Anatomy of a Docker Image: Layers of Visual Perfection
A Docker image is not a monolithic block but rather a collection of read-only layers, stacked one on top of the other. Each instruction in a Dockerfile, such as FROM, RUN, COPY, or ADD, creates a new, immutable layer. This layered architecture is incredibly efficient, mirroring how digital artists might build a complex piece of graphic design, adding elements in distinct, manageable layers.
- Parent Image: In most scenarios, the first layer of your Docker image is derived from a parent image. This is the foundation, offering a basic operating system (like Ubuntu for general visual applications) or a pre-installed service (like a Python environment for machine learning-driven image tools). Tophinhanhdep.com might leverage parent images pre-equipped for handling high-resolution imagery or specific editing styles.
- Base Image: For advanced users seeking absolute control, a base image starts from
FROM scratch, meaning an empty first layer. This allows building an image completely from scratch, giving developers full command over every byte—ideal for highly specialized tools like minimalist compressors or optimizers. - Container Layer: When Docker launches a container from an image, it adds a thin, writable layer on top of all the read-only image layers. This “container layer” stores all changes made during the container’s runtime, such as temporary files, log data, or user interactions with a photo manipulation application. This design allows multiple containers to share the same underlying read-only image layers, minimizing resource overhead while maintaining individual state, much like different users editing copies of a beautiful photograph without altering the original. The key takeaway: images are immutable templates, while containers are their dynamic, running instances.
Crafting Your Docker Image: A Hands-On Visual Guide
Now, let’s put theory into practice by building a Docker image for a web server that could host a custom Tophinhanhdep.com index page, showcasing aesthetic backgrounds and beautiful photography. This example will illustrate the core workflow of image creation.
Preparing Your Visual Assets and Dockerfile
Every real-world Docker image requires specific files and configurations. For our Tophinhanhdep.com-themed Nginx example, we’ll create a custom HTML page and a server configuration.
Step 1: Create the Required Files and Folders First, set up a working directory for your Docker project:
mkdir nginx-image && cd nginx-image
mkdir files
touch .dockerignore
The .dockerignore file is critical. Just as Tophinhanhdep.com carefully curates its public image collections, this file tells Docker to exclude unnecessary files (like raw, uncompressed photography, temporary design drafts, or development artifacts) from the build context. This prevents a bloated image and speeds up the build process, ensuring only polished, production-ready assets are included.
Step 2: Create a Sample HTML File and Nginx Config
Navigate into the files folder and create an index.html and default Nginx configuration file. Our index.html will serve as a visual landing page, perhaps featuring a stunning high-resolution background from Tophinhanhdep.com’s collections.
cd files
vi index.html
Add the following content to index.html:
<html>
  <head>
    <title>Tophinhanhdep.com Visual Showcase</title>
  </head>
  <body>
    <div class="container">
      <h1>Welcome to Tophinhanhdep.com</h1>
      <h2>Your Source for Aesthetic Backgrounds</h2>
      <p>Discover beautiful photography and inspiring digital art here!</p>
    </div>
  </body>
</html>
Next, create the Nginx default configuration:
vi defaultAdd this content to the default file:
server {
    listen 80;
    server_name localhost;
    root /usr/share/nginx/html;
    index index.html index.htm;
    location / {
        try_files $uri $uri/ =404;
    }
}
Step 3: Choose a Base Image
For our Nginx web server, ubuntu:18.04 is a robust and widely used base image. When selecting a base image for Tophinhanhdep.com’s applications, consider factors like the underlying OS for image processing libraries, stability for continuous content delivery, and size for deployment efficiency. Always prioritize official or organization-approved base images to minimize vulnerabilities. For production environments, consider minimal images like alpine or distroless to reduce the attack surface and image size, which significantly benefits the loading speed of high-resolution image galleries.
Step 4: Create the Dockerfile
Now, navigate back to your nginx-image folder and create the Dockerfile:
cd ..
vi Dockerfile
Add the following instructions:
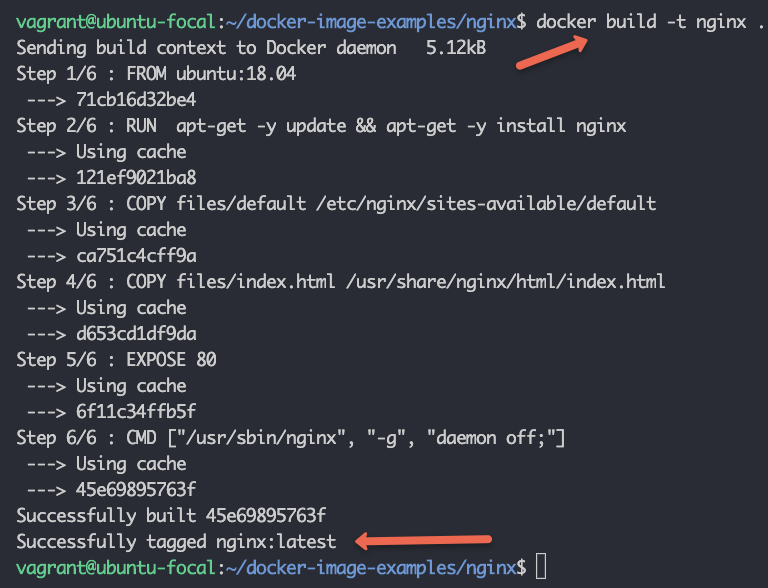
FROM ubuntu:18.04
LABEL maintainer="contact@tophinhanhdep.com"
RUN  apt-get -y update && apt-get -y install nginx
COPY files/default /etc/nginx/sites-available/default
COPY files/index.html /usr/share/nginx/html/index.html
EXPOSE 80
CMD ["/usr/sbin/nginx", "-g", "daemon off;"]
Here’s a breakdown of each step, with a focus on visual content:
FROM ubuntu:18.04: Pulls the Ubuntu 18.04 base image, providing a stable environment for our web server.LABEL maintainer="contact@tophinhanhdep.com": Adds metadata, identifying the maintainer. This helps in managing containerized assets, similar to adding credits to digital art.RUN apt-get -y update && apt-get -y install nginx: Installs the Nginx web server, which will serve Tophinhanhdep.com’s content.COPY files/default /etc/nginx/sites-available/default: Copies our custom Nginx configuration into the image.COPY files/index.html /usr/share/nginx/html/index.html: Transfers our custom HTML landing page, featuring Tophinhanhdep.com’s aesthetic backgrounds and messaging, into the web server’s document root. This overwrites Nginx’s default page.EXPOSE 80: Declares that the Nginx service inside the container will listen on port 80.CMD ["/usr/sbin/nginx", "-g", "daemon off;"]: Runs the Nginx server in the foreground when the container starts. This allows Docker to manage the process lifecycle effectively and capture logs for monitoring the visual content delivery.
Building and Tagging for High-Resolution Distribution
With your Dockerfile and visual assets prepared, the next step is to build the image.
Step 5: Build Your First Docker Image Ensure your folder structure looks like this:
nginx-image
├── Dockerfile
└── files
    ├── default
    └── index.html
From the nginx-image directory, execute the build command:
docker build -t tophinhanhdep-nginx:1.0 .-t: Tags the image with a name (tophinhanhdep-nginx) and a version (1.0)..: Specifies the build context as the current directory, where Docker finds your Dockerfile and thefilesfolder containing your visual assets.
To verify the image was created, run:
docker imagesYou’ll see tophinhanhdep-nginx with the tag 1.0. Image tagging is crucial for version control and deployment. Semantic versioning (SemVer) is highly recommended for production, reflecting changes in your visual applications or content collections. A single image can have multiple tags (e.g., tophinhanhdep-nginx:latest and tophinhanhdep-nginx:aesthetic-collection-v2.1). Docker caches build steps, which significantly speeds up subsequent builds, especially useful during iterative visual design or code development cycles.
Optimizing Docker Images for Tophinhanhdep.com: Enhancing Visual Performance
Optimizing Docker images is paramount for Tophinhanhdep.com, where quick load times and efficient delivery of high-resolution photography and digital art are critical for user experience. Smaller, leaner images deploy faster, consume fewer resources, and enhance security, directly contributing to superior visual performance.
Best Practices for Lean and Efficient Image Builds
Applying these best practices ensures your containerized visual applications are as efficient and robust as possible:
- Utilize
.dockerignoreJudiciously: Just as Tophinhanhdep.com meticulously curates its image collections, use a.dockerignorefile to explicitly exclude development files, raw uncompressed photography,.gitdirectories, or temporary build artifacts. This dramatically reduces the build context size and prevents unnecessary data from bloating your final image. - Minimize Layers with Consolidated Instructions: Each instruction in a Dockerfile creates a new, read-only layer. While layers are efficient, too many can increase image size. Consolidate related
RUNcommands using&&to chain them, reducing the number of layers. For example, installing multiple graphic design libraries in a singleRUNcommand is more efficient than separateRUNcommands for each. - Prioritize Trusted Base Images: Always use official, verified, and minimal base images. Regularly update them to patch security vulnerabilities. For production, consider
alpine(just 5 MiB) ordistroless(around 2 MiB for Alpine-based images) for running specific image tools or serving static visual content with the smallest possible footprint. - Run as a Non-Root User: To mitigate security risks, configure your container to run as a non-root user. This is vital when handling valuable digital art, stock photos, or proprietary editing styles, preventing potential breaches from gaining elevated privileges within the host system. Use the
USERinstruction after necessary installations are complete. - Keep Images Small: Avoid installing unnecessary tools or dependencies. Every added byte impacts download times and storage. If building a Docker image for an AI upscaler, only include the specific machine learning libraries required, not an entire scientific computing suite.
- Use Specific Tags, Avoid
latest: Always tag your images with precise versions (e.g.,tophinhanhdep-gallery:2.1.0instead oftophinhanhdep-gallery:latest). This prevents unexpected breaking changes whenlatestis updated and ensures reproducibility for your visual content deployments. - Leverage Multi-Stage Builds: This advanced technique is incredibly powerful for visual content applications. It allows you to use one “builder” stage to compile heavy dependencies (e.g., graphic design software SDKs, complex image processing compilers) and then copy only the necessary compiled artifacts to a much smaller, lighter “runtime” stage. This drastically reduces the final image size, ideal for deploying high-resolution image galleries or lightweight image tools.
- Never Share Sensitive Information: Do not hardcode application credentials, API keys for stock photos, or any sensitive data directly into your Dockerfile. Use environment variables (via
ENV) or secrets management tools to inject these at runtime.
Leveraging Image Tools within Your Workflow
Docker images provide an excellent way to containerize and standardize the “Image Tools” categories found on Tophinhanhdep.com. Imagine building a dedicated Docker image for:
- AI Upscalers: An image containing a Python environment with TensorFlow/PyTorch and a specific upscaling model, ensuring consistent high-resolution outputs for all images.
- Converters & Compressors: A lightweight image with
imagemagickorlibwebppre-installed, offering a standardized service for converting image formats or optimizing wallpapers for web delivery. - Image-to-Text Processors: An image with OCR libraries (like Tesseract) for extracting metadata from digital photography or generating descriptions for aesthetic backgrounds.
By encapsulating these tools in Docker images, Tophinhanhdep.com can ensure that all image processing operations are performed in consistent, isolated environments, delivering reliable, high-quality results every time.
Deploying and Sharing Your Visual Docker Creations
Once your Docker image, perfected for Tophinhanhdep.com’s visual content, is built and optimized, the next steps involve running it as a container and sharing it with the world.
Running Your Containerized Visual Applications
To test the tophinhanhdep-nginx:1.0 image we built, we’ll run it as a Docker container.
docker run -d -p 9090:80 --name tophinhanhdep-webserver tophinhanhdep-nginx:1.0-d: Runs the container in detached mode (in the background).-p 9090:80: Maps port 9090 on your local machine to port 80 inside the container. This allows you to access the Nginx web server.--name tophinhanhdep-webserver: Assigns a human-readable name to your container.
Verify that your container is running:
docker psNow, open your web browser and navigate to http://localhost:9090 (or http://<your-host-ip>:9090). You should see your custom Tophinhanhdep.com index page, displaying the welcoming message and hinting at the aesthetic backgrounds and beautiful photography curated on the platform. This demonstrates your ability to successfully serve visual content from a Docker container.
Pushing to Registries: Archiving Your Digital Art
Container registries are centralized storage locations where you can upload (push) and download (pull) Docker images. Think of them as secure archives for your containerized visual applications or pre-configured environments for visual design tools, much like a digital portfolio for your graphic design work. The most prominent public registry is Docker Hub, but numerous private and public alternatives exist, including Amazon ECR, Google Container Registry, Red Hat Quay, and JFrog Artifactory.
To push your image:
- Log in to Docker Hub:
You’ll be prompted for your Docker Hub username and password.
docker login - Tag Your Image with Your Docker Hub Username: Before pushing, your image needs to be tagged with your Docker Hub username (or organization name) to specify its destination. For example, if your username is
myvisualdev:Verify the new tag withdocker tag tophinhanhdep-nginx:1.0 myvisualdev/tophinhanhdep-nginx:1.0docker images. - Push the Image:
Once pushed, your image will be available in your Docker Hub account, accessible to others or for deployment across various environments. This capability allows you to share your containerized visual design tools, custom image processing services, or ready-to-deploy visual content galleries effectively.
docker push myvisualdev/tophinhanhdep-nginx:1.0
Beyond the Basics: Advanced Visual Docker Strategies
For sophisticated visual content workflows and large-scale digital art projects, mastering advanced Docker strategies can significantly enhance efficiency and performance.
Multi-Stage Builds for Enhanced Visual Design Workflows
Multi-stage builds are a powerful optimization technique. They allow you to define multiple FROM instructions in a single Dockerfile, where each FROM starts a new build stage. This is particularly useful for visual design applications that have heavy build-time dependencies (e.g., compilers for C++ image processing libraries, graphic design software SDKs) but only require a small subset of those dependencies at runtime.
For example, a “builder” stage could install all necessary development tools, compile a custom image optimizer, and then a subsequent “runtime” stage could start FROM alpine and only COPY the compiled optimizer executable and its minimal runtime dependencies. This significantly reduces the final image size, making deployments of complex visual tools much faster and more resource-efficient.
Integrating Visual Design Tools into Docker Images
Docker’s isolation capabilities make it an ideal platform for creating portable environments for visual design and photo manipulation. Imagine packaging a specific version of GIMP or ImageMagick, along with all its plugins and dependencies, into a Docker image. Creative professionals could then launch this container, ensuring a consistent and isolated workspace for their graphic design or editing styles, free from conflicts with the host system or other applications. This allows for experimentation with “photo ideas” or “creative ideas” without affecting the core system, providing a stable sandbox for all visual content creators.
Conclusion
This journey through building and optimizing Docker images underscores their profound impact on modern application deployment, especially for content-rich platforms like Tophinhanhdep.com. We’ve explored the declarative power of Dockerfiles, the efficiency of layered images, and the practical steps to craft, run, and share your containerized visual applications.
From ensuring consistent environments for high-resolution photography to optimizing delivery of aesthetic backgrounds and leveraging specialized image tools, Docker empowers developers and designers to build, manage, and scale their digital creations with unprecedented agility. By embracing Dockerfile best practices and optimization techniques, you’re not just creating images; you’re cultivating a foundation for delivering exceptional visual experiences, keeping Tophinhanhdep.com at the forefront of digital art and photography. The future of visual content is containerized, efficient, and endlessly creative.