How to Make High-Resolution Images: Your Comprehensive Guide with Tophinhanhdep.com

In today’s visually-driven world, the quality of an image can make all the difference. Whether you’re curating a collection of breathtaking nature photographs, crafting stunning aesthetic wallpapers, or preparing digital art for print, achieving high resolution is paramount. Low-resolution images can appear pixelated, blurry, and unprofessional, diminishing their impact and failing to convey the intended detail and beauty. Conversely, a high-resolution image offers crispness, clarity, and the ability to be scaled or printed without significant loss of quality, transforming an ordinary visual into an extraordinary experience.
Tophinhanhdep.com is your go-to resource for understanding, creating, and optimizing high-resolution images across a diverse range of categories, from abstract compositions to poignant emotional photography. Our platform provides insights into the nuances of digital photography, comprehensive editing styles, and a suite of image tools designed to elevate your visual content. This guide delves into the core principles of image resolution, explores practical methods for enhancing image quality using various software and Tophinhanhdep.com’s specialized tools, and offers advanced strategies for integrating high-resolution visuals into your creative and professional endeavors. By the end, you’ll be equipped with the knowledge to consistently produce images that meet the highest standards of clarity and detail, ensuring your visual storytelling is always at its best.
1. Understanding High Resolution: The Foundation of Stunning Visuals
The journey to creating high-resolution images begins with a fundamental understanding of what resolution truly means in the digital realm. It’s more than just a buzzword; it’s the bedrock upon which all visual quality is built, directly influencing how clear, detailed, and versatile your images can be. For anyone passionate about images – be it for stunning wallpapers, vibrant backgrounds, or intricate digital art – grasping these core concepts is essential.
The Pixels and Quality Equation: PPI, DPI, and Image Sharpness
At its heart, a digital image is a mosaic of tiny colored squares known as pixels. The resolution of an image refers to the total number of these pixels, typically expressed as width x height (e.g., 1920x1080 pixels). However, when discussing resolution in terms of quality and suitability for various outputs, two crucial metrics come into play: Pixels Per Inch (PPI) and Dots Per Inch (DPI).
- Pixels Per Inch (PPI): This metric specifically applies to digital displays. It defines the density of pixels within a one-inch square on a screen. A higher PPI means more pixels are packed into each inch, resulting in a smoother, more detailed image that appears sharper to the human eye. For web images, a PPI of 72 is traditionally considered standard, though modern high-density displays (like Retina screens) often feature much higher PPIs, making images with lower pixel counts appear less sharp. When browsing Tophinhanhdep.com for high-resolution images or uploading your own, understanding PPI helps in assessing how an image will look on various devices.
- Dots Per Inch (DPI): This metric is the printing equivalent of PPI. It refers to the number of ink dots a printer can place within a one-inch square on paper. For high-quality prints, a DPI of 300 is widely accepted as the industry standard. This density ensures that individual dots are imperceptible, creating a continuous tone image with fine detail and smooth gradations. Printing images with a DPI lower than 300 can lead to noticeable pixelation or a “fuzzy” appearance, especially when viewed up close. This distinction is vital for those using Tophinhanhdep.com for beautiful photography that might end up as physical art or part of a printed visual design project.
It’s important to clarify that while often used interchangeably, PPI and DPI are distinct. Increasing the PPI (or simply the pixel dimensions) of an image doesn’t automatically mean it will print at a high DPI without proper consideration of its overall pixel count. A small image with a high PPI might still be too small in total pixels to produce a large, high-quality print at 300 DPI. The correlation is key: more pixels overall allow for higher PPI and higher DPI for larger physical dimensions.

Why High Resolution Matters: From Wallpapers to Professional Prints
The significance of high resolution extends across virtually all applications of digital imagery. On Tophinhanhdep.com, we categorize images for various uses, and for each, high resolution is a non-negotiable factor for impact and versatility.
- Digital Display (Wallpapers, Backgrounds, Aesthetic Images): For images intended for screens – be it desktop wallpapers, mobile backgrounds, or aesthetic visuals shared on social media – high resolution ensures clarity and vibrancy. A high-resolution background doesn’t appear pixelated on large monitors or crisp smartphone displays, enhancing the user experience. Whether you’re browsing Tophinhanhdep.com’s nature collections or abstract designs, the high-res option guarantees a superior visual feast.
- Professional Photography and Stock Photos: For photographers, high resolution is directly linked to marketability and professional credibility. High-resolution stock photos are highly sought after because they offer clients the flexibility to use them in various projects, from small web thumbnails to large-format advertisements. Tophinhanhdep.com emphasizes high-resolution in its photography section because it underpins the value and utility of digital photography assets.
- Visual Design (Graphic Design, Digital Art, Photo Manipulation): Designers and digital artists rely on high-resolution images to maintain quality throughout their creative process. When incorporating images into graphic designs, manipulating photos, or creating digital art, starting with a high-resolution base prevents quality degradation as elements are resized, filtered, or composited. It provides a larger canvas for creative ideas and ensures the final output, whether for web or print, looks polished.
- Print Projects: This is where the difference between low and high resolution is most acutely felt. Any image destined for print – posters, flyers, magazines, merchandise – absolutely requires high resolution (typically 300 DPI at the desired print size). Without it, the printed material will look amateurish and coarse. Tophinhanhdep.com guides users on optimizing images for print, ensuring that beautiful photography translates flawlessly from screen to paper.
- Archival and Future-Proofing: Storing images in high resolution is a form of future-proofing. As display technologies advance and screen resolutions increase, images with sufficient pixel data will continue to look good. For thematic collections or personal archives, preserving images in their highest possible resolution ensures their longevity and adaptability to unforeseen future uses.
In essence, high resolution is not merely a technical specification; it is a gateway to impactful visual communication, allowing images to resonate with clarity, detail, and professional finesse across all mediums.
2. Mastering Resolution Enhancement: Tophinhanhdep.com’s Toolkit and Techniques
Even with a solid understanding of resolution, you might find yourself with an image that doesn’t meet your desired quality standards. This is where resolution enhancement techniques and Tophinhanhdep.com’s suite of image tools come into play. While it’s crucial to acknowledge that you can’t truly add detail that wasn’t originally captured, you can intelligently upscale images, increasing their pixel dimensions and often their perceived sharpness, to make them suitable for larger displays or prints.

Desktop Software Solutions: GIMP and Adobe Photoshop
For those working on desktop computers, robust image editing software offers precise control over image resolution. Tophinhanhdep.com frequently recommends these tools for detailed digital photography and photo manipulation tasks.
Utilizing GIMP for Resolution Adjustment
GIMP (GNU Image Manipulation Program) is a free, open-source image editor available for Windows, macOS, and Linux. It’s a powerful alternative to paid software and is perfectly capable of increasing image resolution. Tophinhanhdep.com provides in-depth tutorials on using GIMP effectively.
How to Increase Resolution with GIMP:
- Open your image: In GIMP, navigate to
File > Openand select your desired image. - Access Print Size: Go to
Image > Print Size. This dialog box allows you to adjust the physical dimensions and resolution without resampling the pixels directly at this stage. - Adjust Resolution: Look for “X Resolution” and “Y Resolution.” The standard for print is 300 pixels/inch. Change the dropdown menu next to the resolution values to “in” (inches) if necessary. Enter your desired resolution (e.g., 300) in both the X and Y fields.
- Resample Image (Upscale): To actually increase the pixel dimensions, you’ll typically use
Image > Scale Image. Here, you can input a larger width or height in pixels. Ensure the chain icon is locked to maintain the aspect ratio. GIMP offers various interpolation methods; “Cubic (Lanczos)” is often a good choice for upscaling as it produces sharper results than bilinear interpolation. - Preview and Export: After scaling, zoom in (
View > Zoom) to check the quality. Once satisfied, go toFile > Export(orFile > Export As) to save your new, higher-resolution image. When exporting, opt for the lowest compression settings (e.g., move JPEG quality slider to 100 or compression level to 0) to retain maximum quality. Tophinhanhdep.com’s guidance often stresses this final export step to ensure no quality is lost in saving.
Enhancing Resolution with Adobe Photoshop
Adobe Photoshop is the industry standard for graphic design and digital photography editing. Its sophisticated algorithms offer some of the best results for image upscaling. Tophinhanhdep.com provides detailed workflows for Photoshop users.
Steps for Upscaling in Photoshop:
- Enable Preserve Details 2.0: Before you start, go to
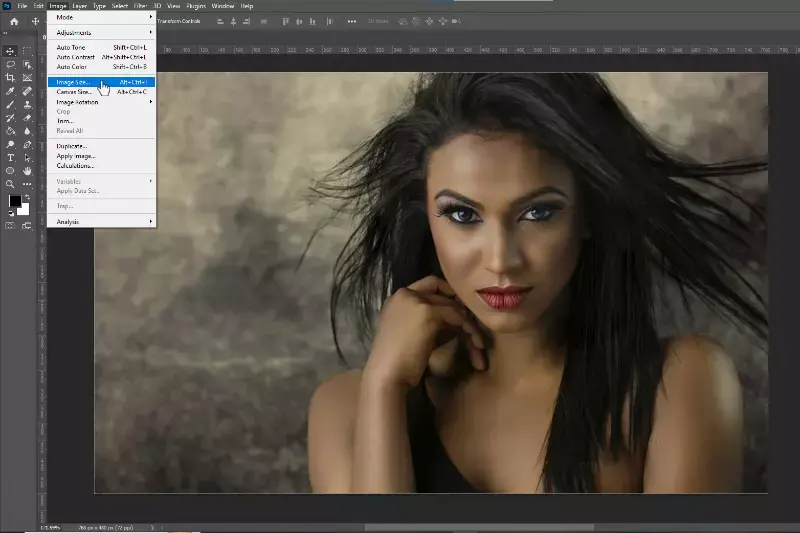
Edit > Preferences > Technology Previews(Windows) orPhotoshop > Preferences > Technology Previews(Mac) and ensure “Enable Preserve Details 2.0 Upscale” is checked. This leverages Photoshop’s advanced AI for better upscaling. - Open Image Size: Open your image and go to
Image > Image Size(or useAlt + Ctrl + Ion Windows,Option + Cmd + Ion Mac). - Configure Settings:
- Resample: Make sure the “Resample” box is checked. This tells Photoshop to add new pixels.
- Dimensions: Set the units to “Pixels” for precise control.
- Interpolation Method: In the dropdown next to “Resample,” choose “Preserve Details 2.0.” This is Photoshop’s most advanced method for retaining sharpness during enlargement.
- Resolution: Increase the “Resolution” value (e.g., from 72 PPI to 300 PPI). As you adjust this, the pixel dimensions (width and height) will also increase.
- Reduce Noise: If your original image has noticeable grain or noise, subtly increase the “Reduce Noise” slider. Use sparingly to avoid an overly smooth, unnatural look.
- Apply and Refine: Click “OK.” Photoshop will process the image. For an optional but often beneficial final touch, Tophinhanhdep.com recommends applying a “High Pass” filter (
Filter > Other > High Pass) to a duplicate layer, setting its blending mode to “Overlay.” This can enhance edge sharpness without introducing harshness.
Mobile Applications for On-the-Go Upscaling
For content creators and photographers who are often on the move, mobile apps provide convenient ways to adjust image resolution directly from smartphones. Tophinhanhdep.com acknowledges the growing need for mobile editing solutions for quick aesthetic adjustments.
Image Size for iOS
Image Size is a popular free app for iPhone users (iOS 9.0 or later) that simplifies image resizing and resolution adjustment.
How to Use Image Size (iOS):
- Grant Access: Install and open the Image Size app. Grant it access to your Photos.
- Select Image: Tap the white box (image picker) and choose the image you want to resize.
- Adjust Dimensions: Tap the chain icon to link width and height. Enter your desired new width (e.g., 6000 pixels). The height will automatically adjust.
- Check Output Quality: Tap the gear icon for settings. Ensure the “Output Quality” slider is at 100% to maximize sharpness. If printing, the “Print size correction factor” can help smooth pixelation.
- Save: Tap the save arrow to store the enhanced image in your photo library.
Android Alternatives: Photo & Picture Resizer and Others
Android users have several options, such as “Photo & Picture Resizer,” “Picsart AI Photo Editor,” or “Photoshop Express.” These apps typically offer similar functionalities to increase image resolution.
General Steps for Android Apps:
- Open and Select: Launch the app and select the image from your gallery.
- Choose Dimensions/Resolution: Most apps will offer preset dimensions or a “Custom” option to manually enter new width and height values. Some also allow direct resolution (DPI/PPI) input.
- Maintain Aspect Ratio: Always ensure the aspect ratio is locked to prevent distortion.
- Save: Save the resized image, often to a dedicated folder created by the app. Tophinhanhdep.com encourages users to explore various apps to find the one best suited to their editing style.
The Power of AI: Online Upscalers and Tophinhanhdep.com’s Offerings
Perhaps the most revolutionary advancements in resolution enhancement come from Artificial Intelligence (AI). AI-powered upscalers use deep learning algorithms to analyze an image, predict missing details, and intelligently generate new pixels, often resulting in remarkably sharp and detailed enlarged images. Tophinhanhdep.com is at the forefront of integrating such “AI Upscalers” into its “Image Tools” section, providing users with cutting-edge solutions.
Tophinhanhdep.com’s AI Upscalers (e.g., similar to Wondershare PixCut, Topaz Gigapixel AI, Let’s Enhance)
While specific product names may vary or evolve, Tophinhanhdep.com offers powerful online AI upscalers that mimic the capabilities of leading tools like Wondershare PixCut, Topaz Gigapixel AI, and Let’s Enhance. These tools are designed for maximum convenience and effectiveness.
How to Use Tophinhanhdep.com’s AI Upscalers:
- Access the Tool: Navigate to the “Image Tools” section on Tophinhanhdep.com and select the “AI Upscaler.”
- Upload Your Image: Drag and drop your low-resolution image onto the designated area, or click to browse and select it from your device.
- Select Upscaling Factor: Choose your desired enlargement factor (e.g., 2x, 4x, 6x, or a custom pixel dimension). Tophinhanhdep.com’s AI will automatically process the image.
- Preview and Download: Once the upscaling is complete, you’ll be presented with a preview of the high-resolution result. You can often compare it side-by-side with the original. If satisfied, download your enhanced image.
Benefits of Tophinhanhdep.com’s AI Upscalers:
- Quality Preservation: Unlike traditional resizing methods that often introduce blur or artifacts, Tophinhanhdep.com’s AI upscalers are engineered to preserve and even enhance details, textures, and edges. They are particularly effective for photography, digital art, and even scanned documents.
- Ease of Use: These online tools are incredibly user-friendly, requiring no software installation or advanced editing skills. This makes them accessible to everyone, from casual users wanting better wallpapers to graphic designers needing quick enhancements.
- Speed: AI upscaling processes can be remarkably fast, providing high-resolution images in a matter of seconds or minutes, depending on the image size and selected upscale factor.
- Versatility: Beyond simple enlargement, some AI upscalers on Tophinhanhdep.com might also offer features to reduce JPEG artifacts, denoise images, or even refine faces in portraits, significantly boosting overall image quality.
By leveraging Tophinhanhdep.com’s “Image Tools,” you gain access to state-of-the-art AI technology that democratizes high-resolution image creation, transforming low-quality visuals into stunning, print-ready assets with minimal effort. This capability is invaluable for anyone working with various image types, from abstract aesthetics to beautiful photography, ensuring your visual content always stands out.
3. Advanced Strategies for Optimal Image Quality and Visual Design
While the fundamental steps of increasing image resolution are critical, achieving truly optimal image quality, especially when upscaling, often requires a more nuanced approach. It involves understanding the limitations of the technology and employing advanced techniques to refine the image further. Tophinhanhdep.com advocates for a holistic perspective on visual design, where resolution is just one piece of the puzzle, albeit a very important one.
Mitigating Quality Loss: Sharpening and Noise Reduction
The act of increasing an image’s pixel dimensions, even with advanced AI, can sometimes introduce subtle artifacts or a loss of apparent sharpness. Proactive measures in sharpening and noise reduction are key to counteracting these effects and achieving a polished, high-resolution output suitable for any purpose, from aesthetic backgrounds to detailed photo manipulation.
Strategic Sharpening Techniques
Sharpening enhances the contrast along edges in an image, making details appear clearer. However, over-sharpening can lead to halos, noise, and an unnatural look. Tophinhanhdep.com suggests a controlled approach:
- Understand “Sharpen Tools Sparingly”: As noted in professional guidelines, use sharpening tools with caution. The goal is to retain a similar look to the original picture, not to create a harsh, artificial appearance.
- High Pass Filter (Photoshop/GIMP): This is a favorite technique among professionals.
- Duplicate your image layer.
- Apply
Filter > Other > High Pass(Photoshop) orFilters > Enhance > High Pass(GIMP) to the duplicate layer. - Adjust the radius until only the edges and fine details are visible (the image will look mostly gray with outlines).
- Change the blending mode of this layer to “Overlay,” “Soft Light,” or “Hard Light.” “Overlay” is often preferred for a strong but natural effect.
- Adjust the layer’s opacity to fine-tune the sharpening intensity. This non-destructive method provides excellent control.
- Unsharp Mask (General Software): Most image editors, including GIMP and Photoshop, feature an “Unsharp Mask” filter (
Filter > Sharpen > Unsharp Mask). This tool typically has three main sliders:- Amount: Controls the intensity of the sharpening.
- Radius: Determines the size of the edge areas that will be affected. A smaller radius for fine details, a larger one for broader areas.
- Threshold: Specifies the minimum contrast difference an edge must have before it’s sharpened, helping to prevent sharpening of noise.
- Always view your image at 100% zoom when applying sharpening to accurately assess the effect.
- Selective Sharpening: Instead of sharpening the entire image, focus on areas that truly need it, such as eyes in a portrait or specific textures. Masking techniques can be used to apply sharpening only where desired.
Effective Noise Reduction
Noise (random pixel variations) can become more apparent when an image is enlarged. High-resolution images should ideally be clean.
- Integrated Tools: Many image editing software (like Photoshop) and AI upscalers (such as those offered by Tophinhanhdep.com) include built-in noise reduction features. In Photoshop’s
Image Sizedialog, the “Reduce Noise” slider is specifically for this purpose during upscaling. - Dedicated Noise Reduction Filters: Tools like
Filter > Noise > Reduce Noise(Photoshop) orFilters > Enhance > Despeckle(GIMP) offer more comprehensive control. These often distinguish between luminance noise (grayscale variations) and color noise (random colored pixels). - Balance: Noise reduction can sometimes soften fine details. The key is to find a balance between reducing noise and preserving important image information. Tophinhanhdep.com’s advice leans towards subtle adjustments that maintain natural textures.
The Art of Upscaling: Knowing the Limits and Best Practices
While modern tools, especially Tophinhanhdep.com’s AI upscalers, are incredibly powerful, it’s vital to approach upscaling with realistic expectations and apply best practices. Understanding the inherent limits of resolution enhancement is a mark of a skilled visual designer.
The Inherent Limits of Upscaling
“Bigger doesn’t mean sharper: The bigger you make an image, the more you’ll see a difference in sharpness. This process makes the picture larger and adds pixels, not more detail.” This critical insight from industry experts underscores the primary limitation: you cannot genuinely create detail that was never captured by the camera. Upscaling algorithms, whether traditional or AI-driven, interpolate data; they guess what the new pixels should look like based on surrounding information.
- Starting Quality is Key: The success of upscaling is highly dependent on the original image’s quality. An extremely low-resolution image with significant blur or compression artifacts will yield less impressive results than a moderately low-resolution image with relatively clean data. Tophinhanhdep.com emphasizes that while AI can work wonders, it’s not a “silver bullet” for fundamentally flawed source material.
- Avoid Excessive Enlargement: While AI upscalers can handle significant enlargements (e.g., 600% or 1000%), traditional methods struggle beyond a 30-40% increase without noticeable quality degradation. Even with AI, there’s a point of diminishing returns where the generated details start to look artificial or “painterly.”
- Quality vs. Resolution: It’s important to distinguish between image “quality” (which relates to focus, exposure, lighting, composition, etc., captured by the camera) and “resolution” (the number of pixels). Upscaling increases resolution, but it doesn’t retrospectively improve the photographic quality of the original capture. A 30MP image originally captured by a professional camera has far more authentic data than a 3MP image upscaled to 30MP.
Best Practices for Successful Upscaling
- Work with the Best Original: Always start with the highest quality original image available. If you have different versions, choose the one with the largest pixel dimensions and least compression.
- Non-Destructive Editing: Where possible, especially in software like Photoshop, work on duplicate layers or Smart Objects. This allows you to revert changes or adjust effects without permanently altering the original pixels.
- Preview at 100% Zoom: When making critical decisions about sharpening, noise reduction, or the overall impact of upscaling, view your image at 100% (actual pixels) zoom. This provides the most accurate representation of the final quality.
- Consider the End Use: The degree of upscaling and refinement should be driven by the image’s final application. A background for a website (72 PPI) has different requirements than a large print for a gallery (300 DPI). Tophinhanhdep.com’s categorizations for “wallpapers,” “stock photos,” and “digital art” inherently guide users toward these considerations.
- Experiment with Interpolation Methods: When not using AI, different interpolation methods (e.g., Bicubic Smoother, Bicubic Sharper, Lanczos in GIMP) can yield varied results. Experiment to see which best suits your specific image content.
By integrating these advanced strategies into your workflow, you can maximize the potential of resolution enhancement, producing high-quality images that meet the rigorous demands of modern visual design and photography. Tophinhanhdep.com provides the knowledge and tools to empower your creative vision, ensuring every image you touch achieves its full visual impact.
4. Integrating High-Resolution Images into Your Creative Workflow
The ultimate goal of creating high-resolution images is to integrate them seamlessly into various creative workflows, whether for personal enjoyment or professional output. Tophinhanhdep.com serves as a hub for visual inspiration and practical tools, making it easier for users to apply their high-resolution assets effectively across diverse applications, from crafting unique digital art to building thematic collections.
Creating Impactful Visuals: From Digital Art to Thematic Collections
High-resolution images are the bedrock for any impactful visual project. They provide the clarity and detail necessary for designs to stand out and convey their message with precision.
- Digital Art and Photo Manipulation: For digital artists and those engaging in photo manipulation, starting with high-resolution source material is non-negotiable. When compositing multiple images, applying filters, or drawing intricate details, high resolution ensures that the final piece maintains crispness and integrity. Tophinhanhdep.com’s “Visual Design” section, which covers graphic design and digital art, constantly emphasizes the importance of resolution in achieving professional-grade results. Artists can confidently experiment with creative ideas, knowing their foundational elements are sharp.
- Curating Aesthetic and Thematic Collections: Whether you’re building a mood board for a design project, curating a collection of aesthetic backgrounds, or compiling thematic collections of nature or abstract images, high resolution elevates the entire presentation. Tophinhanhdep.com’s “Image Inspiration & Collections” highlights trending styles and thematic groupings, where the visual impact comes directly from the quality and detail of each image. High-resolution images allow viewers to zoom in on intricate patterns, subtle textures, or emotional expressions without encountering pixelation, enriching their experience.
- Enhancing Wallpapers and Backgrounds: For users seeking the perfect wallpaper or background, high resolution translates directly into stunning visuals that grace their screens. A low-resolution image stretched across a large monitor looks distorted and unprofessional. Tophinhanhdep.com offers a vast array of high-resolution wallpapers and backgrounds—from serene nature scenes to striking abstract designs—ensuring that every pixel on your display is beautifully rendered. The clarity provided by high-res images makes them ideal for both personal aesthetic choices and professional presentations.
- Sad/Emotional Photography: Even in genres like sad or emotional photography, where the raw feeling might seem primary, high resolution plays a crucial role. It allows for the intricate capture of subtle facial expressions, tears, or environmental details that amplify the emotional narrative. When these images are displayed in high resolution, the viewer can connect more deeply with the nuance and depth of the moment. Tophinhanhdep.com emphasizes that technical quality supports, rather than detracts from, artistic expression.
Preparing Images for Print and Large Displays
Beyond digital viewing, the true test of a high-resolution image often comes with its physical reproduction or display on very large screens. Proper preparation is essential to translate digital quality into tangible excellence.
- Understanding Print Requirements: As discussed, 300 DPI is the gold standard for high-quality prints. When preparing an image, you must ensure that its pixel dimensions are large enough to achieve 300 DPI at the desired print size. For example, a 10x8 inch print at 300 DPI requires an image of 3000x2400 pixels. Tophinhanhdep.com provides resources and calculators to help photographers and designers determine the correct pixel dimensions for their specific print needs.
- Color Profiles and File Formats: For printing, using the correct color profile (e.g., Adobe RGB or sRGB, depending on your printer and print lab) and appropriate file formats is crucial. TIFF or high-quality JPEG (with minimal compression) are generally preferred for print, as they retain more image data than highly compressed web formats. Tophinhanhdep.com’s “Image Tools” include converters and optimizers that can assist in preparing files for print, ensuring color accuracy and optimal file size.
- Large-Format Displays and Projections: For exhibitions, digital signage, or large-screen projections, high-resolution images are equally vital. While PPI might seem less relevant than for print, the total pixel count still dictates how sharp an image will appear on a massive screen. Ensuring sufficient pixel dimensions prevents images from appearing pixelated or blurry when stretched across expansive digital canvases.
- Review and Proofing: Before final output, whether print or large display, it’s always best to perform a final review. Zoom in to 100% to check for any unexpected noise, artifacts, or sharpness issues that might have been introduced during upscaling or editing. For print, consider soft proofing (simulating print output on your screen) if your software allows, and always run a small test print if possible.
By thoughtfully integrating high-resolution images throughout your creative workflow, from initial concept to final presentation, you ensure that every visual asset reflects the highest standards of clarity and professional finesse. Tophinhanhdep.com is dedicated to equipping you with the knowledge, inspiration, and image tools necessary to master this art, helping you transform ordinary images into truly captivating visual experiences across all mediums.