How to Transform Raster Images into Scalable Vectors

In the vast and vibrant world of digital imagery, images come in two primary forms: raster and vector. While raster images, composed of individual pixels, excel at capturing intricate detail and subtle photographic nuances, they inherently suffer from resolution dependency. This means that when you zoom in or attempt to scale a raster image beyond its original dimensions, it quickly succumbs to pixelation, resulting in a blurry, unsharp, and unprofessional appearance. This limitation poses a significant challenge for designers, artists, and anyone needing visuals that maintain pristine quality across various sizes and applications, from a small website icon to a large-scale billboard.
Enter vector graphics – the antithesis of raster in their fundamental composition. Instead of pixels, vector images are built from mathematical equations that define points, lines, curves, and shapes. This unique structure grants them unparalleled scalability: a vector image can be enlarged to any size, from a tiny favicon to an enormous wall mural, without ever losing its crispness, clarity, or sharp edges. Every line remains smooth, every curve perfectly rendered, making vectors the ideal choice for logos, illustrations, typographic designs, and any visual element destined for diverse usage.
Understanding how to convert a pixel-based raster image into a resolution-independent vector graphic is a highly practical skill, opening up a world of creative possibilities for graphic design, digital art, and photo manipulation. Whether you’re refining a high-resolution photograph for a new aesthetic, preparing stock photos for diverse uses, or simply exploring creative ideas for visual design, mastering vectorization is an invaluable addition to your toolkit. This comprehensive guide will delve into the methods and tools available, primarily focusing on popular software like Corel Vector, Adobe Photoshop, and Adobe Illustrator, allowing you to breathe new, scalable life into your images. We’ll explore various techniques, from manual outlining to automated tracing, ensuring your designs stand out with timeless clarity and adaptable versatility.
Understanding Vector Graphics and Their Indispensable Role in Visual Design
Before diving into the “how-to,” it’s crucial to grasp the fundamental differences between raster and vector images and why the latter holds such a powerful position in modern visual design. This foundational knowledge will illuminate the “why” behind the effort of vectorization, tying directly into the core concepts of graphic design, digital art, and even high-resolution photography post-processing.
What is a Vector Image? The Mathematics of Scalability
A vector graphic is not just a different file type; it’s a fundamentally different way of representing visual information. Unlike raster images (e.g., JPEGs, PNGs, GIFs) that store data pixel by pixel, a vector image stores information about geometric primitives: points, lines, curves, and shapes. Each of these elements is defined by mathematical equations. For instance, a circle in a vector file isn’t a collection of colored pixels arranged in a circular pattern; it’s a mathematical description that specifies its center point, radius, and fill color.
This mathematical basis is the secret to a vector image’s greatest strength: infinite scalability. When you enlarge a vector graphic, the software recalculates these mathematical equations to render the shapes at the new size, ensuring that lines remain perfectly sharp and curves stay smooth, regardless of the zoom level. There’s no fixed resolution, no pixel grid to stretch or distort. This makes vector graphics indispensable for:
- Logos and Branding: A company logo needs to look perfect on a business card, a website banner, a billboard, or embroidered on a uniform. Vector formats guarantee consistent brand identity.
- Illustrations and Icons: Clean, crisp lines and shapes are essential for digital art, infographics, and user interface icons.
- Typography: Fonts are essentially vector graphics, allowing text to be rendered smoothly at any size.
- Print Media: For print materials of any size, vectors ensure professional quality and sharp output.
Common vector file formats include SVG (Scalable Vector Graphics), AI (Adobe Illustrator Artwork), EPS (Encapsulated PostScript), and PDF (Portable Document Format, when it contains vector data). These formats are the bedrock of graphic design and digital art, providing creative ideas and flexible solutions for a multitude of projects.
The Limitations of Raster and the Need for Conversion
Raster images, while excellent for complex photographic detail, have inherent limitations. When a raster image is scaled up, its fixed pixel count becomes apparent, leading to pixelation and a loss of clarity. This can be particularly problematic for high-resolution photography that might need to be repurposed for different contexts or sizes. Imagine a stunning nature photograph intended for a large print – if it was initially captured at too low a resolution or isn’t edited carefully, pixelation becomes a real concern.
The need for vectorization often arises when:
- Resizing without Quality Loss: A small image, like a scanned logo or a simple drawing, needs to be enlarged significantly.
- Preparing for Print: Images for banners, t-shirts, or other merchandise require sharp, scalable graphics.
- Creating Flexible Assets: Designers need elements that can be easily modified in terms of color, shape, and size without degradation, fostering creative ideas and allowing for diverse editing styles.
- Achieving Specific Aesthetic Styles: Vectorization can transform a photographic image into a distinctive, stylized illustration, contributing to various aesthetic and thematic collections. This is a common technique in digital art and photo manipulation.
By converting an image to a vector, you’re essentially translating its pixel-based information into a series of mathematically defined shapes, transforming it from a static collection of dots into a dynamic, adaptable artistic asset ready for any visual design challenge.
Image Tools for Vectorization: Corel Vector, Photoshop, and Illustrator
The journey from a raster image to a vector graphic is achievable through various specialized image tools, each offering unique strengths and workflows. The choice of software often depends on the complexity of the original image, the desired artistic outcome, and your familiarity with specific platforms. Whether you’re looking for a dedicated vector graphics app or leveraging photo editing software’s vector capabilities, there’s a solution tailored to your creative process.
Corel Vector: A Dedicated Web-Based Vector Graphics Application
Corel Vector, a powerful web-based graphic design app (formerly Gravit Designer Pro), is purpose-built for creating and manipulating vector graphics. Its intuitive interface and comprehensive toolset make it an excellent choice for converting images, especially for artistic, stylized vector portraits. Corel Vector allows for both meticulous manual tracing and semi-automated approaches, making it ideal for visual design and digital art projects that demand precision and artistic control. Its accessibility as a web-based tool also means you can create on any device, enhancing flexibility for your creative ideas.
Adobe Photoshop: Leveraging Paths and Selections in a Raster Editor
While Adobe Photoshop is renowned as the industry standard for pixel-based photo editing and high-resolution photography, it possesses robust features for working with vector elements. Photoshop allows users to create vector shapes and paths from scratch, and crucially, to convert pixel selections into vector paths. This capability makes it a viable, albeit more effort-intensive, option for vectorizing images, particularly when you’re already deeply integrated into the Adobe Creative Cloud ecosystem. It’s often used for specific editing styles that blend raster and vector elements, or for generating simple, monotone vector outlines from complex images for graphic design.
Adobe Illustrator: The Premier Vector Graphics Software
Adobe Illustrator is the undisputed leader in vector graphics editing. Designed from the ground up for vector creation, it offers the most sophisticated and efficient tools for image vectorization, especially its “Image Trace” feature. Illustrator excels at quickly converting raster images into editable vector artwork, providing numerous presets and fine-tuning options to achieve a wide array of stylistic results. For professional graphic design, detailed digital art, and creating scalable branding elements, Illustrator is the go-to tool for transforming raster images into versatile vector assets. Its strength lies in its ability to handle complex paths and colors with precision, making it perfect for anything from abstract designs to detailed photography conversions.
By understanding the capabilities of these image tools, you can select the most appropriate method for your vectorization needs, optimizing your workflow for efficiency and artistic quality.
Step-by-Step Guide: Crafting a Vector Portrait with Corel Vector (Manual Approach)
Creating a vector portrait from a photograph using Corel Vector is an enjoyable and rewarding process that transforms a raster image into a unique piece of digital art. This method emphasizes a more artistic, manual approach, allowing for significant creative control over the final aesthetic. It’s an excellent way to turn beautiful photography into a stylized image, perfect for visual design projects, custom wallpapers, or aesthetic backgrounds.
1. Choosing Your Source Image
The foundation of a great vector portrait is a well-chosen source image. Look for high-resolution photography that is not only visually appealing but also features excellent lighting and strong contrast. Good contrast simplifies the identification of light, mid-tone, and shadow areas, which are crucial for the vectorization process. Clear details are also a plus, as you’ll be outlining them. If your image has a distracting background, consider removing it first to isolate your subject, ensuring a clean base for your vector work.
Example: A portrait with clear facial features, defined hair, and distinct clothing details, illuminated by good directional light, will yield the best results.
2. Setting Up Your Document and Importing the Image
Begin by opening Corel Vector and creating a new document. Opt for an “Infinite Canvas” by leaving the Width and Height fields empty, providing ample space for your creative ideas to unfold. Next, import your chosen photograph onto the canvas. The easiest method is to drag and drop the image directly from your computer, or use the File > Import > Place image option.
Once imported, it’s highly recommended to lock the image layer. This prevents accidental movement or resizing while you meticulously draw over it.
3. Building Base Shapes: Outlining Major Elements
This is where the artistic vectorization truly begins. Using Corel Vector’s Pen or Bezigon tools, you’ll start outlining the largest, most fundamental “pieces” of your portrait. Think of these as the primary color blocks. For a portrait, these would typically include the face, hair, neck, torso/clothing, and any prominent accessories.
- Pen Tool: Best for free-hand drawing and creating paths with sharp corners.
- Bezigon Tool: Ideal for achieving perfect curves with fewer anchor points.
Don’t worry about precise colors at this stage; simply use distinct fill colors for each shape to make them easily distinguishable. The goal is to capture the overall form and boundaries.
Tip: Work in layers. Create separate layers for hair, skin, clothing, etc., to maintain organization and ease of editing.
4. Adding Detail: Main Features, Lights, Shadows, and Mid-tones
With the base shapes established, you’ll move on to outlining the main features and tonal variations. This is a meticulous process that builds depth and realism (or stylized realism) into your vector portrait.
Main Features
Outline prominent features such as eyebrows, eyes, nose, mouth, and ears using the Pen or Bezigon tools. Again, temporary fill colors help visualize these distinct elements. Remember to keep your base shapes hidden or as outlines so you can clearly see the underlying photograph for tracing. Lock these layers as you complete them to prevent unintended alterations.
Lights, Mid-tones, and Shadows
This is the most time-consuming but crucial step for bringing your vector portrait to life. You’ll identify and outline distinct areas of light, shadow, and mid-tones within each base shape. The contrast in your original photograph will greatly aid this process.
- Light Spots: Begin by outlining the areas where light directly hits the subject, creating highlights. These might be subtle reflexes on the hair, nose, cheekbones, or shoulders. Represent these as solid, lighter-colored shapes.
- Mid-tones: Next, move to the areas that are slightly darker than the highlights but not true shadows. These are your mid-tones, adding subtle depth.
- Shadows: Finally, outline the darkest areas of the portrait, such as the underside of the chin, deep creases, or areas furthest from the light source. These shapes will use the darkest tones.
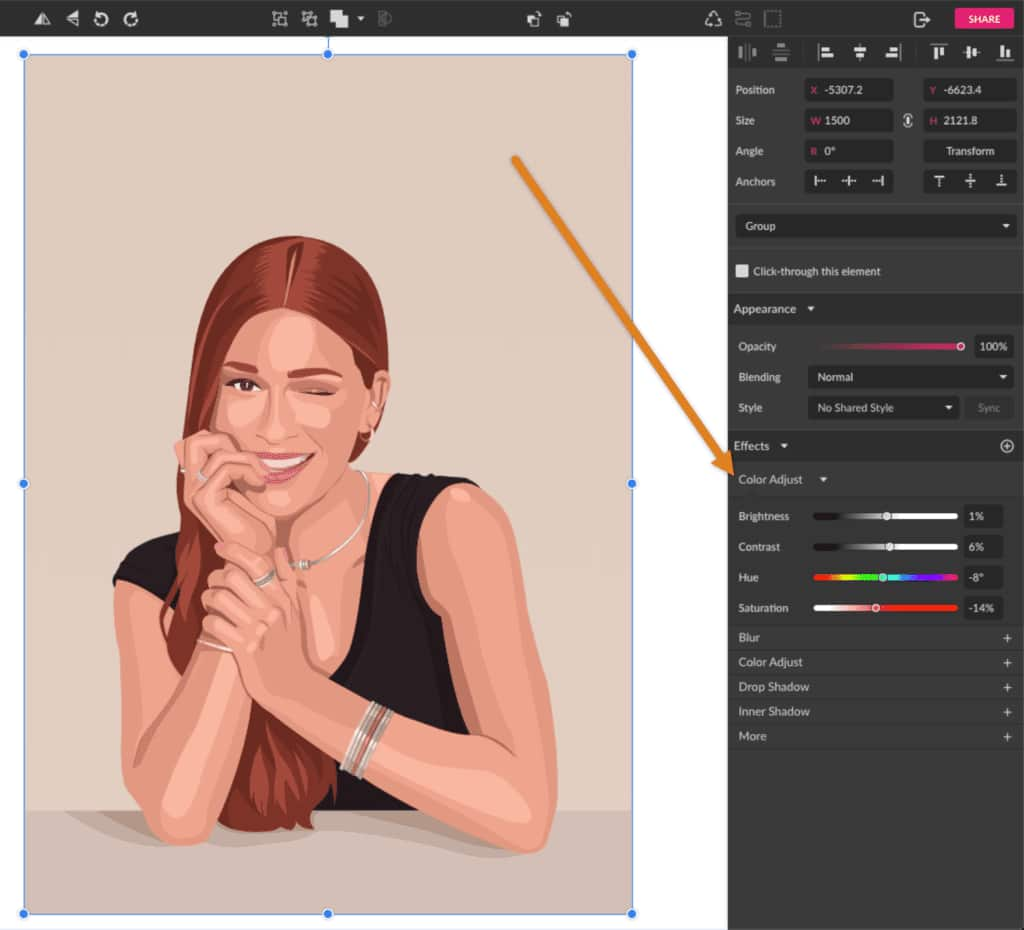
Creative Tip: You’re not aiming for photographic realism but rather a stylized representation. Think of these as abstract color blocks that collectively create the illusion of form and light. If your original image lacks contrast, a Color Adjust effect can help emphasize these tonal differences before tracing.
Final Outlines
To further define shapes and create crisp divisions, add “final outlines” at critical intersection points. These are typically thin, dark vector lines that delineate features like fingers, the jawline, or distinct elements of clothing.
5. Detailing Accessories and Final Touches
Accessories often require a slightly different approach, especially if they are metallic.
- Metallic Accessories: For items like bracelets, earrings, or necklaces, capture the base color, then add several layers of increasingly lighter, smaller shapes to simulate light reflections. These small highlights give metal its characteristic shine. Shadows cast by accessories on the skin also need to be represented as distinct dark shapes.
Once all the shapes are traced, you’ll have a complete vector portrait. Now is the time for final color adjustments.
- Color Palette Tweaking: Experiment with different hues, saturations, and brightness levels for your shapes. You can easily select a color group and change its fill.
- Stylistic Effects: Add a final overlay layer (e.g., a rectangle the size of your background) and experiment with
Blending Modes(likeScreen) andOpacityin the Appearance panel. This can introduce a cohesive color tint or aesthetic effect, enhancing the overall mood. For example, aScreenblend mode with a purple overlay (#9900FF) at 14% opacity can create a striking visual.
This manual vectorization method in Corel Vector is a powerful tool for visual designers and digital artists to create unique and scalable vector artwork from any photograph, fostering creative ideas and expanding thematic collections. The possibilities for different styles—from blurry shapes to minimalistic or more realistic interpretations—are endless.
Step-by-Step Guide: Vectorizing an Image in Adobe Photoshop (Paths & Export)
While Adobe Photoshop is primarily a raster graphics editor, it offers effective methods to convert raster images into vector paths, which can then be exported as vector files. This approach is particularly useful for extracting clean, scalable outlines or monotone shapes from existing photographs, making it a valuable technique for image tools and visual design workflows.
1. Preparing Your Raster Image
Start by opening your raster image in Photoshop. For optimal results, especially if you want to isolate a subject, it’s often beneficial to remove any busy or distracting backgrounds first. Photoshop offers several powerful selection tools for this:
- Select Subject: An AI-powered tool that automatically detects and selects the main subject. Found under
Select > Select Subjector as a button in the options bar when a selection tool is active. - Object Selection Tool: Allows for more refined selection of specific objects within an image.
- Quick Selection Tool/Magic Wand: Useful for selecting areas of similar color.
- Pen Tool: For precise manual path creation, which is inherently vector-based.
Once your subject is selected, fine-tune the edges using Select and Mask if necessary, and output the selection to a new layer for non-destructive editing.
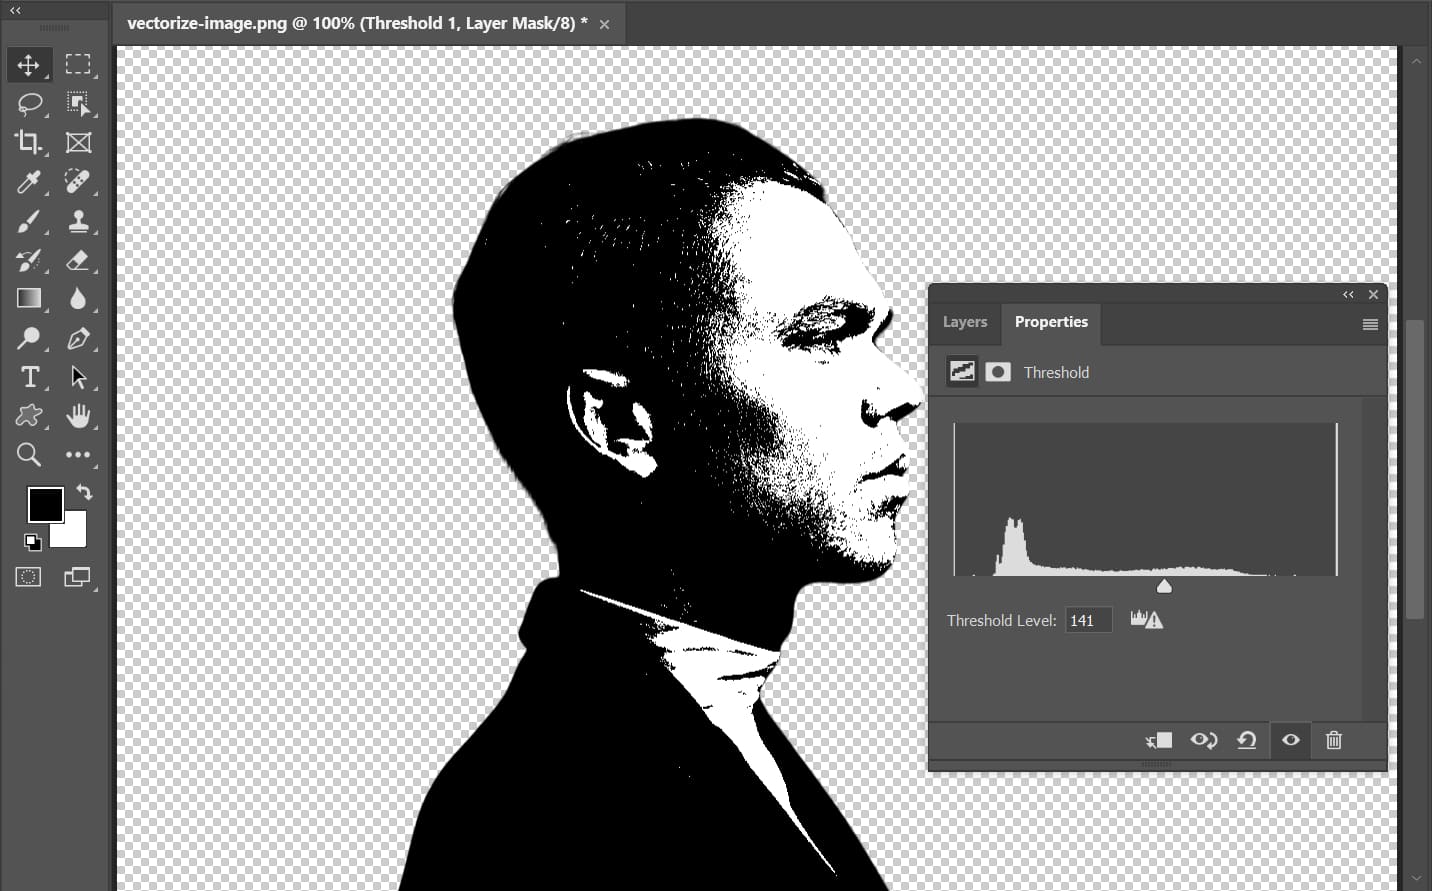
2. Creating a Threshold Effect for Simplification
To prepare the image for vectorization into a clean, often monotone style, applying a Threshold adjustment is key.
- Go to the
Layerspanel, click theCreate new fill or adjustment layericon, and chooseThreshold. - Adjust the slider in the
Propertiespanel until you achieve a black and white image that retains the key details and contours of your subject. This step effectively simplifies the image into stark tonal areas, making it easier to convert to paths. For a subtle aesthetic or specific artistic intent, this simplification is an editing style in itself.
3. Selecting Tonal Areas with Color Range
With the Threshold layer applied, you now need to select the black (or white) areas that will form your vector shape.
- Go to
Select > Color Range. - In the
Color Rangedialog box, use theEyedropper Toolto click on a black area of your image. Adjust theFuzzinessandRangesliders to ensure all desired black (shadow) or white (highlight) pixels are selected. You can use theGrayscalepreview to visualize the selected areas. - Click
OKto apply the selection. You’ll see “marching ants” indicating the active selection.
4. Converting Your Selection into a Work Path
This is the pivotal step where pixel information is translated into vector data.
- With the selection active, choose any selection tool (e.g.,
Rectangular Marquee ToolorMove Tool). - Right-click anywhere on your canvas within the selection and choose
Make Work Path. - In the
Make Work Pathdialog, set aTolerancevalue. A value between1.0and1.5pixels is generally good for irregular paths like those around a portrait. A lower tolerance creates more anchor points and follows the pixel edges more closely, while a higher tolerance creates smoother curves with fewer points, which can be beneficial for simpler designs. - Click
OK. You won’t see much change visually, but a vectorWork Pathhas been created. You can verify this by opening thePathspanel (Window > Paths). Double-click theWork Pathto save it as a named path.
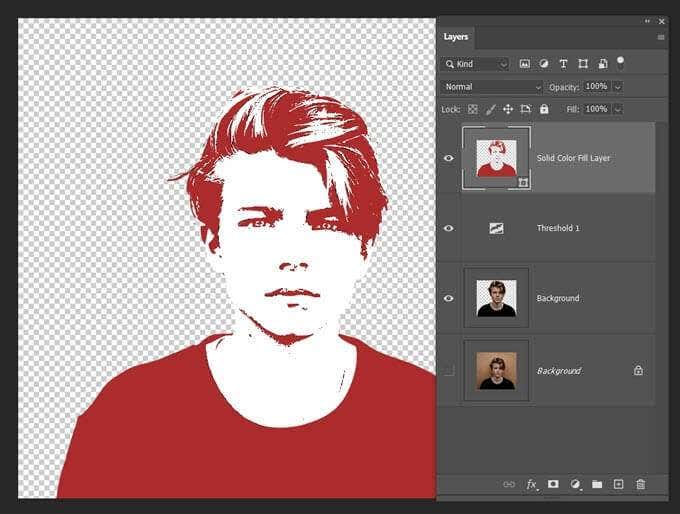
5. Creating a Solid Color Fill Layer (Vector Shape)
Now, you’ll convert this work path into a solid, editable vector shape layer.
- Ensure the work path is still active (click on it in the
Pathspanel if it isn’t). - Go to the
Layerspanel, click theCreate new fill or adjustment layericon, and chooseSolid Color. - Select any color from the
Color Pickerand clickOK.
This action creates a new Solid Color Fill layer, which is fundamentally a vector shape layer. The path you created now dictates the shape of this colored layer. You can change its color at any time by double-clicking the color swatch on the layer. This vector shape is now scalable without pixelation.
6. Exporting Your Vector Image as an SVG or to Illustrator
To finalize your vector image and use it outside of Photoshop:
- Export as SVG: Right-click on your new
Solid Color Filllayer in theLayerspanel and chooseExport As.... In theExport Asdialog, selectSVGfrom theFormatdropdown menu and clickExport. This saves your vector graphic as a scalable vector file. - Export Paths to Illustrator: If you have Adobe Illustrator installed, you can export the path directly for further editing. Go to
File > Export > Paths to Illustrator. This will save the active path (the vector shape you created) as an.aifile, which Illustrator can open. This allows for seamless integration into a more robust vector editing environment for advanced graphic design or photo manipulation.
This Photoshop workflow enables you to generate simple, clean vector outlines and shapes from complex raster images, providing a valuable intermediate step in various visual design and image inspiration projects.
Step-by-Step Guide: Vectorizing an Image in Adobe Illustrator (Image Trace)
Adobe Illustrator is the industry-standard software for vector graphics, and its “Image Trace” feature is the most efficient and powerful tool for converting raster images into editable vector art. This method is highly automated, offering a range of presets and fine-tuning options to achieve various artistic styles, from minimalistic line art to detailed, multi-color illustrations suitable for all aspects of visual design and digital art.
1. Preparing Your Image in Illustrator
Begin by opening your raster image (JPG, PNG, GIF, etc.) in Adobe Illustrator. While Illustrator can handle various image types, simple images with clear subjects, good contrast, and relatively low resolution often yield cleaner initial vectorization results, especially if you’re aiming for a stylized look. For complex aesthetic photography, a high-resolution source will capture more detail for tracing.
Example: A clean illustration, a logo, or a portrait with distinct outlines works well. For image inspiration, you might choose an abstract pattern or a nature scene to transform into a unique vector style.
2. Understanding Image Trace and Presets
Illustrator’s Image Trace panel (Window > Image Trace) is the heart of this process. It automatically analyzes the pixel data of your raster image and converts it into vector paths. The magic lies in its Presets, which are pre-configured settings designed for different types of images and desired outcomes.
- Select Your Image: Click on your raster image on the artboard to select it. This will activate the
Image Traceoptions in thePropertiespanel or theControlpanel at the top. - Choose a Preset: Click the
Image Tracebutton to apply a default trace, or click the small arrow next to it to reveal a dropdown menu of presets.- High Fidelity Photo / Low Fidelity Photo: Best for photographs or complex artwork, creating very detailed or slightly less detailed vector images, respectively. Great for digital photography conversions.
- 3 Colors / 6 Colors / 16 Colors: Ideal for logos or artwork with flat color areas, limiting the output to a specific number of colors.
- Shades of Gray: Produces a detailed grayscale vector image.
- Black and White Logo: Creates a simple, two-color (black and white) logo, perfect for clean graphic design elements.
- Sketched Art / Silhouettes / Line Art / Technical Drawing: Tailored for specific artistic effects, creating predominantly line-based black-and-white drawings.
Select the preset that most closely matches your image and desired style. Illustrator will automatically process the image. You’ll instantly see your pixel-based image transform into a vector preview.
3. Fine-Tuning Your Traced Image
After applying a preset, you can further refine the vectorization results using the sliders and options in the Image Trace panel. This allows for precise control over the aesthetic and detail of your vector graphic, aligning it with your creative ideas or specific editing styles.
- Mode: Switch between
Color,Grayscale, orBlack and Whiteto adjust the overall color rendition. - Palette: For
Colormode, chooseAutomatic,Limited, orDocument Libraryto control the range of colors used. - Colors/Threshold: For color or grayscale modes, the
Colorsslider (orThresholdfor B&W) allows you to increase or decrease the number of colors or the intensity of black/white. Dragging left simplifies the image, while dragging right adds more detail. - Advanced Options: Expand the
Advancedsection for more granular control:- Paths: Controls the tightness of the vector paths to the original image. Lower values create more exact paths, higher values simplify.
- Corners: Adjusts the fidelity of corners.
- Noise: Filters out minor details or “noise” from the original image, leading to cleaner vectors.
- Method: Choose
Abutting(creates cut-out paths) orOverlapping(creates stacked paths). - Ignore White: Automatically removes any white background or areas.
Experiment with these settings until you achieve the desired visual design outcome. If you find a combination of settings that you like, you can save it as a New Preset for future use, streamlining your workflow for various image collections.
4. Expanding and Ungrouping the Vector Artwork
Once you’re satisfied with the Image Trace preview, the final step in creating editable vector paths is to Expand the object.
- With the traced image selected, click the
Expandbutton in thePropertiespanel,Controlpanel, or go toObject > Image Trace > Expand. - This action converts the live trace object into actual, editable vector paths and shapes.
- Immediately after expanding, the resulting artwork will likely be grouped. To edit individual shapes, right-click the artwork and select
Ungroup(you may need to do this multiple times if there are nested groups) or go toObject > Ungroup.
Now, your vector image is composed of individual, selectable, and editable shapes. You can see these in the Layers panel (Window > Layers), where each color area will correspond to one or more vector paths.
5. Editing and Saving Your Vector Image
With your image fully vectorized and ungrouped, you have complete creative freedom for further photo manipulation and graphic design.
- Modify Colors: Use the
Direct Selection Tool(A) to select individual shapes or groups of shapes. Then, change theirFillandStrokecolors using theColororSwatchespanels. You can select all shapes of a similar color by choosing one, then going toSelect > Same > Fill Color. - Reshape and Refine: Use the
Direct Selection Tool(A) to move anchor points, adjust curve handles, or delete unwanted paths to refine the shapes. - Combine Shapes: Use the
Pathfinderpanel (Window > Pathfinder) to combine, subtract, or intersect shapes, creating more complex vector artwork.
Finally, save your vector image in an appropriate format to preserve its scalability and quality.
- Go to
File > Export > Export As... - In the dialog box, choose
SVG(Scalable Vector Graphics) for web use and general compatibility, orAI(Adobe Illustrator) to save it as an editable Illustrator project. You can also save asEPSorPDF(ensure ‘Preserve Illustrator Editing Capabilities’ is checked for PDFs if you intend to edit it later in Illustrator).
Illustrator’s Image Trace makes the conversion of high-resolution photography, stock photos, or any raster image into a versatile vector graphic incredibly efficient, supporting a wide range of aesthetic styles and creative ideas for any visual design project.
Conclusion: Unleashing the Power of Vectorization for Your Visuals
The ability to transform raster images into scalable vector graphics is a cornerstone skill in the realm of digital imagery, indispensable for anyone involved in graphic design, digital art, or comprehensive photo manipulation. We’ve explored the fundamental distinction between pixels and paths, emphasizing how vector images, built on mathematical equations, offer unparalleled clarity and adaptability across all scales – from a subtle design element on a webpage to a large-format print advertisement or an aesthetic wallpaper.
Whether you choose the artistic, manual detailing afforded by Corel Vector for a unique vector portrait, leverage Photoshop’s powerful selection and path tools for clean outlines, or rely on Illustrator’s robust “Image Trace” for efficient, automated conversion, the outcome is the same: an image asset that defies resolution limitations. Each method presents its own advantages, catering to different artistic visions and technical requirements.
By mastering these image tools and techniques, you unlock a new dimension of creative possibilities for your visual content. You can take beautiful photography and translate it into striking digital art, transform high-resolution stock photos into adaptable branding elements, or convert complex aesthetic images into simplified, trending styles for thematic collections and mood boards. Vectorization is not merely a technical process; it is an act of empowering your visuals, ensuring they remain crisp, impactful, and endlessly versatile in an ever-evolving digital landscape. Embrace the power of vectors, and let your creative ideas transcend the boundaries of pixels.