Mastering Background Images in Microsoft Word: A Comprehensive Guide

Microsoft Word, a cornerstone of productivity software, offers a surprising depth of customization features that extend beyond basic text formatting. One such powerful feature is the ability to integrate images as backgrounds, transforming a plain document into a visually engaging canvas. Whether you’re aiming for a subtle branding element across all pages, a dynamic cover page, or a complete overhaul of your document’s aesthetic, understanding how to effectively use background images is a valuable skill. This guide will walk you through the various methods of adding image backgrounds in Word, from watermarks to full-page fills, and explore how these techniques can elevate your visual design, drawing inspiration from high-resolution photography, artistic concepts, and practical image tools.
In today’s visually-driven world, the impact of a document extends beyond its textual content. A well-chosen background image can set the tone, reinforce a brand, or simply make information more appealing and easier to digest. From corporate reports adorned with abstract designs to personal projects featuring serene nature wallpapers, the possibilities are vast. However, mastering these visual enhancements requires more than just a simple click; it involves an understanding of image quality, placement, and how they interact with your content.
Adding a Full-Page Background Image (Across All Pages)
When the goal is to imbue your entire document with a consistent visual theme, Word’s watermark feature is your primary tool. This method allows you to overlay a picture across every page, often with a subtle transparency that ensures your text remains legible. It’s ideal for official documents requiring a company logo, “Confidential” stamp, or any recurring visual motif.
The process begins in the Design tab of your Word ribbon, a central hub for document aesthetics. Here, you’ll find the “Page Background” group, home to essential tools for visual customization.
Utilizing Watermarks for Subtle Backgrounds
The watermark feature, despite its name, is incredibly versatile and can be used to insert any image you desire as a background. The default setting often applies a “washout” effect, making the image semi-transparent – a design choice rooted in graphic design principles to prevent the background from overpowering the foreground content.
- Navigate to the Design Tab: Open your Microsoft Word document and click on the “Design” tab located in the top-left section of the Word window. This tab groups all the tools related to the overall look and feel of your document.
- Select Watermark: Within the “Page Background” group, you’ll find the “Watermark” option. Click on it to reveal a dropdown menu. This menu offers a selection of preset watermarks like “Confidential” or “Draft,” but for images, we’ll choose a custom option.
- Choose Custom Watermark: From the “Watermark” dropdown, select “Custom Watermark.” This action opens the “Printed Watermark” dialog box, providing granular control over your background image.
- Enable Picture Watermark: In the “Printed Watermark” window, activate the “Picture watermark” option by clicking its corresponding radio button. This tells Word that you intend to use an image rather than text as your watermark.
- Select Your Picture: Click the “Select Picture” button. This will prompt a new window, offering several ways to source your image:
- From a File: This is the most common option, allowing you to browse your local computer for an image. When selecting, consider using a high-resolution image from your personal collection of beautiful photography or a professionally curated stock photo. The clarity of a digital photography piece can significantly impact the final aesthetic.
- Web Search (Bing Image Search): Word allows you to search for images online directly. While convenient, always be mindful of copyright and licensing when using images from the internet. Creative Commons licensed images are generally a safer bet if you plan to distribute the document.
- OneDrive: If your images are stored in Microsoft’s cloud service, you can access them directly from here, streamlining your workflow. This is excellent for ensuring consistency if you have thematic collections or mood boards stored online.
- Insert the Image: After selecting your desired image file, click “Insert.” You’ll be returned to the “Printed Watermark” dialog box.
Enhancing Visuals with Washout and Scaling Options
Once your image is selected, the “Printed Watermark” dialog box offers further customization to refine its appearance:
- Washout: This checkbox is typically enabled by default. “Washout” applies a lightened, semi-transparent effect to your image, ensuring that your document’s text remains easily readable over the background. This is a critical visual design consideration. If you want a more vibrant, opaque background, you can uncheck this box, but be prepared to adjust your text color or placement to maintain legibility.
- Scale: The “Scale” dropdown allows you to adjust the size of your background image. “Auto” is often sufficient, as Word attempts to fit the image proportionally to the page. However, you can experiment with percentages (e.g., 50%, 100%, 200%) to see how the image scales. For intricate abstract patterns or nature wallpapers, specific scaling might be needed to achieve the desired visual impact.
- Apply the Watermark: After making your selections for Washout and Scale, click “OK.” Your chosen picture will now appear as a background on every page of your document, beneath all text and other objects.
This method seamlessly integrates images (wallpapers, aesthetic elements, abstract designs) across your entire document, laying a foundation for sophisticated visual design. Remember, the quality of your source image is paramount. Using image tools like compressors or optimizers beforehand can prevent large file sizes, especially for high-resolution photography, ensuring your document remains manageable. AI upscalers might even be beneficial if you start with a lower-resolution image but need it to fill a page without pixelation.
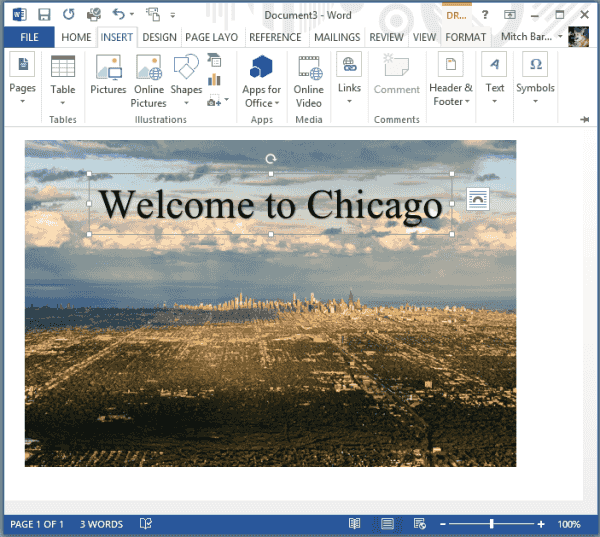
Inserting a Background Image on a Single Page
While watermarks are perfect for document-wide consistency, there are scenarios where you only need a background image on a specific page, such as a striking cover page or a section break. Microsoft Word doesn’t offer a direct “single-page background” option in the “Page Color” menu for images, but a clever workaround involving shapes provides precise control.
This technique is particularly useful for creating dynamic visual design elements without affecting the rest of your document. It allows for creative ideas to flourish on a single canvas, perhaps showcasing beautiful photography or a thematic collection tailored to that page.
The Shape Method: Precision for Individual Pages
This method involves inserting a large rectangular shape, filling it with your chosen image, and then sending it behind the text. This gives you unparalleled flexibility in terms of image placement, sizing, and layering on a per-page basis.
- Navigate to the Target Page: Scroll to the specific page where you want to add the background image. To get a clear view, it’s often helpful to switch your view to “One Page” mode (View tab > One Page).
- Insert a Rectangle Shape:
- Go to the “Insert” tab in the ribbon.
- Click “Shapes” in the “Illustrations” group.
- Select the “Rectangle” shape from the dropdown menu.
- Draw a rectangle that completely covers the entire page. Don’t worry about precision at this stage; you can adjust it later.
- Send Behind Text: With the newly drawn rectangle still selected, the “Shape Format” tab (or “Drawing Tools” > “Format” in older Word versions) will appear.
- In the “Arrange” group, click “Wrap Text.”
- Select “Behind Text” from the options. This crucial step ensures that your image will sit behind all your existing and future text, making it a true background.
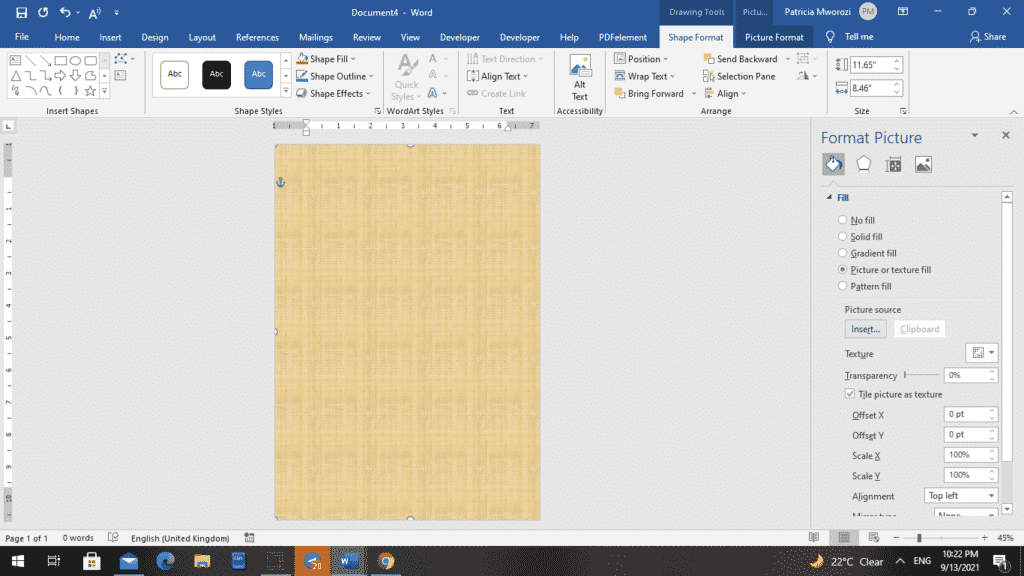
- Access Format Shape/Picture Pane: To fill this rectangle with your image:
- For newer Word versions (Word 365, 2019, 2021): With the rectangle selected, click the small “launcher” icon (a tiny arrow pointing diagonally down-right) in the “Shape Styles” group on the “Format” tab. This opens the “Format Shape” pane on the right side of your Word window.
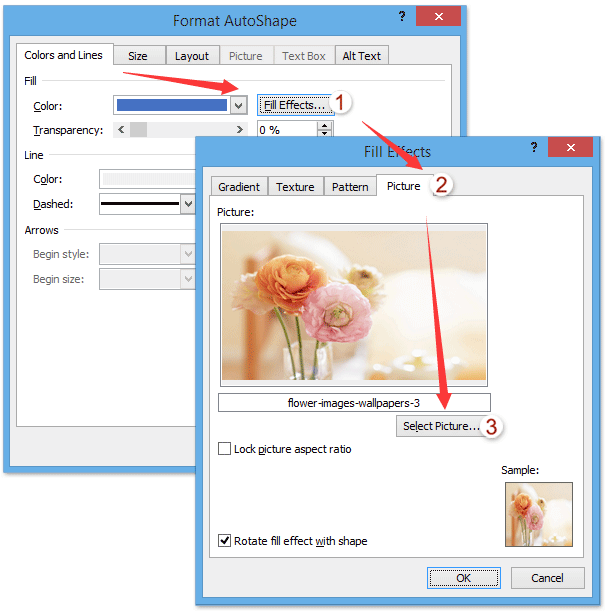
- For older Word versions (Word 2010 or earlier): Right-click the rectangle, select “Format Shape” (or “Format AutoShape”), and then go to the “Fill” tab.
- Choose Picture or Texture Fill:
- In the “Format Shape” pane (or dialog box), expand the “Fill” section.
- Select “Picture or texture fill.”
- Under “Picture source,” click the “Insert…” button (or “File…” for older versions) to select your image. Again, prioritize high-resolution photography or compelling stock photos that fit the page’s theme.
- Insert Your Image: Browse your computer, perform a web search, or access OneDrive to find your desired image, similar to the watermark process. Select the image and click “Insert.”
- Remove Shape Outline: To make the image truly seamless, remove the rectangle’s border:
- In the “Format Shape” pane (or dialog box), expand the “Line” section.
- Select “No line” (or “No color” for older versions).
- Final Adjustments (Optional):
- Tile picture as texture: If your image is small and you want it to repeat across the page, check this option. This is great for subtle patterns or abstract backgrounds.
- Transparency: You can adjust the transparency of the shape fill here, similar to the washout effect of watermarks, allowing text to be more prominent.
Positioning and Layering for Optimal Visual Design
Once the image is inserted into the shape, further refinement might be necessary:
- Adjust Image Size and Position: If the image doesn’t perfectly fit the page, click on the shape (the image itself), and then use the sizing handles to drag and resize it. For precise control, use the “Size” and “Position” options found by right-clicking the image and selecting “Size and Position.”
- Size Tab: Set “Scale Height” and “Scale Width” to 100% relative to the page, and ensure the “Lock aspect ratio” checkbox is ticked to prevent distortion.
- Position Tab: Set both “Horizontal” and “Vertical” alignment to “Centered” relative to the “Page.” This ensures the image is perfectly centered within your document’s boundaries.
- Ensure Proper Layering (“Behind Text”): Double-check that the image is set “Behind Text” in the “Wrap Text” options. This is crucial for maintaining text readability.
- Text Color and Styling: Remember that a background image, even on a single page, affects how your text appears. You might need to adjust your font color, size, or add text boxes with solid fills behind the text to ensure it stands out clearly. This is a common practice in visual design and photo manipulation to create contrast.
This method gives you artistic control over individual pages, allowing for diverse creative ideas and thematic collections within a single document. It’s an excellent way to highlight a specific section or create a memorable opening using high-resolution, aesthetically pleasing images.
Advanced Customization and Visual Considerations
Beyond the basic insertion of background images, Word offers tools and best practices that can significantly enhance the final appearance and functionality of your document. These considerations delve into areas of visual design, photography, and the practical application of image tools.
Adjusting Image Opacity and Transparency
Achieving the perfect balance between a captivating background image and legible foreground content often hinges on adjusting transparency. Whether using the watermark method or the shape method, controlling the image’s opacity is key.
- For Watermarks: As discussed, the “Washout” checkbox in the “Printed Watermark” dialog box offers a quick semi-transparent effect. If you need more nuanced control, you’ll need to edit the picture directly before inserting it as a watermark using external image editing software.
- For Shape-Filled Images (Single Page): This method provides excellent post-insertion transparency control.
- Select the Image: Click near the edge of the page to select the shape containing your background image.
- Access Picture Format Tab: The “Picture Format” tab will appear on the ribbon.
- Use Transparency Menu: In the “Adjust” group, click “Transparency.” A gallery of preset transparency levels will appear. You can select one, or click “Picture Transparency Options” for a slider that offers fine-tuned control. This allows you to soften vibrant nature backgrounds or make abstract patterns less distracting, ensuring your text remains prominent.
Effective use of transparency is a core principle in graphic design, preventing your background (whether it’s a bold digital art piece or a subtle texture) from competing with your primary message.
Sourcing High-Resolution Images for Stunning Backgrounds
The quality of your background image directly impacts the professionalism and aesthetic appeal of your document. Using low-resolution images can result in pixelation and a grainy appearance, diminishing your visual design efforts.
- High Resolution is Key: Always aim for high-resolution images. These can be photographs you’ve taken (digital photography), or images sourced from reputable platforms.
- Stock Photos: Websites like Unsplash, Pexels, and Pixabay offer extensive collections of free, high-resolution stock photos covering almost any theme imaginable—from nature and landscapes to abstract and aesthetic concepts. Paid stock photo services (e.g., Adobe Stock, Getty Images) offer even broader selections and licensing options. These are excellent sources for finding wallpapers, beautiful photography, or specific thematic collections.
- Creative Commons: When searching for images, especially online, filter for Creative Commons licenses to ensure you have the right to use and modify the images in your document. Always check the specific license terms (e.g., attribution required).
- Image Editing Styles: Consider how the image’s editing style complements your document’s content. A minimalist document might benefit from a clean, abstract background, while a travelogue could feature vibrant, emotive landscape photography.
- Image Tools for Optimization:
- Compressors: Large, high-resolution images can make your Word document file size enormous, leading to slow loading and sharing issues. Before inserting, use an image compressor tool to reduce file size without significant loss of quality.
- Optimizers: Image optimizers can further fine-tune images for web or print, balancing quality and size.
- AI Upscalers: If you have an ideal image but its resolution is too low, AI upscalers can intelligently increase its size and detail, making it suitable for a full-page background without noticeable pixelation. These tools leverage artificial intelligence to reconstruct lost pixel information, making formerly unusable images viable for your visual design projects.
By thoughtfully selecting and preparing your images, you ensure that your background contributes positively to the overall impression of your Microsoft Word document.
Best Practices for Background Images in Word Documents
Integrating images as backgrounds in Word goes beyond just the technical steps. To truly enhance your documents, it’s essential to consider visual design principles, ethical sourcing, and practical performance implications.
Copyright and Creative Commons: Legal and Ethical Sourcing
In the realm of digital imagery, respect for intellectual property is paramount. Just because an image is available online doesn’t mean it’s free to use.
- Understand Copyright: Most images are protected by copyright, meaning the creator retains exclusive rights to their use and distribution. Unauthorized use can lead to legal issues.
- Creative Commons Licenses: Many photographers and artists share their work under Creative Commons (CC) licenses, which specify how their work can be used. Common types include:
- CC0 (Public Domain Dedication): No rights reserved; free to use for any purpose. Ideal for stock photos.
- CC BY (Attribution): Free to use, but you must credit the original creator.
- CC BY-NC (Attribution-NonCommercial): Free to use for non-commercial purposes with attribution.
- CC BY-SA (Attribution-ShareAlike): Free to use, but you must attribute and share any adaptations under the same license.
- Personal Use vs. Distribution: If you’re creating a document purely for personal use (e.g., a private diary), copyright concerns are minimal. However, if you plan to print, distribute, or publish the document (even internally within an organization), always ensure you have the proper rights or use images explicitly licensed for such use. Tophinhanhdep.com, for instance, emphasizes ensuring that any image chosen from their collections respects intellectual property rights, whether it’s beautiful photography or abstract art.
- Create Your Own: The safest approach is to use images you have created yourself through digital photography. This gives you complete control and eliminates any copyright worries. This could be anything from a unique abstract painting captured digitally to a stunning piece of nature photography.
Optimizing Images for Performance and Accessibility
While visually appealing backgrounds are desirable, they should not come at the cost of document performance or accessibility.
- File Size Management: High-resolution images, especially uncompressed ones, can drastically increase your Word document’s file size. This makes it slower to open, save, and share.
- Compress Images: Before inserting an image into Word, run it through an image compressor. Many free online image tools can reduce file size by optimizing image data without visibly degrading quality.
- Word’s Built-in Compression: Word also has a built-in “Compress Pictures” feature (Picture Format tab > Adjust group > Compress Pictures). This can be useful for reducing file size after insertion, though pre-compression often yields better results.
- Clarity and Legibility: The primary purpose of most Word documents is to convey information through text. Your background image should enhance, not hinder, this.
- Contrast: Ensure there is sufficient contrast between your text and the background image. Dark text on a dark image, or light text on a light image, will be unreadable.
- Transparency/Washout: Use transparency judiciously. For busy or detailed images, a high degree of transparency or the “washout” effect is crucial. For mood boards or thematic collections where text is minimal, you might use a more opaque image.
- Simple Backgrounds: Often, simpler backgrounds like subtle abstract patterns, blurred nature scenes, or monochromatic aesthetic gradients work best as they provide visual interest without distracting from the content.
- Accessibility Considerations: Some users may find busy backgrounds distracting or difficult to read.
- Offer Alternatives: If distributing a document widely, consider providing a version without the background image for accessibility purposes.
- Avoid Text-on-Pattern: Highly patterned backgrounds can make text very difficult to follow for individuals with visual impairments or cognitive differences.
- Image-to-Text Tools (Indirect Application): While not directly related to making an image a background, the broader context of image tools includes “Image-to-Text.” If you ever need to extract text from a graphic before integrating it into a Word document (perhaps a quote from a graphic as part of a visual design project), these tools can be invaluable.
By adhering to these best practices, you ensure that your background images not only look great but also contribute to a functional, ethical, and accessible document. The thoughtful integration of wallpapers, backgrounds, and beautiful photography, coupled with smart image tools and a strong understanding of visual design, empowers you to create truly impactful documents in Microsoft Word.
In conclusion, transforming your Microsoft Word documents with engaging image backgrounds is a journey that marries functionality with creativity. Whether you opt for a subtle, document-wide watermark featuring a company logo or an eye-catching, full-page image on your cover, the methods outlined provide the technical pathways. However, the true artistry lies in the choices you make: selecting high-resolution imagery, understanding visual design principles like transparency and contrast, and ethically sourcing your visual assets. By embracing the diverse world of photography—from aesthetic abstract designs to serene nature wallpapers—and leveraging image tools for optimization, you can elevate your documents from mere text carriers to compelling visual experiences. Your Word documents can become showcases of creative ideas and thoughtful visual design, leaving a lasting impression on your readers.