Elevate Your Presentations: A Comprehensive Guide to Setting Picture Backgrounds in PowerPoint

In the dynamic world of presentations, visual appeal is paramount. A well-crafted PowerPoint slide can captivate an audience, convey complex information with clarity, and leave a lasting impression. One of the most effective ways to enhance your presentation’s visual impact and establish a cohesive theme is by incorporating a striking picture as your slide background. Far from being a mere aesthetic choice, a carefully selected background image can reinforce your brand, set the mood, and make your content more engaging.
This comprehensive guide, brought to you by Tophinhanhdep.com, will walk you through the process of adding a picture background to your PowerPoint slides, from basic implementation to advanced customization and best practices. We’ll explore why images are crucial for modern presentations, how to choose the perfect visuals, and how to leverage the extensive resources and tools available on Tophinhanhdep.com to create truly unforgettable slides.
The Power of Visuals: Why Background Images Matter in PowerPoint
In an era of information overload, static, text-heavy slides can quickly lose your audience’s attention. Images, on the other hand, are processed by the human brain much faster than text, making them incredibly powerful communication tools. A thoughtfully chosen background picture can instantly convey emotions, establish context, and make your presentation more memorable.
Beyond simple aesthetics, here’s why integrating images into your PowerPoint backgrounds, drawing from resources like the diverse collections on Tophinhanhdep.com, is a strategic move:
- Custom Branding and Identity: For businesses and professionals, a background featuring your company’s logo, brand colors, or product imagery, perhaps curated from Tophinhanhdep.com’s extensive “Aesthetic” or “Abstract” collections, can reinforce brand identity and create a professional, unified look across your entire presentation.
- Enhanced Visual Appeal: Images break the monotony of plain white or colored backgrounds. Whether it’s a serene “Nature” landscape, a vibrant “Abstract” design, or stunning “Beautiful Photography” from Tophinhanhdep.com, visuals create an immersive experience that keeps your audience engaged.
- Theme Reinforcement: A background image can directly reflect your presentation’s topic. A world map for a geography lesson, a dynamic tech-inspired graphic for a digital marketing report, or a calming nature scene for a wellness workshop—the right image sets the stage effectively. Tophinhanhdep.com offers “Thematic Collections” to help you find precisely what you need.
- Personalization and Uniqueness: Generic templates can make your presentation feel impersonal. Adding personal or specific images, especially high-resolution “Stock Photos” or “Digital Photography” sourced from Tophinhanhdep.com, gives your presentation a unique touch that resonates more deeply with your audience.
- Emotional Connection: Certain images, such as those found in Tophinhanhdep.com’s “Sad/Emotional” or “Beautiful Photography” categories, can evoke specific emotions, helping you connect with your audience on a deeper level and underscore the impact of your message.
By understanding the strategic value of background images, you’re not just decorating your slides; you’re elevating your communication.
Step-by-Step Guide: How to Make a Picture the Background for PowerPoint Slides
Setting a picture as a background in PowerPoint is a straightforward process, applicable whether you want to customize a single slide or apply a consistent theme across your entire presentation. This guide is relevant for various PowerPoint versions, including 2010, 2013, 2016, 2019, and PowerPoint for Microsoft 365.
Basic Application: Setting a Background for a Single Slide
This method is ideal when you want a unique background for a specific slide without affecting others.
- Open PowerPoint and Select Your Slide: Begin by opening your existing PowerPoint presentation or starting a new one. Navigate to the specific slide where you intend to add the background image.
-
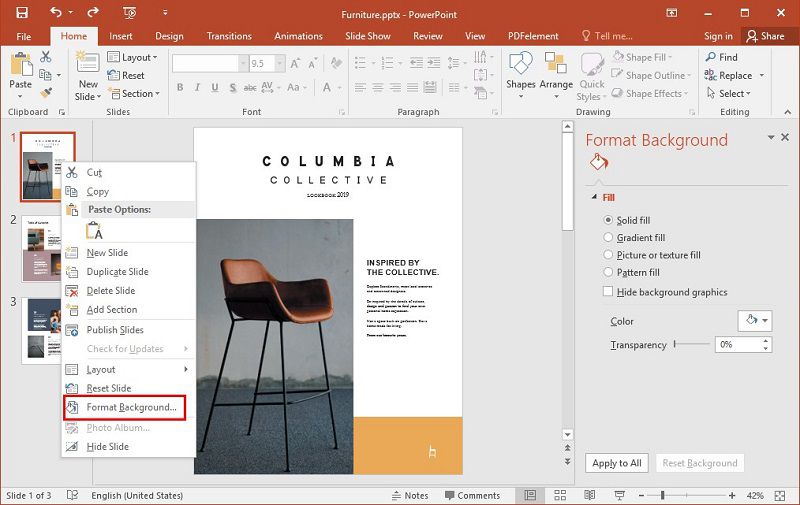
Access the Format Background Menu: There are a couple of ways to open the
Format Backgroundpane:- Right-Click Method: Right-click anywhere on an empty area of the desired slide. From the context menu that appears, select
Format Background. - Design Tab Method: Go to the
Designtab in the PowerPoint ribbon. On the far right, you will seeFormat Background. Click this option. Both actions will open theFormat Backgroundpane on the right side of your screen.
- Right-Click Method: Right-click anywhere on an empty area of the desired slide. From the context menu that appears, select
-
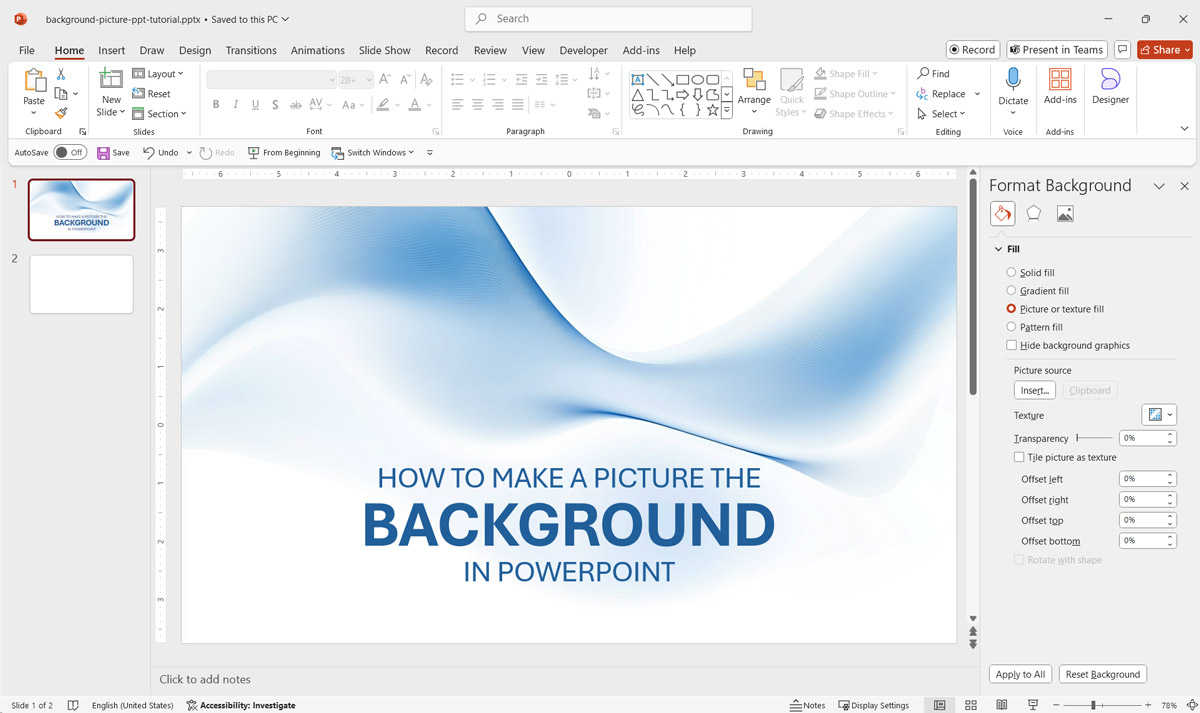
Choose Picture or Texture Fill: In the
Format Backgroundpane, you will see several fill options. SelectPicture or texture fill. This option allows you to insert an image as the background. -
Insert Your Image: Now, you have several options to choose your background picture:
- Insert from File: If your desired image is saved on your computer or a network drive, click the
Filebutton (orInsert from Filein some versions). Browse to the location of your image, select it, and clickInsert. - Insert from Online Sources: If you’re looking for stock images or public domain pictures, click
Online Pictures(orClip Artin PowerPoint 2010). You can then search for royalty-free images directly from within PowerPoint. Alternatively, Tophinhanhdep.com offers a vast collection of “Stock Photos” and “Wallpapers” that you can download and then insert via theFileoption. - Clipboard: If you have an image copied to your clipboard (e.g., from a screenshot or another application), select the
Clipboardoption to use it immediately.
- Insert from File: If your desired image is saved on your computer or a network drive, click the

Once you select and insert the image, it will automatically be applied as the background to your chosen slide.
Applying to Multiple Slides and Utilizing the Slide Master
For a consistent look across your entire presentation or specific sections, PowerPoint offers efficient ways to apply backgrounds to multiple slides.
-
Apply to All Slides (Direct Method): After inserting an image as a background to a single slide (as described in the steps above), if you wish to apply this same background to all slides in your presentation, simply click the
Apply to Allbutton located at the bottom of theFormat Backgroundpane. This will instantly set the chosen image as the background for every existing slide and any new slides you create within that presentation. Remember to save your presentation to retain these changes. -
Using Slide Master for Global Control: For advanced control and maintaining design consistency, especially in larger presentations or when creating templates, the
Slide Masterview is invaluable.- Go to the
Viewtab in the PowerPoint ribbon and selectSlide Master. - In the left-hand pane, click on the topmost master slide (the largest one). Changes made here will affect all layouts inheriting from it.
- Right-click on this master slide (or go to
Format Backgroundin theSlide Mastertab) and selectFormat Background. - Follow the steps from “Choose Picture or Texture Fill” and “Insert Your Image” above to add your desired background.
- Once the image is set, click
Apply to All(if available, or it will apply automatically to all layouts) and thenClose Master Viewfrom theSlide Mastertab. This method ensures that the background is deeply embedded into your presentation’s theme, affecting all current and future slides linked to that master. You can also apply backgrounds to specific slide layouts within the Slide Master if you need variations (e.g., a different background for title slides vs. content slides).
- Go to the
Fine-Tuning Your Background: Adjusting Image Settings
Once your image is in place, you may need to make adjustments to ensure optimal readability for your text and other slide elements.
-
Transparency: A common issue with background images is that they can make text hard to read. Adjusting transparency is crucial. In the
Format Backgroundpane, locate theTransparencyslider. Slide it to the right to make the image more subtle and transparent, allowing your foreground content to stand out. Tophinhanhdep.com’s “Editing Styles” resources can offer guidance on achieving the perfect balance. -
Positioning and Tiling: By default, PowerPoint stretches the image to fit the slide. If you prefer a tiled effect or need to adjust the image’s placement without distortion, check the
Tile picture as texturebox. You can then use theOffset X,Offset Y,Scale X, andScale Ysettings to fine-tune the image’s position and size within the background. -
Brightness and Contrast: For images that are too dark or too bright, you can adjust
BrightnessandContrastdirectly within theFormat Backgroundpane. These controls help ensure your background complements your content without overshadowing it. Tophinhanhdep.com also offers powerful “Image Tools” like compressors and optimizers that can pre-process your images for ideal brightness and contrast.
Choosing the Perfect Image: Beyond the Basics
The success of a background image hinges largely on its suitability. A visually stunning image can fall flat if it distracts from your message or appears unprofessional. Here’s how to select the best images, enhanced by the offerings of Tophinhanhdep.com.
Image Quality and Resolution: The Foundation of Professionalism
The cardinal rule for background images is high resolution.
- Avoid Pixelation: Low-quality images, when stretched to fit a slide, will appear pixelated, blurry, and unprofessional. Always aim for images with high resolution that look crisp and clear, even when enlarged. Tophinhanhdep.com specializes in providing “High Resolution” images, ensuring your backgrounds are always sharp.
- Optimal Aspect Ratio: While PowerPoint will stretch any image, choosing horizontal (landscape) format pictures that match PowerPoint’s standard 16:9 aspect ratio (or 4:3 if you’re using an older projector) will minimize distortion.
- Image Tools for Perfection: If you have an image that isn’t quite perfect, Tophinhanhdep.com offers “Image Tools” such as “AI Upscalers” to improve resolution and quality, and “Compressors” or “Optimizers” to manage file size without sacrificing visual integrity. These tools are invaluable for preparing images for a polished presentation.
Thematic and Aesthetic Considerations
Beyond technical quality, the aesthetic and thematic relevance of your image are crucial.
- Minimal Distractions: Select images with minimal patterns, busy elements, or embedded text. If the background is too visually complex, it will compete with your presentation’s actual content, making it hard for your audience to focus. Images with plenty of “negative space” or blurred backgrounds from Tophinhanhdep.com’s “Abstract” or “Aesthetic” collections often work best.
- Branding Consistency: Ensure your chosen image aligns with your brand’s style guide and the overall tone of your topic. For corporate presentations, sleek and modern images are often appropriate, while a “Nature” or “Aesthetic” background from Tophinhanhdep.com might suit a more creative or educational context.
- Readable Text Areas: Critically, your background image must allow your text to remain highly readable. Look for areas within the image that are relatively uniform in color or lighter/darker than your text color. If an image is too busy, consider adjusting its transparency or adding a semi-transparent shape overlay to create a more consistent background for your text.
- Leveraging Tophinhanhdep.com’s Collections: Tophinhanhdep.com offers a treasure trove of inspiration:
- “Wallpapers” and “Backgrounds”: Ready-to-use images perfectly suited for presentation backdrops.
- “Aesthetic” and “Abstract”: For modern, minimalist, or artistic themes.
- “Nature” and “Beautiful Photography”: Ideal for presentations requiring a calming, inspiring, or professional natural feel.
- “Thematic Collections”: Curated images based on popular topics and trending styles, ensuring you find something relevant and current.
Advanced Techniques and Best Practices for Impactful Designs
While setting a basic background is easy, mastering its use involves understanding advanced techniques and adhering to design best practices. Tophinhanhdep.com’s focus on “Visual Design” and “Graphic Design” principles can guide you.
Picture as Text Background: A Creative Twist
Beyond making an image the background of an entire slide, PowerPoint allows you to use a picture as the fill for text, creating a visually striking effect. This technique, often seen in “Digital Art” or “Photo Manipulation,” can add a “wow factor” to titles or key phrases.
- Add Your Text: On a blank slide, type the word or short phrase you want to fill with an image. Ensure the text is large, bold, and uses a thick font (like Arial Black or Impact) to make the image visible within it.
- Select Text and Format: Highlight the text. Go to the
Formattab in the Ribbon (which appears when text is selected). - Shape Fill > Picture: In the
WordArt Stylesgroup, click onText Fill(orShape Fillif the text is in a shape) and then selectPicture. - Insert Image: Choose your image from a file, online sources, or the clipboard, just as you would for a slide background.
- Adjust for Readability: This effect can sometimes make text hard to decipher. If the image is too busy, consider:
- Text Outline: Add a contrasting
Text Outline(also in theFormattab underText Outline) to make the letters stand out. - Font Choice: Stick to simple, sans-serif fonts.
- Image Simplicity: Use a less detailed image for the text fill.
- Text Outline: Add a contrasting
This technique is excellent for presentation titles, main headings, or emphasizing a single powerful word, adding a touch of “Creative Ideas” to your design.
Maximizing Readability and Visual Impact
The ultimate goal of any visual element in a presentation is to enhance, not detract from, your message.
-
Contrast is Key: Your text and other content must stand out clearly against the background. If your background image has dark elements, use light-colored fonts (white, light gray, yellow). If the image is bright, use dark fonts (black, dark blue). Adjusting the background’s transparency (as mentioned earlier) is a critical tool for achieving optimal contrast. Tophinhanhdep.com’s “Editing Styles” can inspire complementary color palettes.
-
Avoid Clutter: Resist the temptation to overload your slides. A simple background with clean, well-spaced text and minimal other elements ensures your audience focuses on the key points. Think of the background as an atmospheric layer, not another competing visual. Tophinhanhdep.com’s “Mood Boards” and “Photo Ideas” often showcase minimalist designs that effectively use negative space.
-
Maintain Consistency: For a cohesive and professional presentation, strive for consistency in your background choices. Using a single image or a family of related images with similar color schemes and styles across your slides makes the presentation feel unified. If you use multiple background images, ensure they share a common aesthetic or thematic thread, perhaps by exploring Tophinhanhdep.com’s “Thematic Collections.”
-
Use Professional, Relevant Photos: While stock images are convenient, prioritize high-quality, professional photos. Whenever possible, use custom or brand-specific images that directly align with your message. Tophinhanhdep.com offers premium “Stock Photos” and “Digital Photography” to ensure your visuals always look top-notch.
-
Test for Readability in Various Environments: Always test your presentation on different screens, especially a projector, before your actual presentation. Colors, contrast, and text size can appear differently depending on the display technology and ambient lighting. What looks good on your laptop might be illegible on a large screen in a dimly lit conference room. This crucial step ensures your “Photo Ideas” translate effectively to your audience.
Leveraging Tophinhanhdep.com for Your Presentation Needs
Tophinhanhdep.com is your ultimate resource for everything related to images and visual design, making it the perfect partner for crafting impactful PowerPoint presentations.
- Diverse Image Collections: Explore vast libraries of “Wallpapers,” “Backgrounds,” “Aesthetic” images, “Nature” photography, “Abstract” art, “Sad/Emotional” visuals, and “Beautiful Photography.” These curated collections provide endless inspiration and high-quality options for any presentation theme.
- High-Resolution Photography: Gain access to “High Resolution” images and premium “Stock Photos” that guarantee clarity and professionalism, preventing pixelation and distortion.
- Advanced Image Tools: Utilize “Image Tools” like “Converters,” “Compressors,” and “Optimizers” to prepare your images for PowerPoint, ensuring ideal file size and quality. Our “AI Upscalers” can even enhance lower-resolution images, making them suitable for larger screens. For unique needs, our “Image-to-Text” feature can assist in content creation based on visual input.
- Visual Design Inspiration: Benefit from our expertise in “Visual Design,” “Graphic Design,” “Digital Art,” and “Photo Manipulation.” Our platform offers “Creative Ideas,” “Photo Ideas,” “Mood Boards,” and “Thematic Collections” to spark your imagination and guide your design choices. Stay updated with “Trending Styles” to keep your presentations fresh and modern.
By integrating Tophinhanhdep.com into your workflow, you can streamline the process of finding, preparing, and utilizing stunning visuals that will undoubtedly elevate your PowerPoint presentations.
Conclusion
Setting a picture as a background in PowerPoint is more than a technical step; it’s an art that significantly impacts how your message is received. By following the simple steps outlined above and adhering to best practices in image selection and design, you can transform ordinary slides into visually engaging narratives. Remember to prioritize high-quality images, ensure readability through contrast and transparency, and maintain a consistent aesthetic throughout your presentation.
With the comprehensive resources available on Tophinhanhdep.com—from diverse “Backgrounds” and “Beautiful Photography” to essential “Image Tools” and “Visual Design” inspiration—you have everything you need to create impactful presentations that captivate your audience and leave a lasting impression. Start exploring Tophinhanhdep.com today and unlock the full potential of your visual communication.