Mastering Monochrome: How to Transform Your Images into Stunning Black and White

In the vibrant world of digital photography and visual design, where color often dominates, the timeless appeal of black and white imagery continues to captivate artists, photographers, and enthusiasts alike. Far from being a mere “downgrade” or a relic of the past, converting a color photograph to black and white can unlock an entirely new dimension of artistic expression. It allows viewers to focus intently on fundamental elements such as texture, form, light, and shadow, stripping away the potential distractions of hue to reveal the raw essence and emotional depth of a scene.
Whether you’re aiming to evoke a sense of nostalgia, create dramatic visual impact, highlight intricate details in high-resolution images, or simply add a classic aesthetic to your digital art, mastering the art of monochrome conversion is an invaluable skill. This comprehensive guide will navigate you through various methods and tools, from simple one-click solutions to advanced professional techniques, empowering you to transform your everyday photographs into compelling black and white masterpieces. Drawing on a range of approaches suitable for different skill levels and creative goals, we’ll explore how this fundamental editing style enhances everything from beautiful photography to abstract compositions, making it a cornerstone of effective visual design and a source of endless image inspiration.

The Enduring Allure of Monochrome Photography
Why choose black and white when the world is brimming with color? The answer lies in its unique ability to transcend reality and communicate on a more profound level. Black and white photography offers distinct advantages that colored images often cannot replicate, making it a powerful tool for visual storytelling and aesthetic enhancement across various image collections.
Highlighting Texture, Form, and Composition
Without the distraction of color, the eye is naturally drawn to the tactile qualities of surfaces and the distinct shapes and outlines of objects. A black and white conversion can dramatically emphasize the rough bark of a tree, the smooth curve of a silhouette, the intricate patterns of an abstract design, or the delicate folds of fabric. This focus on intrinsic visual elements allows for a deeper appreciation of the image’s inherent structure and composition, turning an ordinary scene into a study of light and form. This is particularly effective for backgrounds and wallpapers where subtle details might otherwise be lost.

Creating Dramatic and Emotional Impact
Monochrome images inherently carry a sense of gravitas and timelessness. They can evoke powerful emotions – from the somber tones of a sad, emotional portrait to the stark beauty of a dramatic landscape. The interplay of light and shadow, intensified in black and white, adds depth and mood that can elevate a photograph beyond a simple record of reality. This style is often employed in beautiful photography to convey a classic, artistic sensibility.
Emulating Vintage and Classic Aesthetics
Black and white photography harks back to the earliest days of the medium, instantly imbuing an image with a retro charm. Adding a subtle grain or sepia tone during post-processing can further enhance this vintage feel, transporting the viewer to another era. This approach is perfect for creating thematic collections or mood boards centered around historical or classic styles, adding a unique touch to your digital photography.
By deliberately removing color, photographers gain a renewed focus on the core elements of their craft: light, shadow, texture, and composition. This intentional limitation paradoxically opens up a universe of creative possibilities, pushing the boundaries of photo ideas and visual design.
Essential Considerations Before Conversion
Before diving into the technicalities of converting your images to black and white, a few preparatory steps and considerations can significantly impact the quality and artistic success of your monochrome masterpiece. These insights are crucial for anyone practicing digital photography and aiming for high-resolution, stunning results.
Shoot in RAW Format
This is arguably the most critical piece of advice for any serious photographer considering black and white conversion. While your camera might offer a black and white shooting mode, especially in JPEG, resist the temptation to use it. When you shoot in JPEG black and white, your camera discards vast amounts of color information, limiting your editing potential significantly.
Instead, always shoot in RAW format. RAW files capture the full spectrum of color tones and light information that your camera sensor can record. This uncompressed data provides maximum flexibility during post-production. When you convert a RAW color image to black and white, you retain the ability to precisely control how different color channels (reds, greens, blues, etc.) translate into varying shades of gray. This control is vital for achieving optimal contrast, detail, and mood, allowing you to manipulate the image’s tonal range without causing pixelation or artifacts. It ensures your stock photos or personal captures retain their high resolution and quality throughout the editing process.
Choose Your Photograph Wisely
Not every color image will shine in monochrome. Some photographs rely heavily on color for context, explanation, or visual impact. For instance, an image of a vibrant festival parade where costume colors are central to the narrative would lose much of its meaning in black and white.
Images that convert well to black and white typically feature:
- Strong Contrast: A good range of light and dark areas provides a solid foundation for monochrome conversion.
- Compelling Textures and Patterns: These elements become more pronounced without color. Think of weathered wood, rough fabrics, or intricate architectural details.
- Powerful Shapes and Forms: Silhouettes, geometric structures, and the human form often gain drama and emphasis in black and white.
- Emotional Depth: Portraits, especially close-ups focusing on expressions, can be incredibly impactful in monochrome, highlighting the subject’s emotions.
- Interesting Light and Shadow: Dramatic lighting, sharp shadows, or soft, diffused light can create stunning tonal variations.
Consider the inherent strengths of your image. Does it have a strong story that doesn’t rely on color? Does its composition, form, or texture stand out? By selecting the right base image, you set yourself up for creating truly beautiful photography in black and white. This thoughtful selection is a key aspect of creative ideas and image inspiration, informing your approach to visual design.
Diverse Approaches to Black and White Conversion
The journey from a colorful image to a captivating black and white one can be taken through various paths, utilizing a spectrum of image tools and software ranging from simple online converters to sophisticated professional editors. The best method for you will depend on your desired level of control, the complexity of the image, and the tools you have at hand.
User-Friendly Software and Online Tools
For those seeking quick conversions or working with basic requirements, several accessible options offer straightforward ways to achieve a black and white effect. These tools are perfect for optimizing images for social media, creating simple backgrounds, or experimenting with aesthetic styles without a steep learning curve.
PhotoWorks: Effortless Monochrome with Refined Controls
PhotoWorks is an intuitive image editor available for Windows and Mac, designed for ease of use without sacrificing powerful features. Its approach to black and white conversion is notably simple yet effective.
Steps to Convert in PhotoWorks:
- Start PhotoWorks and Import: Launch the program and load your chosen image.
- Activate Black and White Effect: Navigate to the “Enhancement” tab and simply check the “Black and White” box. This instantly desaturates your image, removing all color.
- Refine with Tone Sliders: For further customization, utilize the “Tone” sliders. Adjust “Whites” and “Highlights” to control brighter areas, and “Shadows” and “Blacks” to bring out darker details. This granular control allows you to fine-tune contrast and tonal depth, ensuring your black and white image isn’t just a “dull gray mess” but a nuanced composition. For instance, you can decrease “Exposure” to darken bright areas, preventing overexposure.
- Save Your Work: Once satisfied, save your newly transformed image.
PhotoWorks also offers creative possibilities like blurring backgrounds to hide imperfections or applying vintage and movie presets for an instant retro mood, extending its utility beyond basic conversion into broader image manipulation and creative ideas.
Movavi Photo Editor: Quick Conversion with Presets
Movavi Photo Editor provides another intuitive platform for image enhancement, including black and white conversion. It balances ease of use with a range of features.
Steps to Convert in Movavi Photo Editor:
- Open Image: Install and open Movavi, then click “Add image” to select your photo.
- Access Color Options: Go to the “Adjust” tab, select “Manually,” and scroll to the “Color” section to find the “Saturation” option.
- Apply Grayscale: Drag the “Saturation” slider all the way down to -100. This will effectively remove all color, converting your photo to black and white.
- Alternatively, Use Effects Tab: For an even quicker method, go to the “Effects” tab and select the “Grayscale” filter for instant conversion. You can then adjust the intensity of the effect with a slider.
- Save: Click “Save” to keep your edited image.
Movavi’s combination of manual saturation control and dedicated grayscale filters makes it a versatile tool for various editing styles.
Snapseed: Mobile Monochrome for On-the-Go Editing
For photographers who primarily use their mobile phones or tablets, Snapseed (available for Android and iOS) is an excellent, powerful, and user-friendly app for converting images to black and white.
Steps to Convert in Snapseed:
- Open App and Select Image: Launch Snapseed and tap to open the photo you wish to edit.
- Choose Black & White Filter: Tap the pencil icon to open the tools panel. Select the “Black & White” filter from the list. Snapseed offers several filter presets (e.g., Neutral, Contrast, Bright, Dark, Film, X), allowing you to pick a starting point that aligns with your vision.
- Fine-Tune Settings: If the default result isn’t perfect, you can adjust the brightness, contrast, and grain of the effect using intuitive sliders. For example, applying a red “Color Filter” within the B&W tool can darken blues and greens in the original image, providing more control over the final tonal distribution.
- Save Your Photo: Once you’re happy, save your edited image.
Snapseed is ideal for quick enhancements and creative ideas, especially when creating images for social media or digital art on the go.
Online Converters: LunaPic and GrayscaleImage.com for Instant Results
For immediate conversions without software installation, web-based tools like LunaPic and GrayscaleImage.com offer simple, free solutions. These converters are handy image tools for various formats (JPEG, PNG, SVG, WEBP, TIFF) and are excellent for quick tasks or converting stock photos.
Steps for Online Converters (General):
- Upload Image: Go to the website and select your image file from your computer or paste a URL.
- Apply Filter: Typically, you’ll find a “Black & White” or “Grayscale” filter option. Select it, and the conversion is often automatic.
- Adjust (if available): Some online tools, like LunaPic, may offer a slider to adjust the effect’s strength, giving you some control over the outcome. GrayscaleImage.com also allows for tone adjustments.
- Download and Save: Download your new black and white image. Many platforms offer direct sharing options.
While convenient, be mindful of privacy concerns when uploading sensitive images to online platforms. These tools are perfect for straightforward conversions, enhancing accessibility for anyone looking to convert images to black and white.
Basic Built-in Tools: Paint and Microsoft Publisher
For minimal editing needs, even standard Windows applications can convert images to black and white. These offer limited control but are readily available.
- Microsoft Paint: Open your image, go to the “Image” menu, select “Properties,” and check the “Black and White” box. Save the image. Note that older versions might not have this option.
- Microsoft Publisher: Insert your image into a project, left-click it to open the editing panel, choose “Recolor,” and select “Grayscale” from the dropdown list. Save the changes.
These tools are suitable for very basic purposes, like quickly preparing images for documents or simple graphic design layouts, but lack the nuanced control offered by dedicated photo editors.
Advanced Techniques in Professional Editors (Photoshop)
For unparalleled control and artistic precision, professional image editing software like Adobe Photoshop is the gold standard. It provides a robust suite of tools that allow photographers to sculpt light, contrast, and tone to create stunning black and white photography. This level of photo manipulation is central to high-end digital art and sophisticated editing styles.
Adobe Photoshop: The Pinnacle of Monochrome Control
Photoshop offers multiple methods for black and white conversion, with the “Black & White Adjustment Layer” being the most recommended for its non-destructive workflow and extensive control.
Recommended Method: Black & White Adjustment Layer
- Open Image: Launch Photoshop and open the image you intend to convert.
- Create Adjustment Layer: Go to
Layer > New Adjustment Layer > Black & White. This creates a new layer specifically for the black and white effect, leaving your original image untouched. - Adjust Tonal Values with Color Sliders: The Black & White Adjustment Layer panel will appear, featuring sliders for various color channels (Reds, Yellows, Greens, Cyans, Blues, Magentas). This is where the magic happens:
- Reds & Yellows: Crucial for skin tones. Slide these to the right to lighten skin (e.g., in a portrait) or to the left to darken them for more dramatic contrast.
- Greens & Cyans: Affect foliage, skies, and certain fabrics. Adjust these to alter the brightness of landscapes or specific elements.
- Blues & Magentas: Influence skies, water, and shadows. Darkening blues can create a moody, dramatic sky. By manipulating these sliders, you control how each original color translates into a specific shade of gray, allowing for precise tonal shaping.
- Use Presets: Photoshop also offers several built-in presets (e.g., High Contrast Blue Filter, Infrared, Maximum Black, Maximum White) that provide excellent starting points for different looks.
- Add a Color Tint (Optional): Tick the “Tint” box in the adjustment layer panel and click the colored square to select a color. This allows you to add a subtle color cast (like sepia for a vintage look) to your black and white image, further enhancing its aesthetic.
- Save Your Work: Once satisfied, merge your layers (if desired) and save the image.
Alternative Photoshop Methods:
- Levels Adjustment Layers: After converting to black and white, add a
Levels Adjustment Layer(Layer > New Adjustment Layer > Levels). This tool allows you to refine the brightness, contrast, and tonal range by adjusting the black point, white point, and midtone sliders. Moving the black point slider left darkens the image; moving the white point slider left lightens it. The midtone slider can lighten or darken mid-range tones. Output levels can also be adjusted to make the darkest parts lighter or lightest parts darker, expanding the dynamic range. - Hue/Saturation Adjustment Layer: A simpler, though less controlled, method. Add a
Hue/Saturation Adjustment Layer(Layer > New Adjustment Layer > Hue/Saturation) and drag the “Saturation” slider all the way down to -100. This is non-destructive but offers less individual color control than the dedicated Black & White layer. - Gradient Map Adjustment Layer: Create a
Gradient Map Adjustment Layer(Layer > New Adjustment Layer > Gradient Map). Select a black and white gradient (Photoshop has one built-in). This layers a contrasty gradient over your image, and you can adjust the sliders in the gradient editor to add more contrast or light. This is a powerful tool for dramatic effects. - Photoshop Actions: For batch processing or to apply a consistent artistic style,
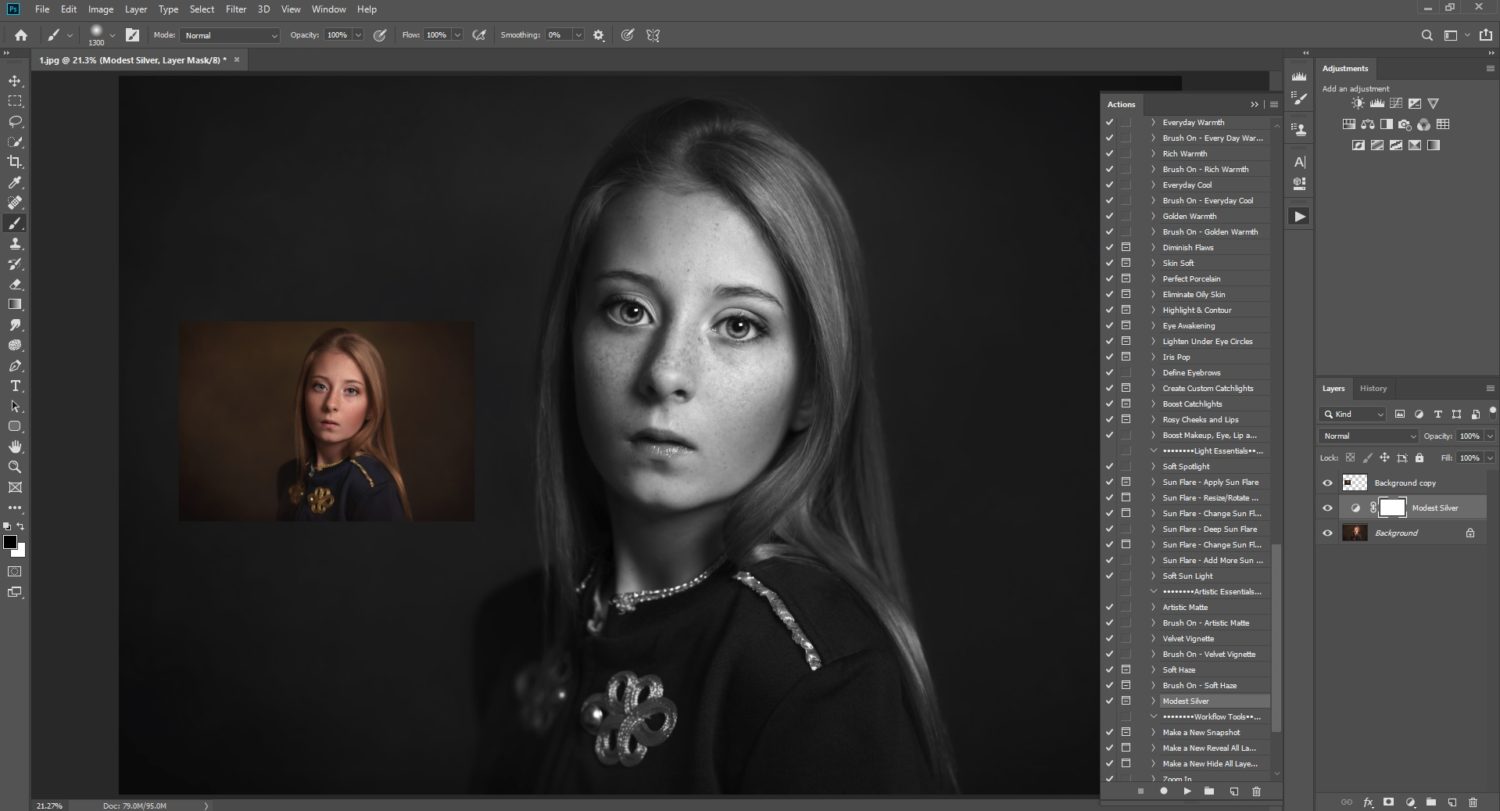
Photoshop Actionscan automate the conversion process. Many photographers use pre-made actions (like “Modest Silver” from Summerana) to quickly achieve specific black and white looks across multiple images, aligning with professional editing styles and creative ideas.
Beyond Conversion: Enhancing Your Monochrome Masterpiece
Converting an image to black and white is often just the first step. The true artistry lies in the subsequent enhancements that sculpt light, define form, and imbue the image with a unique character. This advanced post-processing falls squarely within visual design and photo manipulation, transforming a mere desaturated image into a profound piece of digital art.
Sculpting Light and Shadow with Contrast and Tonal Range
The backbone of any compelling black and white image is its contrast and tonal range. Without color, the visual impact relies entirely on the interplay between the darkest blacks, brightest whites, and the myriad shades of gray in between.
- Curves Adjustment Layer: The
Curves Adjustment Layerin Photoshop or similar tools in other editors (like PhotoWorks’ Tone sliders) offers the most precise control over tonal mapping. By adjusting points along the curve, you can selectively lighten or darken specific tonal ranges. An “S-curve,” for example, enhances contrast by darkening shadows and brightening highlights, creating a punchy, dramatic look. Conversely, a flatter curve can produce a softer, more ethereal image. - Levels Adjustment Layer (Revisited): As discussed,
Levelsprovides excellent global control over black point, white point, and midtones, effectively stretching the tonal range to create a richer, more impactful monochrome image.
Emphasizing Texture and Detail
With color removed, textures and fine details come to the forefront. Enhancing these elements can significantly boost the visual interest of your black and white photos.
- Clarity and Dehaze: Tools like “Clarity” (in PhotoWorks, Lightroom, or Photoshop’s Camera Raw) or “Dehaze” can add local contrast, making textures pop without over-sharpening the entire image.
- Sharpening: Judicious sharpening can enhance edges and fine details, but use it sparingly to avoid introducing noise or an artificial look, especially in high-resolution images.
Dodging and Burning: Localized Tonal Control
Inspired by darkroom techniques, “dodging” (lightening) and “burning” (darkening) specific areas of an image are powerful photo manipulation techniques. This allows you to guide the viewer’s eye, emphasize key elements, and sculpt the light within your scene.
- In Photoshop, you can use the
DodgeandBurntools directly, or for a non-destructive approach, use aCurvesorLevelsadjustment layer with a layer mask, painting white on the mask to reveal the adjustment in specific areas. - For example, you might dodge a subject’s face to make it brighter and draw attention, or burn the edges of an image to create a subtle vignette, focusing the eye inwards.
Adding Artistic Touches: Grain and Vintage Effects
To truly nail a specific aesthetic, especially a retro or filmic one, consider adding subtle effects:
- Film Grain/Noise: Many editors offer tools to add artificial film grain. This can replicate the look of classic film photography, adding texture and character that aligns with trending styles or thematic collections.
- Vignetting: A darkened edge around the photo can effectively frame the subject and add a classic touch. This can be created with a simple radial filter or a separate adjustment layer with a blurred mask.
- Sepia Toning: While technically adding color back, a sepia tone gives a warm, antique feel, often associated with old photographs. This can be achieved through a
Hue/Saturationadjustment layer (colorizing with a brown hue) or the “Tint” option in the Black & White Adjustment Layer.
Selective Color: A Creative Twist
Sometimes, leaving a single splash of color in an otherwise black and white image can create a striking visual effect, known as selective color or color accent. This technique isolates one element of the image, drawing immediate attention to it and enhancing its significance. While not strictly black and white, it showcases a powerful creative idea born from the monochrome conversion process. This involves duplicating your image, converting one layer to B&W, and then masking out the color from the original layer in specific areas.
These advanced techniques allow photographers and designers to go beyond simple desaturation, leveraging their image tools to create visually arresting and emotionally resonant black and white images that fit seamlessly into any collection of aesthetic or beautiful photography.
Conclusion
The journey to transforming your images into black and white is an exploration of form, light, and emotion. Far from being a creative limitation, the removal of color compels both the artist and the viewer to engage with the photograph on a deeper, more fundamental level. Whether you’re enhancing high-resolution stock photos, crafting a compelling digital art piece, or simply adding a timeless aesthetic to your personal image collections, the power of monochrome is undeniable.
From the straightforward one-click solutions offered by user-friendly software like PhotoWorks and Movavi, or convenient online converters such as LunaPic and GrayscaleImage.com, to the intricate, precision-driven controls within professional platforms like Adobe Photoshop and Snapseed, the tools available for black and white conversion are more diverse than ever. Each method provides a unique pathway to unleash your creative ideas and refine your editing styles.
By understanding the “why” behind black and white photography—its ability to highlight texture, evoke drama, and create a classic aesthetic—and by thoughtfully choosing your images and applying the appropriate techniques, you can elevate your visual design. Experiment with tone sliders, master adjustment layers, sculpt light with dodging and burning, and add subtle vintage grain. The possibilities for creating stunning, emotionally resonant, and beautiful photography in black and white are truly endless.
So, take a deep breath, grab your favorite image, and embark on this rewarding artistic endeavor. Explore the vast potential of monochrome photography and transform your images into timeless works of art that speak volumes without uttering a single hue.