How to Make an Image Black and White in Adobe Illustrator: A Comprehensive Guide

The world of visual design is perpetually evolving, yet some artistic choices remain timeless. Among these, the power of black and white imagery stands as a testament to enduring elegance and profound emotional depth. Stripping away the distraction of color, monochrome aesthetics compel viewers to focus on form, texture, light, and shadow, revealing the raw essence of a composition. For designers, photographers, and visual artists, mastering the art of grayscale conversion is an invaluable skill, and Adobe Illustrator, despite its primary focus on vector graphics, offers robust tools to achieve this effect with precision and control.
At Tophinhanhdep.com, we understand the multifaceted needs of visual creators, from sourcing high-resolution wallpapers and stock photos to utilizing advanced image tools and finding endless creative inspiration. This guide delves deep into the various methods Illustrator provides for converting your vibrant images into compelling black and white masterpieces, seamlessly integrating these techniques into your broader visual design workflow. Whether you’re aiming for a classic photographic look, a striking graphic design element, or optimizing images for print, we’ll equip you with the knowledge to transform your visuals effectively.
The Enduring Appeal of Monochrome Imagery in Visual Design
Black and white isn’t merely the absence of color; it’s a distinct aesthetic choice that carries significant weight in visual communication. It offers a unique lens through which to view images, emphasizing elements that might otherwise be overlooked in a colorful composition.
Enhancing Aesthetic and Emotional Impact
When we talk about Images on Tophinhanhdep.com, covering categories like Wallpapers, Backgrounds, Aesthetic, Nature, Abstract, Sad/Emotional, and Beautiful Photography, the application of monochrome can be transformative. A stunning nature photograph, for instance, can gain a dramatic, ethereal quality when rendered in black and white, highlighting the intricate patterns of leaves or the rugged textures of mountains without the distraction of seasonal hues. Abstract designs, too, find new dimensions, with emphasis shifting to geometric forms and the interplay of light and dark.
Emotionally, grayscale imagery often resonates deeply. Sad/Emotional themes frequently find a powerful voice in black and white, conveying a sense of introspection, nostalgia, or solemnity that color might dilute. Even joyful moments can be imbued with a timeless, classic feel. This ability to distill the essence of a scene or emotion makes black and white an indispensable tool for artists seeking to create Aesthetic and impactful visuals. It pushes the viewer to engage with the subject on a deeper, more conceptual level, appreciating the artistry in composition and contrast. For anyone compiling Mood Boards or Thematic Collections from Tophinhanhdep.com’s extensive library, converting selected images to black and white can instantly unify a diverse set of visuals under a cohesive, sophisticated theme, demonstrating a keen eye for Trending Styles and Photo Ideas.
![]()
Practical Applications for Graphic Design and Photography
Beyond pure aesthetics, converting images to black and white holds considerable practical value, especially in Visual Design and Photography. For Graphic Design projects, a grayscale background can be incredibly effective in making overlaid text or colorful foreground elements pop. Imagine a marketing banner: a subdued, monochrome image from Tophinhanhdep.com’s Stock Photos collection as a backdrop allows key information or a vibrant logo to immediately capture attention, rather than competing with a busy colored background. This clever use of contrast is a popular “trick” among designers looking to make their Creative Ideas truly stand out.
In the realm of Photography, especially Digital Photography and Editing Styles, black and white conversions are a cornerstone. Many photographers deliberately shoot or convert to monochrome to hone their eye for light and composition, elevating ordinary scenes into extraordinary visual statements. For High Resolution stock photos or personal portfolios, presenting an image in both color and black and white can showcase versatility and artistic vision. Furthermore, there are tangible benefits for production. For instance, when printing large-format graphics or specific materials, outputting files in grayscale can significantly reduce printing costs. Many professional printing services, like those potentially supported by Tophinhanhdep.com’s print-ready solutions, offer black & white pricing which is more economical than color, provided the image is correctly submitted in grayscale. This highlights the importance of precise conversion methods to ensure professional results and efficiency.
Before diving into the technical steps within Illustrator, it’s crucial to understand a few foundational best practices that ensure a smooth and effective workflow, preserving your original artwork and maximizing your control over the final grayscale output.
Essential Preparations Before Converting to Grayscale in Illustrator
Successfully transforming your images to black and white in Adobe Illustrator isn’t just about knowing where the buttons are; it’s about setting yourself up for success. Proper preparation can save you time, prevent loss of original work, and unlock the full potential of Illustrator’s color editing capabilities.
Optimizing Your Workflow in Illustrator
One of the golden rules in any digital design endeavor is to always work from a duplicate file. This practice is paramount in Illustrator. Before you make any significant color adjustments, save a copy of your original document. This ensures that you always have an untouched version to revert to, should your grayscale experiments not yield the desired results or if you need the original color version for other purposes. Think of this duplicate as your dedicated “IC print file” or “grayscale working file,” maintaining organization and safeguarding your creative assets.
When it comes to selecting objects for conversion, Illustrator offers flexibility. To convert the entire image to grayscale, you’ll first need to select all objects on your artboard. This can be easily done by navigating to Select on the main toolbar and choosing All. However, it’s vital to remember a common pitfall: locked layers or objects. Illustrator’s layer panel and object locking feature are excellent for preventing accidental edits, but they can hinder your grayscale conversion. Therefore, always make sure to unlock all layers & objects on your artboard by going to Object menu > Unlock All. This ensures that every element intended for conversion is accessible to Illustrator’s editing functions.
A frequent issue encountered by users is finding the color edit options grayed out in the menus. This typically occurs when Illustrator doesn’t recognize the selected element as a raster image or an editable vector object in a way that allows for direct color manipulation by these specific commands. A highly effective fix, as noted by experienced designers, is to rasterize the image or object. To do this, with your image selected, go to Object > Rasterize… Choose your preferred settings (e.g., resolution, color model) and click OK. Rasterizing converts vector data or linked images into a pixel-based format within Illustrator, often enabling the previously grayed-out color editing options. While Illustrator is a vector program, it handles raster images, and sometimes explicit rasterization is needed for certain pixel-level adjustments.
For users leveraging Tophinhanhdep.com’s Image Tools, this preparatory phase can be further enhanced. Before even importing images into Illustrator, you might use our AI Upscalers to ensure your base imagery is of the highest possible resolution, preventing pixelation when transformed. Similarly, our Converters can prepare images in the optimal format for Illustrator, while Optimizers can help manage file sizes, ensuring a smoother workflow both within Illustrator and when eventually saving your finished grayscale artwork. These tools complement your Illustrator skills, providing a holistic approach to image preparation and enhancement.
With your images ready and your Illustrator workspace optimized, you’re now poised to explore the diverse methods for transforming your colorful creations into captivating grayscale visuals.
Step-by-Step Methods to Make Your Images Black and White in Illustrator
Adobe Illustrator offers several distinct pathways to achieve a black and white effect, each providing varying levels of control and suited for different design needs. From quick, straightforward conversions to nuanced adjustments of tonal values, mastering these methods will empower your creative process.
Method 1: The Quick Convert to Grayscale
This is by far the fastest and most direct method to convert an image or selected objects to grayscale in Illustrator. It’s ideal when you need a standard black and white conversion without intricate tonal adjustments.
Step-by-Step Instructions:
- Launch Illustrator and Open Your Image: Begin by opening the image or design file you wish to convert in Adobe Illustrator.
- Select All Objects: To apply the grayscale conversion to your entire artwork, ensure all objects are selected. Go to the main toolbar, click Select, and then choose All. Remember to unlock any locked layers or objects as discussed in the preparation phase. If you only want to convert specific elements, select just those objects using the Selection Tool (V).
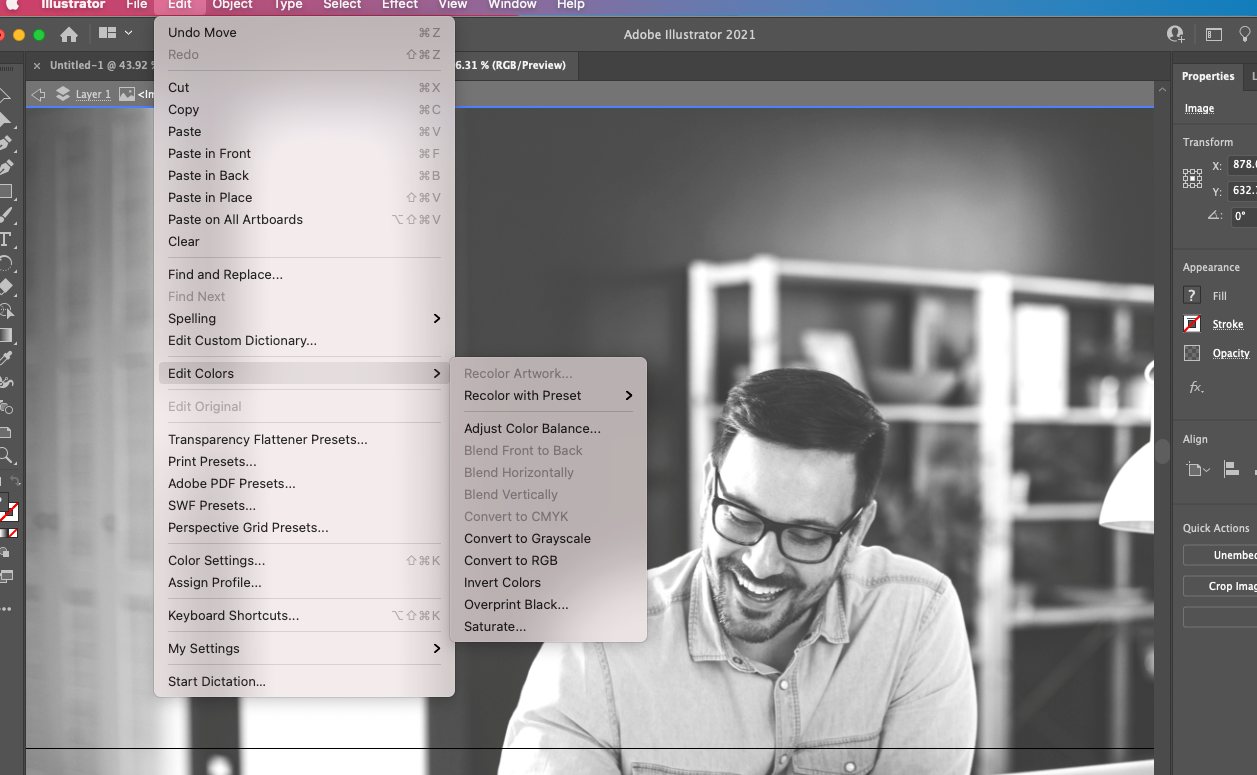
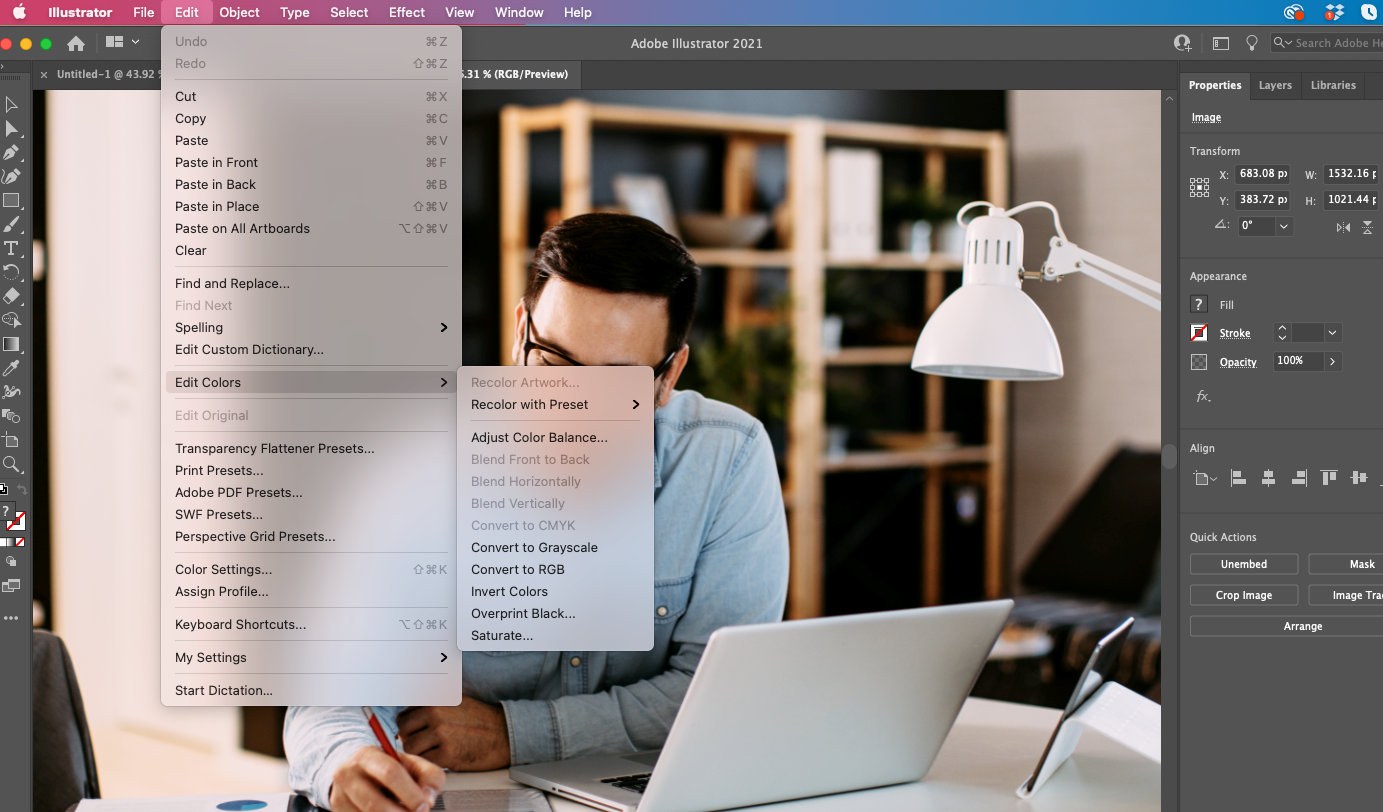
- Convert to Grayscale: With your objects selected, navigate to the main toolbar, click Edit, hover over Edit Colors, and then click Convert to Grayscale.
- Observe the Transformation: Instantly, your selected image or objects will be converted into a black and white, or grayscale, rendering.
This method is incredibly efficient for a default grayscale look, suitable for quick edits, placeholders, or when the precise shades of gray are not the primary concern.
Method 2: Adjusting Shades with Color Balance
For those who desire more control over the intensity of blacks and the overall tonal range within their grayscale image, the Adjust Color Balance method is an excellent choice. This approach not only converts your image to grayscale but also allows you to fine-tune the shades of gray simultaneously, giving you a greater say in how dark or light your monochrome output appears.
Step-by-Step Instructions:
- Select Your Image/Objects: As with all methods, start by selecting the image or specific objects you intend to convert.
- Access Adjust Color Balance: Go to the Edit menu on the main toolbar, select Edit Colors from the drop-down list, and then click Adjust Color Balance.
- Configure the Dialog Box: A window will pop up. Crucially, check both the Preview box (to see your changes in real-time) and the Convert box.
- Adjust the Black Percentage: You will see a slider, typically affecting the percentage of black (often labeled ‘K’ for Key or Black in CMYK contexts) in your image. Move this slider to the left to lighten the grayscale image (reducing black intensity) or to the right to darken it (increasing black intensity).
- Finalize the Adjustment: Once you are satisfied with the depth and contrast of your black and white image, click OK.
This method provides an intuitive way to manage the ‘mood’ of your grayscale image, allowing you to create anything from a soft, ethereal look to a high-contrast, dramatic effect, making it perfect for Visual Design projects where specific tonal values are critical for the desired Aesthetic.
Method 3: Fine-Tuning with Desaturation
The Desaturate option offers an even more granular level of control over the shades of gray in your image, operating on the principle of removing color saturation to achieve a monochrome effect. This method is particularly versatile because it stems from the powerful Recolor Artwork feature, which allows for broader color manipulations.
Step-by-Step Instructions:
- Select Your Image/Objects: Ensure the image or objects you wish to convert are selected.
- Access Recolor Artwork: Go to the Edit menu on the main toolbar and select Edit Colors from the drop-down list. Then, click Recolor Artwork to launch the Live Color window. Alternatively, for a quicker route, you can often click the color wheel icon displayed on the Control panel (if visible).
- Navigate to Global Adjust: Within the Live Color window, you’ll see various sliders and controls. Look for two buttons to the right of the sliders at the bottom of the window. Click on the one that resembles a play button (often a small triangle or an arrow pointing right). From the drop-down list that appears, select Global Adjust.
- Desaturate the Image: Now, locate the Saturation slider. Move this slider all the way to its leftmost position, typically indicated as -100. This action will effectively remove all color information, rendering your image in black and white.
- Further Adjustments (Optional): The beauty of this method is the accompanying sliders for Brightness, Temperature, and Luminosity. You can adjust these to further refine the look of your grayscale image, enhancing contrast, warmth (even in monochrome, a subtle warmth or coolness can be perceived), or overall lightness.
- Confirm Changes: Click OK once you are pleased with the desaturated and adjusted grayscale image.
This method is highly recommended for Digital Photography and Photo Manipulation where subtle adjustments to light and shadow, even within a monochrome palette, can significantly alter the emotional impact and visual quality of the image. It offers more nuanced control than a simple “Convert to Grayscale,” making it a favorite for Creative Ideas and unique Editing Styles.
Method 4: Advanced Recolor Artwork for Grayscale Mastery
When the previous three options don’t quite deliver the precise results you envision, or when you need highly specific control over how individual colors translate into shades of gray, the Recolor Artwork option offers an advanced solution. This method allows you to map original colors to specific grayscale values, providing unparalleled customization.
Step-by-Step Instructions:
- Prepare Grayscale Swatches: First, you’ll need access to grayscale swatches. Click on the Swatch Libraries menu (often an icon that looks like a book or library shelves) located on the Swatches panel. From the drop-down list, select Default Swatches, and then click Print. This will load a collection of print-oriented swatches, including a grayscale folder. Drag this grayscale folder directly into your main Swatches panel for easy access.
- Launch Recolor Artwork: Select the image or objects you want to recolor. Go to the Edit menu on the main toolbar, select Edit Colors, and then click Recolor Artwork to open the Live Color dialog.
- Adjust Grayscale Swatches: Within the Live Color dialog, you’ll see a section displaying the current colors of your artwork and their corresponding grayscale assignments. To make detailed adjustments, navigate to the sliders at the bottom of the window and ensure CMYK is selected as the color mode.
- Modify Individual Black Percentages: In the Current Colors column, select the original color you wish to modify its grayscale equivalent. Once selected, locate the K (Black) slider and move it to adjust the percentage of black for that specific original color. This allows you to dictate precisely how light or dark that color will appear in your grayscale image.
- Iterate and Finalize: Repeat step 4 for any other original colors you want to fine-tune. The Preview option (if available) will help you visualize these changes in real-time.
- Confirm Changes: Once you are satisfied with the customized grayscale mapping, click OK.
This advanced method is particularly useful for complex Visual Design projects or when working with detailed Digital Art where subtle variations in gray tones are crucial. It’s an invaluable tool for designers aiming for absolute control over their monochrome palette, ensuring that the final output aligns perfectly with their Creative Ideas and Aesthetic vision.
Beyond Grayscale: Recoloring and Workflow Integration with Tophinhanhdep.com
Converting images to black and white in Illustrator is just one facet of a comprehensive visual design workflow. For many designers and photographers, the ability to selectively reintroduce color, convert color modes, and prepare files for various outputs is equally crucial. Tophinhanhdep.com supports these extended needs with a wealth of resources and tools.
Adding Selective Color to Grayscale Imagery
One striking artistic technique is the use of selective color, where a primarily grayscale image features one or a few elements in full color. This draws the viewer’s eye to specific details, creating dramatic impact and a sense of focus. In Illustrator, applying this to a grayscale image or design is entirely possible and aligns perfectly with Visual Design: Photo Manipulation and fostering Creative Ideas.
If you’ve converted an entire artwork to grayscale and now wish to color specific text or objects, you’ll first need to enable color editing for those elements. Select the grayscale object (e.g., text) and go to Edit > Edit Colors > Convert to RGB or Convert to CMYK, depending on your document’s primary color mode. Once converted back to a color mode, you can then use the Color panel or Swatches panel to apply your desired hues.
For a grayscale photograph, you might employ a different technique, such as adding colorful vector shapes or overlays to specific areas. Illustrator allows you to layer color elements on top of your grayscale raster image, creating a compelling blend of monochrome and vibrant accents. This method can add a contemporary twist to Beautiful Photography or create unique Aesthetic effects for Mood Boards and Thematic Collections.
Converting Grayscale back to RGB or CMYK
Just as you convert to grayscale, you can easily revert or change the color mode of your artwork in Illustrator. This is particularly important when preparing files for different output mediums, as print (CMYK) and screen (RGB) require distinct color profiles.
To convert a grayscale image or artwork to RGB or CMYK, based on your project’s needs:
- Select Your Image/Objects: Ensure the elements whose color mode you want to change are selected.
- Access Color Mode Conversion: Go to Edit > Edit Colors.
- Choose Desired Mode: From the drop-down menu, select either Convert to RGB or Convert to CMYK.
It’s essential to understand that converting a grayscale image to RGB or CMYK won’t magically bring back the original colors; it merely changes the color profile under which the shades of gray are represented. If you wish to reintroduce color, you’d typically work from your original color duplicate file, or selectively apply new colors as described above. This flexibility is crucial for designers who need to adapt their Digital Art and Graphic Design projects for various platforms and print specifications.
Exporting Grayscale PDFs for Professional Use
For professional printing, especially for materials requiring cost-effective black and white output, saving your Illustrator file as a grayscale PDF is a common and essential step. As mentioned, some print services offer reduced rates for true black and white files.
Once your image or artwork has been converted to grayscale using one of the methods described:
- Save Your File: Go to File > Save As…
- Select PDF Format: Choose Adobe PDF from the “Save as type” (Windows) or “Format” (Mac) drop-down menu.
- Configure PDF Settings: In the “Save Adobe PDF” dialog box, you’ll have various options. For grayscale, you might select a predefined preset like “Press Quality” and then ensure that the output settings align with a grayscale profile. It’s always best to consult with your print provider for their exact specifications.
Beyond Illustrator’s saving capabilities, Tophinhanhdep.com’s Image Tools can further enhance your post-production workflow. After creating your perfectly grayscale PDF or image file, you might use our Compressors to reduce file size without compromising quality, making it easier to share or upload. Our Optimizers can prepare your high-resolution images for web display, ensuring fast loading times for your portfolio or website, while maintaining visual integrity. For those who need to extract text from their designs, our Image-to-Text tool can prove invaluable, bridging the gap between visual and textual content. These tools offer a holistic ecosystem, supporting every stage of your image’s journey, from initial concept to final deployment.
Conclusion: Mastering Monochrome with Tophinhanhdep.com
The journey through the various methods of converting images to black and white in Adobe Illustrator reveals the software’s unexpected versatility beyond its vector roots. From the instantaneous Convert to Grayscale to the meticulously controlled Recolor Artwork and Desaturate options, designers and photographers have a rich palette of tools to achieve compelling monochrome effects. Each method offers a unique balance of speed and precision, allowing you to choose the approach that best suits your creative vision and technical requirements.
Embracing black and white imagery in your Visual Design and Photography projects can profoundly elevate their aesthetic and emotional impact. It’s an art form that demands attention to composition, light, and texture, stripping away distractions to highlight the core message. Whether you’re crafting Aesthetic Wallpapers, preparing High Resolution Stock Photos, or creating dramatic Digital Art, the techniques outlined in this guide provide the foundation for stunning results.
As you explore these powerful capabilities within Illustrator, remember that Tophinhanhdep.com is your comprehensive partner in the world of visual content. Beyond these step-by-step tutorials, our platform offers an expansive collection of Images—including diverse Backgrounds, inspiring Nature scenes, and thought-provoking Abstract visuals—to fuel your Creative Ideas. Dive into our Image Inspiration & Collections for Photo Ideas, curated Mood Boards, and insights into Trending Styles that can spark your next project. Furthermore, our robust suite of Image Tools, from Converters and Compressors to AI Upscalers and Image-to-Text functionalities, is designed to complement your Illustrator workflow, ensuring your visuals are always optimized, accessible, and ready for any application.
Experiment with these methods, push the boundaries of monochrome, and let your creativity flourish. With the combined power of Adobe Illustrator and the comprehensive resources at Tophinhanhdep.com, you have everything you need to transform your images and tell your stories in compelling black and white.