How to Make Your Images Black and White in Adobe Illustrator for Stunning Visuals

In the dynamic world of visual design, where vibrant colors often dominate, the timeless appeal of black and white imagery continues to hold a powerful, unparalleled charm. Whether you’re a seasoned graphic designer, a budding digital artist, or a photographer looking to explore new editing styles, transforming a colorful image into a monochromatic masterpiece in Adobe Illustrator is a skill that opens up a world of creative possibilities. At Tophinhanhdep.com, we understand the profound impact that well-executed visuals can have, from breathtaking wallpapers and aesthetic backgrounds to high-resolution stock photos and evocative digital art. This comprehensive guide will walk you through various methods to convert your images to black and white in Illustrator, offering both quick solutions and advanced techniques for meticulous control. We’ll also explore how this process aligns with broader visual design principles and how Tophinhanhdep.com can be your ultimate resource for image inspiration and tools.

The Enduring Appeal of Black and White Photography and Graphic Design
Black and white imagery strips away the distraction of color, compelling the viewer to focus on fundamental elements like light, shadow, texture, and form. This minimalist approach can evoke a sense of nostalgia, drama, elegance, or raw emotion that color often can’t convey. For graphic designers, converting an image to grayscale can help content stand out, provide a sophisticated backdrop, or create a cohesive visual theme for projects ranging from corporate branding to abstract art. For photographers, it’s a classic editing style that brings a new depth to portraits, landscapes, and architectural shots.
Why Grayscale Matters in Visual Storytelling
Grayscale isn’t merely the absence of color; it’s a spectrum of tones from pure black to pure white, encompassing countless shades of gray. This tonal range is crucial for conveying mood and emphasizing compositional elements. A high-contrast black and white image might exude boldness and intensity, while a softer, more subtle grayscale conversion could evoke tranquility or a dreamy quality. Understanding how to manipulate these tones in Illustrator is key to leveraging the full expressive power of monochromatic visuals. It allows you to transform an ordinary image into a compelling visual narrative, highlighting intricate details or simplifying complex scenes into their most impactful forms. From creating moody thematic collections to producing striking aesthetic backgrounds, grayscale conversion is a fundamental tool for effective visual storytelling.
Beyond Aesthetics: Practical Applications of Black and White Images
While the aesthetic benefits of black and white are undeniable, there are also numerous practical reasons why designers and photographers opt for grayscale conversion. For instance, when preparing images for print, especially on certain types of plotters or for specific print media, converting to grayscale can significantly reduce printing costs. Many printing services offer “black & white pricing” for grayscale images, which is often more economical than color printing. This makes it an essential step for producing brochures, posters, or even large-format prints efficiently.
Furthermore, in graphic design, black and white images serve as excellent foundational elements. They can make overlaid text or colored graphics pop, providing a neutral canvas that prevents color clashes. Imagine a vibrant logo placed on a busy, colorful background versus the same logo on a carefully converted grayscale backdrop; the latter often enhances readability and visual hierarchy. Black and white images are also crucial for mood boards and thematic collections, allowing designers to focus purely on composition and form without the distraction of color palettes. For digital photography and photo manipulation, converting to grayscale can help standardize diverse images within a collection, creating a cohesive look and feel. Moreover, when you’re dealing with stock photos or designing wallpapers, a black and white version can offer a versatile alternative, catering to different preferences and design needs found on platforms like Tophinhanhdep.com.
Essential Methods to Convert to Grayscale in Illustrator
Adobe Illustrator, primarily known for its vector capabilities, also offers robust tools for manipulating raster images, including effective ways to convert them to black and white. Unlike a simple desaturation in other software, Illustrator provides several nuanced approaches, giving you control over the final grayscale output. Before you begin, ensure your image is properly embedded in your Illustrator document. If you’ve just placed an image, you’ll see an “Embed” button in the control panel at the top. Click this to integrate the image fully into your file, which is often necessary for color editing options to be available. If you encounter issues where color edit options are grayed out, try selecting your image and going to Object > Rasterize..., then click OK. This can sometimes resolve issues with certain image types or formats preventing direct color adjustments.
Quick Conversion: The “Convert to Grayscale” Command
For designers and photographers seeking the fastest route to a black and white image, Illustrator’s Convert to Grayscale command is your go-to option. This method provides a straightforward and efficient way to remove all color information, transforming your image into a standard grayscale representation. It’s ideal for initial mock-ups, quick edits, or when a neutral, un-adjusted grayscale is precisely what your design requires.
Step-by-Step Guide:
- Launch Illustrator and Open Your Image: Start Adobe Illustrator and open the image file you intend to convert. You can do this by going to
File > Openor by dragging your image directly into the Illustrator workspace. - Select All Objects: If your image is composed of multiple objects or if you want to ensure everything on your artboard is converted, go to the main toolbar, select
Select, and then chooseAll. This ensures no elements are accidentally left in color. For a single placed image, simply selecting the image with theSelection Tool (V)is sufficient. - Embed the Image (if necessary): If you see an “Embed” button in the top control panel after selecting your image, click it. This converts the linked image into an embedded one, often enabling color editing options that might otherwise be unavailable. If no “Embed” button appears, your image is already embedded or the options are accessible.
- Navigate to Convert to Grayscale: With your image or objects selected, go to the
Editmenu on the main toolbar. From the dropdown list, hover overEdit Colors, and then clickConvert to Grayscale. - Observe the Transformation: Instantly, your image will be converted to a black and white format. This method provides a clean, default grayscale conversion without any further adjustments, making it perfect for rapid application.
This method is the most direct way to achieve a black and white look, suitable for backgrounds on Tophinhanhdep.com that need a consistent monochromatic tone or for initial design concepts where speed is paramount.
Finer Control: Adjusting Color Balance
While Convert to Grayscale offers a quick solution, the Adjust Color Balance option provides significantly more control over the tonal qualities of your black and white image. This method not only converts your image to grayscale but also allows you to manipulate the shades of gray, influencing how dark or light various elements appear. This level of control is invaluable when you want to imbue your images with specific moods – perhaps a dramatic, high-contrast look for an abstract wallpaper, or a soft, subtle gradation for nature photography.
Step-by-Step Guide:
- Open and Select Your Image: Begin by opening your desired image in Adobe Illustrator and selecting it using the
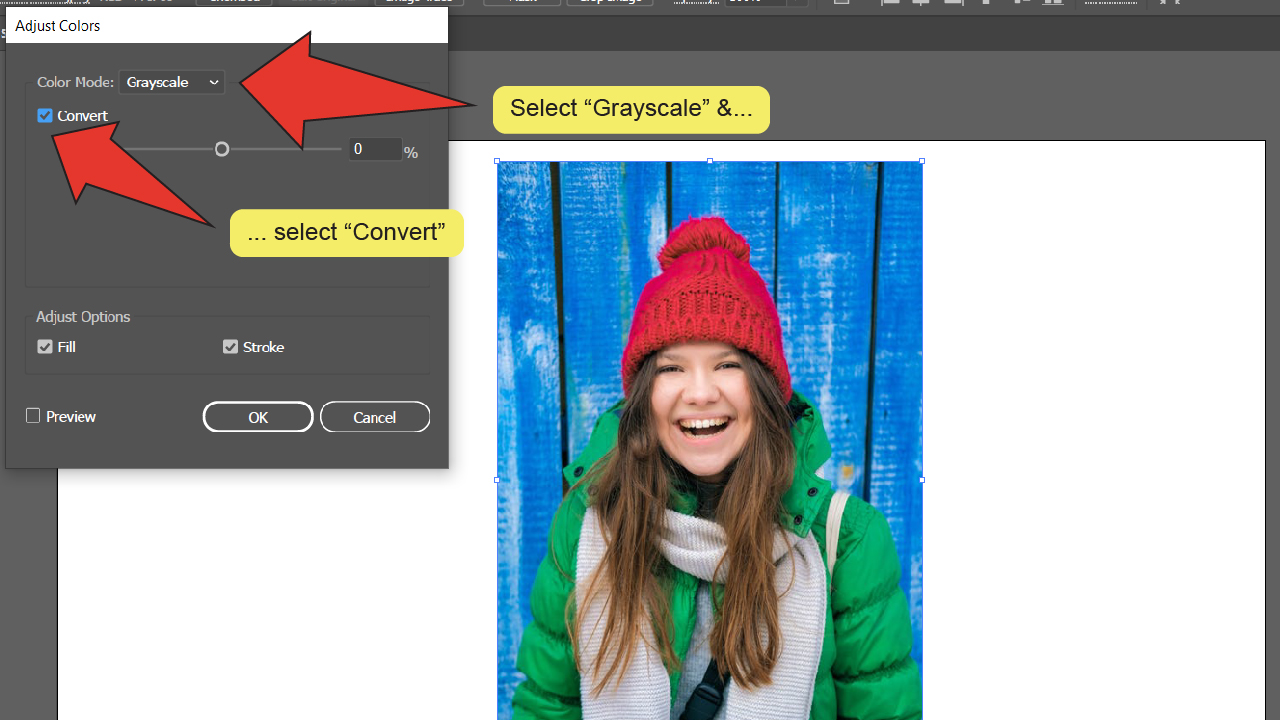
Selection Tool (V). Remember to embed the image if prompted. - Access Adjust Color Balance: Go to the
Editmenu on the main toolbar. From the dropdown list, selectEdit Colors, and then clickAdjust Color Balance.... This will open a dialog box. - Enable Preview and Conversion: In the
Adjust Colorswindow that appears, make sure to check both thePreviewbox and theConvertbox. EnablingPreviewallows you to see the changes in real-time as you make adjustments, which is crucial for achieving your desired outcome. - Set Color Mode to Grayscale: Within the
Adjust Colorsdialog, locate theColor Modedropdown. SelectGrayscale. - Manipulate the Black Slider: You’ll see several sliders, but for grayscale adjustment, focus on the
Blackslider. Moving this slider to the left will decrease the overall black percentage, resulting in a brighter image with lighter grays. Moving it to the right will increase the black percentage, making the image darker and enhancing contrast. Experiment with this slider until you are satisfied with the depth and darkness of the black and the overall tonal range. - Finalize Your Adjustments: Once you achieve the desired black and white effect, click
OKto apply the changes to your image.
This method is particularly useful for achieving specific aesthetic effects for high-resolution photography or for creating impactful sad/emotional or abstract images found in Tophinhanhdep.com’s collections, where tonal depth is paramount. It gives you the power to fine-tune the visual weight of your monochromatic design.
Precision Desaturation: Mastering the Saturation Slider
For even greater control over the nuances of your grayscale conversion, the Desaturate option in Illustrator offers a powerful alternative to the direct Convert to Grayscale command. This method allows you to adjust the saturation levels precisely, giving you fine-tuned control over how colors translate into shades of gray, as well as enabling adjustments to brightness, temperature, and luminosity for truly bespoke results. This is especially useful for visual design projects where you need to carefully manage the emotional impact or aesthetic balance of your image.
Step-by-Step Guide:
- Prepare Your Image: Open your image in Illustrator and select it with the
Selection Tool (V). As with other methods, ensure the image is embedded if it’s a linked file. - Access the Desaturate Command: Navigate to the
Editmenu on the main toolbar. From theEdit Colorsdropdown, selectSaturate.... Alternatively, for more comprehensive control, you can clickRecolor Artwork(or the color wheel icon in the Control panel) to launch theLive Colordialog, which contains the saturation slider and more. - Enable Preview and Adjust Saturation: If using the
Saturatedialog, ensure thePreviewbox is checked. Then, move theIntensityslider all the way to the left (-100). This action will completely remove all color, effectively converting your image to black and white. - Advanced Adjustments with Live Color (Optional): If you opted for
Recolor Artwork(Live Color), you’ll find sliders at the bottom of the window. Click the “Global Adjust” button (often looks like a play button or small dropdown arrow) and selectGlobal Adjustfrom the menu. Move theSaturationslider to its leftmost position (-100) for a full black and white conversion. - Refine Tones (Live Color Only): Within the
Live Colorwindow, you gain additional sliders forBrightness,Temperature, andLuminosity. Experiment with these to fine-tune the look and feel of your black and white image. Increasing brightness can make your image feel lighter and more ethereal, while adjusting luminosity can help differentiate subtle gray tones, providing a richer grayscale effect suitable for beautiful photography or complex abstract designs. - Confirm Your Changes: Once satisfied with your adjustments, click
OKto apply the desaturation and any other tonal changes to your image.
The Desaturate method, particularly when utilizing the Live Color panel, offers a nuanced approach to creating black and white images. It’s a fantastic tool for digital artists and photo manipulators looking for precise control over their high-resolution images, ensuring every detail contributes to the overall aesthetic found in Tophinhanhdep.com’s curated collections.
Advanced Techniques: Recolor Artwork for Grayscale Mastery
When standard grayscale conversions or desaturation don’t quite hit the mark, or when you need granular control over how specific colors translate into shades of gray, the Recolor Artwork feature offers an unparalleled level of customization. This advanced method is particularly useful for complex illustrations, visual design projects with specific brand guidelines, or when performing sophisticated photo manipulation where certain color values need to be mapped to precise grayscale tones. It allows you to define custom grayscale swatches and apply them strategically, giving you absolute mastery over your black and white output.
Step-by-Step Guide:
- Select Your Image/Artwork: Start by selecting the image or vector artwork you wish to convert to grayscale using the
Selection Tool (V). - Load Grayscale Swatches: To ensure you have a robust set of grayscale options, it’s beneficial to load a dedicated grayscale swatch library.
- Click on the
Swatch Libraries Menu(the book icon) located on theSwatchpanel. - From the dropdown list, navigate to
Default Swatchesand then clickPrint. - Once the print swatches load, locate the
grayscalefolder (often named “Grays” or similar) and drag it into your mainSwatchpanel for easy access.
- Click on the
- Launch Recolor Artwork: Go to the
Editmenu on the main toolbar. SelectEdit Colorsfrom the dropdown list, and then clickRecolor Artwork(orRecolor Artin some versions). This will open theLive Colordialog box, a powerful hub for color manipulation. - Adjust Grayscale Swatches: Within the
Live Colordialog, you’ll see a section that lists “Current Colors” and their corresponding “New” colors. This is where you map your original colors to grayscale values.- Go to the sliders at the bottom of the window and select
CMYK. This gives you access to the ‘K’ (Black) slider, which is essential for grayscale control. - In the
Current Colorscolumn, select an original color you want to modify. - Once selected, go to the
Kslider in theCMYKsection. Move this slider to adjust the percentage of black for that specific color. For example, a bright red might be mapped to a mid-gray, while a dark blue could become a darker gray. - Repeat this process for other original colors until you’ve achieved the desired grayscale mapping. You can also use the
Assigntab withinRecolor Artworkto quickly map colors to a grayscale palette.
- Go to the sliders at the bottom of the window and select
- Preview and Finalize: Ensure the
Previewbox is checked to see your changes in real-time. Once you are satisfied with how your original colors have been translated into varying shades of gray, clickOK.
This Recolor Artwork method provides the most comprehensive control over grayscale conversion, making it indispensable for designers working on highly detailed projects, especially when creating specific visual effects or preparing thematic collections for Tophinhanhdep.com. It’s a testament to Illustrator’s flexibility in handling both vector and raster elements for digital art and photo manipulation.
Integrating Black and White into Your Creative Workflow with Tophinhanhdep.com
Mastering black and white conversion in Adobe Illustrator is more than just a technical skill; it’s a creative tool that can significantly elevate your visual design projects. Tophinhanhdep.com, a hub for high-resolution images, photographic inspiration, and practical image tools, provides the perfect ecosystem to apply and enhance these grayscale techniques.
Enhancing Wallpapers and Backgrounds with Monochromatic Tones
Imagine transforming a vibrant landscape or a bustling city scene from Tophinhanhdep.com’s extensive collection into a powerful black and white wallpaper. Removing color can turn a busy background into a sophisticated canvas that makes foreground elements pop, or it can imbue nature photography with a timeless, dramatic quality. Black and white backgrounds are particularly effective for website banners, presentation slides, or digital art where you need a strong, yet unobtrusive visual foundation. By using Illustrator’s Adjust Color Balance or Desaturate options, you can fine-tune the contrast and tonal range of these backgrounds to perfectly match your aesthetic or creative ideas, creating anything from a soft, ethereal backdrop to a stark, impactful design.
Optimizing Black and White Images for Web and Print
After converting your images to black and white in Illustrator, optimization becomes the next critical step, especially for use on Tophinhanhdep.com or other platforms. While Illustrator handles the aesthetic conversion, Tophinhanhdep.com’s suite of image tools — including compressors, optimizers, and AI upscalers — can help ensure your black and white images are ready for any application.
- Compression: Grayscale images can still be large files. Using Tophinhanhdep.com’s compressors helps reduce file size without compromising the quality of your carefully crafted black and white tones, crucial for faster loading web pages and efficient storage.
- Optimization: Optimizing images involves adjusting resolution, file format, and other parameters for specific uses (e.g., web vs. print). For high-resolution photography, maintaining sharp details in black and white is paramount.
- AI Upscalers: If you start with a lower-resolution image and convert it to black and white, Tophinhanhdep.com’s AI upscalers can intelligently enhance its resolution post-conversion, preserving detail and preventing pixelation, making it suitable for larger prints or higher-quality digital displays. This is particularly valuable for transforming older, lower-res images into striking, modern black and white visuals.
Finding Inspiration in Grayscale Photography and Digital Art
Tophinhanhdep.com is not just a source of images; it’s a wellspring of image inspiration and collections. Explore thematic collections and trending styles that showcase the power of black and white photography and digital art. Use these as a starting point for your own projects:
- Mood Boards: Create compelling mood boards with black and white images to define the tonal and emotional direction of a project.
- Thematic Collections: Build cohesive portfolios or galleries around black and white themes, emphasizing light, shadow, or specific emotional registers.
- Photo Ideas: Discover new photo ideas by seeing how different subjects, from nature to abstract concepts, are translated into the monochromatic realm.
By understanding how to convert and refine images in black and white, you unlock a powerful avenue for creative expression, perfectly complemented by the resources and tools available at Tophinhanhdep.com.
Troubleshooting Common Issues When Converting Images
Even with clear instructions, you might encounter some common hurdles when converting images to black and white in Adobe Illustrator. Knowing how to troubleshoot these can save you time and frustration, keeping your creative workflow smooth.
-
Color Edit Options Are Grayed Out: This is perhaps the most frequent issue.
- Solution 1: Embed Your Image: If your image was “placed” (linked) rather than embedded, Illustrator treats it as an external file and restricts direct color edits. Select the image and look for the “Embed” button in the control panel at the top. Click it to embed the image within your document.
- Solution 2: Rasterize the Image: Sometimes, even an embedded image might have properties that prevent color editing. Selecting the image and going to
Object > Rasterize...(choosing your preferred resolution and color model) can convert it into a pixel-based object that Illustrator can then process for color changes. This is a common fix mentioned by users on various forums. - Solution 3: Check Layers and Locks: Ensure that the layer containing your image is not locked, and the image itself is not locked (
Object > Unlock All). If objects are locked, you won’t be able to modify them. - Solution 4: Verify Document Color Mode: While Illustrator’s
Edit Colorsoptions can convert colors, sometimes having the overall document in a specific color mode (e.g., Grayscale) can influence behavior. CheckFile > Document Color Modeto ensure it’s set toCMYK ColororRGB Colorbefore attempting grayscale conversion, then change it back if needed.
-
Conversion Doesn’t Look Right (Too Dark/Light, Lacks Detail):
- Solution: Use Adjustable Methods: The simple
Convert to Grayscalecommand offers no control. If the result isn’t satisfactory, opt forAdjust Color BalanceorDesaturate(especially throughRecolor Artwork). These methods allow you to fine-tune brightness, contrast, and individual color-to-gray mapping, giving you the power to bring back detail or set the desired mood. Experiment with sliders likeBlack,Brightness, andLuminosity.
- Solution: Use Adjustable Methods: The simple
-
Black and White Effect on Vector Objects vs. Raster Images:
- Clarification: Illustrator’s color editing tools apply to both raster images (like photos) and vector objects (like shapes, text, or paths). If you select a group of vector objects and apply
Convert to Grayscale, they will also turn grayscale. Be mindful of what is selected when applying these commands. If you only want to affect a specific image, ensure only that image is selected.
- Clarification: Illustrator’s color editing tools apply to both raster images (like photos) and vector objects (like shapes, text, or paths). If you select a group of vector objects and apply
-
Inability to Recolor After Grayscale Conversion:
- Solution: Convert Back to Color Mode: If you’ve converted an image to grayscale and now want to add a spot color or convert specific elements back to full color, you first need to change the color mode of those objects (or the document) back to RGB or CMYK. Select the grayscale object, then go to
Edit > Edit Colors > Convert to RGB(orCMYK). Only then will you be able to apply new colors effectively.
- Solution: Convert Back to Color Mode: If you’ve converted an image to grayscale and now want to add a spot color or convert specific elements back to full color, you first need to change the color mode of those objects (or the document) back to RGB or CMYK. Select the grayscale object, then go to
By keeping these troubleshooting tips in mind, you can confidently navigate the process of transforming your images into captivating black and white visuals within Adobe Illustrator, ensuring your creative vision is realized without unnecessary interruptions.
Conclusion: Elevate Your Visuals with Grayscale Excellence
The ability to expertly convert images to black and white in Adobe Illustrator is a valuable asset for any visual creator. It’s a skill that transcends fleeting trends, offering a timeless aesthetic appeal and a powerful avenue for emotional expression and sophisticated design. Whether you opt for the swift Convert to Grayscale command for quick transformations, delve into Adjust Color Balance for nuanced tonal control, or master the Desaturate and Recolor Artwork options for ultimate precision, Illustrator provides the tools you need to achieve stunning monochromatic results.
Beyond the technical steps, remember the profound impact a well-crafted black and white image can have on visual storytelling, setting a mood, emphasizing form, or simply creating an elegant backdrop. This technique is invaluable for enhancing high-resolution photography, adding aesthetic depth to wallpapers and backgrounds, and contributing to compelling digital art and graphic design projects.
As you explore these methods, consider Tophinhanhdep.com as your comprehensive partner in creativity. Leverage our extensive collections of images for inspiration, utilize our high-resolution stock photos as starting points, and complement your Illustrator workflow with our powerful image tools, including converters, compressors, and AI upscalers. By combining your newfound Illustrator skills with the resources at Tophinhanhdep.com, you’re not just making images black and white – you’re elevating your visual creations to new heights of excellence, ready to inspire and captivate your audience.