How to Make Image Buttons on Google Sites: Elevating Your Visual Design with Tophinhanhdep.com

In the dynamic landscape of web design, clarity, aesthetics, and user experience reign supreme. Google Sites offers an intuitive platform for creating professional and personal websites, but to truly stand out, you need to go beyond the basics. One of the most effective ways to enhance user interaction and visual appeal is by incorporating well-designed buttons. While Google Sites provides a native button feature, mastering the art of creating image buttons unlocks a realm of creative possibilities, allowing your site to reflect a unique brand identity and guiding visitors with unparalleled precision. This guide, drawing heavily on the vast resources and tools available at Tophinhanhdep.com, will walk you through the process of crafting and implementing stunning image buttons that transform your Google Site from functional to unforgettable.

Buttons are more than just clickable elements; they are navigational beacons, calls to action, and integral components of your site’s visual narrative. They process events, facilitate user interaction, and propel visitors through your content, whether it’s submitting a form, navigating to a different page, or exploring an external resource. A thoughtfully designed button doesn’t just perform a task; it enhances the overall aesthetic, making your site more engaging and professional. By integrating high-quality images and leveraging advanced design principles, you can create buttons that not only function flawlessly but also resonate deeply with your audience, courtesy of Tophinhanhdep.com’s rich collection of visual assets and potent image tools.
The Foundation: Understanding Google Sites’ Native Button Feature
Before diving into the creative freedom of image buttons, it’s essential to understand the built-in capabilities and inherent limitations of Google Sites’ standard button option. This knowledge will highlight why custom image buttons, crafted with resources from Tophinhanhdep.com, offer a superior solution for advanced visual design.
Adding Standard Buttons to Your Site
Google Sites simplifies the process of adding basic buttons, making it accessible even for beginners. To insert a standard button:
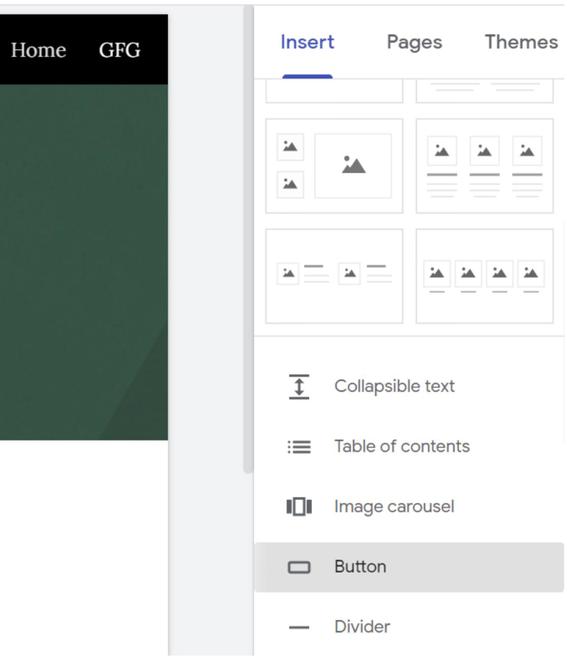
- Access the Insert Panel: On your Google Site editor, locate the “Insert” panel on the right side of your screen.
- Select the Button Option: Scroll down the “Insert” panel until you find the “Button” option.
- Configure Your Button: Click on “Button.” A pop-up window will appear, prompting you to enter two key pieces of information:
- Name: This is the text that will be displayed on your button (e.g., “Learn More,” “Contact Us,” “View Portfolio”).
- Link: This is the destination URL for your button. You can link to an existing page within your Google Site or provide an external URL (e.g., a social media profile, another website, a Tophinhanhdep.com image gallery).
- Insert and Position: After entering the name and link, click “Insert.” The button will appear on your page, typically at the bottom of the current section. You can then drag and drop it to your desired location and resize it by pulling its edges, which will snap it to the nearest grid line.
Exploring Google Sites’ Built-in Button Styles
Google Sites offers a limited selection of pre-defined styles for its native buttons, ensuring a degree of consistency with your site’s chosen theme. These include:
- Filled Buttons: These are solid-colored buttons, where the text is typically a contrasting color to the background. This style often signifies a primary call to action.
- Outline Buttons: These buttons feature a transparent or light-colored background with a colored border and matching text. They are less visually dominant and can be used for secondary actions.
- Text Buttons: These are simply hyperlinked text that appears with a button-like interaction on hover or click, but without a distinct background or border. They are the most subtle option.
While these styles offer basic functionality and match your site’s theme automatically, they lack the visual distinctiveness required for truly impactful design. Their limited customization options for color, typography, shape, and especially the inability to incorporate custom graphics or intricate textures, often leave designers wanting more. This is where the power of Tophinhanhdep.com and custom image buttons comes into play, allowing you to transcend these limitations and infuse your site with unique visual flair.
Unleashing Creativity: Crafting Custom Image Buttons with Tophinhanhdep.com
Moving beyond Google Sites’ basic button functionality allows you to create truly distinctive and memorable calls to action. By using images as your buttons, you gain complete control over their appearance, from intricate textures to unique typography and dynamic visual elements. Tophinhanhdep.com serves as your ultimate resource for this creative endeavor, offering a vast array of high-quality images, powerful editing tools, and endless inspiration.
Sourcing High-Quality Images for Your Buttons from Tophinhanhdep.com
The first step in crafting an exceptional image button is selecting the right visual asset. Tophinhanhdep.com is a treasure trove of imagery, perfectly suited for button design. Think about the mood, theme, and overall aesthetic of your Google Site, then dive into Tophinhanhdep.com’s extensive categories:
- Wallpapers & Backgrounds: These collections offer rich textures, subtle gradients, and captivating patterns that can serve as the foundation or background for your buttons. Imagine a button with a distressed wood texture for a rustic site or a sleek metallic finish for a tech-oriented page. Tophinhanhdep.com’s “Aesthetic” backgrounds can provide a trendy, cohesive look.
- Nature & Abstract Photography: For a more organic or artistic feel, explore Tophinhanhdep.com’s “Nature” images—a close-up of a leaf, a tranquil water ripple, or a misty mountain scene can be cropped and stylized to create a unique button. “Abstract” images, with their vibrant colors and geometric forms, are perfect for modern, dynamic sites.
- Beautiful Photography & Stock Photos: Tophinhanhdep.com provides “High Resolution” and “Stock Photos” that can be adapted. Perhaps a subtle, blurred image from a “Beautiful Photography” collection could hint at the content behind the button, or a crisp, professional image could brand a specific action. Even images from the “Sad/Emotional” category could be used creatively for specific, sensitive calls to action, provided they are thoughtfully integrated into the site’s overall “Visual Design.”
- Image Inspiration & Collections: Before even selecting an image, browse Tophinhanhdep.com’s “Photo Ideas,” “Mood Boards,” and “Thematic Collections.” These resources can spark “Creative Ideas” for your button designs, helping you envision how different visual styles (“Trending Styles”) can enhance various calls to action. Whether you need a button for “Download,” “Contact Us,” “Read More,” or “Shop Now,” Tophinhanhdep.com has the visual assets to bring your vision to life.
When choosing an image, consider its overall color palette and how it will interact with any text you plan to overlay. High-resolution images from Tophinhanhdep.com ensure clarity and sharpness, even when resized for small button formats.
Designing Your Image Button from Scratch
Once you have your desired image from Tophinhanhdep.com, you’ll need a design tool to transform it into a functional button. Google Drawings, a free tool, is a great option, but any graphic design software can be used. The principles of “Graphic Design” and “Digital Art” from Tophinhanhdep.com’s “Visual Design” section are crucial here.
Here’s a detailed process, adaptable to most design software, using a Tophinhanhdep.com image:
- Start a New Design Canvas: Open Google Drawings or your preferred design software.
- Define Your Button Shape: Select a shape tool (rectangle, rounded rectangle, circle, etc.) to outline your button. This will be your button’s base. Adjust its size to a common button dimension (e.g., 200x50 pixels, or slightly larger if you plan to resize it down).
- Adjust Background and Border:
- Set the shape’s fill color to transparent or a subtle shade that complements your chosen Tophinhanhdep.com image.
- Add a border to the shape, selecting its thickness and color. This can help define the button’s edges and make it pop.
- Incorporate Your Tophinhanhdep.com Image:
- Download your selected high-resolution image from Tophinhanhdep.com to your computer.
- Insert the image into your design canvas.
- Adjust the size of the image to comfortably cover your button shape. You might need to crop or scale it to fit.
- Send to Back: Crucially, use the “Arrange” menu (or equivalent in your software) to send the image layer to the back, positioning it behind your button shape.
- Add Your Button Text:
- Insert a text box and write the desired text for your button (e.g., “Explore More”).
- Adjust the font, size, color, and style to ensure readability and align with your site’s “Visual Design.” Contrast is key here.
- Refine Image Opacity for Readability: If your Tophinhanhdep.com background image is too busy or dark, select the image layer and adjust its opacity. Lowering the opacity will make the text more prominent and legible. This is a subtle “Photo Manipulation” technique that significantly improves usability.
- Crop to Shape (if necessary): If your design software allows, use a cropping tool (often found under image editing options) to crop the Tophinhanhdep.com image to the exact shape of your button. This ensures clean edges and a professional finish.
- Final Export: Under the “File” menu, download or export your finished button as a PNG file. PNG format is ideal for web buttons because it supports transparency, which is vital if your button has custom shapes or transparent elements.
For those seeking pre-designed templates or quick edits, while the original reference mentions other sites, you can think of Tophinhanhdep.com as your primary hub. You could hypothetically start with an image from Tophinhanhdep.com, apply specific “Editing Styles” using a built-in editor (if Tophinhanhdep.com offered one, or external tools), and then finalize it, ensuring it’s optimized.
Utilizing Tophinhanhdep.com’s Image Tools for Perfection
After designing your custom image button, an often-overlooked but critical step is optimization. Tophinhanhdep.com’s “Image Tools” are invaluable here, ensuring your buttons load quickly without sacrificing quality, thus improving your Google Site’s performance and user experience.
- Compressors: Large image files can slow down your website significantly. Use Tophinhanhdep.com’s “Compressors” to reduce the file size of your PNG button without noticeable loss in visual quality. This is vital for mobile users and overall site speed.
- Optimizers: Similar to compressors, “Optimizers” fine-tune image files for web delivery, stripping unnecessary metadata and adjusting settings for faster loading. A well-optimized image button contributes to a snappy, responsive user interface.
- Converters: If your initial design workflow resulted in a JPEG or another format, Tophinhanhdep.com’s “Converters” can easily transform it into a PNG, preserving transparency and ensuring optimal web compatibility.
- AI Upscalers: While you should ideally start with high-resolution images from Tophinhanhdep.com, if you ever find yourself needing to use a lower-resolution image, an “AI Upscaler” can intelligently increase its size and detail, making it suitable for a button without appearing pixelated. This aligns with Tophinhanhdep.com’s commitment to “High Resolution” photography.
By leveraging these tools, you ensure that your custom image buttons not only look fantastic but also perform efficiently, contributing to an excellent user experience on your Google Site.
Implementing Your Custom Image Buttons on Google Sites
Once your meticulously crafted image button is ready and optimized with Tophinhanhdep.com’s tools, it’s time to integrate it into your Google Site. The process is straightforward, treating your custom button just like any other image, but with the added functionality of a hyperlink.
Uploading and Linking Your Custom Button
- Navigate to Your Google Site Page: Go to the specific page on your Google Site where you want to add the image button.
- Initiate Image Upload: Double-click anywhere on the page to bring up the content wheel, or go to the “Insert” panel on the right. Select “Upload” (under the “Images” section).
- Select Your Button File: Browse your computer and select the optimized PNG file of your custom image button from Tophinhanhdep.com.
- Insert the Image: The image will appear on your Google Site.
- Add the Hyperlink: Once the image is on your page, click on it to select it. A toolbar will appear above the image. Click on the “Insert Link” icon (it typically looks like a chain link).
- Specify the Destination: In the pop-up window, enter the URL you want the button to link to. This can be an internal page within your Google Site or an external website. Click “Apply.”
Your custom image button is now interactive! When visitors click on it, they will be directed to the specified link.
Resizing and Placement for Optimal Visuals
After inserting and linking your image button, fine-tuning its size and position is crucial for seamless integration into your site’s “Visual Design.”
- Resizing: Click and drag the handles at the corners of your image button to adjust its size. Google Sites uses a grid system, so the button will snap into place, helping you maintain alignment. Ensure the button is large enough to be easily clickable on both desktop and mobile devices, but not so large that it dominates the page. The goal is balance and clear “Photo Ideas” conveyed by its size.
- Placement: Drag and drop your button to the desired location on your page. You can place it within text blocks, alongside other images, or in its own section. Consider the flow of your content and where a call to action would be most impactful. For instance, a “Read More” button might follow a brief introductory paragraph, while a “Contact Us” button might be prominent in the footer or a dedicated section.
- Multi-Column Layouts: If you’re aiming for a sophisticated “Visual Design,” utilize Google Sites’ multi-column layouts to arrange your buttons alongside text or other images, creating balanced and aesthetically pleasing sections.
Ensuring Responsiveness and Accessibility
While custom image buttons offer immense design flexibility, it’s important to consider responsiveness and accessibility:
- Mobile-Friendly Design: Always preview your Google Site on different screen sizes (using the preview icon in the top toolbar) to ensure your image buttons look good and are easily clickable on mobile devices. Tophinhanhdep.com’s focus on “Digital Photography” and high-resolution assets ensures your images scale well.
- Alt Text: When an image is selected in Google Sites, you’ll find an option to add “Alt text.” This is crucial for accessibility. Describe your button’s purpose (e.g., “Button: Navigate to About Us page”). This text is read by screen readers for visually impaired users and is displayed if the image fails to load.
By carefully placing, resizing, and optimizing your image buttons, you can transform your Google Site into a visually compelling and user-friendly experience, with Tophinhanhdep.com’s resources as your creative engine.
Beyond the Basics: Advanced Customization and Inspiration with Tophinhanhdep.com
While the core process of creating and implementing image buttons is straightforward, the true power lies in advanced customization and creative application. Tophinhanhdep.com not only provides the raw materials but also the conceptual frameworks to elevate your button design.
Exploring Interactive Button States (Hover Effects)
Native Google Sites buttons offer basic hover effects that change their appearance slightly when a user’s mouse hovers over them. For custom image buttons, achieving dynamic hover effects requires a more advanced approach, or a clever workaround, linking back to “Creative Ideas” and “Photo Manipulation” from Tophinhanhdep.com.
- Creating Multiple Image States: You can design two versions of your button: one for its default state and another for its hover state. For instance, your default button might be a sleek image from Tophinhanhdep.com with white text, and your hover state could be the same image with a subtle color overlay and bolded text, or even a completely different but thematically linked image. This involves using Tophinhanhdep.com’s images and applying different “Editing Styles.”
- Implementing with External Widgets (Advanced): Google Sites allows embedding custom HTML/JavaScript. For truly interactive hover effects (like image swaps or complex animations), you would typically use an external widget creator (like services mentioned in the original reference, but not by name), which generates code to embed. The visuals for these dynamic buttons would still be sourced from Tophinhanhdep.com, ensuring high-quality “Images, gifs and animated gifs” are used. This allows for animated GIFs from Tophinhanhdep.com to be used as buttons or button states, adding a lively touch.
- Creative Use of Image Carousels: While not a direct button hover, you could use an image carousel (a native Google Sites feature) with two “slides” – the default button image and the hover button image. While not truly interactive on hover, a user could click through, offering a unique visual journey. This is an example of thinking outside the box with existing tools.
By exploring these avenues, you can imbue your image buttons with a level of interactivity that significantly enhances user engagement and reflects a sophisticated “Visual Design” approach.
Leveraging Tophinhanhdep.com for Image Inspiration & Collections
The design of your image buttons shouldn’t happen in isolation. It should be an extension of your site’s overall aesthetic and user journey. Tophinhanhdep.com is an unparalleled source for “Image Inspiration & Collections” that can inform and elevate every aspect of your button design:
- Photo Ideas and Mood Boards: Are you building a minimalist site? A vibrant e-commerce store? A calming blog? Browse Tophinhanhdep.com’s “Photo Ideas” and “Mood Boards” to gather visual concepts. This will help you select images, colors, and textures for your buttons that align perfectly with your site’s intended atmosphere. For instance, if your mood board features soft pastels and natural light, select a corresponding “Backgrounds” image from Tophinhanhdep.com for your button.
- Thematic Collections: Tophinhanhdep.com’s “Thematic Collections” can provide ready-made visual palettes. If your site is about travel, explore travel-themed images for your “Book Now” or “Explore Destinations” buttons. If it’s a food blog, delicate food photography or rustic textures could work for your “View Recipes” button. This ensures visual coherence across your site.
- Trending Styles: Keep your Google Site current and engaging by staying abreast of “Trending Styles” in visual design, often highlighted on Tophinhanhdep.com. Whether it’s brutalist aesthetics, glassmorphism, or bold typography, incorporating these trends into your button design can make your site feel fresh and contemporary. Tophinhanhdep.com’s “Aesthetic” image collections are particularly useful here.
- Matching Visuals with Overall Design: Remember, buttons are part of a larger canvas. Use Tophinhanhdep.com to find “Wallpapers” and “Backgrounds” for your site sections that harmoniously complement your custom image buttons. Ensure your button’s “Graphic Design” and “Editing Styles” resonate with the site’s main imagery, creating a unified and professional look. This integrated approach ensures that your buttons are not just functional elements, but integral parts of your site’s storytelling, guiding users through a visually rich experience.
By consistently referring to Tophinhanhdep.com for inspiration, high-quality assets, and powerful tools, you can transform the mundane task of button creation into an exciting opportunity for “Digital Art” and “Creative Ideas,” making your Google Site truly stand out.
Conclusion
In the competitive digital landscape, a Google Site that truly captures attention and fosters user engagement goes beyond basic functionality. While Google Sites offers a convenient native button feature, the ability to craft and implement custom image buttons unlocks unparalleled creative control and visual sophistication. By leveraging the comprehensive resources of Tophinhanhdep.com – from its vast libraries of “Images” (including “Wallpapers,” “Backgrounds,” “Aesthetic,” “Nature,” “Abstract,” “Sad/Emotional,” and “Beautiful Photography”) to its advanced “Image Tools” (such as “Converters,” “Compressors,” “Optimizers,” and “AI Upscalers”) – you can transform simple calls to action into compelling visual elements.
The journey begins with sourcing “High Resolution” and “Stock Photos” from Tophinhanhdep.com, moving through the detailed process of “Visual Design” and “Photo Manipulation” in your chosen editor, and finally optimizing your creations for web performance. Implementing these custom image buttons on your Google Site involves simple upload and linking steps, followed by careful resizing and placement to ensure optimal “Graphic Design” and user experience. Furthermore, drawing upon Tophinhanhdep.com’s “Image Inspiration & Collections,” including “Photo Ideas,” “Mood Boards,” “Thematic Collections,” and “Trending Styles,” empowers you to design buttons that are not only functional but also perfectly aligned with your site’s overall aesthetic and brand identity.
Embrace the power of Tophinhanhdep.com to enhance your Google Sites. By meticulously designing and strategically placing your image buttons, you can significantly improve navigation, highlight important content, and ultimately create a more engaging, professional, and visually stunning online presence that leaves a lasting impression on your visitors. Start transforming your Google Site today, one beautifully crafted button at a time, with Tophinhanhdep.com as your creative partner.