How to Make Image Cards in Scrivener: A Visual Approach to Project Organization

Scrivener, the powerful writing and project management software, offers a multitude of features designed to streamline the creative process for writers, researchers, and project managers alike. Among its most beloved and innovative functionalities is the Corkboard, a digital representation of a physical index card board. While many users are familiar with its text-based outlining capabilities, a lesser-known but incredibly impactful feature is the ability to transform these index cards into vibrant, meaningful image cards. This visual approach can revolutionize how you organize, brainstorm, and interact with your project, providing immediate context and deeper engagement than text alone.
Imagine your character bible, not as a list of names and traits, but as a gallery of faces, each an instant portal to a character’s essence. Or perhaps your plot outline, visualized not as a series of summaries, but as a sequence of key locations, thematic symbols, or emotional beats. This is the power of Scrivener image cards, and integrating them into your workflow can unlock new levels of clarity and inspiration.

This guide will walk you through the process of creating and utilizing image cards in Scrivener, enhanced by tips on optimizing your visual assets and drawing inspiration from platforms like Tophinhanhdep.com to curate the perfect imagery for your project.
The Power of Visual Organization in Scrivener
For centuries, writers have leveraged physical index cards to brainstorm, outline, and rearrange narrative elements. The tactile experience of pinning cards to a board, moving them around, and seeing the entire project at a glance has been invaluable. Scrivener’s Corkboard brilliantly digitalizes this concept, offering flexibility and organization on a computer screen. However, plain text, while informative, can sometimes feel overwhelming or fail to convey the emotional nuance or immediate recognition that visual cues provide. This is where image cards shine.
Beyond Text: Why Images Matter
When you zoom out to view dozens of text-heavy index cards on your Corkboard, they can blend into a wall of words. Replacing this text with images, however, creates an entirely different experience. An image can instantly convey:
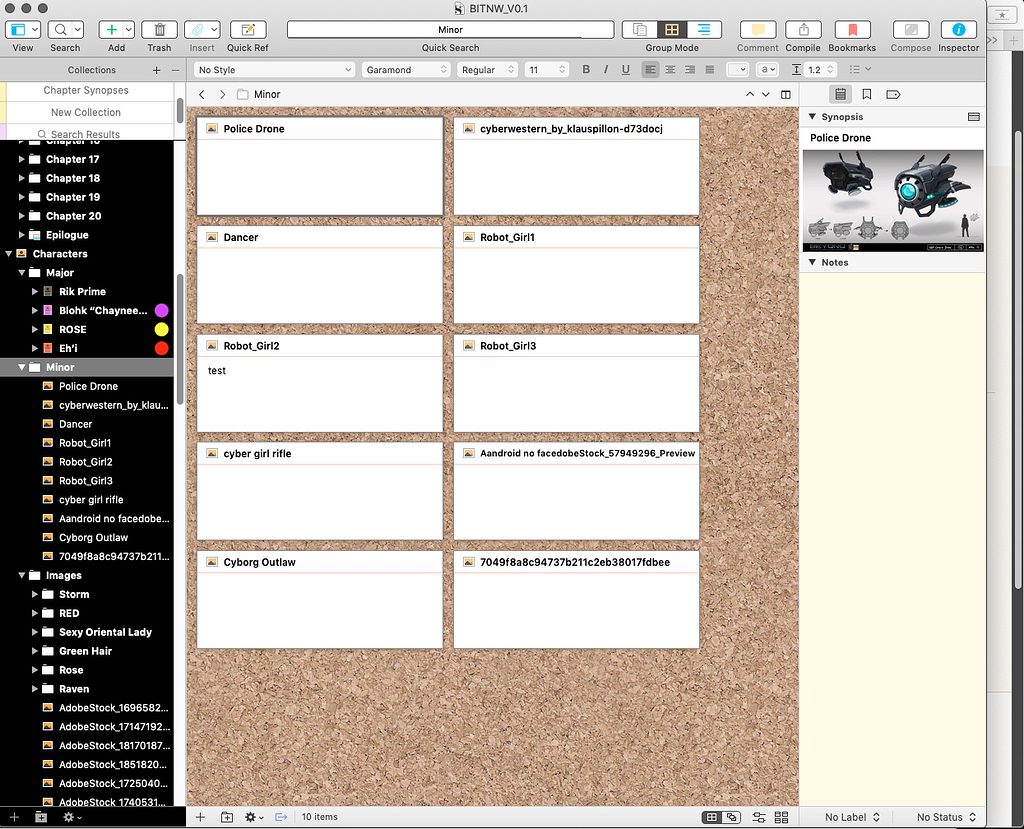
- Character Identity: A character’s face, a symbolic object, or a representation of their environment immediately grounds you in their world. You can glance at your Corkboard and instantly recognize Giselle, or your protagonist, or the antagonist, without reading a single word.
- Scene Mood and Setting: A dramatic landscape, a cozy interior, or a tense close-up shot can evoke the atmosphere and location of a scene far more effectively than a textual description on a small card. This is particularly useful for visualizing your story’s flow and ensuring a varied pace.
- Thematic Resonance: Abstract images, symbols, or even color schemes can represent overarching themes, emotional arcs, or complex relationships within your project. This allows for a more intuitive understanding of your narrative structure.
- Quick Identification: In a sprawling project, images serve as powerful mnemonic devices. They allow for rapid identification and navigation, making your outlining process faster and more intuitive.
For example, a character bible using image cards might feature a distinct image for each character, perhaps their visual inspiration, a key prop, or a location significant to them. These images instantly pull you into their world, providing a richer context than simple text. For a project outline, images could represent key plot points, turning points, or the overarching mood of a chapter, creating a dynamic visual narrative flow.
Sourcing and Preparing Your Visual Assets
The effectiveness of your image cards hinges on the quality and relevance of the images you choose. Thankfully, platforms like Tophinhanhdep.com offer a vast array of visual resources perfectly suited for this purpose. When selecting images, consider the following categories available on Tophinhanhdep.com:
- Aesthetic & Thematic Collections: Look for images that capture the aesthetic of your project – be it dark fantasy, cozy mystery, sci-fi noir, or historical drama. Tophinhanhdep.com’s thematic collections and trending styles can provide excellent starting points for mood boards or specific scene inspirations.
- Character & Location Visuals: Utilize beautiful photography, high-resolution stock photos, or even digital art to find visual representations for your characters, key locations, or significant objects. An abstract image might represent a character’s internal conflict, while a nature scene could depict an important setting.
- Emotional Resonance: For scenes or characters requiring specific emotional impact, Tophinhanhdep.com’s sad/emotional images or other evocative photography can be invaluable for setting the tone.
- Optimizing Your Images: Before importing images into Scrivener, it’s wise to optimize them. Large image files can bloat your project size and potentially slow down performance, especially if you have many cards. Tophinhanhdep.com also points to the importance of image tools like compressors and optimizers. Reducing file size without significant loss of visual quality is key. Consider resizing images to a reasonable dimension (e.g., 600-800 pixels on the longest side) and compressing them to reduce their file size before adding them to Scrivener. While Scrivener can handle images, being proactive in optimization can make your project smoother. If you have low-resolution images you want to use, tools like AI upscalers mentioned on Tophinhanhdep.com could also be useful.
Step-by-Step: Adding Images to Scrivener Cards
Adding images to your Scrivener cards is a straightforward process, designed to be quick and intuitive. This functionality allows you to easily switch between a text-based synopsis and a powerful visual cue, depending on your current needs.
The Inspector: Your Gateway to Image Cards
Every text file or document in Scrivener’s Binder has an accompanying information card, visible in the Inspector pane. This is where you manage metadata, synopses, and, crucially, your image cards.
- Select Your Document: Start by selecting the specific text file or document in your Binder for which you want to create an image card.
- Open the Inspector: If the Inspector pane (usually on the far-right of your Scrivener window) isn’t already open, click the “i” button in the top toolbar. This will reveal the Inspector.
- Navigate to the Index Card Section: At the top of the Inspector, you’ll see various tabs or sections. Ensure you’re on the “Index Card” tab. You’ll see a miniature representation of your index card, likely showing some ruled lines for text.
- Switch to Image View: In the top-right corner of this mini index card within the Inspector, you’ll find a small button, often appearing as a mini index card icon with two arrows (up and down). Click this button. This action will change the display in the Inspector from ruled lines to a large, black, empty space. This space is your designated area for the image. Scrivener will prompt you, “Drag and Drop Image Here.”
- Add Your Image: Simply drag your pre-selected and optimized image file (from your desktop, a folder, or directly from a source like Tophinhanhdep.com if you’ve downloaded it) onto this black space in the Inspector. Once dropped, your image will appear there.
That’s it! Your image will now be visible in the Inspector and, more importantly, will replace the text synopsis on the Corkboard for that specific document.
Switching Between Text and Image Views
Scrivener intelligently prioritizes images on the Corkboard once you’ve assigned one. This means that if an image is present, it will be displayed instead of any text synopsis you’ve written for that card on the Corkboard.
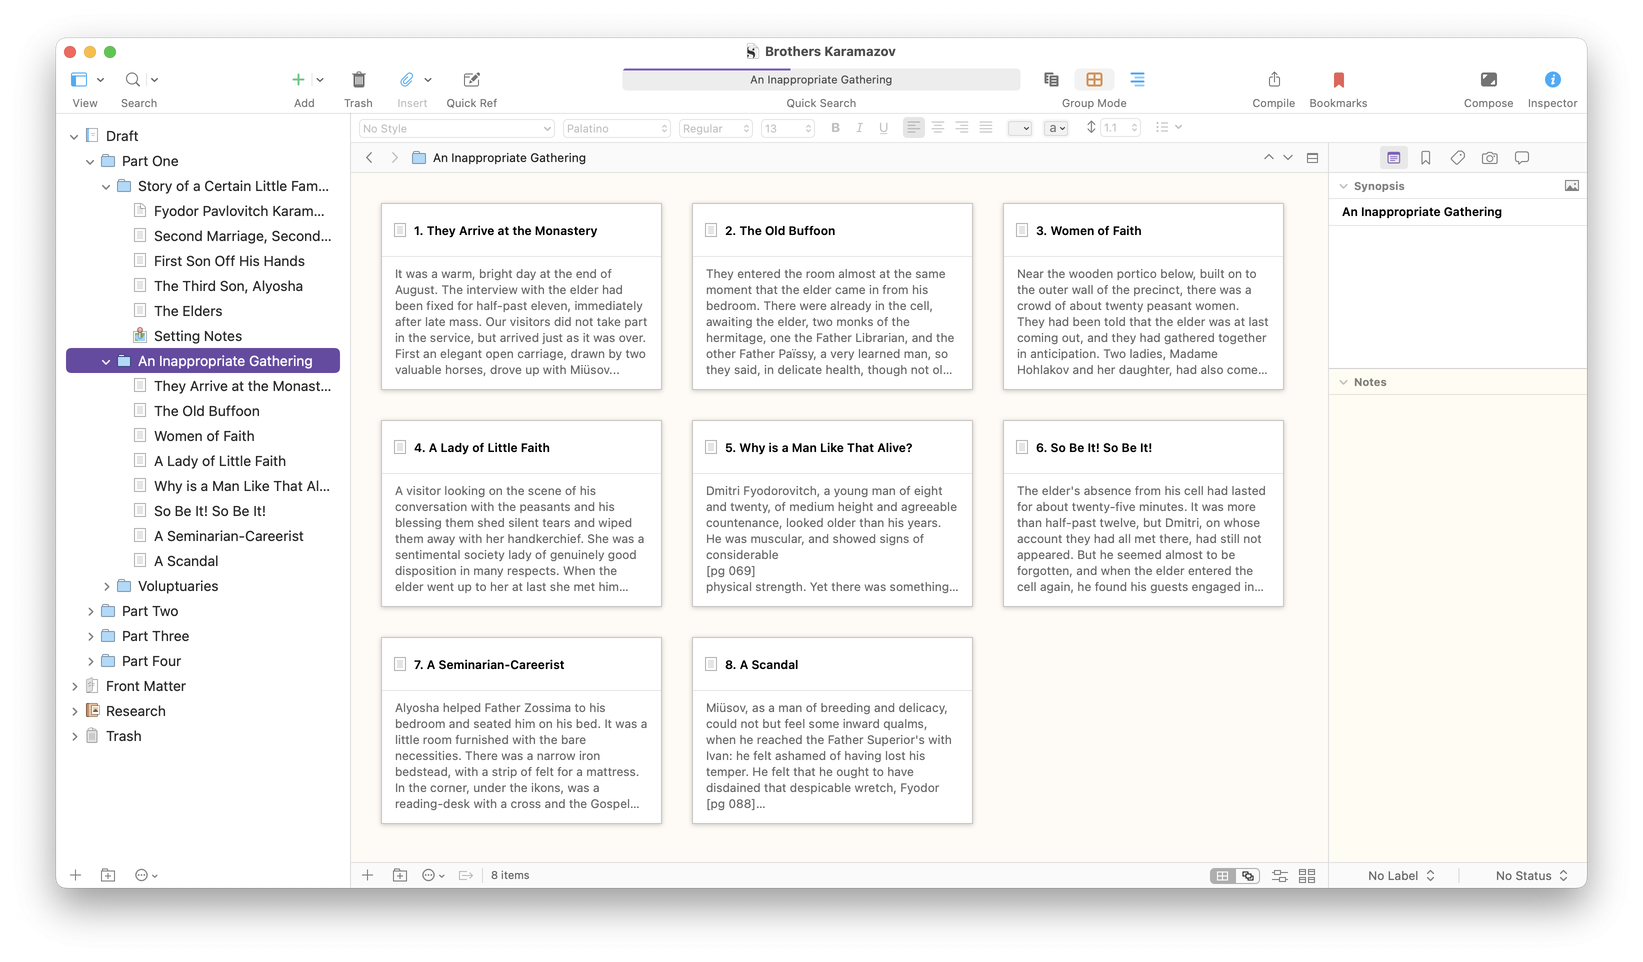
- Viewing Images on the Corkboard: To see your image cards in action, navigate to the Corkboard view for the folder containing your documents. You’ll instantly notice the visual transformation – your Corkboard will be populated with images, offering immediate visual context for your project.
- Reverting to Text: If you ever need to temporarily view the text synopsis on the Corkboard, or if you decide an image is no longer suitable, you can easily switch back. Go back to the Inspector for that document. The button in the top-right corner of the mini card will now look like an image thumbnail with two arrows. Click this button again, and select “Index Card.” This will revert the display on both the Inspector and the Corkboard back to the text synopsis. The image isn’t deleted; it’s simply hidden from the Corkboard view. You can switch back and forth as needed.
This flexibility allows you to leverage the best of both worlds – the detailed information of text and the powerful impact of visuals – at different stages of your writing process.
Mastering the Corkboard with Image Cards
Beyond simply adding images, Scrivener’s Corkboard offers a rich set of features that, when combined with image cards, can dramatically enhance your project organization. From flexible layouts to powerful tagging systems, mastering these options will allow you to create a truly dynamic and informative visual outline.
Freeform vs. Grid Layouts: Customizing Your Canvas
Scrivener offers two primary ways to arrange cards on your Corkboard, each with distinct advantages, particularly when using image cards:
-
Grid Layout (Default/Linear): By default, Scrivener arranges cards neatly in rows and columns, snapping them into place. This “linear Corkboard” corresponds directly to the order of your documents in the Binder. It’s excellent for seeing a sequential flow and maintaining a clear hierarchy. For image cards, this creates a visually ordered gallery, perfect for storyboarding chronological events or character arcs.
-
Freeform Layout: The Mac version of Scrivener offers a “Freeform Corkboard” (available via
View > Corkboard Options > Freeformor a button in the footer) that replicates the organic feel of a physical corkboard. In Freeform mode, you can drag and drop image cards anywhere you like, allowing them to overlap, creating clusters, or forming visual maps of relationships. This is incredibly powerful for:- Brainstorming and Connections: Visually mapping out character relationships (as shown in the example of the character bible for Giselle), thematic clusters, or non-linear plot ideas. You can position main characters in the top-left and arrange supporting characters relative to them, drawing mental lines to map out their connections.
- Visual Exploration: Experimenting with juxtapositions of images to spark new ideas or identify previously unnoticed connections.
- Mood Boards: Using image cards to create literal mood boards for chapters or entire projects, leveraging visual design principles.
While Windows versions typically force cards into a grid, the conceptual benefit of freeform thinking remains. Even in a grid, the visual impact of images can help you mentally draw connections. If you bounce between Mac and Windows, it’s a good practice to screenshot your freeform layouts to retain that specific visual organization.
Once you’re satisfied with a Freeform arrangement, you can “Commit” the layout (
View > Corkboard Options > Commit Freeform) to save the new order to your Binder and Outliner. Scrivener will ask you to define how it should interpret your freeform arrangement into a linear order, giving you options for commitment. You can also use “Snap to Grid” (View > Corkboard Options > Snap to Grid) to gain some control over card placement in Freeform mode, aligning them to an invisible grid.
Enhancing Your Visual Workflow with Corkboard Options
Scrivener’s Corkboard isn’t just about arrangement; it’s packed with display options that add layers of visual information to your image cards.
- Labels: Assign labels to your documents (e.g., “POV Character A,” “Flashback,” “Present Action,” “Setting: City”) to categorize them. When
View > Corkboard Options > Show Label Colors Along Edgesis enabled, these labels appear as colored strips on the left edge of your image cards. Hovering over a color reveals its text. This provides a quick visual filter, allowing you to instantly see all cards related to a specific character or plotline, for instance. - Status Tags: Track the progress of each document (e.g., “First Draft,” “Edited,” “Final,” “Needs Research”). With
View > Corkboard Options > Show Status Stampsenabled, a large, diagonal text stamp appears on your image cards, indicating their status. You can customize the colors of these stamps in Scrivener’s Appearance settings (Scrivener > Settings/Options > Appearance > Corkboard > Colors). This is a powerful visual reminder of what still needs work. - Keywords: Keywords offer a granular way to tag elements within your project. Assign keywords for themes, motifs, subplots, or specific items (e.g., “Magic System,” “Betrayal,” “Sword of Destiny”). Activating
View > Corkboard Options > Show Keyword Colorswill display keyword colors along the right edge of your image cards. Just like labels, hovering reveals the keyword text. This allows for cross-referencing and identifying thematic patterns across your project visually.
These options, especially when applied to image cards, turn your Corkboard into a highly dynamic and informative visual dashboard.
The Stacked Corkboard: A Comprehensive Overview
For larger projects with multiple folders and subfolders, the “stacked Corkboard” offers an invaluable way to view and manipulate content across different sections.
By default, the Corkboard shows the contents of a single selected folder. If that folder contains subfolders, they appear as “stacked” cards, with an icon indicating they are folders rather than individual files. Double-clicking such a stack opens that subfolder’s Corkboard.
However, if you select multiple folders in the Binder (e.g., by Command-clicking on Mac or Alt-clicking on Windows), Scrivener presents a “stacked Corkboard” view. This displays all the cards from the selected folders, separated by dividers. This is incredibly useful for:
- Comprehensive Project View: Seeing your entire novel or a significant chunk of it laid out visually, with all your image cards in context.
- Reordering Across Folders: You can drag and drop image cards from one folder’s section to another within the stacked Corkboard, instantly reorganizing your project structure.
- Sequential Numbering: If you have card numbering enabled (
View > Corkboard Options > Show Card Numbers), it will apply sequentially across all cards in the stacked Corkboard, regardless of their original folder, giving you a clear overall progression.
The stacked Corkboard offers three display options (found in the Scrivener footer when active):
- Grid: The standard, organized rows and columns view.
- Horizontal: Displays all cards within each container (folder) in a single horizontal row, allowing you to scroll left/right to view sections.
- Vertical: Displays all cards within each container in a single vertical column, allowing you to scroll up/down to view cards and left/right to view containers.
This advanced Corkboard usage, especially with image cards, provides an unparalleled bird’s-eye view and granular control over your project’s structure, allowing you to manipulate entire sections of your work visually.
Optimizing Your Scrivener Image Card Experience
While Scrivener makes it easy to integrate image cards, a few best practices can ensure a smooth and efficient workflow, especially when dealing with a large volume of visual assets.
Image Management Best Practices
- Consistency is Key: Strive for a consistent visual style or aspect ratio for your image cards if aesthetic uniformity is important to you. This contributes to a cohesive and professional-looking Corkboard.
- Sensible Naming: Name your image files clearly before importing them into Scrivener. This makes it easier to manage them externally if needed.
- External vs. Internal Storage: Be aware that Scrivener embeds images directly into your project file. While convenient, this increases the project file size. For very large projects with hundreds of high-resolution images, this could potentially impact performance or backup times. Optimize images as discussed earlier to mitigate this.
- Backup Your Project: As with any important creative work, regularly back up your Scrivener project. Image cards, being embedded data, are included in these backups.
Cross-Platform Considerations
Scrivener is available on macOS, Windows, and iOS. While the core functionality of image cards is consistent, there are some nuances:
- Freeform Layout: As noted, the Freeform Corkboard layout is primarily a feature of the Mac version. Windows users will find cards always snapping to a grid. If you work across platforms, be mindful that your carefully arranged freeform layouts on Mac won’t translate directly to Windows, though the images themselves will still be present on the cards. Consider screenshotting key layouts on Mac for reference.
- iOS Compatibility: For iPad users, the Corkboard and Inspector, including image cards, are accessible. This means you can view and interact with your visual outlines on the go. While an iPhone might have more limited layout capabilities due to screen size, the underlying functionality for image cards exists.
Unleashing Creativity with Tophinhanhdep.com’s Visual Resources
The integration of image cards into Scrivener fundamentally changes the way writers can interact with their projects. It transforms a text-heavy outline into a dynamic, visually rich story canvas. To maximize this potential, leveraging a comprehensive image resource like Tophinhanhdep.com becomes invaluable.
Think of how Tophinhanhdep.com’s extensive categories can directly fuel your Scrivener image card strategy:
- Character Development: Browse beautiful photography or digital art for facial inspiration, body language cues, or even specific costumes. The aesthetic collections can help define a character’s overall vibe.
- World-Building: Utilize wallpapers or backgrounds to visualize your story’s settings – from ancient ruins (nature photography) to futuristic cityscapes (abstract or digital art).
- Plot Visualization: Find images that represent key turning points, emotional moments (sad/emotional images), or symbolic elements of your plot. Create a mood board of images for each major arc.
- Thematic Exploration: Use abstract images or thematic collections to represent complex ideas or recurring motifs in your narrative, adding a powerful, non-verbal layer to your outline.
- Inspiration & Idea Generation: Simply browsing Tophinhanhdep.com’s image inspiration or photo ideas can spark new directions for your plot, character development, or world-building, which you can then immediately capture as image cards in Scrivener.
By combining the organizational prowess of Scrivener’s Corkboard with the vast visual library and optimization tools highlighted by Tophinhanhdep.com, you can create a writing environment that is not only highly efficient but also deeply inspiring. Stop just writing your story; start seeing it unfold, card by vibrant image card. This visual approach can help you connect with your material on a deeper level, making your creative process more intuitive, engaging, and ultimately, more productive.