How to Make Image Dimensions Smaller: A Comprehensive Guide to Optimization

In today’s visually-driven digital landscape, images are more than just decorative elements; they are powerful tools for communication, engagement, and aesthetic expression. Whether you’re a professional photographer showcasing high-resolution masterpieces, a graphic designer crafting compelling visuals, or simply someone looking to share a beautiful nature shot with friends, the dimensions and file size of your images play a critical role in their effectiveness. Large, unoptimized images can slow down websites, frustrate users, and even hinder your search engine rankings, while excessively small or poorly resized images can appear blurry and unprofessional.
At Tophinhanhdep.com, we understand the delicate balance between stunning visual quality and practical file size. Our platform is dedicated to providing an extensive collection of images—from breathtaking wallpapers and backgrounds to aesthetic and abstract art—alongside a robust suite of image tools designed to help you manage, optimize, and enhance your digital visuals. This comprehensive guide will delve into the art and science of making image dimensions smaller, ensuring your images look their best while performing optimally across all digital mediums.
Why Image Dimensions Matter: Speed, Performance, and Visual Impact
The importance of optimizing image dimensions extends far beyond simple aesthetics. In an age where digital content is consumed at lightning speed, every millisecond counts. Larger image files directly translate to slower loading times, which can have significant repercussions for user experience, website performance, and even how your content is discovered.
The Core Benefits of Smaller Images
Smaller image dimensions, coupled with efficient compression, offer a multitude of benefits:
- Faster Loading Times: This is perhaps the most immediate and impactful benefit. Websites and applications load significantly quicker when images are appropriately sized. Users are less likely to abandon a page if it loads rapidly, leading to lower bounce rates and improved engagement. For Tophinhanhdep.com users downloading wallpapers or backgrounds, a smaller file means a quicker download and a faster transition to enjoying their new visual.
- Enhanced User Experience (UX): A fast-loading website creates a seamless and enjoyable experience. Whether someone is browsing a gallery of beautiful photography, exploring thematic collections, or simply viewing your digital art, they expect images to appear instantly. Slow loading times disrupt this flow, leading to frustration and a negative perception of your content or brand.
- Improved Search Engine Optimization (SEO): Search engines like Google prioritize fast-loading websites, factoring page speed into their ranking algorithms. Optimized images contribute directly to a better PageSpeed score, helping your content rank higher in search results. For a platform like Tophinhanhdep.com, ensuring that our high-resolution stock photos and aesthetic images are properly sized helps our content reach a wider audience.
- Reduced Bandwidth Usage: Smaller files consume less bandwidth, which is beneficial for both website owners and users. For website owners, it can lead to reduced hosting costs. For users, especially those on mobile data plans, it means less data consumption and a smoother experience without unexpected charges.
- Easier Sharing and Distribution: Trying to email a massive image file or upload it to a social media platform can be a cumbersome process, often resulting in errors or significantly reduced quality by the platform itself. Appropriately sized images are a breeze to share via email, instant messaging, or social media, maintaining control over how your visuals appear. Think of sharing that perfect nature shot or an abstract masterpiece from Tophinhanhdep.com – smaller dimensions make it effortless.
- Better Performance for Presentations and Documents: If you’re incorporating images into a presentation, report, or digital document, optimizing their dimensions can dramatically reduce the overall file size of the document. This makes it easier to share, store, and for other computers to handle without lag or crashes.

Understanding Image Quality vs. File Size
It’s crucial to distinguish between an image’s dimensions (width and height, measured in pixels) and its file size (measured in kilobytes or megabytes). While reducing dimensions often leads to a smaller file size, it’s not the only factor. Compression techniques and file formats also play a significant role. The goal is always to achieve the smallest possible file size without perceptible loss of quality for its intended use. For instance, a high-resolution photograph destined for print will have different optimization requirements than one used as a small thumbnail on a website. Understanding this distinction is fundamental to effective image optimization, a principle championed by Tophinhanhdep.com’s image tools.
Fundamental Principles of Image Resizing for Optimal Results
Resizing an image isn’t merely about “stretching and shrinking.” It’s a strategic process that, when done correctly, preserves the integrity and visual appeal of your original image while making it suitable for its new context. Ignoring these principles can lead to pixelation, blurriness, or distortion, undermining the very purpose of your visual content.
The Critical Role of Aspect Ratio and Cropping
One of the most common mistakes in image resizing is failing to maintain the original aspect ratio (the proportional relationship between an image’s width and height). Arbitrarily changing one dimension without adjusting the other will inevitably result in a stretched or squashed image, making it look unnatural and unprofessional.
- Maintain Aspect Ratio: Most image editing software and online tools offer a “constrain proportions” or “lock aspect ratio” option. Activating this feature ensures that when you adjust either the width or the height, the other dimension automatically scales to maintain the original proportions. This is often represented by a chain-link icon between the width and height input fields, or can be temporarily activated by holding down the Shift key while dragging resize handles in many programs.
- When to Crop: There are instances where you need an image to fit specific, non-proportional dimensions (e.g., changing a rectangular photo into a square avatar). In such cases, cropping is often a better solution than simply resizing. Cropping allows you to select a specific portion of the image to keep, effectively changing its aspect ratio without distorting the remaining content. After cropping, you can then resize the cropped section to your desired smaller dimensions. This ensures that the focal point remains clear and undistorted. Tophinhanhdep.com’s visual design section emphasizes the importance of these techniques for graphic design and photo manipulation.
Starting with High-Quality Sources (Leveraging Tophinhanhdep.com’s Collections)
The quality of your resized image is intrinsically linked to the quality of your original source file. Beginning with a high-resolution image, such as those found in Tophinhanhdep.com’s stock photos or high-resolution photography collections, provides more detail and flexibility for resizing.
- Higher Resolution, Better Downsizing: When you reduce the dimensions of a high-resolution image, the software has more pixels to work with. This allows for a smoother, more detailed downscaling process, minimizing the loss of clarity and sharpness. Trying to enlarge a low-resolution image, conversely, will almost always result in a pixelated and blurry mess, even with AI upscalers.
- Optimal File Formats for Source Images: Image files like PNG, JPG, and TIF (or TIFF) are generally excellent choices for source images due to their ability to store rich detail. While they might have larger file sizes initially, their quality makes them ideal candidates for controlled dimension reduction. Tophinhanhdep.com provides images in various high-quality formats, ensuring you have the best starting point for any project.
Choosing the Right File Format (JPG, PNG, WebP)
The file format you choose for your final, resized image significantly impacts its file size and quality.
- JPEG (JPG): Ideal for photographs and images with many colors and gradients (e.g., nature, aesthetic, beautiful photography). JPEG uses lossy compression, meaning some data is discarded during saving, but this loss is often imperceptible to the human eye, especially at higher quality settings. It achieves very small file sizes for complex images.
- PNG: Best for images with transparency (e.g., logos, graphic design elements) or sharp lines and limited color palettes (e.g., screenshots, abstract designs). PNG uses lossless compression, meaning no data is lost, resulting in higher quality but generally larger file sizes than JPEGs for photographic images.
- WebP: A modern image format developed by Google, WebP offers superior lossless and lossy compression for images on the web. It can achieve significantly smaller file sizes than JPEG and PNG while maintaining comparable or even better quality. Tophinhanhdep.com often converts images to WebP for optimal web performance.
- GIF: Suitable for simple animations and images with very few colors. Not ideal for photographs or complex images.
When resizing, always consider the final use of the image to select the most appropriate format and compression level. Tophinhanhdep.com’s converters and optimizers allow you to easily choose the best format for your needs.
Practical Methods for Reducing Image Dimensions (Using Tophinhanhdep.com Tools and Software)
Reducing image dimensions can be accomplished through various tools, ranging from sophisticated desktop software to convenient online utilities. The method you choose often depends on your technical skill, the number of images you need to process, and the level of control you require. Tophinhanhdep.com offers a suite of “Image Tools” designed to streamline this process, alongside guidance for popular standalone software.
Using Dedicated Image Editing Software
Professional-grade image editing software offers the most granular control over the resizing process, allowing for precise adjustments to dimensions, resolution, and quality.
1. Adobe Photoshop (and similar professional software): Photoshop is the industry standard for graphic design and photo manipulation. It provides two primary methods for resizing:
-
Using the Crop Tool:
- Open your image in Photoshop.
- Select the Crop tool from the Tools panel.
- Click and drag across the image to select the desired portion, or use the crop handles to adjust the area. You can specify exact aspect ratios or dimensions in the options bar.
- Once satisfied, press Enter or click the checkmark icon to apply the crop.
- Go to
File > Save Asto save your newly cropped and implicitly resized image with a new name. This method is excellent for changing aspect ratios while reducing dimensions.
-
Using the Image Size Dialog Box:
- Open your image in Photoshop.
- Go to
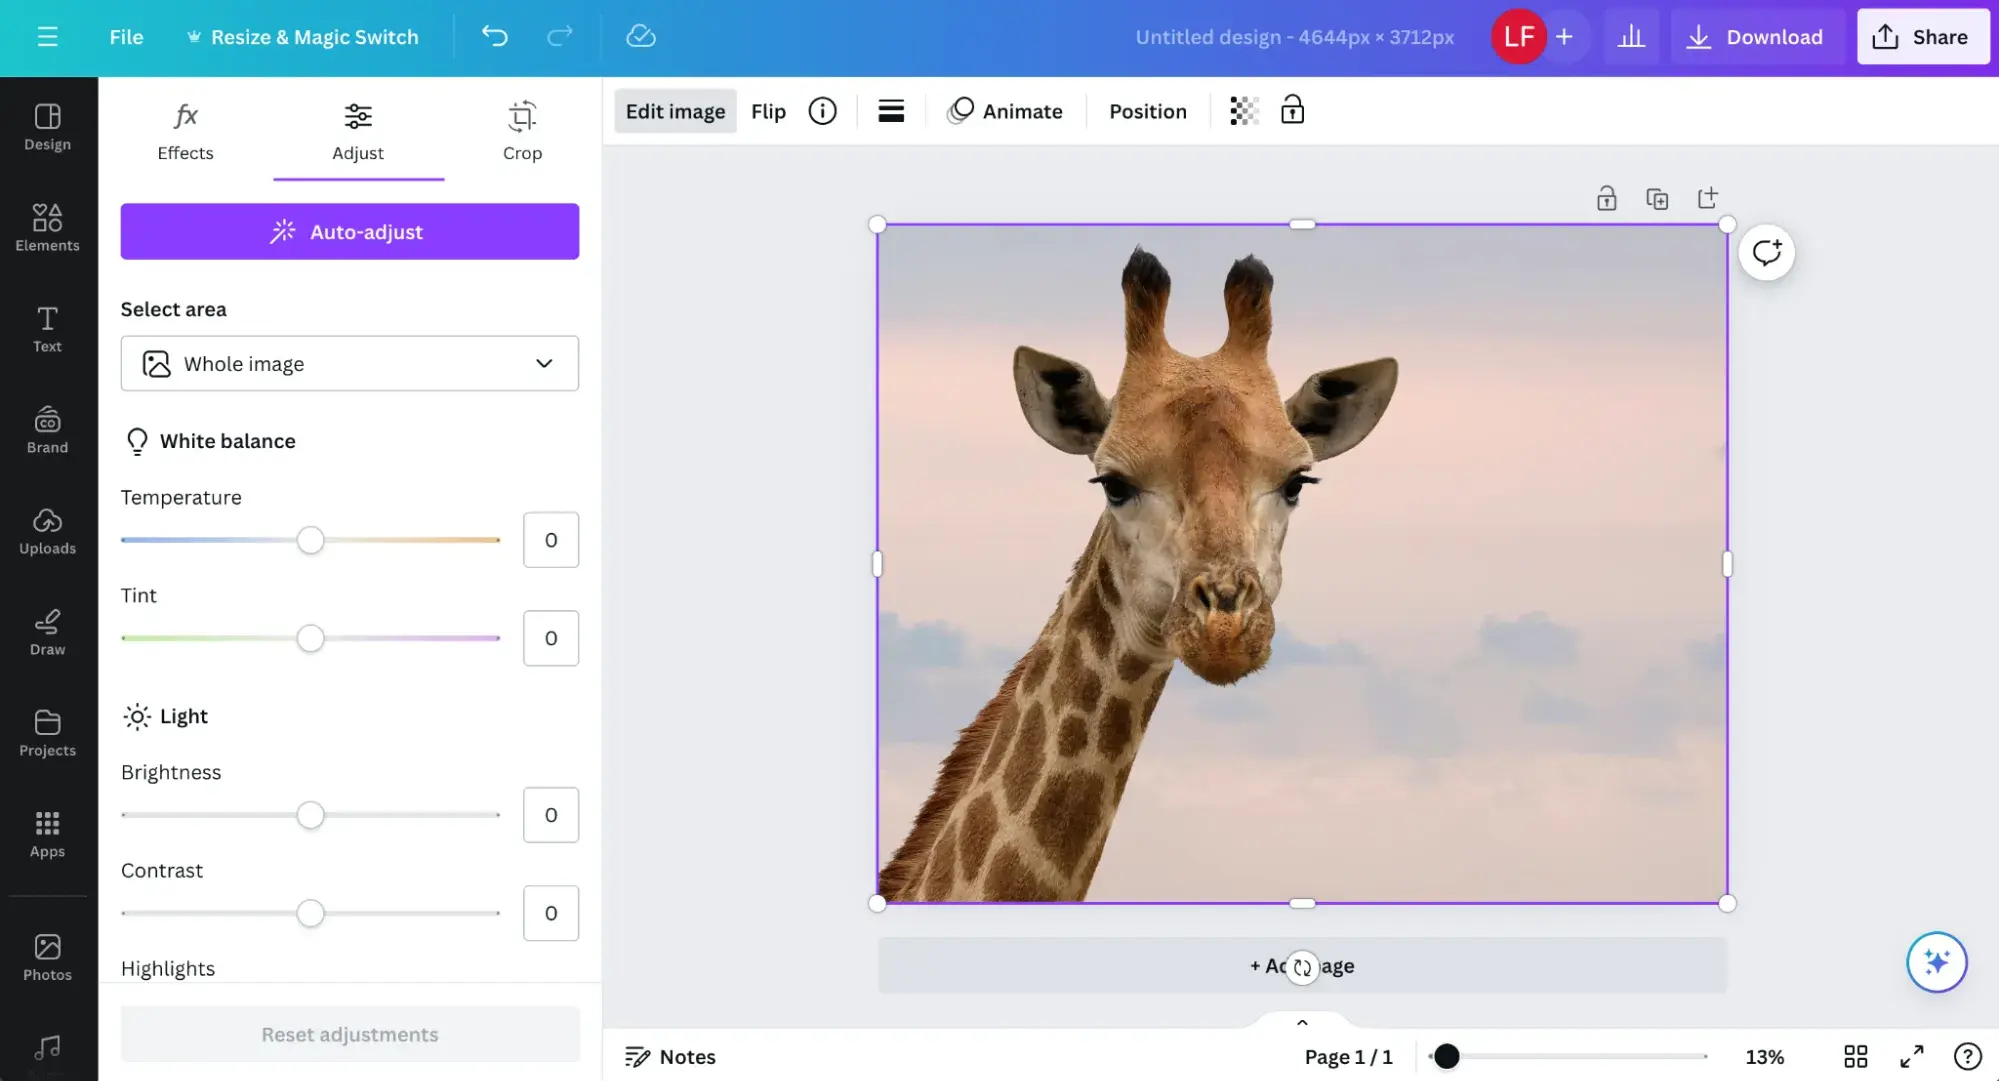
Image > Image Size. - In the Image Size dialog box, you’ll see options to adjust the image.
- Fit To: Choose from predefined resolutions or common print/screen sizes.
- Width and Height: Enter your exact desired pixel dimensions. Ensure the “chain-link” icon is active to “Constrain Proportions” unless you intentionally want to distort the image (which is generally not recommended). You can also select “Percent” from the dropdowns next to Width/Height to scale by a percentage.
- Resolution: Adjust the pixels per inch (PPI) or pixels per centimeter. Lowering this can further reduce file size, but be mindful of your output medium.
- If your image has layers with styles, click the gear icon and select “Scale Styles” to ensure effects are scaled appropriately.
- Click
OKto apply the changes. - Go to
File > Save As(orFile > Export > Save for Web (Legacy)for more web optimization options) to save your resized image. Remember to save it with a new name to preserve the original.
2. SnagIt (and other capture/editing tools): Many screenshot and basic image editing tools like SnagIt also offer simple resizing functions.
- Open your image in SnagIt.
- Navigate to
Image > Resize Imageor click the image size indicator on the canvas. - Enter the desired
WidthandHeightin pixels or inches. - Click
Applyand thenFile > Save Asto save the modified image.
3. Preview (MacOS): For Mac users, the built-in Preview app is a quick and efficient tool for basic resizing.
- Open the image in Preview.
- Go to
Tools > Adjust Size. - Enter the desired
WidthorHeight. Ensure “Scale Proportionally” is checked. You can also change the unit of measurement (pixels, percent, inches, etc.). - Click
OK. - Go to
File > Exportto save the resized image, giving it a new name and choosing the desired format.
4. Photos App (Windows 10/11): Windows users have a convenient built-in option with the Photos app.
- Open the image in the Photos app.
- Click the “See More” menu (three dots) in the upper-right corner.
- Select
Resize. - You can choose from predefined sizes (Small, Medium, Large) for common purposes, or click
Cfor “Define Custom Dimensions.” - Enter your desired
WidthandHeight. Make sure “Maintain Aspect Ratio” is checked. - Optionally, adjust the
Qualityslider to balance file size and visual fidelity. - Click
Save Resized Copyto create a new file, leaving your original untouched.
Harnessing Online Image Tools for Quick Resizing (Tophinhanhdep.com’s Converters & Compressors)
For users who don’t have dedicated software or need a quick solution, online image tools are invaluable. Tophinhanhdep.com offers a range of “Image Tools” perfectly suited for this:
- Tophinhanhdep.com’s Image Resizer: Our dedicated online image resizer provides a user-friendly interface for quickly adjusting dimensions.
- Upload your image to Tophinhanhdep.com’s resizer tool.
- Enter the desired
widthandheightin pixels or percentage, ensuring the aspect ratio is maintained (our tool will usually have this option enabled by default). - Preview the resized image.
- Download the optimized image.
- Tophinhanhdep.com’s Converters and Compressors: Beyond just changing dimensions, our “Compressors” and “Converters” are crucial for further reducing file size without compromising visual integrity.
- After resizing, upload the image to Tophinhanhdep.com’s compressor tool.
- Select your desired output format (e.g., JPEG for photos, PNG for graphics with transparency, or WebP for maximum web efficiency).
- Adjust compression levels if offered (a higher compression percentage means a smaller file but potentially lower quality).
- The tool will process and provide the optimized file, often significantly smaller than the original. Aim for file sizes under 30KB for very fast loading, but modern web standards can accommodate slightly larger files (e.g., 100-200KB) if quality is essential for larger visuals.
- For images that have been resized or compressed to a point where quality is compromised, Tophinhanhdep.com’s “AI Upscalers” can be a powerful remedy, intelligently adding detail to enhance resolution.
Advanced Compression and Optimization Strategies
While resizing dimensions is a primary step, truly optimizing images often involves deeper compression techniques.
- Progressive JPEGs: When saving JPEGs, choose the “Progressive” option if available. These images load in stages, first appearing blurry and then gradually sharpening. This gives the perception of faster loading, improving user experience.
- Remove Metadata: Images often contain metadata (EXIF data) like camera model, date taken, and even GPS location. This data adds to the file size. Many optimization tools, including those on Tophinhanhdep.com, can strip this metadata to further reduce file size.
- Batch Processing: If you have numerous images to resize to the same dimensions (e.g., a gallery of high-resolution stock photos), utilize batch processing features in desktop software or Tophinhanhdep.com’s bulk image tools. This saves significant time and ensures consistency.
Best Practices for Web and Digital Media (Enhancing Your Visual Design)
Effective image dimension reduction is not just a technical task; it’s an integral part of good visual design and digital strategy. By adhering to best practices, you ensure that your images contribute positively to your overall digital presence.
Image Sizing for Websites and Social Media
The “ideal” image size is highly contextual. Consider where your image will be displayed:
- Website Banners & Hero Images: These often require larger dimensions (e.g., 1920px wide) to look sharp on high-resolution screens, but must be highly compressed to maintain fast loading times.
- Blog Post Images: Often fit within the content width of the blog (e.g., 800-1200px wide). Ensure they are responsive to adapt to different screen sizes.
- Thumbnails: Small preview images (e.g., 150x150px or 300x200px) that link to larger images or content. These should have extremely small file sizes.
- Social Media: Each platform (Facebook, Instagram, X/Twitter, Pinterest) has specific recommended image dimensions and aspect ratios for optimal display. Uploading correctly sized images prevents platforms from automatically resizing and compressing them, which can often result in quality degradation. For instance, an aesthetic background for an Instagram story will have different dimensions than a profile picture.
- Email Signatures/Marketing: Keep these images very small in both dimensions and file size to ensure quick loading and avoid being flagged as spam.
Always aim to resize images to the exact dimensions they will be displayed at, rather than relying on CSS or HTML to shrink a large image. While browsers can scale images, they still download the full, larger file, negating performance benefits. Tophinhanhdep.com’s image inspiration and collections can guide you in choosing images that lend themselves well to these specific platform requirements.
Maintaining Visual Integrity in Digital Art and Photography
For artists and photographers, maintaining the visual integrity of their work is paramount.
- Prioritize the Original: Always work on a copy of your original, high-resolution file. This protects your master artwork from irreversible changes. Tophinhanhdep.com’s “Save As” functionality (or similar in desktop tools) for creating backups is essential.
- Gentle Compression: When compressing JPEG files, use the lowest acceptable compression setting (highest quality setting) that still yields a reasonable file size. Experiment to find the sweet spot where visual quality loss is imperceptible.
- Consider Display Medium: The “perfect” resized image depends on its final display. An image for a 4K monitor will have different requirements than one for a mobile phone screen. Think about your target audience and their devices.
- Color Profiles: Ensure your images maintain consistent color profiles (e.g., sRGB for web) after resizing and saving, especially crucial for “beautiful photography” and “digital art.”
Avoiding Common Pitfalls in Image Resizing
- Over-Resizing: Do not make images larger than their original resolution unless absolutely necessary and with the aid of AI upscaling tools (like those available on Tophinhanhdep.com). Upscaling without advanced algorithms leads to pixelation.
- Ignoring Aspect Ratio: As mentioned, avoid distorting images. Crop when a different aspect ratio is needed.
- Editing the Original File: Always create a copy before making any significant changes.
- Excessive Compression: While reducing file size is important, don’t sacrifice too much quality. A blurry or pixelated image detracts from your message.
- Using HTML/CSS for Resizing: Relying on browser-side resizing (e.g., using
width="50%"on a 2000px image when only 500px is needed) is inefficient. The browser still downloads the 2000px image, then scales it down, wasting bandwidth and time. Always serve images at their display dimensions.
Tophinhanhdep.com: Your All-in-One Resource for Image Optimization and Inspiration
At Tophinhanhdep.com, we are committed to empowering individuals and professionals to manage their visual assets effectively. Our platform isn’t just a repository of stunning images; it’s a comprehensive ecosystem designed to support your entire visual workflow, from “Image Inspiration & Collections” to “Image Tools” and “Visual Design” resources.
Beyond Resizing: Exploring Tophinhanhdep.com’s Ecosystem of Image Tools
While this guide focuses on making image dimensions smaller, Tophinhanhdep.com offers a broader spectrum of tools to manage and enhance your images:
- Image Converters: Easily switch between various image formats (JPG, PNG, WebP, etc.) to suit different needs, ensuring compatibility and optimal file size.
- Image Compressors: Go beyond simple resizing by applying advanced compression algorithms that significantly reduce file size without a noticeable impact on visual quality.
- Image Optimizers: A more holistic approach, combining resizing, compression, and other tweaks to ensure your images are perfectly tuned for web performance.
- AI Upscalers: For those instances where you need to enlarge an image or recover detail from a lower-resolution source, our AI upscalers use artificial intelligence to intelligently add pixels and enhance clarity, turning low-quality images into higher-resolution versions. This is particularly useful for breathing new life into older or smaller images from your “Thematic Collections” or “Photo Ideas.”
- Image-to-Text Converters: A unique tool to extract text from images, useful for accessibility and content management.
These tools are not just standalone utilities; they work in conjunction to provide a seamless optimization experience, allowing you to focus on the creative aspects of your visual content.
Curating Visual Excellence from Tophinhanhdep.com’s Image Collections
The foundation of any great visual project is the image itself. Tophinhanhdep.com provides an unparalleled library of diverse images that serve as an excellent starting point for any design or photography endeavor:
- Wallpapers & Backgrounds: Discover high-resolution images perfect for personalizing your devices or creating immersive digital experiences.
- Aesthetic & Nature Photography: Explore stunning visuals that evoke emotion and beauty, ideal for projects requiring a captivating touch.
- Abstract & Sad/Emotional Images: Find unique and expressive visuals that cater to a wide range of creative and thematic needs.
- High-Resolution Stock Photos: Access professional-grade photography suitable for commercial and personal use, providing the rich detail needed for effective resizing and manipulation.
- Digital Art & Photo Manipulation Inspirations: Our collections serve as a muse for graphic designers and digital artists, offering creative ideas and trending styles to fuel your projects.
By selecting high-quality images from Tophinhanhdep.com, you ensure that you’re always starting with the best possible source, making the process of reducing image dimensions and optimizing for performance far more successful.
In conclusion, mastering the art of making image dimensions smaller is an essential skill in the digital age. It’s a balance between visual fidelity and technical efficiency, directly impacting user experience, website performance, and content reach. With the principles and practical methods outlined in this guide, and by leveraging the powerful “Image Tools” and rich “Image Collections” available at Tophinhanhdep.com, you can confidently optimize your images for any digital platform, ensuring your visuals always leave a lasting, positive impression.