Mastering Image Resolution: Your Comprehensive Guide to High-Quality Visuals with Tophinhanhdep.com

In today’s visually-driven world, the quality of an image can make or break its impact. Whether you’re a professional photographer showcasing your latest work, a graphic designer crafting compelling visuals, or simply an individual looking to print cherished memories, understanding “how to make an image high resolution” is an indispensable skill. A high-resolution image offers clarity, sharpness, and detail that low-resolution counterparts simply cannot match, making it essential for everything from stunning wallpapers and backgrounds to intricate digital art and print projects.
At Tophinhanhdep.com, we are dedicated to providing a vast collection of breathtaking images—from aesthetic and nature to abstract and sad/emotional photography—all available in high resolution. We also empower our users with the knowledge and tools needed to achieve exceptional visual quality. This guide will delve into the concept of image resolution, explain why it matters, and walk you through various methods to enhance your images, ensuring they always look their best.

Understanding Image Resolution: The Foundation of Stunning Visuals
Before we dive into the “how,” let’s clarify the “what.” Image resolution fundamentally refers to the amount of detail an image holds. This detail is measured in pixels.
Pixels, PPI, and DPI Explained: Every digital image is composed of tiny squares of color known as pixels. The more pixels an image has, the more detail it can display.
- PPI (Pixels Per Inch): This metric defines the pixel density in a digital image. A higher PPI means more pixels are packed into each inch of the image, resulting in a sharper and more detailed appearance on screens. For digital display, 72 PPI is often considered standard, but for high-definition screens and professional digital work, much higher PPIs are common.
- DPI (Dots Per Inch): This relates specifically to printing. DPI measures the density of ink dots a printer can place on a physical inch of paper. A higher DPI typically results in a smoother, more refined printed image, with 300 DPI being the industry standard for high-quality prints. While PPI and DPI are distinct, they are often used interchangeably to convey the overall sharpness and detail of an image in conversation.
Why High Resolution Matters for Your Images: The importance of high resolution cannot be overstated, especially when you consider the diverse applications of images:
- Digital Display & Aesthetics: For modern screens, high-resolution images ensure crispness, whether it’s for stunning wallpapers on your desktop, vibrant backgrounds on your mobile, or captivating aesthetic visuals shared online. Tophinhanhdep.com prides itself on offering images optimized for high-definition displays, from serene nature scenes to thought-provoking abstract art.
- Print Quality: When it comes to printing, resolution is paramount. A low-resolution image, when enlarged for print, will appear pixelated, blurry, and unprofessional. High-resolution files, on the other hand, retain their detail and sharpness, making them suitable for large format prints, photo books, or merchandise.
- Cropping and Flexibility: Higher resolution images offer more flexibility for editing. You can crop into a high-resolution photograph significantly without immediately encountering pixelation, allowing for greater creative freedom and photo manipulation. This is invaluable for refining compositions or extracting specific details from beautiful photography.
- Professionalism in Visual Design: For graphic designers and digital artists, high-resolution images are the building blocks of quality work. They allow for intricate detail, clean lines, and overall polish in logos, marketing materials, and digital art pieces. Tophinhanhdep.com’s collections provide a rich resource of high-resolution visuals for creative ideas and graphic design projects.
- Future-Proofing: Technology evolves rapidly. What looks “high-res” today might be considered standard or even low-res tomorrow. Starting with or converting to the highest possible resolution ensures your images remain relevant and adaptable for future uses and platforms.
While increasing resolution is possible, it’s crucial to understand its limitations. Upscaling an image primarily adds more pixels; it doesn’t magically invent new, genuine detail that wasn’t present in the original capture. Therefore, starting with the highest possible quality source image is always the best practice in digital photography. However, when that’s not possible, the following methods can significantly improve the perceived resolution of your images.
Desktop Software Solutions for Upscaling Images
Professional image editing software offers robust tools for increasing image resolution. These applications provide fine control over the upscaling process, allowing for optimal results.
Leveraging GIMP for Free Image Upscaling
GIMP (GNU Image Manipulation Program) is a powerful, free, and open-source image editor available for Windows, macOS, and Linux. It’s an excellent choice for those seeking a cost-effective yet feature-rich solution for graphic design and photo editing.
Here’s how to improve image resolution using GIMP:
- Open GIMP: Launch the application on your computer.
- Load Your Image: Go to
File > Open, select your desired image from the dialog box, and clickOpen. - Select the Entire Image: Ensure the image window is active, then press
Ctrl+A(Windows) orCommand+A(Mac) to select the whole image. - Copy the Image: Press
Ctrl+C(Windows) orCommand+C(Mac) to copy the selection. - Create a New High-Resolution Canvas: Go to
File > New. In the “Create a New Image” dialog box, you’ll see the current image’s width and height pre-filled. Do not change these yet. - Set Optimal Pixel Density: To ensure the final image has a standard resolution for printing (300 PPI), select
Advanced Options. Adjust theX resolutionandY resolutionvalues to300(if they aren’t already), then clickOK. You now have a new, empty image window with the same dimensions as your original but prepared for higher pixel density. - Resize the Canvas: With the new image window active, go to
Image > Canvas Size. - Lock Aspect Ratio: Before adjusting, make sure the chain icon to the right of the width and height measurements is locked to maintain the image’s aspect ratio.
- Enter New Dimensions: Enter your desired new
widthvalue. Theheightwill automatically adjust. Remember or jot down these new dimensions. ClickResize. - Paste and Position Image: In the new, larger image window, press
Ctrl+V(Windows) orCommand+V(Mac) to paste your copied image. It will appear at its original size, likely centered on the larger canvas. - Select Floating Selection: In the
Layersdialog, ensureFloating Selection (Pasted Layer)is selected. - Activate Scale Tool: Go to the
Toolboxdialog and select theScale tool(it might be hidden under the Shear tool). - Scale the Pasted Image: Click on the pasted image. In the
Scaledialog box, ensure the chain icon is locked, then enter the samewidthvalue you used in step 9. This will scale the pasted image to fill the new canvas. ClickScale. - Review and Sharpen (Optional): Zoom in (
View > Zoom) to inspect the quality. If needed, GIMP has sharpening tools (Filters > Enhance > Sharpen) that can be used sparingly to refine details. - Anchor Layer: Once satisfied, select the
Anchor Layericon (often located next to the Floating Selection in the Layers dialog) to merge the pasted layer with the background. - Export Your High-Resolution Image: Go to
File > Export. Choose a save location, name your file (e.g.,new_photo.pngornew_photo.jpg), and clickExport. For best quality, set theCompression Levelslider to zero (if available for your chosen format) and confirmExport.
Adobe Photoshop: The Professional Standard for High-Resolution Conversions
Adobe Photoshop is the industry-standard software for photo editing and graphic design. Its powerful resampling algorithms and detailed controls make it an unparalleled tool for increasing image resolution, especially for professional photography and intricate visual design projects.
Here’s how to convert low-resolution images to high resolution in Photoshop:
- Open Image in Photoshop: Launch Photoshop and open your desired image via
File > Open. - Enable Preserve Details 2.0: For the best results, enable Photoshop’s advanced upscaling technology. Go to
Edit > Preferences > Technology Previews(Windows) orPhotoshop > Settings > Technology Previews(Mac). Check the box forEnable Preserve Details 2.0 Upscaleand clickOK. - Access Image Size Panel: Go to
Image > Image Size, or use the shortcutAlt + Ctrl + I(Windows) /Option + Command + I(Mac). - Understand Image Size Settings:
- Dimensions: Displays current pixel dimensions. Ensure the unit is set to “pixels.”
- Fit To: Predefined resizing options. Avoid using this if you need specific dimensions or want to avoid cropping.
- Enable Resample and Choose Interpolation Method:
- Resample: Make sure this box is checked. It tells Photoshop to change the number of pixels in the image.
- Interpolation Method: From the dropdown menu next to “Resample,” select
Preserve Details 2.0. This is Photoshop’s most advanced algorithm for adding new pixels while maintaining original details, crucial for upscaling. Other options like Bicubic Smoother also work well for enlargements.
- Increase Resolution: In the
Resolutionbox, enter your desired PPI or DPI value. For high-quality prints,300 PPI/DPIis standard. For digital use, you might increase pixel dimensions (Width/Height) directly to your target output size while keeping PPI at a reasonable level (e.g., 72 PPI for web, or higher for retina displays). As you increase resolution or dimensions, you’ll see the image size (file size) increase. - Reduce Noise (Optional but Recommended): As images are upscaled, noise can become more apparent. The
Reduce Noiseslider in the Image Size panel helps smooth out imperfections. Adjust it carefully; a small percentage (e.g., 2-4%) is often sufficient to improve sharpness without blurring fine details. - Apply Changes: Click
OKto apply the new resolution and dimensions to your image. - Apply High Pass Filter for Sharpening (Optional, but highly effective): Upscaling can sometimes lead to a slight softening of details. The High Pass filter can restore crispness:
- Duplicate Layer: Press
Ctrl + J(Win) /Command + J(Mac) to duplicate your image layer. - Apply High Pass: With the duplicated layer selected, go to
Filter > Other > High Pass. - Adjust Radius: Increase the
Radiusvalue until you clearly see the edges and details of your image, but stop before it looks overly harsh or haloed. ClickOK. - Change Blending Mode: In the
Layerspanel, change the Blending Mode of the High Pass layer toOverlay(or Soft Light, Hard Light, Linear Light, Vivid Light for different effects). This will blend the sharpened edges into your image, making it appear much crisper. Adjust the layer’s opacity if the effect is too strong.
- Duplicate Layer: Press
- Save Your High-Resolution Image: Go to
File > Save As(orFile > Export > Export As) to save your newly upscaled image. Choose an appropriate format (e.g., JPEG for web, TIFF or PNG for print or further editing) and adjust quality settings as needed.
macOS Preview: Simple Resolution Boosts for Mac Users
For Mac users, the built-in Preview application offers a quick and easy way to adjust image resolution without needing dedicated photo editing software. While less feature-rich than GIMP or Photoshop, it’s perfect for simple adjustments.
- Open Image with Preview: Locate your image file, right-click (or Ctrl-click) on it, and select
Open with > Preview. - Access Adjustment Tools: Click the
Markup Toolbaricon (usually a pen tip inside a circle, or a toolbox icon). - Select Adjust Size: In the Markup Toolbar, click the
Adjust Sizeicon (often depicted as three nested boxes or an icon resembling a scale). - Adjust Dimensions: In the “Image Dimensions” dialog box, ensure the
lock iconbetween width and height is closed (locked) to maintain the aspect ratio. Make sureResample Imageis checked. - Enter New Width/Height: Change the
WidthorHeightto your desired pixel dimension. The other dimension will automatically adjust. You can also change the “Resolution” value directly. - Apply Changes: Click
OK. Preview will resize your image. - Save/Export: Go to
File > Saveto overwrite the original image (useFile > Duplicatefirst if you want to keep the original) orFile > Exportto save it as a new file with the new resolution.
Mobile and Online Tools for On-the-Go Resolution Enhancement
In our increasingly mobile world, having access to image resolution tools on smartphones and through web browsers is incredibly convenient. These solutions, particularly AI-powered ones, are making high-resolution image creation more accessible than ever.
Image Size App for iPhone: High Resolution in Your Pocket
For iPhone users, dedicated apps like “Image Size” (available on the App Store) provide a straightforward way to resize and increase the resolution of images directly on your device.
- Install and Open Image Size: Download, install, and open the “Image Size” app. Grant it access to your Photos.
- Select Your Image: Tap the
white box(image picker) or theimage iconto browse your photo library and select the image you wish to resize. - Lock Aspect Ratio: Tap the
chain iconto link the Width and Height values, ensuring the image’s proportions are maintained during resizing. - Set New Dimensions: Enter your desired
Widthvalue (e.g., 6000 pixels). TheHeightwill automatically adjust. TapDone. - Check Output Quality: Tap the
gear icon(settings). Ensure theOutput Qualityslider is at100 percentfor maximum resolution. - Print Size Correction (Optional): If you plan to print, you can select the
+ (Plus)icon to increase thePrint size correction factorto smooth out potential pixelation. Then, use the back arrow to return to the main page. - Save Image: Tap the
save arrow icon(usually pointing downwards into a box) to save the final, high-resolution image to your device’s photo library.
For Android users, similar apps like “Photo & Picture Resizer” or mobile versions of “Photoshop Express” and “Picsart AI Photo Editor” offer comparable functionalities to increase image resolution. Always check your camera settings as well, as some devices allow you to adjust the default resolution for photos you take.
AI Upscalers: The Future of High-Resolution Imagery (Tophinhanhdep.com’s Recommendation)
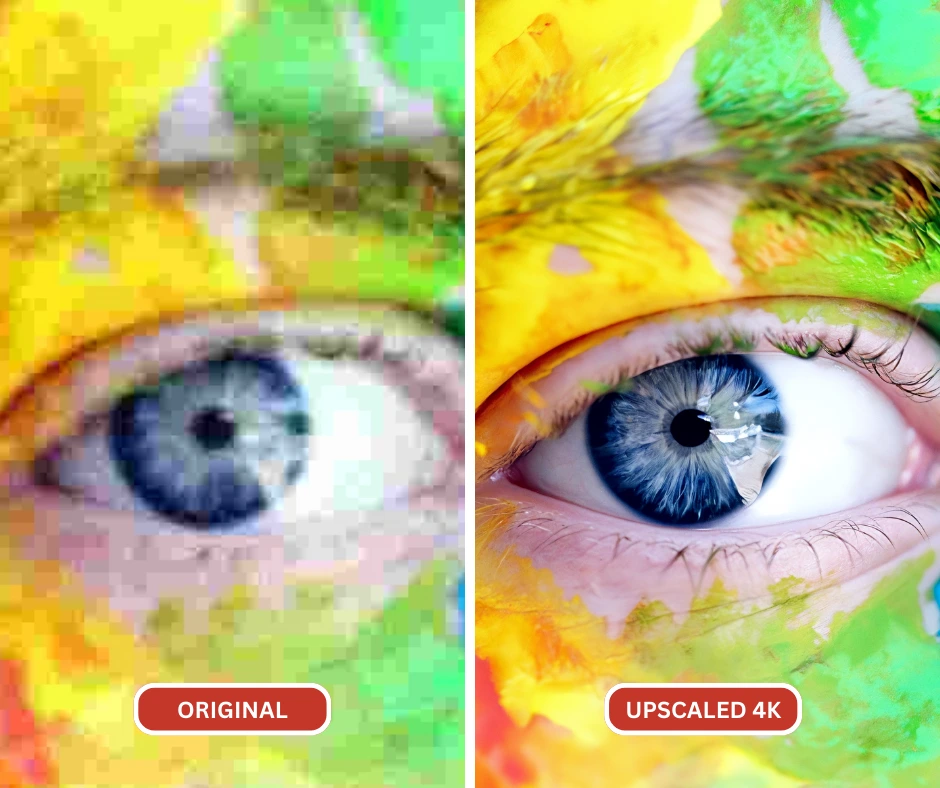
AI-powered image upscaling has revolutionized how we approach resolution enhancement. Unlike traditional methods that simply interpolate pixels, AI upscalers use deep machine learning and advanced neural networks (like SRCNN - Super-Resolution Convolutional Neural Network) to “intelligently guess” and generate new pixels, resulting in significantly sharper and more detailed images without the usual pixelation or blur associated with basic resizing.
Tophinhanhdep.com highly recommends utilizing AI upscaling technology when seeking to convert low-definition images to high-definition pictures, especially for enhancing existing low-resolution photos found in our thematic collections or for improving your own digital photography.
How AI Upscalers Work (and why Tophinhanhdep.com stands by them):
- Deep Learning Algorithms: AI upscalers are trained on millions of images. They learn patterns, textures, and details, allowing them to accurately “fill in” missing information when an image is enlarged. This is a crucial distinction from traditional methods that can often lead to artificial-looking results.
- Quality Preservation: The primary advantage is their ability to zoom pictures by hundreds or even thousands of percent (e.g., 1000%) without losing significant quality. They minimize pixelation and blur, making them ideal for enlarging photos for print projects, creating high-res close-ups, or correcting low-light photos.
- Ease of Use: Many AI upscalers are incredibly user-friendly, often requiring just a few clicks or a drag-and-drop to process an image. This makes them accessible for everyone, from graphic design professionals to casual users.
- Online Accessibility: Many powerful AI upscaling tools are available online, directly through a web browser. This means no software installation is required, offering convenience and flexibility.
Using an AI Upscaler Recommended by Tophinhanhdep.com (General Steps):
- Access the Tool: Visit a reputable AI image upscaler website (e.g., an online tool recommended by Tophinhanhdep.com’s Image Tools section, or search for “AI Image Upscaler”).
- Upload Your Image: Drag and drop your low-resolution picture onto the designated area or click to select it from your computer or mobile device.
- Select Upscale Factor (Optional): Many tools allow you to choose how much you want to enlarge the image (e.g., 2x, 4x, 8x, or custom percentages).
- Process and Download: The AI will automatically process the image. This may take a few seconds or minutes depending on the file size and server load. Once finished, you can download your new, high-resolution image.
AI upscalers are an invaluable addition to the “Image Tools” category, offering a powerful yet user-friendly solution for making pictures higher resolution, breathing new life into older or lower-quality visuals for Tophinhanhdep.com’s diverse range of applications.
Best Practices for Maintaining and Achieving High-Resolution Images
Beyond specific tools and techniques, adopting certain habits and understanding image fundamentals can significantly impact the resolution and overall quality of your images.
Start with High-Quality Originals
The golden rule of image resolution is that you cannot create detail that was never captured. Always strive to:
- Shoot in the Highest Resolution: When using a digital camera or smartphone for digital photography, configure it to capture images at its highest possible resolution setting.
- Use RAW Formats: If your camera supports it, shooting in RAW provides the most uncompressed data, offering maximum flexibility for editing and resolution adjustments later.
- Source High-Quality Stock Photos: When using images from external sources, always opt for high-resolution stock photos. Tophinhanhdep.com provides a curated collection of beautiful photography and thematic collections, ensuring you start with excellent quality.
Understand File Formats
Different image file formats handle resolution and compression differently:
- JPEG (JPG): A common format that uses lossy compression, meaning some data is discarded to reduce file size. While good for web, repeated saves can degrade quality. Save JPEGs at the highest quality setting possible.
- PNG: A lossless format, ideal for images with transparency or sharp lines (like graphic design elements). It retains all image data, making it suitable for high-resolution output where file size isn’t a critical concern.
- TIFF (TIF): A high-quality, lossless format often used in professional printing and archival. TIFF files are large but retain all image data, making them perfect for preserving high resolution.
When to Use Different Resolutions
Tailor your resolution to the image’s intended purpose:
- Web (Wallpapers, Backgrounds, Aesthetic, Trending Styles): While higher resolution is always better, for website performance, images should be optimized. Typically, images around 72-150 PPI are sufficient for on-screen display, but ensure pixel dimensions are large enough for modern high-resolution monitors (e.g., 1920x1080 for desktop wallpapers, or larger for 4K displays). Use compressors and optimizers (available in Image Tools) to reduce file size while maintaining visual quality for Tophinhanhdep.com’s online collections.
- Print (Nature, Abstract, Sad/Emotional, Beautiful Photography): For professional prints, aim for 300 PPI/DPI. This ensures crisp, detailed physical output. Always check with your printer for specific recommendations.
Importance of Careful Editing
Even with high-resolution images, poor editing can degrade quality. When using photo manipulation techniques or applying editing styles:
- Work on Copies: Always edit a duplicate of your original high-resolution image.
- Non-Destructive Editing: Utilize layers and adjustment layers in software like Photoshop to make changes that can be easily undone without permanently altering the original pixels.
- Sharpen Judiciously: While sharpening can enhance details, over-sharpening creates halos and an artificial look. Use sharpening tools sparingly.
Exploring Tophinhanhdep.com for Inspiration and High-Resolution Images
Tophinhanhdep.com is more than just a guide; it’s a hub for visual excellence. Our platform offers:
- High-Resolution Image Collections: Discover a diverse range of images, from serene nature landscapes and captivating abstract art to emotional portraits and aesthetic backgrounds, all curated in high resolution for your needs.
- Photography Inspiration: Explore thematic collections and trending styles to spark new photo ideas and create mood boards for your projects.
- Image Tools & Resources: Find recommendations for converters, compressors, optimizers, and AI upscalers to manage and enhance your images effectively.
By understanding the intricacies of image resolution and utilizing the right tools and practices, you can ensure your visuals consistently meet the highest standards. Whether you’re enhancing an old photo or preparing a new masterpiece for print or digital display, Tophinhanhdep.com is here to guide you every step of the way towards achieving stunning, high-resolution imagery.