How to Make Images Higher Quality: A Comprehensive Guide

In today’s visually-driven world, the quality of an image can significantly impact its effectiveness, whether it’s a breathtaking wallpaper for your desktop, a background for a professional presentation, or a photograph destined for print. From stunning nature shots to intricate abstract art, every visual element demands clarity and sharpness. At Tophinhanhdep.com, we understand the critical role high-resolution images play in capturing attention and conveying messages. This guide delves into various techniques and tools, both free and professional, that empower you to transform low-quality images into high-resolution masterpieces, ensuring your visuals always stand out.
Improving image quality isn’t just about making a picture bigger; it’s about enhancing its detail, reducing pixelation, and optimizing it for its intended use. While it’s generally true that an image’s quality is best preserved when captured at high resolution initially, there are numerous scenarios where you might need to upscale an existing image. Perhaps you found a perfect aesthetic background that’s too small, received a low-resolution stock photo, or need to prepare an old digital photography shot for a large print. We’ll explore how software applications, AI-driven tools, and even built-in operating system utilities can help you achieve professional-grade results.
Understanding Image Resolution and Quality Fundamentals
Before diving into the “how-to,” it’s essential to grasp the core concepts of image resolution and quality. This foundational knowledge will help you make informed decisions when choosing tools and applying techniques.
Pixels, PPI, and DPI: The Building Blocks
At its heart, a digital image is a grid of tiny colored squares called pixels. The more pixels an image contains, the more detail it can display.
- Resolution: In digital imaging, resolution often refers to the total number of pixels along an image’s width and height (e.g., 1920x1080 pixels). A higher pixel count generally means a higher resolution.
- Pixels Per Inch (PPI): This metric describes the pixel density of a digital image. A common standard for high-quality printed images is 300 PPI. The higher the PPI, the smoother and more detailed an image appears on screen or in print, as there are more pixels packed into each inch.
- Dots Per Inch (DPI): Similar to PPI, DPI specifically refers to the density of ink dots a printer can place on paper. While often used interchangeably with PPI, DPI is strictly a printer specification. For most practical purposes in image editing, focusing on PPI is sufficient.
An image with low PPI will show noticeable pixelation when enlarged, meaning the individual squares become visible, making the image look blocky and blurry. Conversely, a high PPI image can be scaled up more without significant loss of perceived quality. Tophinhanhdep.com offers a vast collection of high-resolution images, perfect for backgrounds and wallpapers, where pixel density is paramount.
Why Higher Resolution Matters (and its Limitations)
Increasing an image’s resolution allows for several key benefits:
- Larger Prints: For physical prints, especially large formats like posters or canvas art, a high-resolution image (typically 300 PPI) is crucial to avoid pixelation and maintain sharp detail.
- Effective Cropping: With more pixels, you can crop into a section of an image without severely degrading its quality, allowing for more flexible photo manipulation and creative ideas.
- Better Display on High-Resolution Screens: Modern displays (4K, Retina) can reveal imperfections in low-resolution images more readily. High-resolution visuals ensure crisp presentation across all devices.
- Professional Appearance: High-quality visuals reflect professionalism, whether for a digital art portfolio or stock photos used in a marketing campaign.
However, it’s vital to understand the limitations: simply increasing the pixel count (upscaling) doesn’t magically add new detail that wasn’t there in the first place. When you enlarge an image, software algorithms essentially “guess” what the new pixels should look like, interpolating between existing ones. While advanced techniques, especially AI upscalers, are remarkably good at this, they can’t invent information. An image initially captured at a low resolution will never truly match the intrinsic quality and detail of one originally captured at a high resolution. Quality is also determined by factors like focus, exposure, and lighting, which are established during the digital photography process.

General Tips for Upscaling Images Effectively
To mitigate the loss of sharpness and achieve the best possible results when increasing image resolution:
- Start with the Best Possible Original: Always use the highest resolution and least compressed version of your image available.
- Avoid Excessive Enlargement: While there’s no hard rule, increasing dimensions by more than 30-40% in a single step can lead to a noticeable loss of sharpness with traditional methods. AI tools push this boundary significantly.
- Use Sharpening Tools Sparingly: Many image editing tools include sharpening features. Use them carefully, as over-sharpening can introduce artifacts and make an image look unnatural.
- Consider the End Use: A slight increase for web display might be fine, but a significant enlargement for print requires more rigorous techniques.
- Experiment with Interpolation Methods: Different algorithms for adding pixels (interpolation) yield varying results. Familiarize yourself with options like Bicubic Smoother, Preserve Details, or AI methods.
Desktop Software Solutions for Image Enhancement
Desktop software offers powerful features and fine control for increasing image resolution. These tools are staples in digital photography and graphic design workflows.
Elevating Quality with GIMP (Free & Open-Source)
GIMP (GNU Image Manipulation Program) is a robust, free, and open-source image editing tool available for Windows, macOS, and Linux. It supports a wide array of image formats, making it an excellent choice for basic to advanced image manipulation, including resolution enhancement.
Here’s a step-by-step guide to increasing image resolution using GIMP:
- Open Your Image: Launch GIMP, then go to
File > Openand select the image you wish to enhance. - Copy the Image: Ensure the image window is active, then press
Ctrl+A(Windows) orCommand+A(Mac) to select the entire image. Copy it usingCtrl+CorCommand+C. - Create a New High-Resolution Canvas: Go to
File > Newto open the “Create a New Image” dialog. Click onAdvanced Options. - Set Desired Resolution: In the
Advanced Optionssection, ensure theX resolutionandY resolutionvalues are set to 300 pixels per inch (the standard for print quality). Do not change the pre-filled width and height at this stage. ClickOK. This creates a new, high-DPI canvas of the same dimensions. - Resize the Canvas: With the new image window active, select
Image > Canvas Size. - Increase Canvas Dimensions: In the “Set Image Canvas Size” dialog, ensure the chain icon next to
WidthandHeightis locked to maintain aspect ratio. Enter your desired new, larger width (e.g., from 4000 pixels to 6000 pixels). The height will adjust automatically. Make a note of these new dimensions. ClickResize. - Paste and Scale the Original Image: In the new, larger canvas window, paste your copied image by pressing
Ctrl+VorCommand+V. You’ll notice the original image appears in the center at its initial size within the larger canvas. - Activate Floating Selection: In the Layers dialog, select “Floating Selection (Pasted Layer)” if it’s not already active.
- Use the Scale Tool: From the Toolbox dialog, select the
Scale Tool(it might be nested under another tool). - Scale the Pasted Image: Click on the pasted image. In the Scale dialog box, ensure the chain icon is locked. Enter the same width value you used when resizing the canvas in step 6. You’ll see a preview of the scaled image. Click
Scalewhen satisfied. - Check Quality and Anchor Layer: Zoom in (
View > Zoom) to inspect the quality of your resampled image. Once happy, select theAnchor Layericon (an anchor symbol) in the Layers dialog to merge the scaled image with the background. - Export Your High-Quality Image: Go to
File > Export. Choose a save location and name your file, specifying the extension (e.g.,new_photo.pngornew_photo.jpg). For optimal quality, move theCompression Levelslider to zero (for formats like JPEG that allow it), then clickExport.
Harnessing macOS Preview for Quick Adjustments
For macOS users, Preview is an often-overlooked yet capable built-in tool for basic image editing, including resizing and resolution adjustment. It’s ideal for quick enhancements without needing to download additional software.
- Open Image with Preview: Locate your image file, right-click it, and select
Open with > Preview. - Access Markup Toolbar: Click the
Markup Toolbaricon (often looks like a pen tip). - Select Adjust Size: In the Markup toolbar, click the
Adjust Sizeicon (which might appear as three nested boxes). - Modify Dimensions: In the “Image Dimensions” dialog box, ensure the lock icon is closed (to maintain aspect ratio) and “Resample Image” is selected. Adjust the
Widthto your desired amount (e.g., from 1000 pixels to 1300 pixels). The height will automatically adjust. - Save or Export: Click
OK. The image will resize. You can thenFile > Saveto overwrite the original orFile > Exportto save it as a new file, preserving the original.
Professional-Grade Upscaling with Adobe Photoshop
Adobe Photoshop is the industry standard for image editing and graphic design. While it has a steeper learning curve, its powerful resampling capabilities, especially with modern AI enhancements, make it a top choice for increasing image resolution. Tophinhanhdep.com often features guides on advanced Photoshop techniques for graphic design and photo manipulation.
Here’s how to enhance image resolution in Photoshop:
- Enable Preserve Details 2.0 (Important for Quality): Before starting, go to
Edit > Preferences > Technology Previews(Windows) orPhotoshop > Preferences > Technology Previews(Mac). Ensure “Enable Preserve Details 2.0 Upscale” is checked. This advanced algorithm helps retain original details during enlargement. ClickOK. - Open Image and Access Image Size: Open your image in Photoshop (
File > Open). Then, go toImage > Image Size(orAlt+Ctrl+Ion Windows,Option+Command+Ion Mac). - Understand Image Size Panel:
- Image Size: Displays the file size.
- Dimensions: Shows current pixel width and height. Ensure units are set to “pixels.”
- Fit To: Allows resizing to preset dimensions, but often causes cropping. It’s generally better to manually adjust.
- Choose Interpolation Method:
- Ensure
Resampleis checked. - From the interpolation dropdown menu, select
Preserve Details 2.0(if available and enabled in preferences). This is Photoshop’s most effective method for upscaling without losing detail. Other options likeBicubic Smoother (enlargement)are also good but less advanced.
- Ensure
- Increase Resolution: Enter your desired
Resolutionvalue, typically 300 pixels per inch (PPI) for print. As you increase the PPI, Photoshop will automatically calculate and increase the pixelWidthandHeight. - Reduce Noise (Optional but Recommended): If your image has noise, adjust the
Reduce Noiseslider. A small amount (e.g., 4%) can make a difference without over-smoothing. - Apply and Refine: Click
OK. The image will be resampled. - Apply High Pass Filter (Optional Sharpening): To give your image a final sharpness boost:
- Duplicate your image layer (
Ctrl+JorCommand+J). - Go to
Filter > Other > High Pass. - Adjust the
Radiusvalue until edges are highlighted but avoid over-sharpening. ClickOK. - In the Layers panel, change the duplicated layer’s
Blending ModetoOverlay. This blends the sharpened details back into the image.
- Duplicate your image layer (
- Save or Export:
File > Save As(to save as a new file) orFile > Export > Export Asfor more control over format, quality, and size.
Remember, while Photoshop can significantly improve low-res images, it cannot create detail that was never present. Its strength lies in intelligently interpolating pixels and offering extensive post-processing tools for visual design.
AI-Powered Tools and Online Platforms for Superior Upscaling
The advent of Artificial Intelligence has revolutionized image enhancement, offering capabilities far beyond traditional methods. AI upscalers use machine learning to intelligently add pixels, often achieving impressive results with minimal loss of quality. Tophinhanhdep.com recognizes AI upscalers as a leading tool category.
The Power of AI Upscalers (e.g., Tophinhanhdep.com’s Fotophire Maximizer, Topaz Gigapixel AI)
AI image upscalers like Fotophire Maximizer (available via Tophinhanhdep.com) and Topaz Gigapixel AI are designed specifically to enlarge images by hundreds or even thousands of percent without introducing noticeable pixelation, blur, or distortion. Instead of simply interpolating pixels, these tools “learn” from millions of real-world images to generate new pixels that intelligently fit the scene.
Key Benefits of AI Upscalers:
- Significant Enlargement: Upscale images by 600% or more with exceptional quality.
- Detail Retention: AI models focus on preserving fine details, textures, and sharpening edges.
- Noise and Artifact Reduction: Many AI tools can simultaneously reduce noise and remove JPEG artifacts while upscaling.
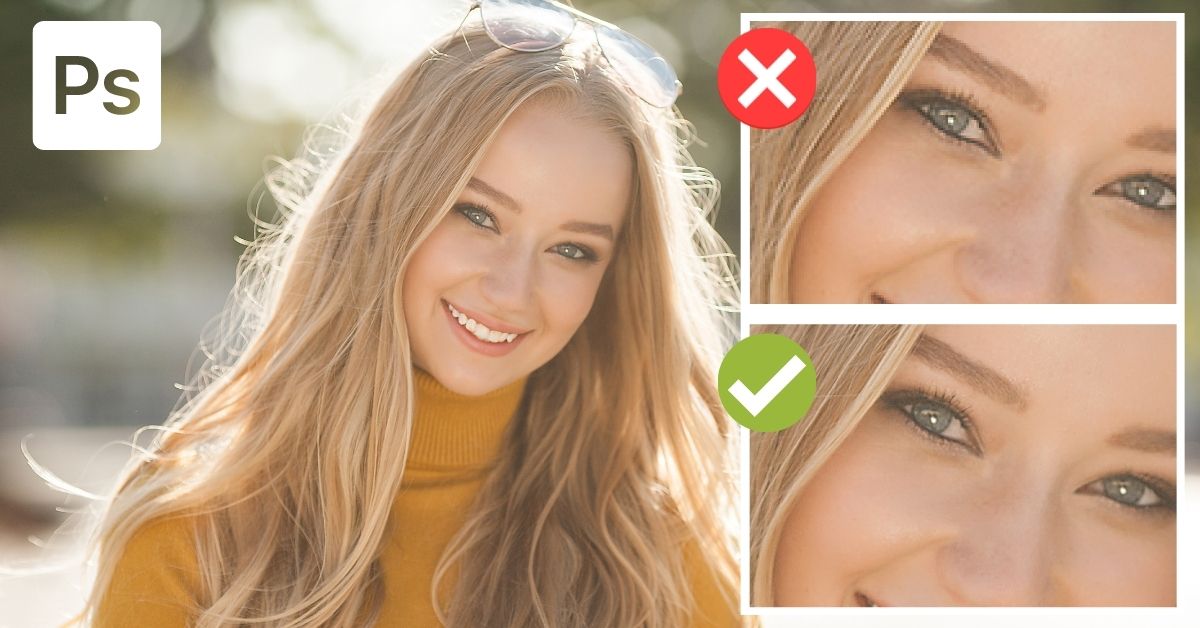
- Face Refinement: Some, like Topaz Gigapixel AI, include face recognition technology to enhance facial details without distortion, ideal for portrait photography.
Basic Workflow for AI Upscalers:
- Upload/Import Image: Drag and drop your image or open it within the software.
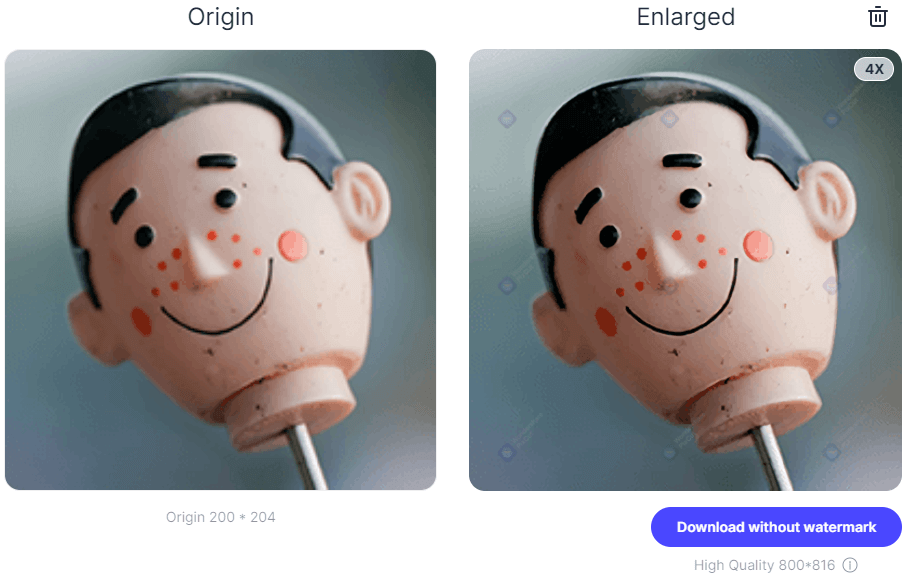
- Select Scale Factor: Choose a preset magnification (e.g., 2x, 4x, 6x) or enter a custom scale.
- Adjust AI Settings (Optional): Many tools offer sliders for “Suppress Noise,” “Remove Blur,” or “Face Refinement.” The “Auto” setting often works well for beginners.
- Preview and Compare: Most tools provide a real-time preview, allowing you to compare the original and upscaled versions side-by-side.
- Export: Save the enhanced image in your preferred format (JPEG, PNG, TIFF).
Tophinhanhdep.com’s Fotophire Maximizer (formerly Wondershare Fotophire Maximizer) is an excellent example of a dedicated AI-powered solution. It boasts features like zooming pictures up to 1000% without pixelation, enlarging photos for print projects, providing high-res close-ups, and even correcting low-light photos. Its drag-and-drop interface and real-time preview make it user-friendly.
Online Tools for Instant Quality Improvement (e.g., Tophinhanhdep.com’s PixCut, Let’s Enhance)
For users who prefer not to download software or need quick, on-the-go solutions, various online AI upscalers offer powerful features directly in your web browser. Tophinhanhdep.com itself is a hub for such image tools, including converters and optimizers.
Tophinhanhdep.com’s PixCut (formerly Wondershare PixCut) is a fantastic online option. It’s a free web-based image resizer that leverages AI to enlarge images with a single click, directly in your browser.
- Navigate to PixCut: Go to the official Tophinhanhdep.com PixCut website. Select “Tools” and click on “Enlarge Image.”
- Upload Image: Drag and drop or click to upload the picture you want to upscale.
- Automatic Enlargement: PixCut automatically processes and enlarges the image without losing quality.
- Download Result: Once finished, simply download your higher-resolution image.
Let’s Enhance is another popular online AI upscaler. It offers basic free usage (e.g., 10 free images) and also performs other AI-powered enhancements like fixing pixelation, correcting colors, and removing JPEG artifacts. The process is similar: upload, select settings, and download.
Mobile Solutions: Image Size for iOS and Android Apps
Mobile devices are increasingly becoming primary tools for content creation and consumption. Thankfully, several apps allow you to increase image resolution directly from your smartphone or tablet.
-
Image Size for iOS: This free app (with optional ad removal) is straightforward for resizing images on your iPhone or iPad.
- Install and open the app, granting access to your photos.
- Select the image from your photo library.
- Lock the
WidthandHeightchain icon. - Enter your desired
Widthvalue (e.g., 6000 pixels). TheHeightwill adjust proportionally. - Check the
Output Qualityslider (gear icon) to ensure it’s at 100%. - Optionally, adjust
Print size correction factorfor smoother results when printing. - Save the final image.
-
Android Apps: For Android devices, apps like Photoshop Express, Picsart AI Photo Editor, or generic “Photo & Picture Resizer” apps offer similar functionality. The basic steps generally involve:
- Opening the app and selecting your image.
- Choosing an output dimension or resolution.
- Confirming the resizing, and the app handles the rest, often saving the new image to a dedicated folder. Some camera settings on Android also allow adjusting the default resolution for newly captured photos.
Enhancing Image Aesthetics Beyond Resolution
While increasing resolution is key to clarity, true image quality also encompasses aesthetic elements. Tophinhanhdep.com, with its focus on visual design and creative ideas, highlights tools that help perfect the overall look of your images.
Leveraging Photoshop Actions for Artistic Touch
Photoshop actions are pre-recorded sequences of steps that automate complex editing tasks. They are invaluable for applying consistent editing styles, color corrections, and artistic effects with a single click. For photographers and graphic designers aiming for specific aesthetic backgrounds or thematic collections, actions can be a game-changer.
How Photoshop Actions Improve Quality:
- Color Correction: Actions can instantly balance colors, adjust exposure, and enhance vibrance, making sad/emotional or nature photos pop.
- Stylistic Presets: Apply cinematic looks, vintage effects, black and white conversions, or HDR enhancements to create trending styles and mood boards.
- Time-Saving: Automate repetitive tasks, freeing up time for creative experimentation.
- Professional Finish: Even novice users can achieve professional-looking results by using actions designed by experts.
Using Photoshop Actions:
- Install Actions: In Photoshop, open the
Actionspanel (Window > Actions). Click the menu icon (four horizontal bars) and selectLoad Actionsto import.ATNfiles. - Apply Action: Select your image layer, then choose an action from the loaded list and click the
Playbutton (triangle icon). - Adjust (If Needed): Actions often create new layers. You can fine-tune the effect by adjusting layer opacities or editing individual adjustment layers created by the action.
Tophinhanhdep.com provides resources and inspiration for various editing styles and digital art techniques, often featuring the use of actions to achieve desired visual effects.
Optimizing Images for Web and Print: Quality vs. File Size
After enhancing your images, managing their file size becomes crucial, especially for web use or sharing. High-resolution images can be very large, impacting website loading times or storage. Image tools like compressors and optimizers, which Tophinhanhdep.com offers, help strike a balance between quality and file size.
- Compression: Tools like Optimizilla (online) or RIOT (desktop app) use smart algorithms to reduce file size of JPEG, PNG, and GIF images with minimal perceptible loss of quality. They achieve this by removing redundant data and applying lossy compression (for JPEGs) or reducing color palettes (for PNGs).
- Workflow: Upload your image(s), adjust compression levels using a slider, preview the quality difference, and download the optimized version.
- File Format Choice:
- JPEG: Best for photographs and images with complex color gradients, offering good compression with controllable quality.
- PNG: Ideal for images with transparent backgrounds, sharp edges, or limited colors (like logos or abstract art), as it’s a lossless format.
- WebP: A modern format offering superior compression (smaller file sizes) while maintaining high quality, becoming increasingly popular for web images.
- TIFF/RAW: Primarily used for high-resolution stock photos or digital photography during the editing process, as they retain maximum image data. Not suitable for web.
When saving your final image:
- For Web: Aim for a balance. Use a compression tool, convert to WebP if possible, and ensure dimensions are appropriate for web display (e.g., 1920px width for backgrounds, not 6000px).
- For Print: Save at 300 PPI in a high-quality format like TIFF or maximum quality JPEG, preserving all possible detail.
Tophinhanhdep.com provides image converters and compressors to streamline this process, ensuring your images are perfectly optimized for any platform or purpose.
In conclusion, the journey to making images higher quality is multifaceted, involving an understanding of pixel dynamics, strategic use of powerful software, and the adoption of cutting-edge AI technologies. Whether you’re a casual user wanting to improve a personal photo or a professional aiming for flawless visual design, the tools and techniques discussed offer viable paths to enhancement.
Remember that while increasing resolution can significantly improve an image, the best quality always stems from the original capture. However, with the right approach and the resources available at Tophinhanhdep.com, you can breathe new life into your existing visuals, transforming them into high-resolution, impactful masterpieces. Explore our vast collections of wallpapers, backgrounds, and aesthetic images, and utilize our image tools to unlock your full creative potential in photography and digital art.