Mastering Image Transparency in Google Slides with Tophinhanhdep.com

In today’s visually-driven world, presentations are no longer just about conveying information; they’re about captivating your audience, creating a memorable experience, and reinforcing your message with stunning visuals. Google Slides, a ubiquitous tool for crafting dynamic presentations, offers a myriad of features to achieve this, with image transparency being a cornerstone of sophisticated visual design. Whether you’re aiming for a subtle overlay, a striking layered effect, or a seamless integration of elements, understanding how to adjust transparency can elevate your slides from ordinary to extraordinary.
At Tophinhanhdep.com, we understand the power of compelling visuals. Our extensive collections of Images (including Wallpapers, Backgrounds, Aesthetic, Nature, Abstract, Sad/Emotional, Beautiful Photography), robust Photography resources (featuring High Resolution, Stock Photos, Digital Photography, Editing Styles), and advanced Image Tools (like Converters, Compressors, Optimizers, AI Upscalers, Image-to-Text) are designed to empower creators like you. This guide delves deep into the art of transparency in Google Slides, showcasing not only the practical steps but also how to leverage Tophinhanhdep.com’s resources to achieve unparalleled Visual Design, spark Creative Ideas, and inspire your Image Inspiration & Collections.
The ability to control image and shape opacity is a fundamental skill in Graphic Design and Photo Manipulation. It allows you to introduce depth, highlight critical text, and create a harmonious balance between visual elements and content. This comprehensive tutorial will walk you through the precise steps to make images and shapes transparent in Google Slides, explore advanced applications, troubleshoot common issues, and ultimately help you craft presentations that resonate.
How to Make an Image Transparent in Google Slides: A Step-by-Step Guide
Designing slides that integrate images with overlay text can significantly enhance audience engagement and highlight crucial information. However, often, the vibrancy or intensity of an image can hinder the legibility of your text, making transparency adjustments indispensable. Google Slides provides an intuitive way to manage this through its “Format Options.”
Before you begin, selecting the right image is paramount. Tophinhanhdep.com offers a vast array of High Resolution images across diverse categories like Aesthetic, Nature, Abstract, and Beautiful Photography, perfect for any presentation theme. Choosing an image that complements your content, even before applying transparency, sets the stage for a professional look.
Here’s how to adjust the transparency of an image you’ve already placed in your Google Slides presentation:
Adjusting Transparency for Visual Impact
- Insert Your Image: Start by opening your Google Slides presentation. Navigate to the slide where you wish to add an image. Go to
Insert > Image. You can choose to “Upload from computer,” “Search the web,” “Drive,” “Photos,” “By URL,” or “Camera.” For optimal quality, especially when considering transparency, we recommend using High Resolution images from your personal collection or from Tophinhanhdep.com’s extensive Stock Photos library. - Select the Image: Once your image is on the slide, click on it to select it. You’ll notice blue handles around its perimeter, indicating it’s active.
- Access Format Options: With the image selected, you have two primary ways to open the Format Options panel:
- Go to
Format > Format Optionsfrom the top menu bar. - Alternatively, and often more quickly, right-click directly on the selected image and choose
Format Optionsfrom the contextual menu that appears.
- Go to
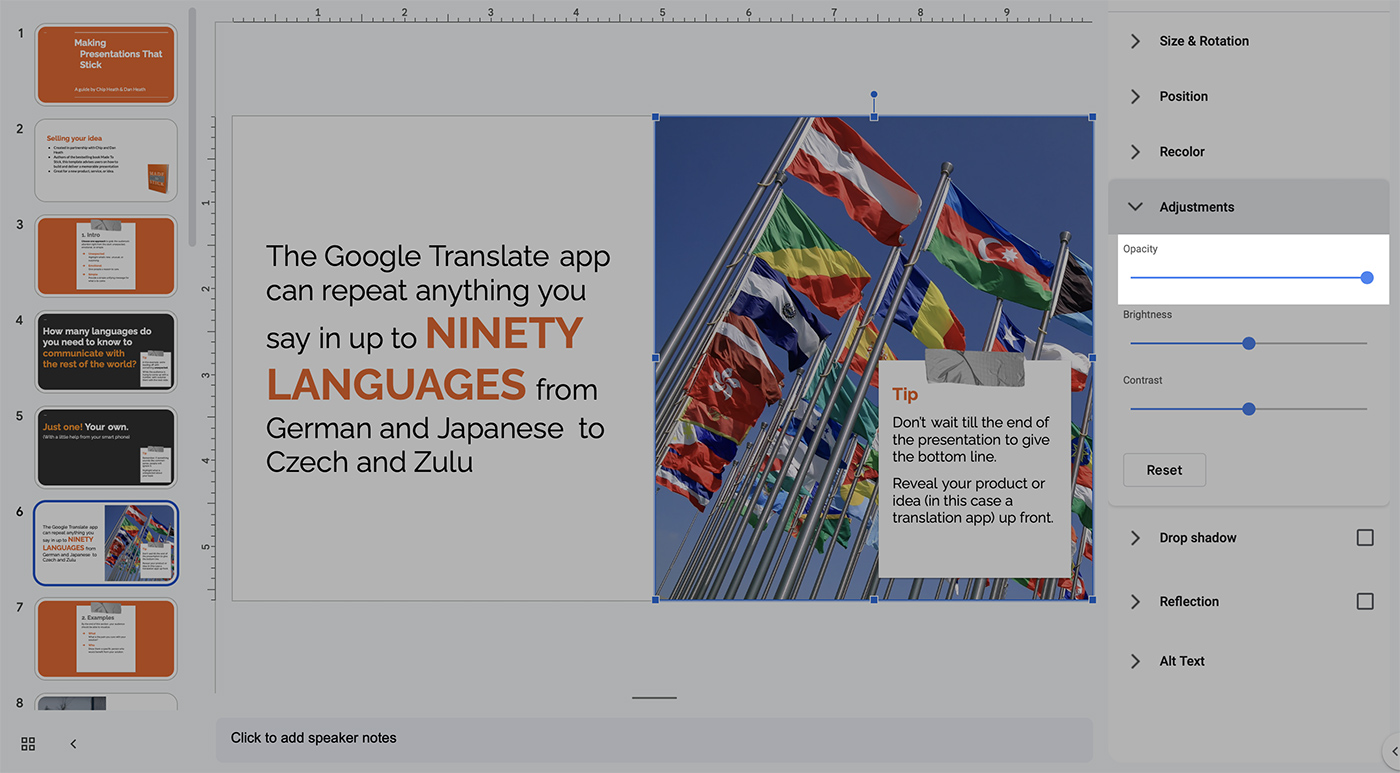
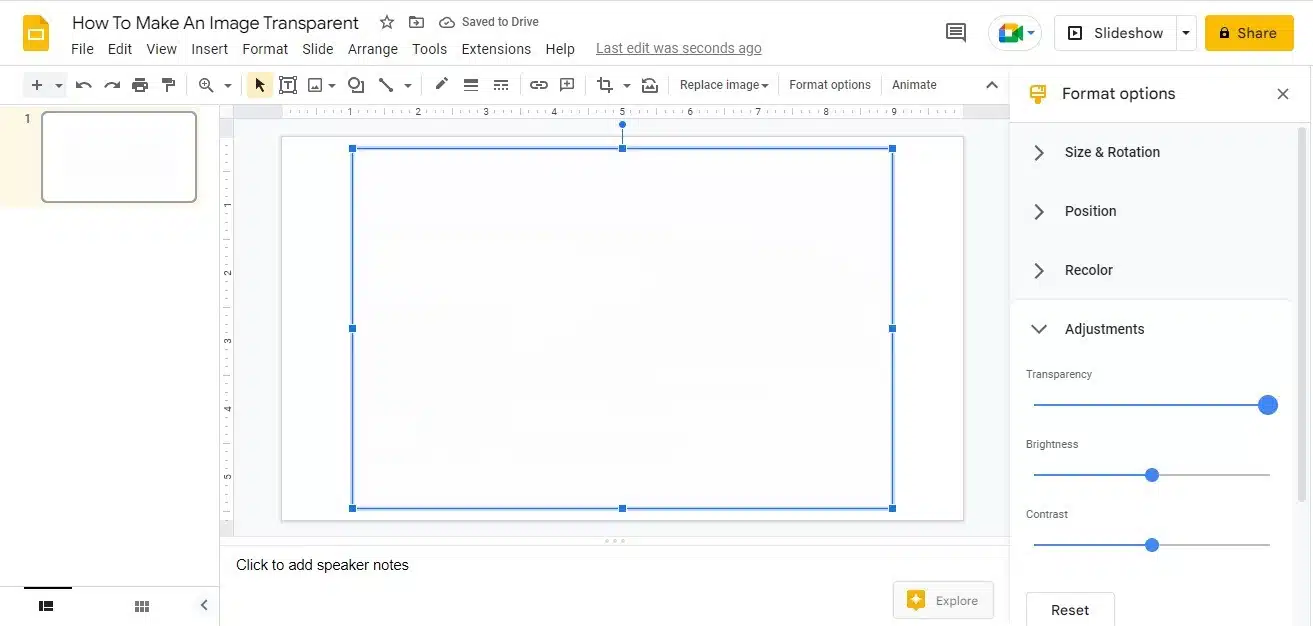
- Expand the Adjustments Menu: A “Format options” sidebar will appear on the right side of your screen. Within this sidebar, look for and expand the “Adjustments” menu. This section is your control hub for fine-tuning your image’s visual properties.
- Utilize the Transparency Slider: Inside the “Adjustments” menu, you’ll find sliders for “Transparency,” “Brightness,” and “Contrast.” To make your image more transparent, click and drag the “Transparency” slider towards the right. Moving it left will make the image more opaque.
- Pro Tip for Visual Design: Experiment with the “Brightness” and “Contrast” sliders in conjunction with transparency. A slightly brighter and less contrasted image might blend more seamlessly as a background when made transparent, enhancing the overall Aesthetic of your slide.
- Refine and Overlay: Once you’ve achieved your desired level of transparency, observe how it interacts with any overlay text or other elements you plan to add. You can now easily insert a text box (
Insert > Text box) over the image and add your presentation title, subtitles, or other relevant information. The transparency ensures that your text remains highly legible while the image provides rich Visual Design and context without overwhelming the viewer.

This technique is invaluable for creating subtle backgrounds from Nature scenes or Abstract patterns, allowing your content to shine while maintaining a captivating visual foundation. It’s a core element of effective Digital Photography application within presentations, transforming ordinary slides into engaging visual narratives.
How to Make a Shape Transparent in Google Slides
Beyond images, Google Slides also allows you to manipulate the transparency of shapes, opening up another realm of Creative Ideas for your Visual Design. Transparent shapes can serve as subtle highlights, sophisticated overlays, or design elements that add depth without obstructing underlying content. The process for shapes differs slightly from images, especially when it comes to custom color and opacity controls.
Customizing Shape Opacity and Color
Adjusting the transparency level of a shape is synonymous with changing its opacity. Whether you want a partially see-through accent or a completely invisible placeholder, Google Slides provides the tools.
Here’s how to make a shape transparent in Google Slides:
- Insert a Shape: Go to
Insert > Shape > Shapesfrom the top menu. Choose any shape that suits your Graphic Design needs, such as a rectangle, circle, or arrow. Draw it onto your slide. - Select the Shape: Click on the newly inserted shape to select it.
- Access Fill Color Options: In the toolbar at the top, locate the “Fill color” icon (which looks like a paint bucket). Click on it.
- Choose a Custom Color: From the color palette that appears, you can select a standard color. However, to adjust transparency, you need to select the “Custom” option (usually a plus icon or “Custom…” at the bottom of the palette).
- Adjust the Transparency Slider: A custom color window will open. This window features a color picker, options for HEX codes, and crucially, a “Transparency” slider. Drag this slider towards the right to increase the shape’s transparency (making it more see-through) or towards the left to reduce it (making it more opaque).
- Tip for Precision: You can also enter a specific HEX color code for precise branding, then adjust its transparency. This ensures brand consistency, a key aspect of Visual Design.
- Apply and Overlay: Once you’re satisfied with the transparency level, click “OK” or “Add” to apply the changes. You can then add text boxes or other elements over the shape, creating dynamic layouts, highlighted sections, or subtle Aesthetic backgrounds for your text.
Making a Shape Completely Transparent
There are instances where you might want a shape to be completely invisible, perhaps as a clickable hot-spot or an organizational placeholder.
- Select the Shape: Click on the shape you want to make completely transparent.
- Go to Fill Color: Click the “Fill color” icon (paint bucket) in the toolbar.
- Select “Transparent”: Instead of going to “Custom,” you will see a direct option labeled “Transparent” in the standard color palette. Click this, and your shape’s fill will become completely invisible. Its border, if present, will still be visible unless you also make the border transparent using the “Border color” options.
This technique is incredibly useful for advanced Graphic Design and Photo Manipulation within Google Slides, allowing for intricate layering and interaction design.
How to Make a Background Transparent in Google Slides: Two Approaches
The concept of a “transparent background” in Google Slides can refer to two distinct but equally powerful techniques, each contributing uniquely to Visual Design and Creative Ideas. The first involves making an entire image, used as a slide’s background, partially transparent. The second, more advanced method, focuses on removing the background from an object within an image to make it transparent, allowing the main subject to float seamlessly over your slide content. Tophinhanhdep.com offers invaluable Image Tools to facilitate both approaches.
Utilizing Images as Slide Backgrounds with Transparency
This method is ideal when you want an immersive visual experience, where a stunning Wallpaper or Background from Tophinhanhdep.com underlies your content without overpowering it.
- Insert an Image as a Slide Background:
- Go to
Insert > Imageand choose your source (e.g., “Upload from computer”). Select a High Resolution image, perhaps a serene Nature landscape or an intriguing Abstract pattern from Tophinhanhdep.com. - Once the image appears on your slide, manually resize it by dragging its corner handles until it covers the entire slide canvas.
- Go to
- Send the Image to the Back: This crucial step ensures that your background image remains behind all other elements (text boxes, shapes, other images).
- Right-click on the image.
- From the contextual menu, select
Order > Send to back.
- Adjust Image Transparency: Now that the image is a true background, you can apply transparency to it, just as you would any other image.
- With the background image still selected, go to
Format > Format Options(or right-click and selectFormat Options). - In the right-hand sidebar, expand the “Adjustments” menu.
- Locate the “Transparency” slider and drag it towards the right to increase transparency. Adjust until your background image creates the desired subtle effect, allowing your foreground elements to pop while contributing to the overall Aesthetic.
- With the background image still selected, go to
This technique is fantastic for creating mood-setting slides, like introducing a presentation with a gently fading Beautiful Photography image, or providing a consistent Background across multiple slides without distracting from the main message. It’s a core Visual Design strategy that utilizes Digital Photography effectively.
Removing Image Backgrounds for Object Isolation (External Tool Integration)
Sometimes, you don’t want the entire image to be transparent; instead, you want to cut out a specific object or person from its original background and place it cleanly onto your slide, creating an image with a truly transparent background around the subject. Google Slides does not have a native “remove background” feature for complex images that preserves only the foreground object. This is where Tophinhanhdep.com’s advanced Image Tools come into play.
Tophinhanhdep.com offers a powerful Background Remover tool, which leverages AI Upscalers and smart algorithms to precisely detect and isolate subjects from their backgrounds. This is an essential step for Photo Manipulation and achieving sophisticated Graphic Design effects in your presentations.
Here’s how to achieve this effect using Tophinhanhdep.com:
- Prepare Your Image: Choose an image where you want to isolate the main subject. This could be a picture of a product, a person, or any object you wish to integrate seamlessly into your slide. Tophinhanhdep.com’s Stock Photos often come with clean subjects, but any image can be processed.
- Utilize Tophinhanhdep.com’s Background Remover:
- Open your web browser and navigate to Tophinhanhdep.com.
- Look for the “Image Tools” section and select the “Background Remover.”
- Upload your image. Tophinhanhdep.com’s intelligent algorithms will automatically process it, removing the background and presenting you with the isolated object on a transparent canvas.
- Download and Optimize:
- Once processed, download the image with its transparent background from Tophinhanhdep.com. The output will typically be a PNG file, which supports transparency.
- Before uploading to Google Slides, consider using Tophinhanhdep.com’s Compressors or Optimizers if the file size is very large. This ensures your presentation remains fast and responsive, especially when dealing with multiple High Resolution images.
- Insert into Google Slides:
- Return to your Google Slides presentation.
- Go to
Insert > Image > Upload from computerand select the newly downloaded transparent PNG from Tophinhanhdep.com. - The image will appear on your slide with its background completely removed, allowing the subject to blend perfectly with your slide’s existing Background or other elements.
- Position and Layer: You can now freely resize, rotate, and position this transparent-background image anywhere on your slide. Use the
Orderoption (right-click on image> Order) to adjust its layering relative to text boxes or other shapes, enabling complex Visual Design and Photo Manipulation effects like collages or Mood Boards.
This method is particularly effective for adding a Personal touch to your slides with images of people or objects without the clutter of their original surroundings. It brings elements of Digital Art and advanced Editing Styles directly into your Google Slides workflow.
Making Multiple Images Transparent in Google Slides
For larger projects requiring numerous transparent images, efficiency is key. While Google Slides doesn’t offer a single “batch transparency” button, there are smart workflows to speed up the process, especially when combined with Tophinhanhdep.com’s capabilities.
Method 1: Applying Transparency to Grouped Images (Same Transparency Level)
If you want several images to have the same level of partial transparency and be treated as a single unit on one slide:
- Upload All Images: Drag and drop all desired images from your computer onto a single Google Slide, or insert them one by one. Ensure these are High Resolution images, ideally sourced from Tophinhanhdep.com’s Stock Photos or Thematic Collections.
- Group the Images:
- Select all the images you want to group. You can do this by clicking and dragging your mouse to create a selection box around them, or by clicking on one image and then holding
Shiftwhile clicking on the others. - Once all are selected, go to
Arrange > Groupfrom the top menu.
- Select all the images you want to group. You can do this by clicking and dragging your mouse to create a selection box around them, or by clicking on one image and then holding
- Adjust Transparency for the Group:
- With the grouped images still selected, open the
Format Optionssidebar. - Expand “Adjustments” and use the “Transparency” slider. The transparency adjustment will now apply uniformly to all images within the group.
- With the grouped images still selected, open the
- Ungroup for Individual Placement (Optional): If you later need to move or resize individual images from the group, simply right-click the group and select
Ungroup. You can then cut (Ctrl+XorCmd+X) and paste (Ctrl+VorCmd+V) individual images onto different slides or rearrange them as needed, applying Creative Ideas to each slide.
Method 2: Batch Background Removal with Tophinhanhdep.com (For Object Isolation)
If your goal is to remove backgrounds from multiple images to isolate subjects, Tophinhanhdep.com provides a more efficient solution than manual cropping in most basic tools. While a direct “desktop app” for batch processing might exist on Tophinhanhdep.com for advanced users (similar to what was mentioned for remove.bg), the web-based tool can handle images one by one very quickly. For extreme bulk processing, Tophinhanhdep.com’s API or desktop integration might be available for subscribers, which would directly align with the “Image Tools” and “Optimizers” categories.
For most users, simply processing images individually on Tophinhanhdep.com’s web interface is incredibly fast:
- Process Images on Tophinhanhdep.com: Go to Tophinhanhdep.com’s “Background Remover” tool. Upload images one by one or in small batches if the interface supports it. Download each image as it’s processed. This rapid process leverages AI Upscalers to ensure the edges are crisp even after background removal.
- Upload to Google Slides: Once you have all your transparent PNGs, upload them to Google Slides. You can drag and drop multiple files onto a slide, or insert them via
Insert > Image. - Allocate and Arrange: Now you can individually place, resize, and order each transparent-background image on your desired slides, composing complex Visual Design layouts or Mood Boards with ease. This provides unparalleled freedom for Digital Art and advanced Photo Manipulation.
Advanced Techniques and Tophinhanhdep.com Tools for Enhanced Visuals
Mastering basic transparency is just the beginning. The interplay of transparency with other design elements and the strategic use of Image Tools from Tophinhanhdep.com can unlock a higher level of Visual Design and Creative Ideas in your Google Slides presentations.
Layering Shapes and Text with Transparent Overlays
Transparency is the cornerstone of sophisticated layering. You can:
- Create Depth: Place a semi-transparent shape over a Background image (e.g., an Abstract wallpaper from Tophinhanhdep.com) and then place your text over the shape. This creates separation, making text readable while preserving the background’s visual appeal.
- Highlight Key Areas: Use a brightly colored, semi-transparent rectangle or circle (adjusting its opacity via the “Custom” fill color option) behind specific text or icons to draw attention, much like a digital highlighter. This is a subtle yet effective Graphic Design technique.
- Subdued Backgrounds: Apply a large, semi-transparent rectangle over the entire slide, giving a uniform tint to a busy Beautiful Photography background. This can make text stand out more effectively without changing the original image’s brightness or contrast.
Utilizing Transparent Gradients
Google Slides allows you to apply gradient fills to shapes. You can further enhance this by making parts of the gradient transparent:
- Insert and Select a Shape: As before, insert your desired shape.
- Apply Gradient Fill: Go to the “Fill color” icon, but instead of selecting a solid color, choose “Gradient.” You can pick from pre-set gradients or create a custom one.
- Custom Gradient Transparency: In the custom gradient editor, for each color stop in your gradient, you can individually adjust its transparency slider. This allows you to create gradients that fade from an opaque color to complete transparency, adding a truly dynamic feel to your Visual Design. Imagine an element slowly fading into a Nature background.
Combining Transparency with Animations
Adding animations to transparent elements can create stunning visual transitions and add Digital Art flair:
- Animate Transparent Shapes/Images: Select your transparent shape or image. Go to
Insert > Animation. Choose an entrance or exit animation (e.g., “Fade in,” “Fly in”). - Smooth Visual Transitions: A transparent shape that “fades in” or “fades out” can smoothly reveal or conceal content, making your presentation more dynamic and engaging. This technique, when applied thoughtfully, greatly contributes to the overall Aesthetic and professional feel of your slides.
Tophinhanhdep.com’s Ecosystem for Visual Excellence
Tophinhanhdep.com is more than just an image repository; it’s a comprehensive platform for all your visual needs, directly supporting advanced Google Slides design:
- Image Collections & Inspiration: Explore Photo Ideas, Mood Boards, Thematic Collections, and Trending Styles on Tophinhanhdep.com to find the perfect visual narrative for your presentation. Whether you need Sad/Emotional imagery for a poignant message or vibrant Wallpapers for an energetic pitch, Tophinhanhdep.com has you covered.
- High Resolution & Stock Photography: Ensure your transparent images remain crisp and professional, even after resizing or opacity adjustments, by starting with High Resolution assets from Tophinhanhdep.com’s Stock Photos library.
- Image Tools Beyond Transparency:
- Converters: Easily convert image formats if needed, ensuring compatibility with Google Slides.
- Compressors/Optimizers: Reduce file sizes without compromising quality, making your presentations load faster and perform smoother – crucial when incorporating many Beautiful Photography images.
- AI Upscalers: If you have a lower-resolution image you want to make transparent and then scale up, Tophinhanhdep.com’s AI Upscalers can enhance its quality, preventing pixelation. This is invaluable for Digital Photography work.
- Image-to-Text: While not directly related to transparency, Tophinhanhdep.com’s image-to-text tools can help extract information from complex visual documents, which might then be presented clearly on a transparent background.
By integrating these tools and resources, you’re not just making images transparent; you’re orchestrating a symphony of visual elements to create truly impactful presentations.
Best Practices for Transparency in Google Slides and Beyond
Thoughtful application of transparency goes beyond merely making something see-through; it’s about enhancing communication, maintaining an Aesthetic balance, and ensuring legibility. Here are some best practices:
- Prioritize Legibility: The primary goal of any presentation is to communicate effectively. While transparent backgrounds and overlays are visually appealing, always ensure your text remains easy to read.
- Contrast is Key: Use contrasting colors between your text and the transparent element. For instance, white text over a dark, transparent overlay, or vice-versa.
- Subtle Shadows: Adding a subtle “Drop Shadow” (found in “Format Options”) to your text can significantly improve its readability over a complex or semi-transparent background.
- Maintain Brand Consistency: If your presentation adheres to specific brand guidelines, use custom colors for shapes and adjust their transparency accordingly. Tophinhanhdep.com encourages this kind of meticulous Visual Design for professional outcomes.
- Experiment with Different Levels: Don’t settle for the first transparency setting. Drag the slider back and forth, viewing your slide in “Present” mode to see how it looks to an audience. The ideal transparency level often depends on the image’s inherent busyness and the amount of text you’re overlaying.
- Consider the Overall Mood: Transparency can significantly influence the Aesthetic and mood of your slides. A highly transparent, desaturated Background image might evoke a serious or contemplative mood, while a brightly colored, moderately transparent overlay can convey energy. Tophinhanhdep.com’s Mood Boards and Thematic Collections can guide your choices.
- Use High-Quality Source Images: Always start with High Resolution images. When you make an image transparent, especially if it’s scaled, a low-resolution image will quickly become pixelated or blurry, undermining your Visual Design efforts. Tophinhanhdep.com is your go-to source for professional-grade Stock Photos and Beautiful Photography.
- Troubleshooting Common Issues:
- Transparency Slider Not Showing for Shapes: Remember to click “Fill color” or “Border color,” then select “Custom” to reveal the transparency slider for shapes.
- Image Not Appearing Transparent: Ensure you’ve selected the image itself and are using the “Transparency” slider in the “Adjustments” section of “Format options.” For shapes, verify you’re adjusting the “Fill color” transparency, not just the border.
- Text Visibility Over Transparent Shapes: If text is hard to read, slightly increase the shape’s transparency, change the text color for better contrast, or add a subtle text shadow.
Conclusion: Elevate Your Presentations with Tophinhanhdep.com and Transparency
The ability to make images and shapes transparent in Google Slides is a powerful feature that transforms standard presentations into engaging visual experiences. It’s a key skill in Visual Design and Graphic Design, enabling creators to achieve depth, highlight information, and seamlessly integrate diverse visual elements. From subtle background washes using Nature or Abstract imagery to sharp object cutouts from Beautiful Photography, transparency offers a spectrum of Creative Ideas.
As you embark on your journey to master these techniques, remember that the quality of your source materials and the efficiency of your workflow are paramount. Tophinhanhdep.com stands as your indispensable partner, providing an extensive library of High Resolution Images and Stock Photos across every conceivable category (including Wallpapers, Backgrounds, Aesthetic, Sad/Emotional, Beautiful Photography). Beyond inspiring Image Inspiration & Collections, our robust Image Tools – including Background Removers, Compressors, Optimizers, and AI Upscalers – streamline the Digital Photography and Photo Manipulation processes, ensuring your transparent visuals are always pristine and impactful.
By combining the native capabilities of Google Slides with the advanced resources available at Tophinhanhdep.com, you are equipped to create presentations that are not just informative, but truly captivating. Experiment, innovate, and let transparency be the element that elevates your next Google Slides masterpiece. Your audience will thank you for the stunning Visual Design and the clear, compelling message you deliver.