How to Make Image Transparent in Photoshop: A Comprehensive Guide for Tophinhanhdep.com Users

In the dynamic world of digital imagery and visual storytelling, the ability to manipulate and refine your photos is paramount. For creators on Tophinhanhdep.com, whether you’re curating stunning wallpapers, crafting intricate digital art, or enhancing your high-resolution photography, knowing how to make an image transparent in Adobe Photoshop is an indispensable skill. A transparent background isn’t just a technical tweak; it’s a creative superpower that unlocks endless possibilities for graphic design, photo manipulation, and effective branding.
This comprehensive guide, tailored for the diverse needs of Tophinhanhdep.com users, will walk you through various methods to achieve image transparency in Photoshop. From quick, AI-powered solutions to meticulous manual selection techniques and even the creation of transparent gradients, you’ll discover how to elevate your visual content, protect your work, and integrate images seamlessly into any visual design project. We’ll explore why transparency matters for your aesthetic compositions, how it supports your stock photo aspirations, and how it integrates with other image tools to optimize your workflow.
![]()
The Power of Transparency in Visual Design
A transparent background fundamentally changes how an image interacts with its surroundings. Instead of being confined by a solid, often distracting, rectangular box, your subject can float freely, allowing for seamless integration into other images, web layouts, or graphic designs. This capability is central to many of the visual design principles championed on Tophinhanhdep.com.
Why Transparent Backgrounds Matter for Your Tophinhanhdep.com Images
![]()
Imagine creating a mood board for a new thematic collection. With transparent elements, you can layer different aesthetic images, textures, and graphic elements without harsh edges, creating a cohesive and visually appealing composition. For digital artists, a transparent canvas is the starting point for complex digital art pieces, allowing them to paint or draw without being constrained by a fixed background color. Photographers can isolate subjects from their original settings, placing them into new, imaginative backgrounds for compelling photo manipulation. Whether you’re designing a new wallpaper, preparing a background for a web project, or showcasing your beautiful photography, transparent images offer unparalleled flexibility. They enable you to:
- Create dynamic compositions: Easily combine elements from multiple images.
- Enhance branding: Place logos and watermarks without an unsightly box around them.
- Improve web design: Integrate images that adapt to any website background.
- Isolate subjects: Highlight the focus of your photography or digital art.
- Build versatile assets: Develop images that can be reused across various projects on Tophinhanhdep.com and beyond.
Protecting Your Photographic Masterpieces
One of the most compelling reasons photographers on Tophinhanhdep.com seek transparent image capabilities is for watermarking. Your hard work, whether it’s high-resolution nature shots, abstract art, or emotional portraiture, is valuable. In the age of easy digital distribution, safeguarding your intellectual property has never been more critical. A transparent watermark, subtly yet effectively placed, discourages unauthorized use and ensures your credit remains with your creative output. While no method guarantees absolute protection against copyright theft, a well-designed transparent watermark serves as a powerful deterrent and a clear declaration of ownership. It’s a vital tool in the digital photography toolkit, helping you claim your work without distracting from its inherent beauty.
Quick and Automated Transparency in Photoshop
Adobe Photoshop, renowned for its sophisticated image tools, has continually evolved to simplify complex tasks. Recent updates, particularly for versions Photoshop 2020 (v21.0.0) and later, introduce powerful artificial intelligence (AI) features that can automate much of the background removal process, saving valuable time for Tophinhanhdep.com creators.
Leveraging Photoshop’s AI for Instant Background Removal
For many images, especially those with clearly defined subjects and contrasting backgrounds, Photoshop’s AI can perform near-instant background removal. This feature, powered by the “Select Subject” tool, intelligently identifies the main focus of your image and separates it from the background with remarkable precision.
Here’s how to use this quick method:
- Open Your Image: Launch Adobe Photoshop and open the image file you wish to make transparent. You can do this by navigating to “File” > “Open” or by simply dragging your image into the Photoshop workspace.
- Access the Properties Panel: If it’s not already visible, go to “Window” > “Properties” to open the Properties panel, usually located on the right side of your workspace.
- Utilize Quick Actions: Within the Properties panel, locate the “Quick Actions” section. Here, you’ll find a button labeled “Remove Background.”
- Click and Wait: Click “Remove Background.” Photoshop’s AI will then analyze your image, identify the subject, and automatically create a layer mask that hides the background, revealing a checkered pattern indicating transparency. This process usually takes only a few seconds.
Important Note: The checkered pattern signifies transparency in Photoshop. When saved in a compatible format (like PNG), these areas will be completely clear.
While incredibly efficient, the AI-powered “Remove Background” tool might not always achieve perfection, especially with very complex images, intricate details like hair, or backgrounds that blend too closely with the subject. In such cases, further refinement or a more manual approach may be necessary.
Initial Setup: Duplicating Layers for Non-Destructive Editing
Before making any significant changes, whether automated or manual, it’s always best practice to work non-destructively. This means making changes on a duplicate layer, preserving your original image data. This way, you can always revert to the original if something goes awry, or experiment without fear of permanent alteration.
- Duplicate the Background Layer: Once your image is open, locate the “Layers” panel (if not visible, go to “Window” > “Layers”). Your image will likely be on a “Background” layer, often locked with a padlock icon.
- Unlock and Duplicate: Right-click on the “Background” layer and select “Duplicate Layer…” (or simply drag the layer to the “New Layer” icon at the bottom of the Layers panel). You can rename the new layer for clarity (e.g., “Subject Layer”).
- Hide the Original: Click the eye icon next to the original “Background” layer to make it invisible. You will now be working on your duplicate layer, allowing you to see the transparency underneath as you proceed.
This simple step ensures that your original image remains untouched, providing a safety net for all your creative explorations on Tophinhanhdep.com.
Mastering Manual Background Removal Techniques
While AI tools offer speed, manual techniques in Photoshop provide unparalleled precision and control, essential for achieving flawless results on complex images for your Tophinhanhdep.com portfolio or design projects. Mastering these methods ensures you can tackle any background removal challenge, regardless of the image’s complexity.
Choosing the Right Selection Tool for Every Scenario
Photoshop offers a diverse arsenal of selection tools, each suited for different types of image edges and complexities. Selecting the appropriate tool for the job is the first step towards efficient and accurate background removal.
- Magic Wand Tool: Ideal for backgrounds that are largely a single, solid color, or have high contrast with the subject. It selects contiguous pixels of similar color.
- How to use: Select the Magic Wand Tool (W). In the Options bar, adjust the “Tolerance” (a lower value for less variation, higher for more). Click on the background area you want to select. Hold Shift to add to the selection. Once selected, press Delete. You may need to repeat for different areas.
- Lasso Tools (Lasso, Polygonal Lasso, Magnetic Lasso):
- Polygonal Lasso: Best for objects with straight, well-defined edges. You click to create straight-line segments around your subject.
- Magnetic Lasso: Great for objects with fairly defined edges but also curves. It “snaps” to the edge of the object as you drag your mouse along it.
- Lasso Tool: For freehand selections, useful for rough outlines or very irregular shapes.
- Object Selection Tool: (Photoshop 21.0.0+) An intelligent tool that allows you to draw a rough rectangle or lasso around an object, and Photoshop will automatically detect and select it. This is a step up from “Select Subject” when you have multiple objects and only want one.
- Marquee Tools (Rectangular, Elliptical): For objects that are perfectly rectangular or elliptical. Draw the marquee around the object, then proceed to delete the background or create a layer mask.
- Quick Selection Tool: Drags like a paintbrush to quickly select areas. It’s intelligent and tries to guess what you want to select. Good for a quick initial selection that can then be refined.
The Art of Refining Edges with Select and Mask
For subjects with intricate details like hair, fur, or complex textures, the “Select and Mask” workspace is your ultimate refinement tool. This dedicated environment allows for precise edge adjustments that are difficult to achieve with basic selection tools alone.
Steps to use Select and Mask:
- Make an Initial Selection: Start with any of the primary selection tools (e.g., Quick Selection, Object Selection, or even the AI-powered “Select Subject”). Get a decent, though not necessarily perfect, selection of your subject.
- Enter Select and Mask: With your selection active (you’ll see “marching ants”), go to “Select” > “Select and Mask” (or click the “Select and Mask” button in the Options bar if a selection tool is active).
- Adjust View Mode: In the Properties panel of the Select and Mask workspace, change the “View Mode” to “On Layers” (or “Overlay,” “On Black,” etc.) to better see your selection against a transparent or colored background. Adjust the “Opacity” slider to your preference.
- Refine Edge Brush Tool: Crucially, use the “Refine Edge Brush Tool” (often the second icon from the top in the left toolbar within Select and Mask). Brush along challenging edges like hair or fur. Photoshop’s intelligent algorithms will analyze the pixels and separate the foreground from the background with incredible accuracy.
- Adjust Global Refinements: Experiment with the “Global Refinements” sliders in the Properties panel:
- Smooth: Reduces jagged edges.
- Feather: Softens the edge transition.
- Contrast: Creates a harder edge.
- Shift Edge: Expands or contracts the selection boundary.
- Output Settings: In the “Output Settings” section, choose “Output To: Layer Mask.” This applies your refined selection as a non-destructive mask, allowing for future adjustments. Click “OK.”
You’ll return to your main Photoshop workspace with your subject cleanly cut out on a layer mask, ready for integration into any visual design or Tophinhanhdep.com aesthetic.
Final Touches: Lasso, Eraser, and Layer Management
Even after using “Select and Mask,” there might be small areas that need attention. This is where a combination of traditional tools and careful layer management comes into play.
- Refining with Lasso Tools: If you have an active layer mask (which you should, from the “Select and Mask” step), you can use any of the Lasso tools. Select the mask thumbnail in the Layers panel. Use a Lasso tool to select unwanted background areas that are still visible, then fill them with black (to hide) using the Paint Bucket Tool or simply pressing Delete (if your foreground color is black). Conversely, select areas of the subject that were accidentally hidden and fill with white (to reveal).
- The Eraser Tool for Cleanup: For very fine adjustments, the Eraser Tool (E) can be used directly on the layer mask. Remember: painting with black erases (hides), and painting with white reveals. By selecting the layer mask thumbnail and using a soft-edged brush, you can gently erase (or paint back) pixels to perfect your cutout.
- Layer Management for Backgrounds: Once your subject is perfectly isolated on its transparent layer, you can delete the original background layer (if you haven’t already hidden it). You now have a transparent image. You can then:
- Save it as a PNG (as discussed later) to preserve transparency.
- Add a new background layer (e.g., a solid color, a texture, or another image from your Tophinhanhdep.com collection) to blend your subject into a new scene.
- Blur the new background for depth, a popular photo manipulation technique.
This meticulous approach ensures that your high-resolution images meet the exacting standards required for professional digital photography and visual design on Tophinhanhdep.com.
Crafting Transparent Watermarks and Logos
For photographers and businesses showcasing their work on Tophinhanhdep.com, a professional watermark or logo with a transparent background is essential for branding and copyright protection. Photoshop provides the tools to create both simple text-only watermarks and more complex graphic logos, ensuring they seamlessly integrate with your images.
Simple Text-Only Watermarks for Branding
A text-only watermark is the most straightforward way to brand your images. It’s quick to create and effective, ensuring your name or business is visible without overpowering your beautiful photography.
Steps to create a text-only watermark:
- Create a New Project: In Photoshop, go to “File” > “New.” For a watermark that you’ll embed, you’ll want a small canvas. A good starting point is 600 pixels wide by 400 pixels high.
- Set Background to Transparent: Crucially, in the “New Document” dialog box, ensure the “Background Contents” dropdown is set to “Transparent.” If you miss this step, your watermark will have a solid background that you’ll have to manually remove later.
- Add a New Layer (Optional but Recommended): Though not strictly necessary for text on a transparent background, it’s good practice. Go to “Layer” > “New” > “Layer.”
- Select the Text Tool: Choose the “Type Tool” (T) from the toolbar.
- Type Your Watermark: Click on your transparent canvas and type your name, business name, or desired text (e.g., “© YourName Photography”).
- Customize Font and Color: In the Options bar (at the top) or the “Character” panel (Window > Character), adjust the font, size, and color. Consider a neutral or light color that stands out on various backgrounds without being overly distracting. A semi-transparent white or light gray often works well.
- Adjust Opacity (Optional): In the Layers panel, you can reduce the “Opacity” of the text layer to make the watermark more subtle.
- Save Your Text Watermark: Go to “File” > “Save As.” Select “PNG (*.PNG)” as the file format. This preserves the transparency. Click “Save” and then “OK.”
You now have a ready-to-use transparent text watermark that you can embed into any of your Tophinhanhdep.com images.
Designing a Graphic Logo with a Transparent Background
If your brand identity includes a graphic element or a more complex logo, creating it with a transparent background allows for maximum versatility. This process is similar to creating a text watermark but allows for the inclusion of shapes, vector art, or royalty-free icons.
Steps to create a graphic logo with a transparent background:
- Create a New Project with Transparent Background: As with the text watermark, start with “File” > “New.” Set your canvas dimensions (e.g., 600x400 pixels) and ensure “Background Contents” is set to “Transparent.”
- Design Your Logo:
- Shapes Tool: Use Photoshop’s “Shape Tools” (U) to create geometric shapes. You can combine multiple shapes, adjust their colors, and even apply layer styles.
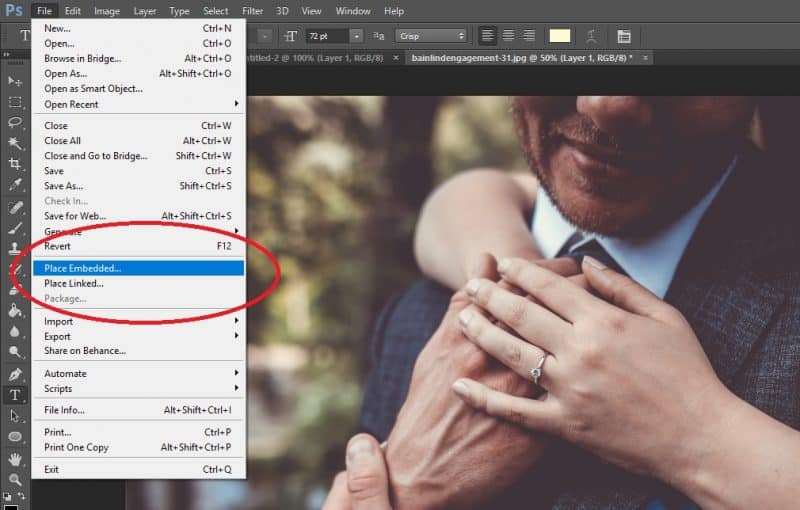
- Custom Graphics/Icons: If you have a pre-designed icon or vector art (e.g., from a royalty-free resource), import it by going to “File” > “Place Embedded.” Photoshop will place it on its own layer.
- Text Integration: Add your business name or slogan using the “Type Tool” (T), just as with the text-only watermark.
- Ensure All Elements are on Transparent Layers: As you add shapes or text, Photoshop automatically places them on new layers. If you place an external image that has a background, you’ll need to follow the background removal steps (AI or manual) discussed earlier to make its background transparent.
- Refine and Arrange: Adjust the size, position, and blending modes of your logo elements until you are satisfied. Ensure your logo maintains readability and impact while being aesthetically pleasing.
- Check for Unwanted Backgrounds: Double-check that there are no remaining solid background areas. The checkered pattern should be visible behind all parts of your logo.
- Save Your Logo File: Go to “File” > “Save As.” Choose “PNG (*.PNG)” as the format to preserve transparency. Saving as “PNG-24” is often recommended for logos for better quality. Click “Save” and then “OK.”
Applying Your Transparent Watermark/Logo to Photos:
- Open Your Target Image: Open the photo you wish to watermark in Photoshop.
- Place the Logo: Go to “File” > “Place Embedded.” Navigate to where you saved your transparent PNG logo file and select it.
- Position and Scale: Photoshop will place your logo on a new layer. You can drag it to your desired position (e.g., bottom right/left) and use the transform handles (Ctrl/Cmd+T) to scale it appropriately.
- Adjust Opacity (Optional): Lower the opacity of the logo layer in the Layers panel to make it less obtrusive.
- Save the Watermarked Image: Once satisfied, go to “File” > “Save As.” You can save it as a JPEG for web use (which will flatten the image and incorporate the transparent logo) or as a PSD if you want to retain layers for future edits.
By following these steps, you can create and apply professional-grade transparent watermarks and logos, effectively branding your beautiful photography and digital art on Tophinhanhdep.com.
Adding Depth with Transparent Gradients
Beyond simply removing backgrounds, Photoshop also allows you to create transparent gradients – a powerful visual design technique for adding subtle fades, blending colors, or creating ethereal effects. This is particularly useful for web backgrounds, aesthetic compositions, or creating unique visual transitions for your Tophinhanhdep.com projects.
Creating a Gradient from Foreground to Transparent
The simplest way to introduce transparency into a gradient is by leveraging Photoshop’s built-in “Foreground to Transparent” gradient preset. This allows for a smooth fade from a solid color to complete transparency.
Steps to create and apply a transparent gradient:
- Select the Gradient Tool: Choose the “Gradient Tool” (G) from the toolbar.
- Set Foreground Color: In your toolbar, click on the foreground color swatch and choose the color you want your gradient to start with (e.g., black, white, or any color relevant to your visual design).
- Choose “Foreground to Transparent”: In the Options bar at the top, click on the gradient thumbnail to open the Gradient Picker. Under the “Basics” set, select the second option, which is typically “Foreground to Transparent.”
- Add a New Layer: Before applying, it’s always best to apply gradients on a new, separate layer for non-destructive editing. Go to “Layer” > “New” > “Layer.”
- Apply the Gradient: On your new layer, click and drag your mouse across the canvas where you want the gradient to appear. The direction and length of your drag will determine the gradient’s spread and direction. For example, dragging from bottom to top will create a fade from your foreground color at the bottom to transparency at the top.
You can experiment with different drag directions (linear, radial, angle, reflected, diamond) from the Options bar to achieve various effects. This technique is perfect for subtle background fades or blending an image into a solid color.
Advanced Gradient Editing and Application via Layer Styles
For more complex transparent gradients, multi-color fades, or applying gradients non-destructively to existing layers, the “Gradient Editor” and “Layer Styles” panel offer extensive control. This allows Tophinhanhdep.com artists to craft highly customized visual effects.
Using the Gradient Editor for advanced control:
- Access Gradient Editor: With the “Gradient Tool” (G) selected, click the gradient thumbnail in the Options bar, then click on the gradient preview in the dialog box to open the “Gradient Editor.”
- Understand Color and Opacity Stops:
- Color Stops: These are the small squares below the gradient bar. Double-click a color stop to change its color. Click anywhere below the bar to add new color stops, creating multi-color gradients.
- Opacity Stops: These are the small squares above the gradient bar. Select an opacity stop, then use the “Opacity” slider to adjust the transparency at that specific point in the gradient. You can add multiple opacity stops to create intricate transparent fades (e.g., fading in, then becoming solid, then fading out again).
- Save Custom Gradients: Once you’ve created a unique transparent gradient, click the “New” button in the Gradient Editor to save it for future use in your Tophinhanhdep.com projects.
Applying Gradients via Layer Styles (Gradient Overlay):
This method applies a gradient as a non-destructive layer effect, allowing you to easily modify or remove it later.
- Select Your Layer: In the Layers panel, select the layer to which you want to apply the gradient. This could be a text layer, a shape layer, or even an image layer.
- Open Layer Style: Double-click on the layer thumbnail (not the name or mask) or click the “fx” icon at the bottom of the Layers panel and choose “Gradient Overlay.”
- Configure Gradient Overlay: In the “Layer Style” dialog box, select “Gradient Overlay.”
- Click on the gradient preview to open the “Gradient Editor” and create or select your desired transparent gradient (as described above).
- Adjust the “Blend Mode,” “Opacity,” “Style” (Linear, Radial, etc.), “Angle,” and “Scale” to fine-tune how the gradient interacts with your layer.
- Apply and Refine: Click “OK” to apply the gradient. The gradient is now a “Layer Effect” visible below your layer in the Layers panel. You can double-click “Gradient Overlay” at any time to re-edit it.
Transparent gradients are powerful tools for digital art and photo manipulation, allowing you to create stunning visual effects that add depth and professionalism to your Tophinhanhdep.com content.
Essential Saving Practices for Transparent Images
After investing time and effort in making your images transparent, the final step—saving them correctly—is crucial. Incorrect saving can lead to losing all your transparency work, turning your perfectly cut-out subject back into a rectangle with a solid white or black background. Understanding file formats is key for Tophinhanhdep.com users dealing with high-resolution images and visual design.
The Importance of PNG for Preserving Transparency
When you need an image to maintain its transparency, the PNG (Portable Network Graphics) format is your go-to choice. Unlike JPEG, which is a lossy format primarily designed for photographs with solid backgrounds, PNG supports true transparency (alpha channels). This means that areas designated as transparent in Photoshop will remain transparent when the image is saved and then placed on a website, in a document, or layered over another image.
How to save as PNG:
- Finalize Your Image: Ensure all transparent areas are correctly displayed as the checkered pattern in Photoshop.
- Go to Save As: Navigate to “File” > “Save As” (or “File” > “Save a Copy” in newer Photoshop versions).
- Select PNG Format: In the “Save As” dialog box, click the “Save as type” (Windows) or “Format” (macOS) dropdown menu and select “PNG (*.PNG).”
- PNG Options: A “PNG Options” dialog box may appear. For most web and design purposes, choosing “Interlace: None” and “Compression: Smallest/Slow” (or just default settings) is sufficient.
- Save: Click “OK” and choose your desired location.
Saving your logos, watermarks, and isolated subjects as PNGs ensures they are versatile assets for all your Tophinhanhdep.com image collections and visual design projects.
Why Save as PSD?
While PNG is essential for the final transparent output, saving a copy of your work as a PSD (Photoshop Document) file is equally vital for a non-destructive workflow.
Reasons to save as PSD:
- Preserves Layers: PSD files retain all your layers, layer masks, adjustment layers, text layers, and smart objects. This means you can reopen the file later and make adjustments to any individual element without affecting others.
- Editable Text: Text layers remain fully editable, allowing you to change fonts, colors, or wording.
- Future Edits: If your client or Tophinhanhdep.com project requires a slight modification to a logo or a subtle tweak to a background removal, having the PSD allows you to do so quickly without starting from scratch.
- Project Archiving: PSDs serve as the master files for your digital photography and graphic design projects, ensuring that you always have a fully editable version available.
How to save as PSD:
- Go to Save As: Navigate to “File” > “Save As.”
- Select Photoshop Format: In the “Save As” dialog box, choose “Photoshop (*.PSD)” from the format dropdown.
- Save: Click “Save” to preserve your layered file.
It’s a best practice to always save both a PSD (for editing) and a PNG (for final transparent output) for any image where you’ve invested significant manipulation, particularly for your high-resolution images destined for Tophinhanhdep.com.
Conclusion
The ability to make an image transparent in Photoshop is more than just a technical skill; it’s a gateway to advanced visual design and creative freedom. For Tophinhanhdep.com users, whether you’re a photographer looking to protect your work, a graphic designer crafting aesthetic compositions, or simply optimizing images for web use, mastering these transparency techniques is indispensable.
We’ve covered everything from Photoshop’s AI-powered quick actions to the meticulous detail of manual selection tools, the artistry of transparent gradients, and the crucial steps for saving your work correctly. Each method offers a pathway to seamless image integration, enhanced branding, and stunning photo manipulation.
Now that you’re equipped with these powerful techniques, we encourage you to experiment. Dive into your image collections, explore new photo ideas, and use transparency to transform your digital art and photography. The tools you’ve learned will enable you to curate more impactful mood boards, develop unique thematic collections, and contribute to the trending styles that define Tophinhanhdep.com. Go forth and create truly stunning images that speak volumes, unburdened by solid backgrounds.