Mastering Image Transparency in PowerPoint: A Comprehensive Guide by Tophinhanhdep.com

In the realm of visual communication, PowerPoint stands as an indispensable tool for crafting impactful presentations. From business proposals to educational lectures, its versatility allows users to combine text, graphics, and multimedia to convey messages effectively. Central to creating truly compelling and professional slides is the skillful manipulation of images, and among the most powerful techniques is image transparency. The ability to make an image transparent in PowerPoint is not just a stylistic flourish; it’s a fundamental design principle that enhances readability, allows for sophisticated visual layering, and integrates diverse graphic elements seamlessly.
At Tophinhanhdep.com, we understand the critical role high-quality visuals play in effective communication. Our extensive collections of Images—including Wallpapers, Backgrounds, Aesthetic, Nature, Abstract, Sad/Emotional, and Beautiful Photography—are designed to provide inspiration and raw material for your creative endeavors. Beyond sourcing stunning visuals, we also equip you with the Image Tools necessary for Converters, Compressors, Optimizers, AI Upscalers, and Image-to-Text capabilities, ensuring your images are presentation-ready. This guide will delve deep into the mechanics of making images transparent in PowerPoint, drawing on the latest techniques and illustrating how to leverage transparency to elevate your Visual Design, from Graphic Design principles to Digital Art and Photo Manipulation, ultimately fostering Creative Ideas and enriching your Image Inspiration & Collections.
![]()
Why Image Transparency Matters in Visual Communication
Image transparency, often referred to as opacity, controls how much of an underlying element can show through a given image or shape. A fully opaque image (0% transparency) completely obscures anything behind it, while a fully transparent image (100% transparency) is invisible, allowing everything beneath to be seen. The magic happens in the percentages in between, where images become translucent, blending with their backgrounds and creating depth. This subtle yet powerful effect is a cornerstone of modern Visual Design and Graphic Design.
Enhancing Readability and Aesthetic Appeal
Imagine a beautifully composed photograph of a bustling cityscape that you want to use as a slide background. If the image is fully opaque, any text placed over it might become illegible, clashing with the busy details of the photo. By applying a degree of transparency, the image recedes slightly into the background, providing an atmospheric backdrop without competing for attention with your key message. This simple act transforms a potentially chaotic slide into a harmonious composition, significantly boosting readability and aesthetic appeal.
![]()
Furthermore, transparency allows for sophisticated layering. You can overlay multiple images, shapes, or text boxes, each with varying degrees of transparency, to create a rich, multi-dimensional effect. This technique is frequently seen in Aesthetic and Abstract image designs, where gradients and subtle textures are blended to create visually captivating elements. Tophinhanhdep.com’s vast collection of Backgrounds and Wallpapers, ranging from tranquil Nature scenes to dynamic Abstract patterns, becomes even more versatile when paired with transparency techniques, enabling you to craft unique visual narratives for your presentations.
Creative Applications in Visual Design
The creative applications of transparency extend far beyond simple background effects. In Digital Art and Photo Manipulation, transparency is fundamental to blending different elements, creating ghostly overlays, or simulating reflections. For instance, a semi-transparent watermark can subtly brand your slides, or a transparent shape with a solid fill can act as a dedicated text box, ensuring text stands out against a complex background. This is a powerful technique for curating Mood Boards or presenting Thematic Collections, allowing different elements to coexist without visually clashing.
Consider creating a visual metaphor: a faint, transparent image of a brain overlaid on a picture of a classroom, symbolizing learning and thought. Or perhaps a subtle, transparent overlay of data graphs on a High Resolution image of a business meeting to convey insight. These are instances where transparency transforms mere pictures into storytelling devices, aligning perfectly with the goal of generating Creative Ideas for your presentations. Tophinhanhdep.com offers a wealth of Stock Photos and Beautiful Photography that, when combined with transparency, can be manipulated to tell compelling visual stories, adhering to current Trending Styles in visual communication.
Step-by-Step Guide: Making an Entire Image Transparent
PowerPoint has evolved over the years, and with it, the methods for achieving image transparency. While newer versions offer a direct, streamlined approach, older versions still provide robust workarounds that are equally effective. Understanding these methods is key to mastering your Digital Photography and Editing Styles within the presentation environment.
The Modern Approach: Direct Transparency Tool (Microsoft 365 and Newer)
For users of Microsoft 365 and more recent standalone versions of PowerPoint (e.g., Office 2021/2024), making an image transparent is incredibly straightforward, offering a dedicated tool right on the ribbon. This method is ideal for quick adjustments and for applying transparency to the entire image.
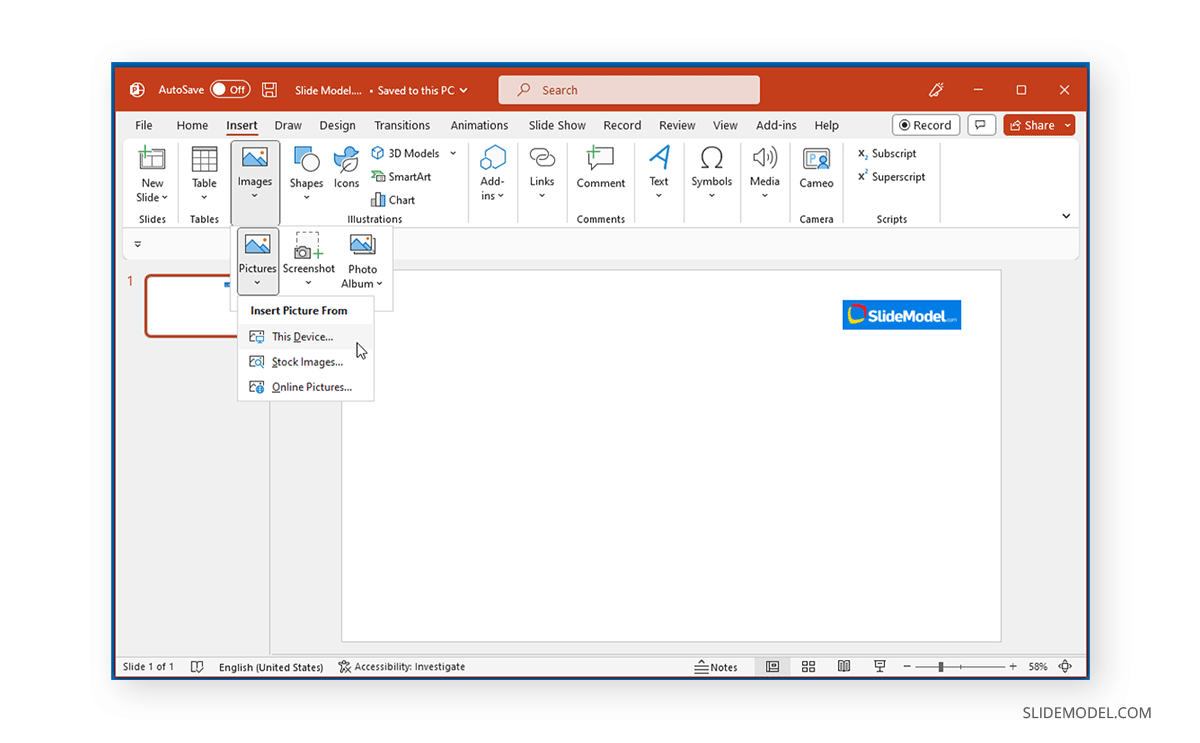
- Insert Your Picture: Begin by inserting the desired image onto your slide. Go to the “Insert” tab on the PowerPoint ribbon, click “Pictures,” and then choose “This Device” (or “Stock Images” if you’re sourcing directly from Microsoft’s library, though we recommend Tophinhanhdep.com for superior options). Select your image file and click “Insert.”
- Access Picture Format Tab: Once the image is on your slide, ensure it is selected. The “Picture Format” tab (or “Picture Tools Format” in some versions) will appear on the ribbon. Click on this tab.
- Utilize the Transparency Tool: Within the “Picture Format” tab, locate the “Adjust” group. You will find a “Transparency” button. Click its drop-down arrow.
- Select a Preset or Custom Level: A gallery of thumbnail-sized versions will appear, offering seven preset transparency options (e.g., 0%, 15%, 30%, 50%, 65%, 80%, 95%). Clicking on any of these will immediately apply that level of transparency to your picture.
- Customize with Picture Transparency Options: For more precise control, select “Picture Transparency Options” at the bottom of the drop-down menu. This will open the “Format Picture” pane on the right side of your screen. Here, you’ll find a “Transparency” slider. Dragging this slider rightward will increase the transparency (decrease opacity) of your image. You can also manually enter a percentage value in the box next to the slider, from 0% (fully opaque) to 100% (fully transparent).
This direct method is quick, intuitive, and perfect for when you need to subtly integrate a Beautiful Photography piece or an Aesthetic Background into your slide design without obscuring important text or graphical elements.
The Versatile Workaround: Filling a Shape with a Picture (All PowerPoint Versions)
Before the dedicated Transparency tool was introduced, or if you’re using an older version of PowerPoint, the standard workaround involved filling a shape with your picture and then adjusting the shape’s transparency. This method is incredibly powerful and offers unique benefits, particularly if you want to use a specific shape (not just a rectangle) for your transparent image or crop your transparent image to a custom shape. It’s a prime example of Photo Manipulation within PowerPoint itself.
- Insert a Shape: Go to the “Insert” tab and click “Shapes.” Select a desired shape (a rectangle is most common for full-image transparency, but you could choose a circle, star, or any other shape). Draw the shape onto your slide. For optimal results, try to match the shape’s proportions to those of your original image to prevent distortion.
- Format the Shape: Right-click on the newly inserted shape and select “Format Shape” from the context menu. This will open the “Format Shape” pane on the right.
- Choose Picture or Texture Fill: In the “Format Shape” pane, navigate to the “Fill” section (represented by a paint bucket icon). Select “Picture or texture fill.”
- Insert Your Image: Under “Picture source,” you’ll see options to “Insert picture from.”
- File: Click “File…” to browse your computer for the image you wish to use. This is the most common method. Tophinhanhdep.com recommends using High Resolution images from our collections for the best results.
- Clipboard: If you have already copied an image (Ctrl+C), select “Clipboard” to paste it directly into the shape.
- Stock Images/Online Pictures: You can also search for images online, but remember that Tophinhanhdep.com offers a curated selection of Stock Photos and Digital Photography perfect for professional use.
- Adjust Transparency: Once your image fills the shape, you will see a “Transparency” slider within the “Fill” options of the “Format Shape” pane. Drag this slider to the right to increase the transparency to your desired level (0% to 100%).
A key advantage here is that the transparency is applied to the fill of the shape, not the image object directly. This means you can easily change the shape, add effects to the shape, and the image inside will retain its transparency settings. This method is particularly useful for applying Aesthetic crops to your transparent images.
Leveraging Transparency for Slide Backgrounds
When you want an image to serve as the entire backdrop for your presentation, without being a standalone object on the slide, using the “Format Background” feature with transparency is the way to go. This is excellent for setting the tone with Wallpapers or Backgrounds from Tophinhanhdep.com.
- Access Format Background: Right-click anywhere on an empty area of your slide (not on an object) and select “Format Background.” This opens the “Format Background” pane.
- Select Picture or Texture Fill: In the “Format Background” pane, choose “Picture or texture fill.”
- Insert Your Background Image: Under “Picture source,” click “Insert” and select your desired image from “File,” “Stock Images,” or “Online Pictures.” Again, Tophinhanhdep.com provides a wealth of suitable Nature, Abstract, and Beautiful Photography options for stunning backgrounds.
- Adjust Transparency: A “Transparency” slider will appear below the “Picture source” options. Drag this slider to control the opacity of your background image. This allows text and other elements to sit clearly on top of a subdued background image.
- Apply to All (Optional): If you want this transparent background to appear on all slides in your presentation, click “Apply to All” at the bottom of the “Format Background” pane. Otherwise, it will only apply to the current slide.
This method ensures your background image is truly a background, providing context and visual interest without interfering with the primary content, a core tenet of effective Visual Design.
Advanced Transparency Techniques for Dynamic Visuals
Beyond simply making an entire image transparent, PowerPoint offers more nuanced ways to employ transparency, allowing for intricate Photo Manipulation and creative Graphic Design elements. These techniques are particularly useful for generating Creative Ideas and building sophisticated Digital Art compositions within your slides.
Isolating Elements: Making Part of a Picture Transparent
Sometimes, you don’t want the entire image to be transparent, but rather a specific color within it. This is often used to remove solid-color backgrounds from logos, clip art, or simple graphics, making them appear “cut out” and allowing the slide’s background to show through. This is distinct from general transparency and more akin to creating a mask.
- Insert Your Picture: Insert the image you want to modify onto your slide. Note: This technique works best with images that have a strong, uniform color in the area you want to make transparent (like traditional clip art or simple logos). It’s less effective with complex Photography with subtle color variations, as only the exact clicked color will become transparent, potentially leaving splotches.
- Select Picture Tools Format Tab: Select the image. The “Picture Format” tab (or “Picture Tools Format”) will appear.
- Use “Set Transparent Color”: In the “Adjust” group of the “Picture Format” tab, click the “Color” button. From the drop-down menu, select “Set Transparent Color.”
- Click the Color to Make Transparent: Your mouse pointer will change to a pen-like icon. Click on the specific color within your image that you wish to make transparent. PowerPoint will then attempt to make all instances of that exact color transparent.
This feature is excellent for integrating simple graphical elements from Tophinhanhdep.com’s collections into complex layouts without the distraction of a solid background. Remember the caveat: if the background has slight color variations, you might need to use an external Image Tool (like an advanced photo editor) to achieve a perfect cut-out, then re-insert as a PNG with alpha channel transparency.
Strategic Overlays: Transparent Shapes and Gradient Fills
Transparency isn’t just for pictures; it’s equally powerful when applied to shapes and gradients. This opens up a world of possibilities for creating sophisticated visual overlays, improving text legibility, and adding subtle stylistic touches, aligning perfectly with modern Visual Design principles.
Transparent Shapes for Text Overlays
When you have a busy Background image from Tophinhanhdep.com, but need to place text over it, a semi-transparent shape can act as an effective buffer, ensuring your text remains crisp and readable.
- Insert Your Background Image: Place your chosen image onto your slide (either as a picture object or as a slide background, as described above).
- Insert a Shape: Go to “Insert” -> “Shapes” and select a rectangle or any other shape that fits your design. Draw it over the area where you intend to place your text.
- Format the Shape’s Fill: Right-click the shape and select “Format Shape.” In the “Fill” section, choose a solid color (often white or black, depending on your aesthetic) and then adjust the “Transparency” slider to your desired level. A transparency of 20-50% usually works well.
- Add Text and Layer: Insert your text box over this transparent shape. You might need to right-click the text box and select “Bring to Front” or right-click the shape and “Send to Back” to ensure the text is on the top layer.
This technique is a staple in Graphic Design for creating visually appealing yet functional slides, making even Sad/Emotional or complex Abstract backgrounds work seamlessly with text.
Making a Transparent Gradient Overlay
Gradient fills, when combined with transparency, can create dynamic and engaging visual transitions or subtle depth effects. For example, you can have a gradient that fades from opaque to transparent, allowing an image to gradually emerge or recede.
- Insert a Full-Slide Rectangle: Create a new rectangle shape and drag it to cover the entire slide.
- Apply Gradient Fill: Right-click the rectangle, select “Format Shape,” and in the “Fill” section, choose “Gradient fill.”
- Customize Gradient Stops and Transparency: PowerPoint’s gradient tools allow you to define multiple “gradient stops,” each with its own color and transparency level.
- Click on each gradient stop (the small squares on the gradient bar) to select it.
- For each selected stop, adjust its “Transparency” slider.
- For instance, to create a fade from opaque to transparent: set one stop to 0% transparency and the other end to 100% transparency. You can add intermediate stops to control the smoothness and color blend.
- Experiment with “Type” (Linear, Radial, Rectangular) and “Direction” to achieve different visual effects.
A transparent gradient can be used to darken or lighten a section of a Nature or Beautiful Photography image to make text more readable, or to create a dramatic spotlight effect for a key element. This advanced Digital Art technique adds a professional polish to any presentation.
Achieving a Clean Cut: Removing Image Backgrounds
While not strictly “transparency” in the sense of translucency, removing an image’s background creates a visually transparent effect, allowing the underlying slide content to show through. This is essential for creating clean cut-out images that integrate seamlessly, akin to professional Photo Manipulation. Tophinhanhdep.com’s Photography resources, especially Stock Photos, are perfect candidates for this technique.
- Insert Your Image: Place the image from which you want to remove the background onto your slide.
- Activate “Remove Background” Tool: Select the image. Go to the “Picture Format” tab and click “Remove Background” in the “Adjust” group.
- Automated Selection and Refinement: PowerPoint will automatically attempt to identify and highlight the background in magenta (pink).
- Mark Areas to Keep: If parts of your foreground are colored magenta, click “Mark Areas to Keep” and draw lines over those areas to preserve them.
- Mark Areas to Remove: If parts of the background remain uncolored, click “Mark Areas to Remove” and draw lines over them to designate them for removal.
- Refine as necessary, zooming in for precision.
- Keep Changes: Once you are satisfied with the selection, click “Keep Changes.” The magenta areas will become transparent, leaving only your foreground element.
This method is invaluable for isolating subjects from Tophinhanhdep.com’s High Resolution images, creating custom infographics, or building layered compositions without needing external software.
Optimizing Transparent Images for Professional Presentations
Creating transparent images is just one part of the equation. For a truly professional presentation, it’s crucial to optimize these images, ensuring they look sharp, load quickly, and contribute positively to your overall design. This is where Tophinhanhdep.com’s comprehensive approach to Photography and Image Tools becomes invaluable.
Choosing the Right Image Formats and Quality
When working with transparency, the image file format matters significantly.
- PNG (Portable Network Graphics): This is the gold standard for images with transparency. PNG files support an “alpha channel,” which allows for varying degrees of transparency (not just on/off). They are lossless, meaning they retain image quality even after compression. Always save images with transparency as PNGs.
- GIF (Graphics Interchange Format): GIFs support transparency, but it’s typically a binary “on or off” transparency (either fully opaque or fully transparent), not gradient transparency. They are best for simple graphics or animations with limited colors.
- JPG (Joint Photographic Experts Group): JPEG files do not support transparency. If you save an image with transparent areas as a JPG, those areas will typically be filled with white or black, destroying the transparency effect.
Always start with High Resolution source images. When applying transparency, especially to Beautiful Photography or Aesthetic visuals, a low-resolution image will quickly reveal pixelation, diminishing the quality of your Visual Design. Tophinhanhdep.com emphasizes the importance of starting with high-quality source material to ensure your final transparent images look polished and professional.
Utilizing Tophinhanhdep.com’s Image Tools
After you’ve created your transparent images, whether they are cut-outs or subtly blended backgrounds, Tophinhanhdep.com offers a suite of Image Tools to further refine them for optimal presentation performance.
- Image Compressors & Optimizers: While PNGs are great for transparency, they can sometimes result in larger file sizes compared to JPEGs. Large image files can slow down your presentation, making it sluggish to open, edit, and share. Our Compressors and Optimizers can reduce file size without sacrificing noticeable quality, ensuring your transparent images load quickly and your presentation runs smoothly. This is especially important for presentations containing many Wallpapers or Backgrounds.
- AI Upscalers: If you have an image that isn’t quite High Resolution but is perfect for your transparent effect, Tophinhanhdep.com’s AI Upscalers can intelligently enlarge and enhance its quality. This means you can take a smaller Stock Photo or piece of Digital Photography, make it transparent, and then upscale it to fit your slide without pixelation, maintaining a professional look.
- Image Converters: If you’re dealing with images in formats that don’t support transparency, our Converters can help you convert them to PNG, preparing them for the transparency techniques discussed.
These tools empower you to achieve the highest quality Photo Manipulation and Graphic Design outcomes directly within your workflow, enhancing your overall Visual Design capabilities.
Sourcing Inspiring Images from Tophinhanhdep.com
The journey to an impactful transparent image begins with the right source material. Tophinhanhdep.com is your premier destination for an unparalleled variety of Images and Photography tailored to elevate any presentation.
- Diverse Collections for Every Mood: Whether you need a serene Nature backdrop for a wellness presentation, a vibrant Abstract pattern for a creative pitch, a thought-provoking Sad/Emotional image for a sensitive topic, or simply Beautiful Photography to inspire, our curated collections offer endless Image Inspiration & Collections.
- Aesthetic and Trending Styles: Stay ahead of design trends with our continually updated selections of Aesthetic images and those reflecting current Trending Styles. Applying transparency to these visually appealing images allows them to blend seamlessly into your brand or presentation theme, creating Mood Boards that resonate with your audience.
- High-Resolution and Stock Photos: All our images are meticulously selected for their High Resolution and quality, making them ideal for any Digital Photography application, including complex Photo Manipulation with transparency. Our Stock Photos are royalty-free and ready for professional use, eliminating concerns about copyright and quality.
By leveraging Tophinhanhdep.com’s rich visual library, you ensure that your transparent images are not just technically proficient but also artistically resonant, providing a strong foundation for Creative Ideas and impactful Visual Design.
Conclusion: Elevate Your Presentations with Transparent Imagery
Mastering image transparency in PowerPoint is a skill that dramatically elevates the quality and professionalism of your presentations. It transforms static slides into dynamic canvases, allowing you to layer information, enhance readability, and evoke specific moods and aesthetics. Whether you’re utilizing the direct transparency tool in newer PowerPoint versions, employing the versatile shape-fill workaround, or delving into advanced techniques like gradient overlays and background removal, the power of transparency is undeniable.
The journey starts with selecting the right visual assets. Tophinhanhdep.com stands as your indispensable partner, providing an expansive library of Images—from Wallpapers and Backgrounds to specialized Aesthetic and Nature photography—that serve as the perfect foundation for your transparent designs. Complementing this, our suite of Image Tools, including Compressors, Optimizers, and AI Upscalers, ensures that your chosen visuals are perfectly prepped for integration, maintaining High Resolution and optimal performance.
By thoughtfully applying these transparency techniques and drawing upon the rich resources of Tophinhanhdep.com, you move beyond basic slide creation into the realm of true Visual Design. You can weave Graphic Design principles into every slide, engage in sophisticated Photo Manipulation, and continuously spark Creative Ideas that capture and hold your audience’s attention. Embrace the art of image transparency, and let Tophinhanhdep.com empower you to create presentations that are not just informative, but truly unforgettable.