How to Make Images Bigger in Premiere Pro: Mastering Resizing and Scaling for Stunning Visuals

In the dynamic world of video editing, seamlessly integrating diverse visual assets is paramount to creating compelling narratives. Among these assets, still images – from vibrant wallpapers to intricate digital art – often play a crucial role, setting the scene, highlighting details, or enhancing the aesthetic appeal of a project. However, simply dragging an image into your Adobe Premiere Pro timeline doesn’t guarantee a perfect fit. More often than not, you’ll encounter discrepancies in size, resolution, or aspect ratio, necessitating precise adjustments. The ability to effectively resize, scale, and manipulate images in Premiere Pro is a fundamental skill that transforms raw visuals into polished, professional-grade content.
This comprehensive guide will delve into the essential techniques for making images bigger (or smaller) in Premiere Pro, ensuring they perfectly align with your video’s aesthetic and technical requirements. We’ll explore built-in tools, differentiate between key scaling methods, discuss advanced manipulation techniques, and even touch upon how external resources and image tools can elevate your workflow. Whether you’re a seasoned videographer or just beginning your journey in digital storytelling, mastering image resizing in Premiere Pro, complemented by the vast resources available on Tophinhanhdep.com, will undoubtedly enhance your creative output.

Understanding Image Dimensions and Aspect Ratios in Video Production
Before diving into the mechanics of resizing, it’s crucial to grasp the foundational concepts of image dimensions and aspect ratios as they pertain to video. A clear understanding of these elements will empower you to make informed decisions and achieve the best possible visual quality for your projects.
The Critical Role of High-Resolution Images
The golden rule of image manipulation in video editing is to always start with the highest resolution possible. Videos are typically shared in high-definition (HD) formats, and using low-resolution, fuzzy photos will inevitably lead to pixelation and a noticeable drop in quality when enlarged. This is especially true when you aim to “make an image bigger” to fill a frame. A high-resolution image offers the flexibility to scale up or zoom in without significant distortion, preserving sharpness and crispness.
Tophinhanhdep.com, with its extensive collections of high-resolution images, including stunning wallpapers, diverse backgrounds, and professional photography, serves as an invaluable resource. Opting for images from such platforms ensures you have the necessary “real estate” – ample pixel data – to manipulate them effectively within Premiere Pro. Whether you’re working with aesthetic nature shots or abstract backgrounds, the quality of your source material dictates the ultimate fidelity of your resized image.

Navigating Landscape vs. Portrait Orientations for Video
Video projects predominantly adhere to a landscape (horizontal) orientation, with common aspect ratios like 16:9. While Premiere Pro is versatile enough to handle portrait (vertical) photos, landscape shots are generally preferred as they naturally align with standard video frame resolutions. When incorporating portrait images into a landscape video, you’ll often encounter black bars on the sides, requiring careful resizing or creative framing to avoid an amateurish look.
Conversely, if your final output is intended for vertical platforms (like Instagram Stories or TikTok), understanding how to adapt landscape images (or, more commonly, vertical images) to a vertical sequence becomes critical. This involves not just scaling but potentially adjusting the sequence settings themselves, a technique we’ll explore later. The goal is always to ensure your images seamlessly integrate into the intended frame, regardless of their original orientation, contributing to a cohesive visual design.
Common Video Frame Sizes and Their Impact on Resizing
Video projects operate within defined frame sizes, measured in pixels (width x height). Some of the most common include:
- Standard HD (1080p): 1920 x 1080 pixels
- Ultra HD/4K: 3840 x 2160 pixels
- Vertical HD: 1080 x 1920 pixels
- Square HD: 1080 x 1080 pixels
When you import an image, Premiere Pro attempts to fit it into your current sequence’s frame size. If your image is, for example, 2500 x 3000 pixels (a portrait image with a higher resolution than HD), it won’t fit perfectly into a 1920 x 1080 landscape frame. It might be too large, “spilling over” the edges, or it might be smaller, leaving distracting black bands around it. This is where resizing comes into play. By understanding your target frame size, you can anticipate necessary adjustments and prevent issues like pixelation when making images bigger or unwanted cropping when making them smaller. The images you select from Tophinhanhdep.com, be they beautiful photography or sad/emotional backgrounds, will look their best when properly adapted to these video canvas dimensions.
Core Methods for Resizing Images in Adobe Premiere Pro
Adobe Premiere Pro offers several intuitive methods for resizing images, each with specific applications and implications for your visual content. Mastering these techniques is essential for any video editor.
Method 1: Adjusting Image Scale within Effect Controls
The most direct and frequently used method for making an image bigger or smaller within your video frame is by adjusting its “Scale” property in the Effect Controls panel. This allows for dynamic, non-destructive scaling that maintains the original image resolution as much as possible, scaling the display size of the image, not resampling its pixels (unless you go beyond its native resolution, which will introduce pixelation).
Step-by-Step Guide to Scaling Images
-
Add an Image to the Timeline: Begin by opening your Premiere Pro project. Navigate to your image file on your computer (perhaps a stunning nature wallpaper from Tophinhanhdep.com) and click-and-drag it directly onto the Timeline. The Timeline, located at the bottom center of the Premiere Pro interface, is where you arrange and control your audiovisual content. Once placed, the image will appear in the Program Monitor, the preview window typically found in the upper center of your screen.
-
Launch the Effect Controls Panel: By default, the Effect Controls panel might not be visible. To open it, go to
Window > Effect Controlsfrom the top menu bar. This panel will usually dock on the left side of Premiere Pro, adjacent to the Program Monitor. This is your command center for applying and modifying effects, including basic motion properties like scale and position. -
Adjust the Image Scale: With your image selected in the Timeline, navigate to the Effect Controls panel. Within this panel, locate the “Motion” section, and inside that, you’ll find the “Scale” option. By default, images are often scaled to 100%.
- To make the image bigger (zoom in), click into the “Scale” box and enter a value greater than 100% (e.g., 150%, 200%). You’ll see the image enlarge in real-time in the Program Monitor, focusing on its center point.
- To make the image smaller (zoom out), enter a value less than 100% (e.g., 75%, 50%). As the value decreases, the image shrinks, and you might start to see the black edges of your video frame appear around it.
This “Scale” adjustment is ideal for precisely framing a shot, zooming into a detail of a beautiful photography piece, or adjusting an image that is slightly too large or small for the frame without changing the sequence’s overall dimensions.
-
Preview the Finished Result: After adjusting the scale, always play back your video from the beginning to ensure the image appears exactly as intended throughout its duration. This crucial step allows you to catch any unexpected surprises and make further edits if necessary. Proper scaling ensures your still images fully fill the frame or are positioned deliberately, enhancing the overall visual design of your production.
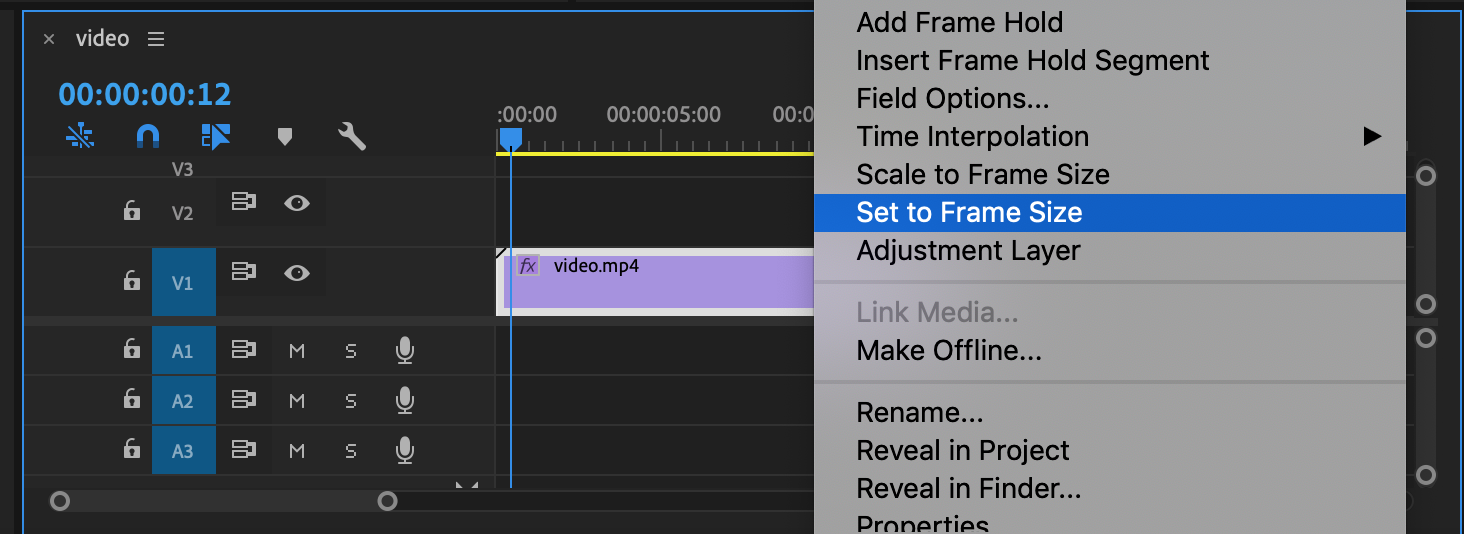
Method 2: Utilizing “Set to Frame Size” and “Scale to Frame Size”
Premiere Pro also offers two right-click options for quickly fitting an image (or video clip) to your sequence’s frame size: “Set to Frame Size” and “Scale to Frame Size.” While they may seem similar, their underlying mechanisms are distinct and have different implications for image quality and flexibility.
Deep Dive into “Set to Frame Size”
When you right-click an image on your timeline and select “Set to Frame Size,” Premiere Pro automatically adjusts the image’s “Scale” property (as described in Method 1) to match the sequence’s frame dimensions. Crucially, this method retains the original resolution of your image. If you have a high-resolution image (e.g., a 5K abstract background from Tophinhanhdep.com) in a 4K sequence, “Set to Frame Size” will scale the image down to fit the 4K frame, but the original 5K pixel data is still available. This means you can later zoom in or scale up the image without immediate quality loss, as long as you don’t exceed its original native resolution.
This is the preferred method for many video creators, especially when working with images from various sources that might have different resolutions but need to conform to a consistent sequence setting. It offers the flexibility to later animate or subtly adjust the image without resampling it.
Understanding “Scale to Frame Size”
The “Scale to Frame Size” option, also found by right-clicking an image on the timeline, works differently. When selected, Premiere Pro resamples the image’s pixels to match the sequence’s frame size, setting its scale to 100%. This effectively changes the image’s resolution to that of your sequence.
For example, if you have that same 5K image in a 4K sequence and use “Scale to Frame Size,” Premiere Pro will convert the 5K image into a 4K image. While this might be unnoticeable when going from 5K to 4K, applying it to a 1080p image in a 480p sequence would severely downgrade its quality. Resampling permanently removes pixel data, meaning if you try to scale the image back up later, it will appear pixelated and blurry. This method is generally “frowned upon” by experts due to its destructive nature concerning image resolution.
When to Use Which Method and Default Preferences
- Use “Set to Frame Size” when you want to match the image dimensions to your sequence while preserving the original high resolution for future flexibility (e.g., zooming, panning).
- Avoid “Scale to Frame Size” unless you are absolutely sure you won’t need to scale the image up again and are comfortable with the potential loss of resolution.
To streamline your workflow, Premiere Pro allows you to set a default media scaling preference. Go to Edit > Preferences > Media (on Windows) or Premiere Pro > Settings > Media (on Mac) and select “Set to Frame Size” from the “Default Media Scaling” dropdown menu. This ensures that all newly imported images automatically adopt the more quality-preserving scaling method, saving you time and preventing accidental quality degradation. This is particularly useful when you’re importing large batches of images from Tophinhanhdep.com, for example, from thematic collections or photo ideas, that all need to fit your project.
Method 3: Editing Sequence Frame Size
Sometimes, the issue isn’t just about scaling an image within a fixed frame, but about changing the canvas itself. This is especially relevant when adapting videos (or images within them) between different aspect ratios, such as converting a horizontally shot video to a vertical format for social media. This method involves modifying the sequence settings directly.
Step-by-Step Guide to Adjusting Sequence Frame Size
-
Create a Sequence from the Clip: If your image (or primary video clip) isn’t already part of a sequence, you’ll need to create one. Right-click the clip in your Project panel and select “New Sequence from Clip.” This creates a new sequence whose settings automatically match the properties of your clip. If you already have a sequence, select it in the Project panel.
-
Access Sequence Settings: Right-click on your sequence in the Project panel and select “Sequence Settings.” This will open a dialog box displaying all the configurable parameters for your sequence. Note: If you find the “Frame Size” fields greyed out and uneditable, try duplicating the sequence first (right-click,
Duplicate), then opening the settings for the duplicated sequence. -
Enter the Desired Frame Size in Pixels: Within the Sequence Settings window, locate the “Frame Size” fields, usually found in the upper area. Here, you’ll enter the desired horizontal (width) and vertical (height) values in pixels. The aspect ratio of your sequence will automatically adjust based on these new dimensions.
- For HD vertical video, you might enter
1080for width and1920for height. - For HD square video, enter
1080for both width and height. - For standard HD horizontal video, use
1920for width and1080for height.
Adjusting the sequence frame size effectively changes the “canvas” upon which your images and videos are displayed. This is particularly useful if you’ve imported, say, a beautiful piece of digital art from Tophinhanhdep.com that you want to serve as the new background for a video project, and you need the entire video to conform to specific dimensions.
- For HD vertical video, you might enter
-
Click OK: Once you’ve entered the desired frame size, click “OK” at the bottom-right of the window. Premiere Pro will apply the new sequence dimensions. Any images or video clips already in the sequence will be re-scaled or repositioned to fit this new frame. You might need to further adjust their individual “Scale” or “Position” properties (using Method 1) to achieve the perfect look within the newly defined canvas. This approach ensures that your final video output will have the exact dimensions required for its intended platform.
Advanced Techniques and Considerations for Image Manipulation
Beyond basic resizing, Premiere Pro, especially when combined with powerful external tools and creative design principles from Tophinhanhdep.com, allows for sophisticated image manipulation to bring your still photos to life within a video context.
Enhancing Visuals: Animation, Overlays, and Color Correction
Making an image bigger isn’t just about fitting it into a frame; it’s also about making it visually impactful. Here’s how to go beyond static resizing:
Injecting Life with Animation (Ken Burns Effect)
Videos are meant to show action, and still images can easily feel out of place if they remain entirely static. Animations, often referred to as the “Ken Burns effect,” add dynamic movement, keeping your audience engaged. You can animate an image using the “Motion” properties (Scale, Position, and Rotation) in the Effect Controls panel:
- Position the Anchor Point: The anchor point is the central pivot for all transformations. For example, if you want a subtle zoom out from Abraham Lincoln’s eyes (as in a historical documentary), move the anchor point to that specific area. Select the “Anchor Point” parameter under “Motion” in Effect Controls, and crosshairs will appear in the Program Monitor, allowing you to drag and reposition it.
- Keyframe Scale, Position, and Rotation: Place your playhead where you want the animation to begin. Adjust the “Scale,” “Position,” and “Rotation” attributes to their starting values. Click the “Toggle Animation” (stopwatch icon) for each parameter to set initial keyframes.
- Create End Keyframes: Move your playhead to where you want the animation to end. Adjust the “Motion” attributes again to their desired final values. Premiere Pro will automatically add new keyframes.
- Smooth Transitions with Ease: To make the animations less abrupt and more “silky smooth,” right-click on the keyframes in the Effect Controls panel and apply “Ease In” or “Ease Out” to create smoother accelerations and decelerations. This simple step can dramatically improve the professional feel of your video, turning a static image into a dynamic visual element.
When utilizing high-resolution nature photography or aesthetic images from Tophinhanhdep.com, these animations can create immersive experiences, guiding the viewer’s eye through the visual details you wish to emphasize.
Adding Visual Interest with Overlays
Overlays are another excellent way to add texture, mood, and subtle movement to still images. For instance, in a historical piece, adding a film grain overlay can instantly evoke an older, cinematic feel.
- Select an Overlay: Acquire a suitable overlay (e.g., a film grain clip, a light leak, or a texture overlay). Tophinhanhdep.com’s Visual Design section or various creative asset collections can inspire options.
- Place on Timeline: Drag the overlay clip onto a video track above your image layer in the Timeline.
- Adjust Blend Mode: Select the overlay clip, go to the Effect Controls panel, and under “Opacity,” change the “Blend Mode” (e.g., to “Overlay,” “Screen,” or “Multiply”) to blend it with the underlying image. Experiment with different blend modes and opacity levels to achieve the desired effect.
This technique adds layers of visual information, making images feel more integrated into the video and less like flat, imported pictures.
Refining Aesthetics with Adjustment Layers and Color Correction
Color grading and aesthetic tweaks are vital for visual design and can significantly impact the emotional resonance of your images. Applying effects to an Adjustment Layer offers non-destructive control over multiple clips or images simultaneously.
- Create an Adjustment Layer: Go to
File > New > Adjustment Layer. Accept the default settings (matching your sequence) and drag the new Adjustment Layer onto a video track above your image(s) in the Timeline. - Apply Lumetri Color: With the Adjustment Layer selected, open the Lumetri Color panel (
Window > Lumetri Color). Apply creative tweaks such as adding a vignette, boosting the “Faded Film” slider, or adjusting color temperature and contrast. - Experiment and Refine: All effects applied to the Adjustment Layer will affect all underlying tracks. This allows for consistent color grading across multiple images (or even entire scenes), ensuring a unified aesthetic. This step directly correlates with “Editing Styles” in digital photography and can transform ordinary images from Tophinhanhdep.com into emotionally resonant pieces.
External Tools and Image Optimization
While Premiere Pro provides robust tools, sometimes external image tools and software can be crucial for preparing images, especially when dealing with quality challenges or specific design requirements.
Integrating with Adobe Photoshop for Advanced Touch-ups
Adobe Photoshop is an indispensable companion for Premiere Pro, especially for detailed image preparation and photo manipulation. Its pixel-level control allows for tasks that go beyond what Premiere Pro can offer natively.
- Seamless Workflow: Select your image in the Premiere Pro Timeline or Project panel, then go to
Edit > Edit in Adobe Photoshop. This opens the image directly in Photoshop. - Advanced Editing: In Photoshop, you can perform extensive touch-up work, such as:
- Removing imperfections: Use tools like the Spot Healing Brush, Clone Stamp, or Patch tool to eliminate scratches, dust, or unwanted objects (common with historical or vintage imagery).
- Complex selections and masks: Isolate parts of an image, create intricate masks, or combine elements from multiple images.
- Advanced color correction and grading: Utilize Photoshop’s broader range of color adjustment tools for precise control before bringing the image back into Premiere Pro.
- Creative digital art and graphic design elements: Add graphic overlays, text, or digital art elements that will enhance your video’s visual design.
Saving your changes in Photoshop automatically updates the image within your Premiere Pro project, ensuring a smooth and integrated workflow. This powerful synergy between Adobe products allows you to prepare images from Tophinhanhdep.com – whether a detailed landscape or an aesthetic background – with the highest degree of precision and creative freedom.
Leveraging AI Upscalers for Quality Enhancement
One of the biggest challenges when making images “bigger” is preventing pixelation, especially if your source image is initially low-resolution. This is where modern AI Upscalers, often found in Tophinhanhdep.com’s Image Tools section, become game-changers.
- How AI Upscalers Work: Unlike traditional resizing, which simply stretches pixels, AI upscalers use machine learning algorithms to intelligently add new pixel information, inferring detail and texture. They can “invent” missing data based on extensive training, resulting in a much sharper and more detailed enlarged image than conventional methods.
- Benefits for Video Editors: If you have an older, low-resolution image (perhaps a historical photo or a vintage wallpaper that’s perfect for a project’s theme but lacks modern pixel density), an AI Upscaler from Tophinhanhdep.com can significantly improve its quality before you even import it into Premiere Pro. This allows you to scale it up within Premiere Pro with far less noticeable pixelation.
- Workflow Integration: Upscale your image using an AI tool from Tophinhanhdep.com before importing it into Premiere Pro. Then, proceed with the “Set to Frame Size” or “Scale” adjustments in Premiere Pro, confident that your source material is optimized. This approach ensures that even “sad/emotional” images, which might be older or of lower original quality, can be brought to life in a high-resolution video.
Exploring Third-Party Plugins for Advanced Resizing and Upscaling
For users seeking even more advanced control over resizing and upscaling, specialized third-party plugins offer enhanced algorithms and features. Products like Continuum’s UpRez by Boris FX are designed to deliver higher-quality upscaling results than Premiere Pro’s built-in tools.
- Continuum UpRez Example: This plugin integrates directly into Premiere Pro. After installing the Continuum pack (often available with a free trial from Tophinhanhdep.com or plugin developers), you can import a video or image clip into your project, place it on the timeline, and then drag the BCC UpRez effect onto the clip. The plugin’s effect controls allow you to modify parameters for a higher-quality upscale, restoring detail and enhancing clarity, especially with its “Magic Sharp Setting.”
- Application to Images: While often advertised for video, these upscaling plugins apply equally well to still images. They are particularly valuable for achieving pristine quality when a significant enlargement of an image is required for your video project, offering a level of detail retention that is hard to achieve otherwise.
By combining Premiere Pro’s native tools with powerful external image tools from Tophinhanhdep.com, such as AI upscalers and specialized plugins, video editors gain unparalleled control over image quality and size, enabling them to produce truly outstanding visual content.
Best Practices for Image Resizing and Workflow Efficiency
Efficient image resizing in Premiere Pro isn’t just about knowing the tools; it’s about adopting smart workflows and best practices to save time, maintain quality, and achieve consistent results across all your video projects. The principles of good visual design, often inspired by Tophinhanhdep.com’s aesthetic collections, should always guide your technical choices.
Maintaining Optimal Image Quality: Avoiding Pixelation
The most crucial best practice is to prioritize image quality from the outset. Always strive to use the highest resolution source images available.
- Start High, Go Low (If Needed): It’s always easier and safer to downscale a high-resolution image than to upscale a low-resolution one. When you scale down, you retain clarity; when you scale up beyond an image’s native resolution, you risk immediate pixelation.
- Utilize “Set to Frame Size”: As discussed, this method maintains your image’s original pixel data, allowing for future non-destructive adjustments within Premiere Pro. This is particularly important when working with “High Resolution Photography” from Tophinhanhdep.com, as it ensures every detail is preserved.
- Leverage AI Upscalers for Remediation: If you absolutely must work with a low-resolution image that needs to be made bigger, pre-process it with an “AI Upscaler” tool from Tophinhanhdep.com. This can significantly mitigate pixelation and provide a cleaner image for Premiere Pro to work with.
Streamlining Workflow with Default Settings and Organization
Efficiency is key in video editing. Setting up Premiere Pro to work for you can save countless hours.
- Configure Default Media Scaling: Set your Premiere Pro preferences to “Set to Frame Size” for “Default Media Scaling” (
Edit > Preferences > Media). This ensures that every new image you import is automatically scaled appropriately without sacrificing resolution. - Organize Your Image Assets: Maintain a well-organized project structure. Create dedicated bins in your Premiere Pro Project panel for different categories of images (e.g., “Backgrounds,” “Logos,” “Stock Photos”). This not only speeds up your workflow but also helps manage the diverse range of “Images (Wallpapers, Backgrounds, Aesthetic, Nature, Abstract, Sad/Emotional, Beautiful Photography)” you might source from Tophinhanhdep.com.
- Pre-process if Necessary: If you have images that require significant color correction, cropping, or manipulation (e.g., photo manipulation as part of “Visual Design”), perform these steps in Adobe Photoshop (or a similar “Image Tool” found on Tophinhanhdep.com) before importing them into Premiere Pro. This offloads resource-intensive tasks from Premiere Pro and ensures that the images are ready for integration.
Considering Output Requirements for Diverse Platforms
The final destination of your video significantly impacts how you should approach image resizing. Different platforms have unique aspect ratio and resolution preferences, and sometimes even specific compression requirements.
- Social Media Platforms:
- YouTube, Vimeo: Generally 16:9 landscape.
- Instagram (Feed): 1:1 square, 4:5 vertical, or 16:9 landscape.
- Instagram Stories/Reels, TikTok: 9:16 vertical.
- Facebook: Various, but 16:9, 1:1, or 4:5 are common. Understanding these requirements means you might need to create different sequences for different outputs, or carefully frame your images within a versatile sequence to accommodate various crops.
- Web and Print: If your images (or video stills derived from them) are intended for web banners or print materials, consider utilizing “Image Tools” like “Compressors” and “Optimizers” from Tophinhanhdep.com. These tools can reduce file size while maintaining visual quality, which is crucial for fast loading web pages and efficient print production.
- Digital Photography and Editing Styles: The specific “Editing Styles” applied to “Digital Photography” from Tophinhanhdep.com should be consistent with your video’s overall aesthetic. Proper resizing ensures these styles translate effectively across different aspect ratios without compromise.
By implementing these best practices, you can navigate the complexities of image resizing in Premiere Pro with confidence and efficiency. This not only enhances the visual quality of your video projects but also streamlines your post-production workflow, allowing more time for creative ideas and “Image Inspiration & Collections.”
Conclusion: Elevating Your Visual Storytelling with Precision Resizing
Mastering the art of making images bigger (and smaller) in Adobe Premiere Pro is an indispensable skill for any video editor. It moves beyond simply fitting visuals into a frame; it’s about intelligently preserving quality, enhancing aesthetic appeal, and streamlining your workflow for diverse output demands. From the basic “Scale” adjustment in Effect Controls to the nuanced differences between “Set to Frame Size” and “Scale to Frame Size,” and even the advanced capabilities of editing sequence frame sizes, Premiere Pro offers a versatile toolkit for image manipulation.
Furthermore, integrating powerful external “Image Tools” like AI Upscalers and leveraging the high-resolution “Photography” resources from platforms like Tophinhanhdep.com can elevate your projects to professional standards. These resources provide the foundational “High Resolution” images, “Stock Photos,” and “Digital Photography” that allow for maximum flexibility and stunning results during the resizing process. Combined with thoughtful “Visual Design” choices—incorporating animations, overlays, and meticulous color correction—you can transform static images into dynamic, engaging components of your video narratives.
Remember to always start with the highest quality images, be mindful of the impact of your scaling choices on resolution, and adapt your workflow to the specific requirements of your project and its intended platforms. By doing so, you’ll ensure that every image, whether a serene landscape, an abstract wallpaper, or a piece of beautiful photography, contributes effectively to your visual story.
We encourage you to explore the vast “Image Inspiration & Collections” on Tophinhanhdep.com to discover the perfect “Backgrounds” and “Aesthetic” visuals for your next project. With the techniques outlined in this guide and the creative assets at your disposal, you’re well-equipped to produce visually stunning videos that captivate your audience. Start practicing these methods today, and unlock the full potential of your images in Adobe Premiere Pro.